How to change time and date in Android. How to change the date and time in Samsung Galaxy How to set the time on LG in automatic mode
Previously, in order to know the exact time, people wore watches. Now this is not necessary, because each of us has a smartphone. It will always show the date and time, but if something goes wrong, it may not be correct. In this article we will talk about how to change the date in Android. Let's get started.
Since today there are many versions of the operating system from Google, our instructions will cover each of them. Manufacturers also often customize “pure” Android, adding their own user interface to it. Below you will learn how to change the date and time in such devices as TouchWiz from Samsung or MIUI from Xiaomi.
On "pure" Android
Let's look at the process of changing the day of the week in the Android operating system on versions 2, 4, 5, 6 and 7. We will do this in ascending order.
Android 2x
Good old Android 2: how primitive its interface looks in 2017... Nevertheless, a large number of devices continue to work on it. Let's figure out how to change the date and time at the same time.
- First, let's go to the OS menu: most often it is a button with the image of several small squares.

- Next, move on to the device settings.

- Scroll down the settings a little and select the item indicated in the screenshot below.

- In the settings of any operating system from Google, starting with its earliest version, there is an option to receive data from the network and automatically set the date and time. In order to activate the function, you need to set the checkbox marked with the number “1” to the active position.

If you want to set the date manually, click on the line opposite the number “2”. The third number is the time zone adjustment. The number "4" allows you to enter the time manually. Five turns the 24-hour clock on or off. The last item (number “6”) allows you to select the format for displaying the day of the week.
- To manually set the date, scroll the day, month, and year wheels, then press Set.

- This is how the time zone is indicated. The value is measured in difference with the reference city of Greenwich, which is located in England. For example, in our case, time moves forward by 2 hours. That’s why we choose the “+2” time zone.

- The time is adjusted in the same way: by scrolling the virtual wheels.

- The following date formats are available. You can select one of them by checking the checkbox.

Attention: we will not talk about the 3rd edition of Android OS, since it was purely tablet and never became popular.
Android 4x
Here the day of the week and time are set in a similar way. Let's look at how this is done.
- Let's go to the main menu of our device. To do this, press the button in its lower central part.

- Select the desired item by tapping on the gear marked in the picture below.

- Scroll the content down until the desired item appears. In our case, it is displayed in English, but in your case it will most likely be written: “Date and time.”

- Similar to the second Android, here you can set the time and date automatically from the network or do the same manually. Specify the display format and select a 24-hour profile.

- Manual date settings look completely different. Now they have become more attractive and look like a small calendar in which we can quickly and conveniently set up what we need. When the changes are made, don't forget to click the "Done" button.

- The date display format can be selected from several options.

Android 5x
Let's figure out how to set the date and time in this OS. Unlike the 4th, its interface has become much more interesting.
- As you already understood, it all starts with settings. Here you can also launch them by opening the main menu and tapping on the gear circled in the screenshot.

- As you can see, the settings here look completely different than in version 4. However, we still need the same section. Click on it.

- If we compare these settings with the 4th edition of Android, we can say that only the color scheme has changed. But this is not surprising: why reinvent the wheel and remake something that already works perfectly.

- The calendar has become even more beautiful. Now he looks almost perfect. However, the installation principle has not changed. Just like in "four", we must select a number and click "OK".

In the meantime, we rise higher and move on to working with a fairly modern sixth version of Android.
Android 6x
In Android 6, we can lower the notification bar and tap on the gear icon. This will open the settings we need. Let's get started.
- Let's go to settings.

- We go to the “System” section and there we tap on the inscription indicated in the screenshot.

- Here we can set synchronization with the network time (number “1”). Do not forget that in order for it to work correctly, you also need to set the time zone. By the way, it can also be switched to automatic mode. For this purpose there is a toggle switch “2”. Accordingly, the numbers “3” and “4” allow us to set the time manually. The last trigger, designated “6,” changes the time display format to 24-hour and back.

- The date is set exactly the same as in Android 5. You select the month using the arrows, highlight the desired date and click “OK”.

Let's move on to the last OS in our review. This is Android 7.
Android 7x
Let's look at how to correctly set the day of the week in Seven.
- Lower the notification bar and click on the gear icon.

- Find the “System” section in the settings and select “Date and Time” in it. We have marked it in the screenshot.

- There is no longer automatic switching of the network time zone. Why the developers removed it is completely unclear. Below you will find the designations for each setting item.
- “1” – activation of automatic time adjustment according to network data;
- “2” – manual date setting;
- “3” – manual time setting;
- “4” – time zone setting;
- “5” – turns on the 24-hour format.

- The algorithm for setting the date has not changed at all. In the same way, select the month, date and click “OK”.

Xiaomi and MIUI
Okay, we figured out the “naked” Android. But besides it, there are a number of add-ons to the operating system that differ from it. One of these shells is the Chinese MIUI. Let's figure out how to change the number in it.
- We lower the “curtain” and go to the gadget settings.

- Let's move on to advanced settings.

- Click on the “Date and Time” item.

- Here we see a familiar picture. Unlike the “pure” “seven”, you can enable the automatic time zone in Xiaomi. Although the 9th version of MIUI is built on its own base. But no one forbids you to configure date settings manually.

Samsung (TouchWiz)
Another very popular add-on or skin for Android is TouchWiz from Samsung. All we have to do is show our readers how the date is set here too. Let's not drag the cat to a certain place, let's get started.
- As usual, we lower the notification line and go to the device settings.

- Notice how unusual the configuration elements look. Select the item marked in the screenshot.

- Everything here is familiar, with the only difference that, unlike Xiaomi, there is no function for auto-setting the time zone.

Please note: both TouchWiz and MIUI all work on the same Android 7. But how strikingly they differ from him. There is even the ability to install themes.
Results and comments
So, now we know how to set the date and time on the Android operating system. This is not just another article with screenshots stolen from the Internet: here is a full-fledged instruction, screenshots of which we took in our laboratory using real phones.
However, if you have any questions, suggestions or comments, you can leave them in the comments. We will consider any reasonable entries and, if necessary, provide an answer that can help in any current situation.
Video instruction
We also suggest watching a training video that shows how to set the date on Android.
The question of how to change the date in Android is usually quickly resolved through the settings, but sometimes it is not possible to set the correct time the first time: the value is constantly confused or displayed incorrectly on the tablet or phone.
It doesn’t matter what version of Android and what shell is installed on your tablet or phone, you can set the date and time using one algorithm.
- Open the Android main menu. Go to Settings.
- Go to the "Date and Time" section.
- Pay attention to the auto-tuning options. If the date and time are determined over the network, but you see incorrect values, connect to the Internet, disable the auto-tuning option by selecting “Disable”, and then enable it again.
If after the update the time is still displayed incorrectly, disable auto-tuning by unchecking the use of network data checkboxes and set the values manually. The corresponding items will become available for making changes immediately after the automatic settings are deactivated.
To set the date and time, open the items of the same name one by one. Move the numbers up and down to change the set value, and then click Done to save. 
The time zone is configured in the same way. You can enable its detection over the network or change it manually. You can also customize the date and time display format on your tablet or phone. The time can be shown in 12-hour or 24-hour format, and the date can be shown in different order of day, month and year.
Why does time go wrong?
Typically, the time on Android is adjusted automatically after installing the SIM card and turning on the device. But why does it periodically get lost on a tablet or phone if the system has enough tools to constantly check and maintain the correct value? The phone does not have a CMOS battery, which is responsible for storing the correct date and time on the computer. Therefore there can be two reasons:
- Using Auto-Tune.
- The difference between the operator's time zone and the time zone on the tablet or phone.
How to disable automatic determination of date and time over the network on Android is described above. But if after carrying out these manipulations the time is still lost, try using the following algorithm:
- Turn off the device, remove the SIM card.
- Turn on the device, go to settings. Open the “Date and Time” section, disable automatic time zone detection.
- Set the correct time zone and apply the changes.
- Turn off the phone, insert the SIM card.
If you can’t change anything this way, and the screen still displays incorrect values, try . The procedure will be similar, only after removing the SIM you must first reset the settings, and only then manually set the time zone. 
Despite the very simple interface of the operating system, many users cannot solve standard system problems: setting the date, text encoding, errors in applications, and others.
Due to an incorrectly set number, the following related problems may occur:
- The user cannot access the application store;
- Installation of programs is impossible due to date failure;
- Problems receiving calls and messages.
If you have identified one or more of the above problems on your device, it means that there is a time setting problem in the system.
By the way, you may be interested in other articles:
- Why the Play Market doesn't work - 12 ways to solve the problem
- How to recover deleted files on Android - Reliable methods
Standard setting method
As a rule, the number on all Android devices is determined automatically via the Internet. . The user can also set the day and time manually.
If your phone fails, first you need to try changing it in the standard way. Follow the instructions:
- Turn on the device menu using the key shown in the figure;
- Find the icon to open the settings menu and click on it;

- Find the date and time item;

Remember! The appearance of all smartphone icons and menus may differ due to different versions of the operating system or installed programs for designing and changing the appearance of icons.
- Now in the window that opens you need to change the settings for today. Also in the window you can set automatic time and time zone settings, set a convenient custom format for displaying numbers;

- Change the time and date manually or connect to the Internet and do it automatically;
This way you can change the date settings in the standard way.
However, quite often, users encounter problems saving settings: a window pops up with the following message: “An error occurred in the date settings.”
This error appears every time you try to change parameters. Let's take a closer look at how you can solve this problem.
If a date settings error occurs
After problems with the phone, the date may appear as “3F.3F.FF”. This entry means that there is no timer entry in the device RAM. One way to solve the problem:
- Every time you try to change the date, it returns to its previous form. You can try to solve the problem manually or using superuser rights. To try to resolve the error manually, remove the SIM card from your phone.
In most cases, a banal date conflict arises: the one set on the device itself and the one set by the mobile operator in the SIM card settings. After the SIM card is removed, turn on the phone again; - Go to the settings and change the time zone manually again and only then install the SIM card again;
- Restart your phone and check the date and time display.
If the number still does not appear correctly, there may be a glitch in the device driver software.
To establish proper operation of the system you need to do Hard Resetdevices:
Resetting the settings to factory settings helps solve many software problems of the device, in particular, date display.
Follow the instructions to hard reset your phone or tablet:
- Go to your phone settings;
- Find the option to restore, reset and backup files, as shown in the picture;

- Open the menu item and reset your phone to factory settings. All installed applications and themes will be deleted. The phone will reboot, you will need to carry out basic setup, as when you turned it on for the first time.
Superuser rights and the ClockworkModRecovery program
If none of the above options worked, you need to use the ClockModRecovery utility.

It is only available for devices with superuser rights. You can get them using the Root Explorer program.

Use the utility only if you are an experienced user.
After installing superuser rights, you automatically lose the warranty at the manufacturer's service centers.
Contact your service center consultant to resolve the issue with the date.
Video:
How to change time and date on Android
Easy ways - How to change the date in Android
Having purchased a new mobile gadget, users may encounter problems with incorrectly set time zones and the current date and time. However, it can be solved quite simply, and in this guide we will tell you how to set the date and time on a smartphone running Android.
To set the time on Android, you need to follow a few simple steps:
Step 1. Run Settings, go to the category " System and device" and select the section " Additionally».
Step 2. Click the button date and time».
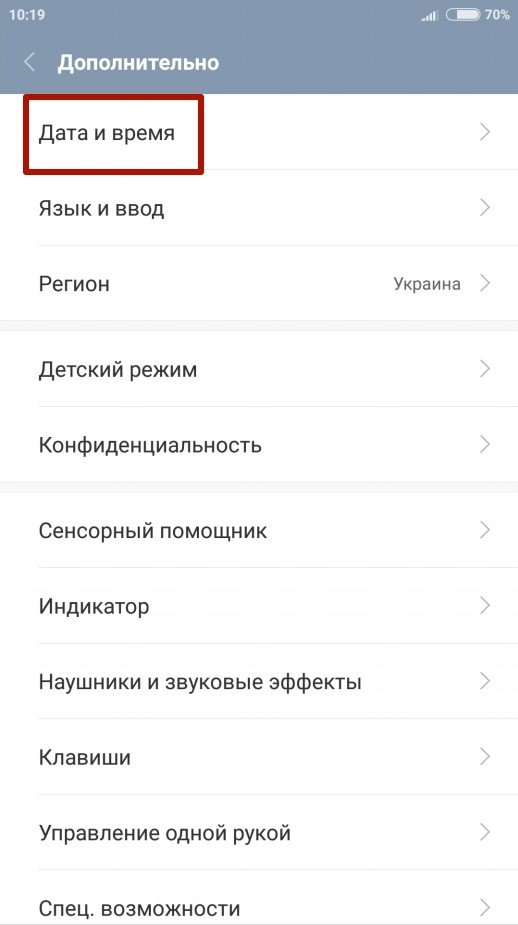
Step 3. In the window that opens, you can set the time, change the date, select the format for displaying the time and date, set the time zone, and also set automatic receipt of settings.

You can also access the date and time settings in another way - through the application Watch:
Step 1. Launch the application Watch.

Step 2. Click the options button.

Step 3. Click on the button Date and time settings».

Why does the time go wrong on Android?
Date and time synchronization on Android smartphones can sometimes not work correctly, causing settings to crash. To fix this issue, you need to disable the " Network date and time" And " Network time zone", and then set the settings manually.

If the issue is not resolved, you should reset Android to factory settings and reset all settings.
Conclusion
Good afternoon, dear readers! In this article, I will show you how to change the date and time on phones Samsung Galaxy: ace, s4 mini, s iii, ace ii, y duos and other models. All of these devices run on the Android system, so these instructions are suitable for everyone.
On phones and tablets running the Android system, including Samsung Galaxy, the date and time are set automatically via the Internet.
However, it is not always possible to access the Internet; in order to change the date and time in Samsung Galaxy manually, do the following.
How to change date and time in Samsung Galaxy
1. Go to your phone settings.
2. In the settings that open, find the “Date and time” item and click on it. 
3. In the date and time settings, click on the “Network date and time” item. 
4. In the window that opens, we see that the time and date are synchronized over the network, turn it off by highlighting the “Off” button. 
5. After completing these steps, you can change the date and time in your Samsung Galaxy phone at your discretion in manual mode. 
As you can see, change the date and time in phones Samsung Galaxy: ace, s4 mini, s iii, ace ii, y duos and other models, very simple. Read also about how to change the date and time in Windows Phone.
That's all for me, I wish you success.
 Reflashing the controller
 Windows installation errors
 How to open an APK file on a computer