Tinymce modx revo does not work. Setting up TinyMCE in MODX Revolution
Today in the MODX telegram channel they wrote that the TinyMCE Rich Text Editor doesn’t do this and doesn’t do that. Some people failed to configure it, for some it produced errors, etc. The question of choosing an editor arose for me as soon as I switched to MODX (which, let me remind you, happened not so long ago, about 8 months ago). There was only one task: to make a simple, convenient and multifunctional content editor. I played around with the regular TinyMCE, played around with ckeditor, played around with the TinyMCE Rich Text Editor and decided to pick the last one.
I don’t want to start a holivar about which editor is better. I am sharing a ready-made solution for a working and multifunctional editor. And which one to choose is of course up to you.
Story
The setup did not take much time; customizing the editor and integrating the necessary functions took much more time. But fortunately, I still know how to Google a little and found several useful topics among English-language resources, with the help of which I was able to implement the editor that we will eventually get.The assembly went without errors.
Installation
1) You can download the auto-installer from my newly created Git repository.2) The installation process is very simple - drop the file tinymcerte-1.0.0-beta.transport.zip into ../core/packages/ and look for the package locally through the installer. Next we just install it. The auto-installer will set the settings itself.
3) In the /files/TinyMCERTE-settings/ folder, you can find a small readme.txt and the typograf plugin, which should be placed in the editor plugins folder (read about this in readme.txt). That's all - the editor is ready to use.
Caveats and revisions
1) I tested this auto-installer on a clean site and a site without an installed editor. I don’t know how and what will happen if you install it on a site that already has an editor (Ace doesn’t count).2) It would be nice to automatically place the typograf folder in the desired section, but my knowledge is not enough to implement this idea. If someone wants to help, that would be cool. I will post the sources of this auto-installer in the same repository today, but later in the evening.
4) To check spelling, the editor uses the yandex.speller service. You can find the service settings in the file ../assets/components/tinymcerte/tinymcerte/js/external-config.json. Spellchecker TinyMCE supports a huge number of languages for checking. Whereas yandex.speller only 3 (Russian, Ukrainian, English).
I suggest trying CKEditor as a visual code editor. Version 4.0 has a neutral black and white theme (very suitable for the MODx admin panel) and some new features (appreciated the insertion of paragraphs in “hard to reach” places).
Cannot be used as a front-end editor.
Ctrl+S works, as well as inserting links, or embedding Resources (iframe) and files (img, audio, video). You just need to select the text and drop the desired Resource/File into the editor.
In the settings you can change the ui color, skin, add your own plugins and change the order and set of panel buttons.
Please indicate the missing functions - I will try to implement them.
Installation via package manager.
Unlike TinyMCE, it is fully compatible with
Action plan:
Add support for richtext TV parameters
- Select on server button in dialog boxes (integration with MODX file browser)
- Settings: extraPlugins, disableObjectResizing, link format control, skin selection
- Menu when dragging files and resources: Embed object | Insert link | Insert the name of the object (it would be cool if dragging worked via both the right and left mouse buttons (like in Windows))
- Modx tag protection
- New buttons (insert tags, edit attributes, etc.)
- List of classes from the steamed style sheet.
- Picking up system settings from the edited context (currently problems with links)
- Customizable keyboard shortcuts.
- Typography plugin - auto-correct quotes, hyphens, etc. on the fly.
- Transparent loading of images via copy/paste and drag"n"drop
- Auto-substitution (parsing and output) of modx tags, if at all possible and to the extent possible (the widget support being developed by the CKSource team may be useful)
- Inline editing from the front end.
It's a pretty big list. We should tone down our fantasies...
Instructions for installing additional plugins:
We find the required plugin, for example, put it in the folder /manager/assets/components/ckeditor/ckeditor/plugins/, Go to system settings, select namespace ckeditor, register our plugin in extra_plugins(separated by commas, if several), then edit toolbar, entering a new button (if there is one). We update the resource edit form and check the result. I suggest sharing interesting plugins.
Additional plugins (not included in the package):
oEmbed - Allows you to embed content (video, photo, audio, frames) from various servers with just a link. The list of services is huge, supported by YouTube, Vimeo, Flickr, Instagram, GitHub, Twitter, JSFiddle and a shitload of other services.
History of changes:
CKEditor 1.1.1
- Fixed compatibility with AjaxManager (there was a bug with drag and drop)
- Added plugins: youtube, wordcount, autocorrect
- Removed the menu that appears when dragging from the tree. Now the link is simply inserted. If you drag a picture, the picture will be inserted.
- IE8 support
CKEditor 1.1.0
====================================
- Integration with MODx file browser
- Richtext TV support
- Support for custom resource classes (Articles for ex.)
- Improved drag"n"drop. Now you can simply throw pictures from the Files tree to insert them into the content.
- Fixed Ctrl+S
- Option extra_plugins (Additional plugins)
- Skin option
Since MODX Revolution initially comes empty and in order for the site to work, I can say with 99% certainty that you will have to install at least one add-on - plastic bag. In this regard, I decided to write a small list of packages that will be useful to many when creating websites on MODx Revolution.
(article updated 02/11/2018)
Additions from the main modx repository
Ace- code highlighting when editing templates, chunks, snippets + built-in emmet.
TinyMCE Rich Text Editor- a nice visual editor for content, can be expanded with additional functions, see the developer’s website.
filetranslit- renames files from Cyrillic to Latin when loading (for example: upload a picture with a name (title) modx-plugin.png(when the site is transferred, such picture names will turn into goats and stop being displayed)), a file with the name will be uploaded to the admin panel modx-plugin.png.
translit– transliteration of aliases for pages (url) – required for .
FormIt- working with forms (creating contact forms of any complexity).
Collections- grouping of documents (resources) - more for large sites where there are many documents in categories - helps to relieve (speed up) the admin panel, because if you have a huge resource tree, it will start to glitch.
simpleUpdater- Modex update in 1 click.
SEO Pro- SEO assistant! Checks the length of fields - title, description, adds a focus keyword (keywords) and shows how the pages will look in search results.
Image SEO alt and title tags- automatically substitutes alt and title for images if they are not specified. Use with caution on a production site, it may break some outputs that go through CODE
Gallery– image galleries
migx- very cool thing! Displaying several TVs in the content, you can create a slider, gallery, etc.
SimpleSearch– organization of site search.
Tagger- tags for posts, tag cloud.
ClientConfig– creation of client settings, which managers can later edit. Those. We enter into it everything that changes frequently, or just something, for example, contacts, address, slogan, etc. – so that the customer can change everything easily and quickly.
Inherit Template— sets the template for child elements.
VersionX– a component for those who hand over sites for improvement to freelancers, or perhaps even beginners. Designed to create local backups of all elements (chunks, snippets, resources). You can view the old version and restore it if necessary. It also allows you to find out who made certain changes.
Console– allows you to run PHP code from the backend.
AjaxManager— acceleration of the admin panel.
Captcha– captcha for logging into the admin panel – additional protection.
backupMODX– creating backups from a working website in 1 click.
logPageNotFound– log 404 errors. Great for tracking broken links.
cacheClear – allows you to delete everything from the /core/cache/ folder with one click.
Additions from the modstore.pro repository
Read about how to connect an additional repository.
AjaxForm- Sending contact forms without reloading the page, via Ajax. Uses FormIt, but in fact you can specify your own snippet.
DateAgo- Nice date formatting like CMS LiveStreet.
autoRedirector- creates 301 redirects automatically, you can also create redirects manually.
Tickets- creating a blog, commenting forms, reviews, etc.
Jevix- something like a typograph, installed on the Tickets machine
mixedImage- mixed file upload (replacement of an additional field (for pictures, attachments, etc.)
pdoTools- a whole combine, which includes the following snippets:
pdoResources- is intended primarily to display a list of resources, but in fact, you can use it to create a lot of interesting things: a site map (for people), photo galleries, portfolios, cases from resources, etc.
pdoMenu- creating a menu.
pdoPage- like pdoRecources, displays a list of resources + creates page-by-page navigation, including from a selection of other snippets.
pdoCrumbs- for creating bread crumbs
pdoUsers— user output
pdoSitemap— creating an auto-generated sitemap.xml
pdoNeighbors— displays previous and next documents (useful for blogs, articles, etc.)
pdoField— displays any field of the specified resource or its parent, including TV parameters.
pdoTitle— designed to visually distinguish documents with page navigation.
pdoArchive— output of an archive of site documents broken down into days, months and years
Parser— intercepts the processing of tags on the page.
This is perhaps the most necessary package; without it you cannot build a normal website. Moreover, it adds support for the Fenom template engine, which is faster than the built-in one.
miniShop2- creation of an online store.
BannerY- Component for managing banners (advertising). It is essentially easy to implement a slider on it.
phpThumbOn- thumbnails for images (displaying images with the required sizes).
MinifyX– minification and merging of scripts and styles into two files (css and js) – allows you to reduce the number of requests and increase page loading speed.
xPoller2— Multilingual surveys.
AdminTools– change the color scheme of the admin panel, favorite elements, notes, authorization in the admin panel via email, etc.
frontendManager— Editing pages from the frontend.
dbAdmin – viewing the listing of database tables from the MODx Revo admin panel. It also allows you to export both a separate table and the entire database as a whole. It can also delete and clear tables (be careful when using it) and produce various kinds of SQL queries.
modDevTools – quick search and replacement of elements in chunks and snippets.
debugParser – Finding bottlenecks on the site.
tagElementPlugin – allows you to edit snippets or chunks by selecting its tag and pressing the ctrl+enter key combinations.
controlErrorLog – adds an icon to the top menu bar that indicates the presence of entries in the error log.
Universal plugins
— automatic compression of images on any site, the service is paid, but not expensive, from the start you are given 10 MB - this is enough to compress about 500 images - which is enough for any business card, you can also get an additional 200 MB for free.
Most likely after the update MODX Evolution systems The TinyMCE text editor is not working for you. This is the picture I have on all the updated sites:
1. Download the plugin from here.
2. Unzip.
3. Fill the ckeditor folder into the folder assets/plugins/
4. Create a plugin ckeditor
5. Copy the contents from ckeditor.tpl
Check the system events “OnRichTextEditorInit”, “OnRichTextEditorRegister” and “OnInterfaceSettingsRender”
6. Enable CKEditor
You can enable CKEditor in Tools>Configuration>Interface and Presentation, in the column " Editor:" choose CKEditor

7. We go into any document and see this picture

8. Let's make friends with CKEditor and the KCFinder file manager
In order for the editor to work correctly with the KCFinder file manager, we replace this code in the file /assets/plugins/ckeditor/functions.php:
$mcpuk_path["base"] = MODX_BASE_URL . "manager/media/browser/mcpuk/browser.php" . $cke_query ; $mcpuk_path["image"] = $mcpuk_path["base"] . "&Type=images"; $mcpuk_path["flash"] = $mcpuk_path["base"] . "&Type=flash"; $mcpuk_path["link"] = $mcpuk_path["base"] . "&Type=files";$mcpuk_path["base"] = MODX_BASE_URL . "manager/media/browser/mcpuk/browse.php";// . $cke_query ; $mcpuk_path["image"] = $mcpuk_path["base"] . "?type=images"; $mcpuk_path["flash"] = $mcpuk_path["base"] . "?type=flash"; $mcpuk_path["link"] = $mcpuk_path["base"] . "?type=files";
9. I assembled my assembly of the buttons I needed
In the file /assets/plugins/ckeditor/modx_config.js you can change the location, remove or add buttons. I put together this combination for myself.

If anyone is interested, you can replace the line of code:
Config.toolbar_modx = [ ["Source"], ["Bold","Italic","Underline","Strike","-","Subscript","Superscript"], ["PasteText","PasteFromWord"] , ["Undo","Redo","-","Find","-","RemoveFormat"], "/", ["NumberedList","BulletedList","-","Outdent","Indent ","Blockquote"], ["JustifyLeft","JustifyCenter","JustifyRight"], ["Link","Unlink","Anchor"], ["Image","Flash","Table","HorizontalRule ","Smiley","SpecialChar"], "/", ["Format","Font","FontSize"], ["TextColor","BGColor"], ["Maximize", "ShowBlocks","- ","About"] ];
Config.toolbar_simple = [ ["Source","-","Maximize","RemoveFormat"], ["PasteText","Find","Replace"], ["Link","Unlink"], ["Image ","SpecialChar"], ["Format"], "/", ["Bold","Italic","Underline","Strike","-","Subscript","Superscript"], ["TextColor" ","BGColor"], ["NumberedList","BulletedList","-","Blockquote"], ["JustifyLeft","JustifyCenter","JustifyRight","JustifyBlock"] ];
Here I left only what I need: Source code, Enlarger (to make it easier to write), text formatting, Insert text only, Search and Replace, Links, Insert images, Symbols, Headings, Text attributes, text and background color, paragraphs, quote and text justification.
Installing additional plugins
CKeditor has a lot of interesting plugins. You can find them on the Internet and on the official website of CKeditor. All plugins are installed in the /manager/assets/components/ckeditor/ckeditor/plugins/ folder.
Next, in “System settings” select “ckeditor” and in the additional plugins field ( extra_plugins) insert the name of the plugin to be installed. And in groups of buttons ( toolbar) insert the “plugin name” in the right place. The add-on is installed and ready to use.
One of the most popular add-ons for MODX Revolution is the TinyMCE visual editor.
This is understandable; it’s rare that a site can do without a good richtext editor for content.
This article covers installing and configuring the TinyMCE editor.
Installation
To install, you need to download the package from the repository (http://modx.com/extras/package/TinyMCE) and install it through the "Manage Packages" section of your website.
After installing the package, you can immediately open any resource for editing and make sure that the editor appears.
You can immediately start writing text in it, but for more comfortable use we recommend setting up the editor.
Setting up TinyMCE will involve several steps:
- Connecting the styles file
- Adding buttons for working with tables
Connecting the style file to TinyMCE
This is necessary so that in the visual editor the text looks the same as on the website: font, size and color of the text, design of pictures and appearance of tables.
Open "System Settings," and in the filter select "Visual Editor":

There are a total of 5 settings available in this section:
- Path to the CSS file (editor_css_path)- specify the path to your file with text styles. Please note that you should not use the full CSS file of your site, but a separate file, in which only the styles directly related to the design of the text (headings h1-h6, paragraphs p, links a, tables tables and others) should be included. The editor will work faster and more correctly.
- Use a text editor (use_editor)- you can disable the editor for a while if necessary, without deleting TinyMCE.
- Editor (which_editor)- MODX Revolution allows you to install several different editors on your site, and you can switch between them if necessary. By the way, you can override this setting for site administrators, thus assigning different editors to different administrators.
- Editor for elements (which_element_editor)- specify an editor for snippets, plugins, chunks. For example, it could be CodeMirror or Ace.
Adding buttons to TinyMCE for working with tables
In TinyMCE, which is installed from the MODX Revolution repository, for some reason work with tables is disabled by default. No, of course you can switch to HTML mode and write the code manually, but why! It is much easier to spend 2 minutes and enable table support.
So, open the system settings, and in the first filter select tinymce:

A list of available options will open. We are interested in 2:
- tiny.custom_plugins- list of connected plugins to TinyMCS. You must add " table", thereby connecting a plugin for working with tables. The plugin comes with TinyMCE and does not need to be installed, you just need to enable it.
- tiny.custom_buttons3- list of buttons displayed on the 3rd line. Indicate there " tablecontrols", thereby adding a set of buttons for working with tables. It is clear that these buttons can be placed on any other line. If you look at the other lines, you will see a list of preset buttons such as undo, redo, selectall and many others. You can “play” with them by placing the buttons in different orders.
 What is cargo? Cargo: definition - Law
 What to do if you lost your package at the post office
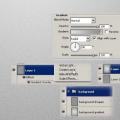 Creating water in Photoshop, reflection, circles, ripples, waves