Installing Windows on an external hard drive. Installation from an external HDD Install from an external drive Windows 7
Sometimes you need an additional copy of the OS on removable media. It will not be possible to perform a standard installation due to system limitations, so you will have to perform additional manipulations using various third-party software. Today we will take a step-by-step look at the entire process, starting with preparing an external hard drive and ending with installing Windows.
Conventionally, all actions can be divided into three steps. To work, you will need three different programs that are distributed on the Internet for free, we will talk about them below. Let's get started with the instructions.
Step 1: Prepare the external HDD
Typically, a removable HDD has one partition where users save all the necessary files, but if you need to separate the OS and other files, that is, create an additional logical drive where Windows will be installed, we recommend that you read the following instructions:

If for some reason AOMEI Partition Assistant does not suit you, we recommend that you familiarize yourself with other representatives of similar software in our other article at the link below. In similar software, you will need to perform exactly the same steps.
Now let's use the built-in Windows function for working with logical drives. We will need it to create a new partition from the free space we just selected.
- Open "Start" and go to "Control Panel".
- Click on a section "Administration".
- In the window that opens, select "Computer Management".
- Go to section "Disk Management".
- Find the required volume, right-click on the free space of the main disk and select "Create Simple Volume".
- A wizard will open where you need to click on "Further" to go to the next step.
- In the second window, do not change anything and immediately move on.
- You can assign your own letter if you want, and then click on "Further".
- The last step is to format the partition. Check that its file system is NTFS, do not change any more settings and complete the process by clicking on "Further".


That's all. Now you can proceed to the next algorithm of actions.
Step 2: Prepare Windows for installation
As mentioned above, the usual installation process when starting the computer is not suitable, so you will have to download the WinNT Setup program and perform certain manipulations. Let's look at this in more detail:
- Download a copy of the selected version of Windows in ISO format so that you can mount the image later.
- Use any convenient program to create a disk image. Find out more about the best representatives of such software in our other material below. Just install such software and open the downloaded copy of Windows in ISO using this software.
- In chapter " Devices with removable media" V "My computer" you should have a new disk with the operating system.
- Run WinNT Setup and in the section "Path to Windows installation files" click on "Choose".
- Navigate to the drive with the mounted OS image, open the root folder and select the file install.win or install.esd depending on the version of Windows.
- Now that the drive letter where the bootloader will be installed has automatically appeared in the second partition (it is not recommended to change it), in the section below "Disk on which the OS will be installed" Press "Choose" and specify the hard disk partition that was created in the first step.
- Click on "Installation".
- After this, a new window will open, where next to the item "Use BootSect for bootloader" instead of "ALL" should be set "BIOS", if the computer uses a classic BIOS. UEFI owners will need to select the appropriate item from the drop-down menu, then click "OK".


After the computer restarts, you will be offered a choice of OS to boot, select the desired option and follow the standard procedure for setting up a new platform.
Step 3: Install Windows
The last step is the installation process itself. You do not need to turn off the computer or otherwise configure booting from an external hard drive, since everything happens through the WinNT Setup program. All you have to do is follow the standard instructions. On our website they are described in detail for each version of Windows. Skip all the preparatory steps and go straight to the installation description.
Read more: Step-by-step installation guide.
Once the installation is complete, you can connect an external HDD and use the OS installed on it. To avoid problems booting from removable media, you need to change the BIOS settings. The article below describes how to set all the necessary parameters using a flash drive as an example. In the case of a removable disk, this process does not change in any way, just remember its name.
It's been a year since I abandoned the DVD drive, and netbook trends indicate that I made the right decision. But I was faced with the question of how to install an operating system without a DVD. The flash drive died out of place, and when I went to the store to buy a new one, I accidentally caught my eye on the Seagate Expansion external drives, the 250Gb version of which cost literally 500 rubles more than the 8Gb flash drive (2323 rubles). And the size and all of which did not bother the jacket pocket much.
Dimensions:141 x 18 x 80 mm
Weight:0.16kg
But as it turned out, installing Windows 7 from a USB HDD does not work on the same principle as with
USB FLASH. Having figured it out and checked its functionality, I’m sharing the information with you.
Works for both Desktop PCs, laptops and Netbooks.
- HDD preparation
- Cutting and preparing HDD partitions;
- Copying Windows 7
HDD preparation
You can make a boot disk, install Windows 7, and then erase it and continue to use the HDD for your needs. Or make it much more convenient:If you don’t mind 4 gigabytes of space on the External HDD, then the Disk can be cut into two parts, in our case I did just that, giving one part for the Windows 7 distribution kit, which will always be at hand.
Cutting and preparing HDD partitions
1. Go to:Control Panel - Administration - Computer Management (Disk Management)
Find Disk 1 (if you have several hard drives in your system, find the one that is equal to the size of your External HDD)
2. Select our External HDD drive:
— Right click with the mouse — Delete volume;
- Right click - Create simple volume;
In the window that appears, select the volume size of 4300 Megabytes (Under the Distribution section), and click next,
In the next dialog, if necessary, select the drive letter and click next. In the new dialog, you need to format our new partition (FAT 32), click next and you're done.
After this, you need to make the created section active, for this:
— right click on a section — make the section active.
Now our External HDD looks like this:
Using the same principle, we format the second partition on the disk, preferably in NTFS. but don't make it active.
Copying Windows 7
Copying a Windows distribution to a boot disk has never been easier.If you have DVD:
— Just open your installation DVD, select all folders and files, and copy to the active partition of your External HDD;
If you have an ISO image:
- Simply open your installation ISO image via
It's been a year since I abandoned the DVD drive, and netbook trends indicate that I made the right decision. But I was faced with the question of how to install an operating system without a DVD. The flash drive died out of place, and when I went to the store to buy a new one, I accidentally caught my eye on the Seagate Expansion external drives, the 250Gb version of which cost literally 500 rubles more than the 8Gb flash drive (2323 rubles). And the size and all of which did not bother the jacket pocket much.
Dimensions:141 x 18 x 80 mm
Weight:0.16kg
But as it turned out, installing Windows 7 from a USB HDD does not work on the same principle as with USB FLASH. Having figured it out and checked its functionality, I’m sharing the information with you.
Works for both Desktop PCs, laptops and Netbooks.
- HDD preparation
- Cutting and preparing HDD partitions;
- Copying Windows 7
HDD preparation
You can make a boot disk, install Windows 7, and then erase it and continue to use the HDD for your needs. Or make it much more convenient:If you don’t mind 4 gigabytes of space on the External HDD, then the Disk can be cut into two parts, in our case I did just that, giving one part for the Windows 7 distribution kit, which will always be at hand.
Cutting and preparing HDD partitions
1. Go to:Control Panel - Administration - Computer Management (Disk Management)
Find Disk 1 (if you have several hard drives in your system, find the one that is equal to the size of your External HDD)
2. Select our External HDD drive:
- Right click with the mouse - Delete volume;
- Right click - Create simple volume;
In the window that appears, select the volume size of 4300 Megabytes (Under the Distribution section), and click next,
In the next dialog, if necessary, select the drive letter and click next. In the new dialog, you need to format our new partition (FAT 32), click next and you're done.
After this, you need to make the created section active, for this:
- right click on a section - make the section active.
Now our External HDD looks like this:
Using the same principle, we format the second partition on the disk, preferably in NTFS. but don't make it active.
Copying Windows 7
Copying a Windows distribution to a boot disk has never been easier.If you have DVD:
- Simply open your installation DVD, select all folders and files, and copy to the active partition of your External HDD;
If you have an ISO image:
- Simply open your installation ISO image through Total Commander or Daemon Tools, select all folders and files, and copy to the active partition of your External HDD;
That's it, your External HDD is ready to act as a Bootable media, just reboot, and in the BIOS Set it as Primary Boot Device. specific External HDD, or simply USB HDD, depending on the BIOS type. Save the changes and proceed to installing your Windows 7.
UPD: For cmd lovers(Thank you )
diskpart
List disk
select disk no.
create partition primary
select partition 1
active
format fs=fat32 quick
As if installing an OS is not something complicated, and my opinion is that it is enough to be friends with the computer and have two more hands in addition to your head - one right and the other left. To install the OS on your computer, you need or.
But what to do if you have neither one nor the other, the optical drive does not work, or you have a netbook? After thinking a little, I remembered that I have an external USB pocket for an HDD and a free old 2.5' HDD too. In general, if you have a pocket hard drive, you can make it bootable.
There are utilities for this purpose that can be used to do this, but I decided to use standard Windows tools.
There are a lot of descriptions and videos on the Internet, but, unfortunately, there is one problematic point that the authors for some reason omit. Well, okay, I'll start in order.
Preparing an external HDD
Before working with a disk, be sure to transfer and save the necessary information from this disk to another medium.
I will carry out all settings using standard Windows 8.1 tools. There may be some differences from previous Windows releases, but if there are any, they are not significant.
First of all, I want to note that making an external HDD bootable is much more convenient. I divided the disk into two partitions, one contains the Windows distribution, the other partition is for my needs.
1. We connect the USB pocket and go to Disk management.
Attention! All data on the disk will be destroyed!
If you have Windows 8 installed on your PC,1 right-click: Start/Disk Management;
If Windows is earlier versions, open the Computer Management console: Start / Control Panel / Administrative Tools / Computer Management / expand Storage Devices / left click Disk Management.
See screenshot:


2. Select an external HDD drive. Be extremely careful; if you select another drive by mistake, all information will be destroyed.
In my case, this is Disk 1. As you can see in the screenshot, the disk is divided into two volumes (partitions):

3. Delete disk partitions:


4. Create new disk partitions. One for the distribution, the second will remain for your needs:
Right-click on a free disk field and select the command in the context menu Create a simple volume:

5. In the Create Simple Volume Wizard window that appears, click the button Further:
Specify the volume size as 4404 megabytes and click Next. Please note that the size is indicated in megabytes. And since 1 gigabyte is equal to 1024 megabytes, then 1024 × 4.3 = 4403.2 megabytes we get for the distribution section (mine weighs 4.18 GB, for example);


In this dialog, you need to format the new partition (FAT 32), click Further then Ready:

6. After this, you need to make the created partition active (don't forget because the computer will boot from this partition), for this:
Right click the mouse and select the command in the context menu Make the section active.
We respond to the confirmation request YES.

The external HDD looks like this:

7. We format the second partition on the disk in the same order, preferably in NTFS, but do not make it active.
Copying Windows to the active partition of an external HDD
Copying a Windows distribution to a bootable external HDD is quite simple and easy.
From boot DVD:
Open the installation DVD in Explorer, select all folders and files, and copy to the active partition of the external HDD;
From the ISO image:
By and large, an ISO image is a kind of archive. So you can open it using any archiver. You can also open the ISO image through Total Commander or Daemon Tools. Well, if you have Windows 8 or 8.1 installed on your PC, then open it with Explorer. Select all folders and files and copy them to the active partition of the external HDD;
That's it, your external HDD can act as bootable media. Just reboot and set USB HDD as boot priority in BIOS (depending on BIOS type).
- When you turn on the laptop, press F2, to ;
- Go to the tab Boot;
- IN Boot Priority order install USB HDD;
- Click F10, and then OK.
If it doesn’t work, then look at the article.
Save the changes and proceed.
As we can see from the text, preparing an external HDD for installing Windows is quite simple. And my description will not be complete if I do not talk about one problem that for some reason is rarely written about on the Internet.
Making the hard drive partition active
When I divided the hard drive into two volumes, for some reason unknown to me, not a single partition of the disk could be made active. This function was not available in the context menu.
The active partition is the partition from which the computer boots.
There are two ways to make a section active:
- Using the Computer Management console. We have already considered this method, but, unfortunately, for a number of reasons, the Make Partition Active command may not be available. The solution to this problem is also not difficult. Remember how to prepare a bootable USB flash drive from the Command Line.
- Using the Command Line, through the utility diskpart. The second method is a little more complicated, but more effective. You just need to do all the operations carefully and slowly.
Setting the active partition using the command line
1. Connect an external USB HDD;
2. Click Start/All Programs/Accessories/Command Prompt. Right-click and select Run as administrator.
 3.
In the window that opens, write the command diskpart and press the button Enter. An invitation line to work with the utility will appear – DISKPART>;
3.
In the window that opens, write the command diskpart and press the button Enter. An invitation line to work with the utility will appear – DISKPART>;
 4.
Enter the command list disk and press the button Enter. You will see all the disks installed on your computer;
4.
Enter the command list disk and press the button Enter. You will see all the disks installed on your computer;
 5.
We select the disk with which we will work. To do this, enter the command select disk 0, where “0” is the disk number in the list, i.e. for my external drive there will be a command select disk 1. Click the button Enter, the message Disk 1 selected will appear;
5.
We select the disk with which we will work. To do this, enter the command select disk 0, where “0” is the disk number in the list, i.e. for my external drive there will be a command select disk 1. Click the button Enter, the message Disk 1 selected will appear;
 6.
Next, you need to find all partitions on the selected disk. Enter the command list partition and press the button Enter.
6.
Next, you need to find all partitions on the selected disk. Enter the command list partition and press the button Enter.
 7.
We select the section we will work with. Enter the command select partition 1, where 1 is the section number in the list, i.e. for the section that we make active. Click Enter, a message will appear Section 1 selected.
7.
We select the section we will work with. Enter the command select partition 1, where 1 is the section number in the list, i.e. for the section that we make active. Click Enter, a message will appear Section 1 selected.
 8.
Mark the selected partition as active, to do this, enter the command active. Click the button Enter, a message will appear DiskPart: Partition marked as active.
8.
Mark the selected partition as active, to do this, enter the command active. Click the button Enter, a message will appear DiskPart: Partition marked as active.
 That's all. Good luck.
Also on the site:
How to make an external USB HDD (hard drive) bootable using standard Windows tools? updated: February 6, 2018 by: admin
Greetings, blog readers.
Today I would like to tell you why and how to install Windows on an external hard drive. This may be needed when users want to evaluate a new version of the operating system. Or they need a shell in which certain applications will run. Depending on the needs, the method also changes. Next we will look at the main points regarding this topic.
Placing Windows 10 on an external hard drive involves quite a few steps. First of all, you need to prepare the device itself. So, to get a removable hard drive with an OS, do the following:
Now we see an unallocated area of 60 GB, which will be needed to install Windows 8 or a newer version. Now we need to transform the space into one that will be “normally” perceived by the system:

As a result, a formatted partition with the NTFS file system will appear on the USB drive. This is where we will install the OS, be it Windows XP or newer versions.
WinNT Setup3 program( )
After we have prepared everything, we can proceed directly to placing the operating system on a removable device:
It’s worth noting right away that such an operation cannot be performed from a floppy drive to an external USB hard drive. This is due to many aspects. So, to get started, just prepare a virtual image.
Installing Win on an external HDD for Mac( )

Sometimes there are situations when users, for some reason, need to install a Microsoft operating system on a USB drive connected to a Mac computer. This could be a lack of highly specialized software options. Or simple interest. In any case, there is a way:
Let's launch our Mac. We check the system for viruses AVG AntiVirus Free. Download drivers for Boot Camp(a program that allows you to carry out the entire operation). To do this, go to “Programs” and then to “Utilities” or “Utilities” - this depends on the version of OS X.
We launch the application and indicate that we need to download everything to support Win.
Afterwards we will perform the actions through, which means the program needs to be downloaded and installed.

Let's launch. Select " Car" and "Create". A wizard for setting up a new “ virtual machines" Click " Continue».
Enter the name of the desired operating system, for example, Windows 7. The type will install itself. We continue until we reach the desired goal. At the very end, select “ Create».
Let's stop at "". Click on the disk next to " Drive: Secondary…».
We indicate the image from our OS.
We confirm the actions and start.
The Win installation screen will appear.

When “” appears, go to “ Devices" and then to "".

After completing the procedure, restart the computer.
Let's go to " Start», « Computer" On the sidebar we find “ Net" We open access to documents. The network should appear " VBOXSVR" Go in and copy the above directory to “”.

Then we go to " Control Panel" And " Programs" You need to find and remove " Oracle VM VirtualBox…" We restart the machine.
Let's go to the catalog " WindowsSupport" Launch " Setup.exe" After finishing, turn off " virtual».
We need in " Macintosh HD" Then in " Users" and to the directory " client_name" Further in "" and in " Windows 7».
We launch the main file with the extension *.vdi. The image is mounted.
Two new disks will appear among the devices. We copy all the contents from them to a new directory.

Connect and clean the USB-HDD. And you can’t do without formatting here.
Let's go to " Start" And " Computer" Then in " Home on psf" And "". We go to the previously created directory and transfer all the elements to our portable device.
 PowerMaster - application for managing energy consumption ZenFone Max Fast charging does not work zenfone 2
 What is ArtMoney and how to use it A program like artmoney for pc
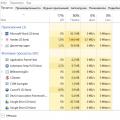 How to speed up game installation