Instance solution based on docker. Introducing the basic features of Docker
Reference for Docker image and container management commands.
Terms
Image is a static build based on a specific OS.
Container is the running instance of the image.
Docker launch rights
To run Docker containers under your own user (without sudo), you need to add to the appropriate group:
Sudo usermod -aG docker YOU_USER
Docker service
Docker Service Management "a:
Sudo service docker start | stop | restart | status sudo restart docker # alias
Images
List of available skins:
Docker images
Download the image (or the entire repository) from the official register (image repository):
Docker pull ubuntu: 14.04
View image information:
Docker inspect ubuntu
Delete image:
Docker commit CONTAINER_ID IMAGE_NAME
Containers
Attention!
After starting the Docker container, services / daemons (such as SSH, Supervisor, etc.) will not start automatically! I spent several hours debugging the error: " ssh_exchange_identification: read: Connection reset by peer"when trying to connect to the container via SSH. But it turned out that just the sshd daemon was not started. You will have to manually start the necessary daemons or supervisor after starting the container:
Docker exec CONTAINER_ID bash -c "service ssh start"
List of all containers (started and stopped):
Docker ps -a
Remove container (s):
Docker rm CONTAINER_ID CONTAINER_ID
Remove all containers:
Docker rm $ (docker ps -aq)
Create and run a Docker container with Ubuntu 14.04 in interactive mode (open the shell of this container):
Docker run -it ubuntu bash docker run [options] image [command] -i Interactive mode, keep STDIN open -t Allocate / creates a pseudo-TTY that attaches stdin and stdout --name Container name instead of ID -w Specify working directory ( --workdir) -e Set the environment variable in the container -u User: the group under which the container should be run -v Mount the file or directory of the host system in the container -p Forward the port (s) of the container -<порт хост-системы>:<порт контейнера>(--publish =) --entrypoint Replace default command from ENTRYPOINT Dockerfile
Note
To detach the TTY without stopping the container, press Ctr + P + Ctrl + Q.
Create and run a Docker container in daemon mode with SSH port forwarding:
Docker run -itd -p 127.0.0.1:221:22 ubuntu
Create and start a container and then delete this container after stopping (useful for debugging):
Docker run -i -t --rm ubuntu bash
Start a stopped container interactively:
Docker start -i CONTAINER_ID
Connect to a daemonized container:
Docker attach CONTAINER_ID
Docker commands
Usage: docker COMMAND docker daemon [--help | ...] docker [--help | -v | --version] A self-sufficient runtime for containers. Options: --config = ~ / .docker Location of client config files -D, --debug = false Enable debug mode --disable-legacy-registry = false Do not contact legacy registries -H, --host = Daemon socket ( s) to connect to -h, --help = false Print usage -l, --log-level = info Set the logging level --tls = false Use TLS; implied by --tlsverify --tlscacert = ~ / .docker / ca.pem Trust certs signed only by this CA --tlscert = ~ / .docker / cert.pem Path to TLS certificate file --tlskey = ~ / .docker / key.pem Path to TLS key file --tlsverify = false Use TLS and verify the remote -v, --version = false Print version information and quit Commands: attach Attach to a running container build Build an image from a Dockerfile commit Create a new image from a container "s changes cp Copy files / folders between a container and the local filesystem create Create a new container diff Inspect changes on a container" s filesystem events Get real time events from the server exec Run a command in a running container export Export a container "s filesystem as a tar archive history Show the history of an image images List images import Import the contents from a tarball to create a filesystem image info Display system-wide information inspect Return low-level information on a container or image kill kill a running container l oad Load an image from a tar archive or STDIN login Register or log in to a Docker registry logout Log out from a Docker registry logs Fetch the logs of a container network Manage Docker networks pause Pause all processes within a container port List port mappings or a specific mapping for the CONTAINER ps List containers pull Pull an image or a repository from a registry push Push an image or a repository to a registry rename Rename a container restart Restart a container rm Remove one or more containers rmi Remove one or more images run Run a command in a new container save Save an image (s) to a tar archive search Search the Docker Hub for images start Start one or more stopped containers stats Display a live stream of container (s) resource usage statistics stop Stop a running container tag Tag an image into a repository top Display the running processes of a container unpause Unpause all processes within a container volume Manage Docker volumes wait Block unt il a container stops, then print its exit code Run "docker COMMAND --help" for more information on a command.For several months now I have been using docker to structure the development / delivery of web projects. I offer the readers of "Habrahabr" a translation of the introductory article about docker - "Understanding docker".
What is docker?
Docker is an open platform for developing, delivering and operating applications. Docker is designed to get your applications up and running faster. With docker, you can decouple your application from your infrastructure and treat the infrastructure as a managed application. Docker helps you deploy your code faster, test faster, deploy applications faster, and reduce the time between writing code and running code. Docker does this with a lightweight container virtualization framework, using processes and utilities to help manage and deploy your applications.At its core, docker allows you to run almost any application, safely isolated in a container. Safe isolation allows you to run many containers on the same host at the same time. The lightweight nature of the container, which runs without additional hypervisor load, allows you to get more out of your hardware.
The container virtualization platform and tools can be useful in the following cases:
- packing your application (and also used components) into docker containers;
- distribution and delivery of these containers to your teams for development and testing;
- uploading these containers to your productions, both in data centers and in the clouds.
What can I use docker for?
Uploading your apps quickly
Docker is great for organizing your development cycle. Docker allows developers to use local containers with applications and services. That later allows you to integrate with the continuous integration and deployment workflow.For example, your developers write code locally and share their development stack (set of docker images) with their peers. When they are ready, they send the code and containers to the test site and run any tests they need. From the test site, they can send code and images to production.
Easier laying out and unfolding
A container-based docker platform will make it easy to port your payload. Docker containers can run on your local machine, both real and on a virtual machine in the data center, and in the cloud.The portability and lightweight nature of docker makes it easy to dynamically manage your workload. You can use docker to deploy or deploy your application or services. Docker's speed allows you to do this in near real-time.
Higher loads and more payloads
Docker is lightweight and fast. It provides a robust, cost-effective alternative to hypervisor-based virtual machines. It is especially useful in high-load environments such as building your own cloud or platform-as-service. But it is just as useful for small to medium applications when you want to get more out of the available resources.The main components of Docker
Docker has two main components:- Docker: an open source virtualization platform;
- Docker Hub: Our platform-as-a-service for distributing and managing docker containers.
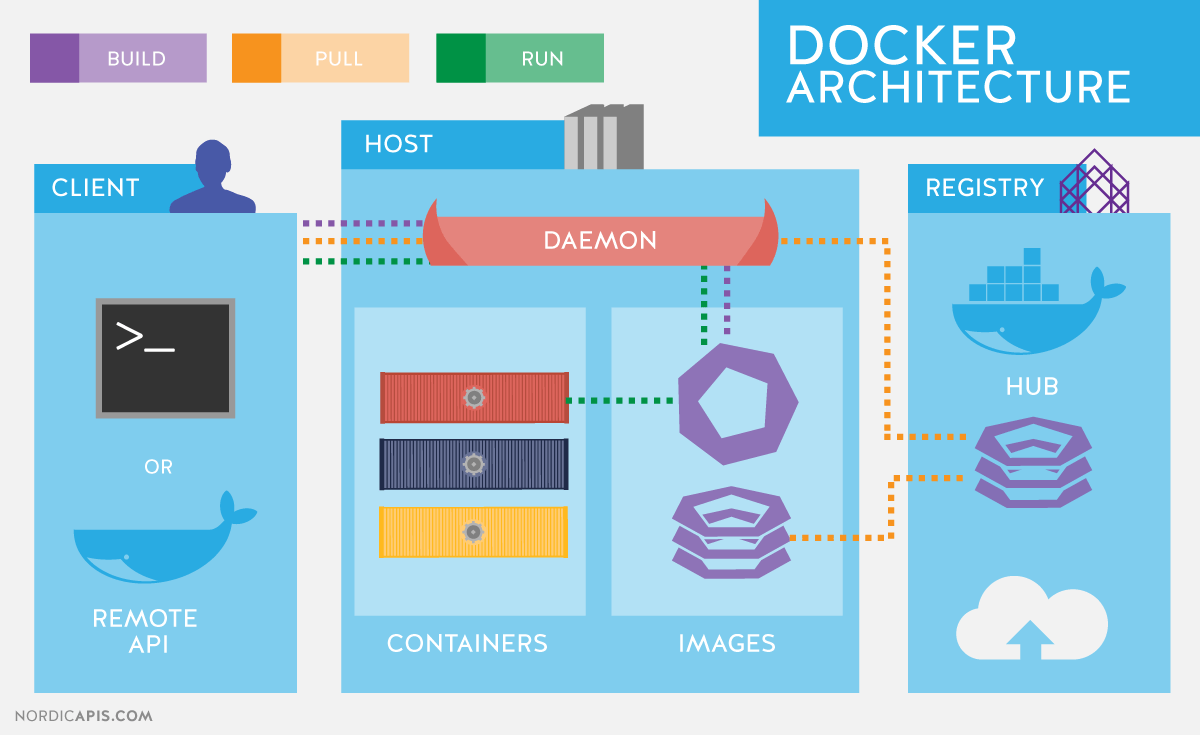
Docker architecture
Docker uses a client-server architecture. The Docker client communicates with the Docker daemon, which takes over the brunt of creating, running, distributing your containers. Both client and server can run on the same system, you can connect the client to a remote docker daemon. Client and server communicate via socket or RESTful API.
Docker daemon
As shown in the diagram, the daemon is started on the host machine. The user does not interact with the server directly, but uses the client for this.Docker client
Docker client, the docker program is the main interface to Docker. It receives commands from the user and interacts with the docker daemon.Inside docker
To understand what docker is made of, you need to know about three components:- images
- register (registries)
- containers
Images
The Docker image is a read-only template. For example, an image can contain an Ubuntu operating system with Apache and an application on it. Images are used to create containers. Docker makes it easy to create new images, update existing ones, or you can download images created by other people. Images are a component of a docker build.Registry
Docker registry stores images. There are public and private registries from which you can download or upload images. The public Docker registry is the Docker Hub. There is a huge collection of images. As you know, images can be created by you or you can use images created by others. Registries are distribution components.Containers
Containers are like directories. Containers contain everything the application needs to run. Each container is created from an image. Containers can be created, started, stopped, migrated, or deleted. Each container is isolated and is a secure platform for the application. Containers are a component of work.So how does Docker work?
So far we know that:- we can create images in which our applications are located;
- we can create containers from images to run applications;
- we can distribute images through Docker Hub or another image registry.
How does the image work?
We already know that an image is a read-only template from which a container is created. Each image consists of a set of levels. Docker uses the union file system to combine these layers into one image. The union file system allows files and directories from different file systems (different branches) to transparently overlap, creating a coherent file system.One of the reasons that docker is lightweight is the use of layers like this. When you change the image, for example, update the application, a new layer is created. So, without replacing the entire image or rebuilding it, as you may have to do with a virtual machine, only the level is added or updated. And you don't have to distribute the whole new image, only the update is distributed, which makes it easier and faster to distribute the images.
At the heart of every look is a base look. For example, ubuntu, an Ubuntu base image, or fedora, a Fedora base image. You can also use images as a base for creating new images. For example, if you have an apache image, you can use that as the base image for your web applications.
Note! Docker usually pulls images from the Docker Hub registry.
Docker images can be created from these base images, we call the description steps for creating these images instructions. Each instruction creates a new image or level. The instructions will be as follows:
- running command
- adding a file or directory
- creating an environment variable
- specifying what to run when the container of this image is launched
These instructions are stored in the Dockerfile. Docker reads this Dockerfile when you build the image, follows these instructions, and returns the final image.
How does the docker registry work?
The registry is a repository for docker images. After creating the image, you can publish it to the public Docker Hub registry or your personal registry.With the docker client, you can search for already published images and download them to your machine from docker to create containers.
Docker Hub provides public and private image repositories. Searching and downloading images from public repositories is available to everyone. The contents of the private storages are not included in the search results. And only you and your users can receive these images and create containers from them.
How does a container work?
The container consists of the operating system, user files, and metadata. As we know, each container is created from an image. This image tells docker what is in the container, what process to run, when the container starts, and other configuration data. Docker image is read-only. When docker starts up the container, it creates a read / write layer on top of the image (using the union file system as mentioned earlier) in which the application can run.What happens when a container starts up?
Either using the docker program or using the RESTful API, the docker client tells the docker daemon to start the container.$ sudo docker run -i -t ubuntu / bin / bash
Let's deal with this command. The client is started using the docker command, with a run option that says a new container will be launched. The minimum requirements for starting a container are the following attributes:
- which image to use to create the container. In our case, ubuntu
- the command you want to run when the container is started. In our case / bin / bash
What happens under the hood when we run this command?
Docker, in order, does the following:
- downloads the ubuntu image: docker checks for the presence of a ubuntu image on the local machine, and if not, downloads it from Docker Hub. If there is an image, then it uses it to create a container;
- creates a container: when the image is received, docker uses it to create the container;
- initializes the filesystem and mounts the read-only level: the container is created in the file system and the read-only level is added to the image;
- initializes network / bridge: creates a network interface that allows docker to communicate with the host machine;
- Setting the IP address: finds and sets the address;
- Starts the specified process: launches your application;
- Processes and outputs the output of your application: connects and logs the standard input, output, and error stream of your application so you can track how your application is running.
Technologies used
Docker is written in Go and uses some of the features of the Linux kernel to implement the above functionality.Namespaces
Docker uses namespaces technology to organize isolated workspaces, which we call containers. When we start a container, docker creates a set of namespaces for that container.This creates an isolated layer, each aspect of the container runs in its own namespace, and does not have access to the external system.
A list of some of the namespaces that docker uses:
- pid: to isolate the process;
- net: to manage network interfaces;
- ipc: to manage IPC resources. (ICP: InterProccess Communication);
- mnt: to manage mount points;
- utc: for kernel isolation and version generation control (UTC: Unix timesharing system).
Control groups
Docker also uses cgroups technology, or control groups. The key to running an application in isolation is to provide the application with only the resources you want to provide. This will ensure that the containers are good neighbors. Control groups allow you to share the available hardware resources and, if necessary, set limits and limits. For example, limit the amount of memory available to a container.Union file system
Union File Sysem or UnionFS is a file system that works by creating layers, making it very lightweight and fast. Docker uses UnionFS to create the blocks from which the container is built. Docker can use several UnionFS flavors including: AUFS, btrfs, vfs, and DeviceMapper.Container formats
Docker combines these components into a wrapper that we call the container format. The default format is libcontainer. Docker also supports the traditional Linux container format using LXC. Docker may support other container formats in the future. For example, integrating with BSD Jails or Solaris Zones.We have touched upon the topic more than once and considered many systems for their construction. Today we will introduce another great system with Docker containers.
Let's start by describing the basic functionality that will come in handy in further articles in the series, and briefly recall the Docker architecture. Docker uses a client-server architecture and consists of a client - docker utility that accesses the server using RESTful API, and a daemon in the Linux operating system (see Fig. 1). Although Docker works on non-Linux operating systems, they are not covered in this article.

The main components of Docker:
- Containers- user environments isolated using operating system technologies, in which applications are executed. The simplest way is to define a Docker container as an application launched from an image. By the way, this is exactly what Docker ideologically differs from, for example, from LXC ( Linux containers), although they use the same Linux kernel technologies. The developers of the Docker project are committed to the principle that one container is one application.
- Images- read-only application templates. New levels can be added on top of existing images, which together represent the file system, modifying or supplementing the previous level. Typically, a new image is created either by saving an already running container to a new image over an existing one, or by using special instructions for the utility. To separate the different levels of a container at the file system level, AUFS, btrfs, vfs and Device Mapper... If you intend to use Docker in conjunction with SELinux, then it is required Device Mapper.
- Registries containing repositories ( repository) images, - network image storages. They can be both private and public. The most famous registry is.
GNU / Linux operating systems use standard Linux kernel technologies to isolate containers, such as:
- Namespaces ( Linux Namespaces).
- Control groups ( Cgroups).
- Privilege Management Tools ( Linux Capabilities).
- Additional, mandatory security systems, such as AppArmor or SELinux.
Let's consider the listed technologies in a little more detail.
Control group mechanism (Cgroups) provides a tool for fine-tuning the allocation, prioritization and management of system resources. Control groups are implemented in the Linux kernel. In modern distributions, cgroup management is implemented through systemd, however, it remains possible to control using the library libcgroup and utilities cgconfig... The main cgroup hierarchies (also called controllers) are listed below:
- blkio- sets limits on input-output operations and on access to block devices;
- cpu- using the process scheduler, distributes processor time between tasks;
- cpuacct- Generates automatic reports on the use of CPU resources. Works in conjunction with the controller cpu described above;
- cpuset- assigns certain processors and memory nodes to tasks;
- devices- regulates access of tasks to specific devices;
- freezer- suspends or resumes tasks;
- memory- sets limits and generates reports on memory usage by tasks of the control group;
- net_cls- carries out tagging of network packets with a class identifier ( classid). This allows the traffic controller ( tc command) and firewall ( iptables) take these tags into account when processing traffic;
- perf_event- allows you to monitor control groups using the utility perf;
- hugetlb- allows you to use large virtual memory pages and apply limits to them.
Namespaces, in turn, they control not resource allocation, but access to kernel data structures. In fact, this means the isolation of processes from each other and the ability to have in parallel "identical", but not overlapping with each other hierarchies of processes, users and network interfaces. If desired, different services can even have their own loopback interfaces.
Examples of namespaces used by Docker:
- PID, Process ID- isolation of the hierarchy of processes.
- NET, Networking- isolation of network interfaces.
- PC, InterProcess Communication- management of interaction between processes.
- MNT, Mount- mount points management.
- UTS, Unix Timesharing System- isolation of the kernel and version identifiers.
A mechanism called Capabilities allows you to split the privileges of the root user into small groups of privileges and assign them separately. This functionality has appeared in GNU / Linux since version kernels 2.2. Initially, containers are started with a limited set of privileges.
You can enable and disable the docker command options:
- mount operations;
- access to sockets;
- Performing some of the operations on the file system, such as changing the attributes of files or the owner.
You can learn more about the privileges using the man page. CAPABILITIES (7).
Installing Docker
Let's take a look at installing Docker using CentOS as an example. When working with CentOS, you have a choice: use the latest version from u pstream or a version built by the CentOS project with Red Hat add-ons. A description of the changes is available on the page.
Basically, this is a reverse porting of fixes from new upstream versions and changes proposed by the Red Hat developers, but not yet accepted into the main code. The most noticeable difference at the time of this writing was that in newer versions the docker service has been split into three parts: a daemon docker, containerd and runc... Red Hat does not yet consider this change to be stable and ships a monolithic version 1.10 executable.
Repository settings for installation upstream versions, as well as instructions for installation on other distributions and operating systems, are given in the installation guide on the official website. Specifically, the settings for the CentOS 7 repository:
# cat /etc/yum.repos.d/docker.repo name = Docker Repository baseurl = https: //yum.dockerproject.org/repo/main/centos/7 enabled = 1 gpgcheck = 1 gpgkey = https: // yum .dockerproject.org / gpg
# cat /etc/yum.repos.d/docker.repo name = Repository baseurl = https: / / yum .dockerproject .org / repo / main / centos / 7 enabled = 1 gpgcheck = 1 gpgkey = https: / / yum .dockerproject .org / gpg |
Install the required packages on and start and enable the service:
# yum install -y docker-engine # systemctl start docker.service # systemctl enable docker.service
# yum install -y docker-engine # systemctl start docker.service # systemctl enable docker.service |
Checking the service status:
# systemctl status docker.service
# systemctl status docker.service |
You can also view system information about Docker and the environment:
# docker info |
If you run a similar command and install Docker from the CentOS repositories, you will see minor differences due to using an older version of the software. From the output docker info we can find out what is used as a driver for storing data Device mapper, and as storage - a file in / var / lib / docker /:
# ls -lh / var / lib / docker / devicemapper / devicemapper / data -rw -------. 1 root root 100G Dec 27 12:00 / var / lib / docker / devicemapper / devicemapper / data
# ls -lh / var / lib / docker / devicemapper / devicemapper / data Rw - - - -. 1 root root 100G Dec 27 12:00 / var / lib / / devicemapper / devicemapper / data |
The daemon startup options, as is usually the case on CentOS, are stored in / etc / sysconfig /... In this case, the name of the docker file. Corresponding line / etc / sysconfig / docker describing options:
OPTIONS = "- selinux-enabled --log-driver = journald"
If you ran the docker command as a non-root user or a member of the docker group, you would see an error like this:
$ docker search mysql
$ search mysql |
Warning: failed to get default registry endpoint from daemon (Cannot connect to the Docker daemon. Is the docker daemon running on this host?). Using system default: https: // index. docker.io/v1/
Cannot connect to the Docker daemon. Is the docker daemon running on this host?
Note that actually adding a user to the docker group is tantamount to adding that user to the root group.
The RHEL / CentOS developers have a slightly different approach to Docker daemon security than the upstream Docker developers themselves. For more information on Red Hat's approach, see an article by RHEL developer Dan Walsh.
If you want the "standard" behavior of Docker installed from the CentOS repositories (that is, described in the official documentation), then you need to create a docker group and add to the daemon start options:
OPTIONS = "- selinux-enabled --log-driver = journald ↵ --group = docker"
OPTIONS = "--selinux-enabled --log-driver = journald ↵ --group = docker" |
Then we restart the service and check that the docker socket file belongs to the docker group, and not root:
# ls -l /var/run/docker.sock |
Finding images and Docker tags
Let's try to find a container on Docker Hub.
$ docker search haproxy
$ search haproxy |

In this output, we have obtained a list of a number of HA Proxy images. The top-most item in the list is the HA Proxy from the official repository. Such images differ in that there is no symbol in the name «/» separating the name of the user's repository from the name of the container itself. The example behind the official shows two haproxy images from open user repositories eeacms and million12.
Images like the two below you can create yourself by registering on Docker Hub. The official ones are backed by a dedicated team sponsored by Docker, Inc. Features of the official repository:
- These are recommended images for use, based on best practices and best practices.
- They are base images that can be a starting point for more customization. For example, base images of Ubuntu, CentOS or libraries and development environments.
- Contains the latest software versions with fixed vulnerabilities.
- This is the official distribution channel for the products. To search for official images only, you can use the option –Filter “is-official = true” commands docker search.
Stars in command output docker search corresponds to the popularity of the image. This is the analogue of the button Like on social networks or bookmarking for other users. Automated means that the image is built automatically from a custom script using Docker Hub. Usually, you should give preference to automatically collected images due to the fact that its contents can be checked by familiarity with the corresponding file.
Download the official HA Proxy image:
$ docker pull haproxy Using default tag: latest
The full name of the image might look like this:
[username] image name [: tag]
You can view the list of downloaded images with the command docker images:
Launching containers
It is not necessary to download the image to run the container. If available, it will be loaded automatically. Let's try to start a container with Ubuntu. We will not list the repository and will download the latest official image supported by Canonical.
$ docker run -it ubuntu [email protected]:/#
$ run - it ubuntu root @ d7402d1f7c54: / # |
Besides the team run, we have specified two options: -i- the container should run interactively and -t- a pseudo-terminal must be highlighted. As you can see from the output, we have root user privileges in the container, and the container ID is displayed as the hostname. The latter may not be true for all containers and depends on the container developer. Let's check that this is indeed the Ubuntu environment:
[email protected]: / # cat / etc / * release | grep DISTRIB_DESCRIPTION DISTRIB_DESCRIPTION = "Ubuntu 16.04.1 LTS"
root @ d7402d1f7c54: / # cat / etc / * release | grep DISTRIB_DESCRIPTION DISTRIB_DESCRIPTION = "Ubuntu 16.04.1 LTS" |
Uname command -a for such purposes it will not work, since the container works with the host kernel.
One of the options could be a unique container name that can be referenced for convenience, in addition to Container ID. It is given as –Name<имя>. If the option is omitted, the name is generated automatically.
The automatically generated container names do not carry a semantic load, however, as an interesting fact, it can be noted that the names are generated randomly from the adjective and the name of a famous scientist, inventor or hacker. In the generator code, for each name, you can find a short description of what the given figure is known for.
You can view the list of running containers with the command. To do this, open a second terminal:
However, if we issue the command, we will not find the container created from the mysql image. Let's use the option -a which shows all containers, not just running containers:
Obviously, the required parameters were not specified when starting the container. For a description of the environment variables required to run a container, see the official MySQL image on Docker Hub. Let's try again using the option -e which sets the environment variables in the container:
$ docker run --name mysql-test ↵ -e MYSQL_ROOT_PASSWORD = docker -d mysql
The last parameter is the command that we want to execute inside the container. In this case, it is the command interpreter. Bash... Options -it are similar in purpose to those used earlier in the command docker run.
In fact after running this command into container mysql-test one more process is added - bash... This can be clearly seen using the pstree command. Abbreviated output to command docker exec:
|
Inside Docker, only Linux, and, experimentally, FreeBSD. Runs natively on Linux and experimentally on FreeBSD. Under MacOSX, Windows - through a virtual machine. Docker is double insulated. Isolating what lies inside the Docker container from the operating system and isolating the operating system from what is inside Docker. Isolation means the isolation of all files, ports, priorities. There is such a thing as "dependency hell". Any software installed on a computer pulls addictions(configuration files, static files usually called asset, auxiliary utilities / services, libraries, etc.). A number of these libraries / utilities / services incompatible with each other. And given that each of these libraries / utilities / services has its own dependencies, the situation is even worse. For example, we use Yandex.Cocaine, which compiles normally only on Ubuntu 14.04 (and, it seems, on Debian 7). But not under CentOS 6, 7, Debian 8, FreeBSD 9, 10, Ubuntu 15, 16, etc. - it is impossible to compile it... We run on these operating systems in Docker. On the other hand, and at the same time, you need to install another, more modern software. And at the same time older. And we are not even talking about seriously different versions of Linux. For example, some software requires at least Ubuntu 14.10, while others require at least Linux 14.04. Docker is one program within an individual environment with an individual version of the operating system. At the expense of puff containers, if you use one root for all the way, then the size of the Docker container is only a few kilobytes larger than the size of the binary file, run under Docker. Thus, we have a binary file that runs as if in our operating system. You can say - bah, yes this is a long-known virtual machine. But no, it’s not like that. These are the so-called containers. It doesn't smell like a virtual machine. Except for Windows and MacOSX, where work without a virtual machine is still experimentally possible only, and the norm in these operating systems is to use Docker inside a full-fledged virtual machine. But Docker VMs are only used for development. Docker virtual machines are not used to run in production. Docker uses operating system containers. LXC on Linux, Jails on FreeBSD. A container is an area of the operating system that is isolated from the main body of the operating system. The container has its own directory tree (including system / dev, / bin, / sbin, etc.), its own network ports, etc., etc. But it doesn't use full virtualization. Which significantly saves resources. Run 100 full virtual machines it will hardly work even on a powerful server. And here running 100 Docker containers even on a weak home machine is possible. True, the use of incomplete virtualization limits the use of operating systems inside containers. As a rule, it is specially prepared versions of Linux or FreeBSD... It is specially trained. Windows - in principle, it is impossible to run in a container. Containers have existed before Docker. Docker, strictly speaking, is just a very convenient set of tools put together to manage container virtualization. But very comfortable. Why is it used? The guys from all sorts of Dropbox, Facebook and other giants, launching 1 million different programs in their services, faced that it is impossible to guarantee identical operating system settings everywhere. And this is critical. To the extent that a perfectly written and tested program on a real server starts behaving unpredictably. Therefore, one of these smart guys gave birth to a new concept - each program on servers runs in its own individual environment, with individual operating system settings. Moreover - originally a software developer tests a program in a Docker container, with certain settings. AND in the same (or with the same settings) Docker container, the program leaves for the server. it allows you to guarantee a much greater identity of the development environment and the runtime environment. Before that, people suffered, came up with cunning installers ... Later spat on attempts to streamline the environment in the OS- and now the concept is as follows - to install programs on servers together with their individually customized operating systems- that is, inside containers. 1 container = 1 OS setting = 1 program inside. In other words:
This allows you not to bother with the settings. "for the server" locally on the developer's machine. This allows you to develop on the developer's machine completely different programs at the same time that requires incompatible operating system settings... This allows you to make much more guarantees that the program on the server will behave the same as on the developer's machine. This allows development for Windows / MacOSX with convenient "transparent" testing under Linux. Docker is applicable to creation / customization only server software for Linux(experimental under FreeBSD). Not for smartphones. And if there are desktops, then only software without a GUI. As far as Docker allowed Simplify the work of developers and admins and improve the quality of the result in one fell swoop- now booming on Docker. A huge mountain of tools has been invented to manage the deployment of applications built with Docker. If earlier, to run 10,000 programs on 1,000 servers, you needed at least 3 highly qualified devops who wrote a bunch of descriptions of how to do this on Puppet, Salt, Chef, Ansible, and even then there were no guarantees, it was all tested for months. Now with Docker, even one qualified devops can run millions of programs on tens of thousands of servers. With a much greater guarantee that all this will start normally. There may be a false impression that the developer prepares containers in Docker, and then transfers them to the admin. The developer submits all of his output to the CI system (usually via git) That is, with the correct organization of the case, the developer cannot / should not influence what the image will be. The main idea is that what we tested is exactly what we run on the production server. One-to-one, including the same files (not the same, namely the same). Docker is a popular tool that uses containers to provide everything you need to run applications. By using Docker containers, you can be sure that your application will work the same on whatever machine you run it on. In this tutorial, you will learn about linking containers and Docker images, and how to install, start, stop, and uninstall containers. OverviewDocker image can be thought of as some kind of template that is used to create containers. Images usually start with the root filesystem, to which various changes and their corresponding launch parameters are then added in layers on top. Unlike typical Linux distributions, a Docker image usually contains only the parts that are needed to run the application. The images do not have statuses, and they do not change. It would be more correct to say that they are the starting point, the basis for Docker containers. The images come to life the moment you enter the docker run command - it immediately creates a container by adding a new read / write layer over the image. This combination of read-only levels (on top of which a read-write level is added) is also known as UnionFS, a file system that cascades merged file systems. Whenever a change is made to an existing running container file, the file is copied from the read-only area to the read-write level, where the changes are applied. And now the original file is hidden by the read / write version, but it is not deleted. Such changes to the read / write level only exist within this separate container. When the container is deleted, all changes are also lost (if they were not saved). Working with containersEach time you use the docker run command, a new container is created from the image you specify. More specific examples will be discussed below. Step 1: creating two containers The docker run command below creates a new container that will use the Ubuntu image as a base. The -t switch will provide a terminal, and the -i switch will provide the ability to interact with it. To get inside the container, you can use the standard bash command. That is, you can enter: $ docker run -ti ubuntu $ docker run -i -t ubuntu: 14.04 / bin / bash (in the second case, you run the / bin / bash command inside the container and you will automatically find yourself inside the container) The command prompt will confirm that you are inside the container as superuser. After the @ sign, you will see the ID of the container you are in: Now, use the echo command to edit the / tmp directory, and then check that the changes were recorded using the cat command: Echo "Example1"> /tmp/Example1.txt cat /tmp/Example1.txt On the screen, you should see: Now exit the container: Once the given command was executed and you exited the command line, the Docker container stopped working. You can see this if you use the docker ps command: Among the running containers, you will not see the one used above: CONTAINER ID IMAGE COMMAND CREATED STATUS PORTS NAMES However, you can add the -a switch in order to see all containers - both running and stopped - and then you will be shown the container in which you worked earlier: $ docker ps -a CONTAINER ID IMAGE COMMAND CREATED STATUS PORTS NAMES 11cc47339ee1 ubuntu "/ bin / bash" 9 minutes ago Exited (127) 10 seconds ago small_sinoussi When a container is created, it has an ID and an automatically generated name. In this case, 11cc47339ee1 is the container ID and small_sinoussi is the generated name. The ps -a command shows this data, as well as the image from which the container was created (in this case ubuntu), when the container was created (9 minutes ago), and what command was run in it ("/ bin / bash"). You can also see the status of the container (you left it 10 seconds ago) If the container was still running, you would see the "Up" status and the time that it is already running. Now you can enter the command again to create the container: $ docker run -ti ubuntu Despite the fact that the command looks the same as last time, it will create a completely new container - it will have a different identification number, and if you try to look at the contents of the Example1 file that you edited earlier, you will not find it. [email protected]: / # cat / tmp / Example1 The output would be: Cat: / tmp / Example1: No such file or directory It may seem to you that the data has disappeared, but, of course, that is not the case. Exit the second container to ensure that both containers (including the first one with the correct file) exist on the system. [email protected]: / # exit $ docker ps -a The output would be: CONTAINER ID IMAGE COMMAND CREATED STATUS PORTS NAMES 6e4341887b69 ubuntu "/ bin / bash" About a minute ago Exited (1) 6 seconds ago kickass_borg 11cc47339ee1 ubuntu "/ bin / bash" 15 minutes ago Exited (127) 6 minutes ago small_sinoussi Step 2: restarting the first container In order to restart an already created container, you must use the start command with two -ai switches. At the end, you need to write the identification number of the container you want to work with, or its name. As a result, your command will look like this: Docker start -ai 11cc47339ee1 Now you are back in the bash shell inside the container and you can verify that the file you created at the beginning of the article is still here: Cat /tmp/Example1.txt You will see on the screen: You can now exit the container: This way, all changes inside the container are saved even if you stop and then restart the container. The data is only deleted when the container itself is deleted. Also, the example above shows that the changes affect one individual container (and not all containers at once). Step 3: removing both containers The final step is to delete the two containers that you created by following this tutorial. To do this, you need to use the docker rm command. However, it only affects stopped containers. After the command, you must specify the identification number or the name of one or more containers. For example, to delete containers created earlier, you must enter the command: Docker rm 6e4341887b69 small_sinoussi The screen will display: 6e4341887b69 small_sinoussi Both containers have now been removed. ConclusionIn this tutorial, you learned about the basic commands for working in Docker and how to create, stop, restart, and delete containers. Did not find an answer to your question? Look at here
|
 Block diagram of the PDS system.To obtain a separable cyclic code from a given CC G (x), you need
 Decisive feedback communication system All closed-loop systems
 Radio engineering signals