What is Joomla 3? What is Joomla and how does it work? Joomla components, modules, plugins and templates
Then do you need Joomla? Then, to create websites for every taste and color, because Joomla is a very popular website content management system. In fact, it is a powerful universal website builder, the capabilities of which are limited only by the author’s imagination. Why should an ordinary Internet user master such a wonderful tool? Here are five reasons why you should learn Joomla:
Reason 1. Joomla is simple.
Actively using Internet resources, every user sooner or later comes to the idea that it is very good to have your own website. Because it opens up a new, hitherto unknown and promising horizon of possibilities.
But how to make a website, even if the very concept of “Internet” was discovered by you only recently? Joomla is the answer to this question. It allows you to create a website of almost any complexity, even for an absolute layman in web technologies. It’s not for nothing that Joomla has been called “CMS for housewives” among professionals. By the way, CMS is an English abbreviation for the concept of “website content management system.” After all, to create a website you will only need to edit the text, almost like in the popular Word editor.
Reason 2. Joomla is free.
Joomla is developed and developed by a community of independent developers. Absolutely anyone can use it and it is completely free.
Moreover, if your curiosity and desire for programming suddenly awakens, the source code of the system is available to everyone, and you can easily make changes to it or simply disassemble the design of various modules to improve your skills.
Reason 3. Joomla is universal.
At its core, Joomla is actually a website builder. It consists of a main system to which you can connect any number (you shouldn’t get carried away, after all, the server’s performance is not infinite) from an extensive list of plugins and modules.
With the help of add-ons, a Joomla-based website can easily be turned into a store, blog, work gallery, information portal, and so on. Only the imagination of the site author limits the use of various modules and plugins and their connection with each other.
Moreover, despite the huge list of free and commercial add-ons, new ones appear almost every day that expand the list of Joomla capabilities.
Reason 4: Joomla is well supported.
Due to its popularity, Joomla is installed on tens of thousands of sites around the world. Hundreds of thousands of developers use it in their projects. Therefore, there are a large number of forums, blogs and information portals dedicated to the use of Joomla.
If you suddenly have a question about using Joomla, then simply by typing it into the search engine input field you will receive several dozen pages with links to various solutions. And even if you couldn’t find a suitable option among this variety, you can always use one of the forums and ask your question there. And soon someone will offer you a solution or point out where you can find the answer.
Reason 5. Joomla is easy to learn.
Professionals from the world of web technologies contemptuously call Joomla “CMS for housewives” precisely because you don’t need to spend several years at university to master it. On the Internet you can find a large variety of educational materials, including video courses, which are very easy to learn and contain a lot of practical examples.
How well do you know Joomla? Let's check! In this article, I have collected 10 features of this CMS that not everyone knows about. Read the article and then write in the comments how many of the points you knew, for example “6/10”. I am sure that not everyone will score 10/10. And the features are really interesting!
1) Hidden registration and login pagesJoomla
Joomla has pages through which a user can register or log in to the site. Exactly the pages. Do not confuse with authorization modules. The addresses of these pages are standard and do not change by default from installation to installation.
The main trick is that even if you don't show users a link to the registration page, an experienced person familiar with Joomla will be able to get to it. How? Very simple:
- php?option=com_users&view=registration- registration form
- php?option=com_users&view=login- authorization form
This feature of Joomla is often used by unscrupulous people to send strange types of spam. Spam comes through the registration form. Those. Through it, the robot registers supposed users, substituting spam text instead of the name:

This is a perversion. But it does happen. I speak from practice. To protect yourself from such “users,” either disable registration on the site or put a verification code (captcha) on it.
If everything is simple with registration, then with authorization it is more complicated. You can remove the login and password entry module from the site, but this will not get rid of the page with the authorization form described above. It is standard, which means that every user can open it and try to guess the administrator’s login and password. Usually no one changes the login. All that remains is to guess the password by brute force. If your site is not too valuable, then it is unlikely that anyone will fool themselves with it. But if the site contains valuable information, then attackers can work with it.
How to protect yourself from password guessing? There are several options. The easiest one is to override the page layout index.php?option=com_users&view=login into the Joomla template you are using and remove the login and password entry form from it. Another option is to use Wedal Recaptcha Login, which will show the captcha after several failed login attempts.
Don't forget about these standard pages in Joomla.
2) Immutability of files.htaccessrobots.txt,web.config.txt and the need to manually update them
Joomla has one interesting feature. When you update your site to a new version, for example, moving from Joomla 2.5 to Joomla 3, the files . htaccess, robots.txt, web.config.txt are not updated along with all the others, although there may be changes to them.
The trick is that these files may contain your personal settings, which may change depending on your environment. Simply put, the settings in the files are edited for different servers and site features. If Joomla rewrote them with every update, then many sites would simply crash with an error, not to mention other hidden problems. Therefore, these files are not updated. But they need to be updated, because... the updated files may contain important changes related to Joomla itself. You can update files by mapping. Those. open new and old, see what was added in the new one, add it to the old one. Like that.
Actually, after installing Joomla updates, messages appear with information about these files. But who reads these messages =)

3) Separate page inJoomla with unique layout/code
My favorite feature. I use it very often, and very often it helps a lot.
Many people know that Joomla has a so-called print layout. This is a file component.php, which is located at the root of the site template being used. The essence of this file is to show only the output of the component on the page, removing the template and modules from it (header, footer, columns, etc., leaving only the content).
To use this layout, you must add to the URL «? tmpl=component" or " & tmpl=component"if the question is already in the URL earlier.
If the standard page looked like this:

Then after adding this construction to the URL, it will be:

In general, the “tmpl=component” trick is quite well known. Nothing interesting here. But I moved on. Who said that we should use this feature strictly for its intended purpose? Watch your hands:
- Copying the file component.php at the root of the Joomla template.
- Let's change its name to, say, myscript.php, and place it there, at the root of the template.
- We write in the file myscript.php any code or layout of any page that we need on the site, but which does not fall under the Joomla standard, for example, we make or insert a ready-made calculator for something.
- We open any page of the site, adding a parameter with our layout to the URL, for example: mysite.ltd/?tmpl=myscript
- The page loads and the code is executed. At the same time in the file myscript.php all the features of the Joomla framework will work, all module positions and components will be available - in general, everything that is in the Joomla template.
It is very comfortable. In this file, you can also receive and parse URL parameters, not forgetting, of course, to filter them at the input. Using this approach, you can easily integrate a third-party script into Joomla, you can receive and parse any data for AJAX requests from the database, you can do almost anything you want. The main thing is not to forget about safety.
4) Own menu in the admin panel
Did you know that it is possible to create your own menu in the Joomla admin panel. It can contain any items other than those found in the standard menu. You can replace the standard menu with it and show only what is really necessary:

Are you weak? =)
This is done quite easily, although with its own subtleties. You can create an administrator menu in the same menu manager where you create all other menus, forgive the tautology. Next, we publish it in the module in the same way, but only in the admin module, in the position “ menu" As a result, we get our own menu.
5) Built-in redirect manager
You should know about this feature, but I’ll tell you anyway. If you need to set up a redirection (redirect) from one page to another, you don’t have to get into the code. Joomla has a pretty good tool that allows you to create redirects through the admin panel. It is called " Redirect Manager" and is available in the admin panel by default in " Components –> Redirection" It looks something like this:

The Joomla Redirect Manager performs several useful functions:
- Collects all requests to the site that returned a 404 error, and shows how many hits there were for each such request - so you can see which pages were requested by visitors, but were not loaded for some reason.
- Allows you to set up redirections both for the pages collected in step 1 and your own, unique redirections.
- Allows you to bulk import redirects to your site. Those. you can create them in Excel and then easily upload them to the manager.
This is a very useful and convenient Joomla feature. I use it often, especially when migrating sites from Joomla 1.5 to the latest version. Typically, in such migrations, the URLs of the site pages are changed, but thanks to the redirect manager, it is possible to retain site visitors.
6) Simultaneous authorization of the front-end admin.
Quite a new feature in Joomla. Allows you to simultaneously log in to both the site and the admin panel (and vice versa).
By default, Joomla has separate authorization. Those. authorization on the site separately, in the admin panel - separately. If you don’t like this and want to enter your username and password only once, then this is possible. Go to General settings –> “System” tab –> “General sessions” option. Activate this option. You will be able to log in and out only once for the entire site.

7) Setting password complexity requirements for users during registration
I bet you didn't know this was possible =). I didn’t know it before, but it exists!
You can go to General settingsJoomla, choose section "Users", go to tab "Password Options" and see the necessary settings:

Set the minimum password length and requirements for numbers, letters and capital letters in the password - just like on large popular sites.
8) Changing the path to the directory with images in the media manager
By default, all images in Joomla are stored in the folder images, located at the root of the site. This same folder opens in the media manager when you want to select or upload an image. Everything seems to be fine, but the world is not ideal.
It happens that this feature really gets in the way. When? Then, when the image you need is, for example, in the images folder of the site template, or the images are stored somewhere in a third-party component, the developers of which somehow did not realize to store them where needed. Happens? Happens. What to do in this case?
It's simple. Let's go to General settingsJoomla, open section "Media manager" and we see the settings in it. Here we are interested in two options:
- Path to the directory with files
- Path to the directory with images
We replace their values with " / »:

After this, we see all the directories in the media manager:

I want to remind you of the obvious: if you have users who can work with the editor and media manager, and whom you do not trust, do not do what is written in this paragraph! It is permissible to perform it only when only a trusted circle of people has access to the editor and media manager, and better yet, only you.
9) Collection of search statistics inJoomla
Typically the site uses a search form. Sometimes it’s very interesting to find out what people are looking for in it. Standard Joomla search gives you this opportunity. You can collect statistics of all requests in the search form on the site, and then analyze it. To do this, go to General settingsJoomla, chapter " Search" and activate the option " Collect search statistics" After this you need to go to " Components –> Search", where you will see the collected statistics:

10) Full page cachingJoomla + browser caching
I think many people already know about this feature, but there is something new in it.
Joomla has a caching system. You can see the caching settings in the general Joomla settings. This is good caching, but it does not cache the entire page. This is logical, since the page usually contains dynamic elements that cannot be cached. For example, the same comments. If they are completely cached, they will be updated with a long delay.
OK. But what if you have a business card website of five pages, and without any additional functionality? The main thing for you is download speed. There is a plugin for such situations in Joomla System - Cache. You can find it in Joomla Plugin Manager. It allows you to cache the entire page. It is disabled by default. If you enable it, all pages on the site will be cached in full. What does it mean? This means that your site will provide users with ready-made HTML pages without wasting time on re-generating them. This can significantly speed up page loading, especially if you are using slow hosting. Another advantage will be a reduction in the load on hosting - because you don’t need to generate anything.
On most hosting sites, Joomla is installed automatically. You only need to pay for the tariff (there are even offers optimized for the engine), connect a domain and select a CMS from the catalog of applications available for installation. The system interface is completely Russified, support forums and training materials are also presented in Russian, so there will be no difficulties in mastering the administrative panel.
Main features of the engine:
- Technical optimization for search engine requirements.
- Create an unlimited number of pages.
- Pre-installed registration system with 9 user groups with different access rights.
- Visual editor for minor design changes and quickly adding new materials without logging into the admin panel
- A content manager that helps monitor how site visitors react to posted materials.
The engine is equipped with several features that distinguish it from other free CMSs: accelerated page loading, a debugging mode, and the ability to communicate with users in private conversations organized through a common mail system. All this is basic functionality, which is significantly expanded by installing plugins.

Modules that add new features are available for download from the official Joomla catalog or from third-party resources. You can also create them yourself - this is the advantage of the open source code of the system. The CMS configuration depends on which plugins you add. It’s unlikely that you can do without them completely, because extensions perform a number of very important tasks:
- protect against unauthorized access and spam;
- allow you to create backup copies;
- help optimize the site to meet the requirements of search engines;
- improve website usability by adding useful widgets and applications;
Each plugin has a set of settings that determine its functionality. This makes Joomla a very flexible system that can be used to create a wide variety of websites. If the capabilities offered by ready-made solutions are not enough to implement the project, you can customize the system at a deeper level. Joomla is a PHP and JavaScript script. These are common programming languages, so there are no problems finding specialists or training materials for self-training.
The engine has a high level of security against hacking and unauthorized access. Developers regularly release updates, including new security tools. However, extensions remain the weak point of the system. It is impossible to control the quality of plugins downloaded from unknown sources. Therefore, it is recommended to use only add-ons from the official catalog and make sure that the developer does not stop supporting them.
Design
The appearance of the site depends on which template you took and how you changed it. There are several design options:
- Downloading free templates for Joomla.
- Purchasing premium themes.
- Independent creation of a layout.
- Order the development of an individual solution.
The choice of method depends on what skills and budget you have. In most cases, the first option is enough for the first website - free templates for Joomla. Fortunately, there are many offers, especially if you search on foreign sites. The only difficulty is that such themes may not support the Russian language, but this can be corrected by editing the files.

Joomla's admin panel does not have a built-in template library. Therefore, the theme you like must first be downloaded to your computer, and then uploaded to the server through “Installing extensions”. After adding the file, the new theme will appear in the “Template Manager” section, where you need to assign it the “Default” status.
Customizing the appearance of a website is done in two ways:
- Using preset template settings. Their functionality depends on the theme itself. Free templates usually offer minimal options like changing the background, logo, colors and font. On premium themes there may be significantly more options for customizing the design.
- Editing template files written using HTML, CSS and JS.
Template files are stored in the Templates folder. It is recommended to download them to your computer, create a backup copy and only then edit them. If you make minor changes, you can get by with the built-in editor, but for deep customization it is more convenient to work with files downloaded to your hard drive.

If you are creating your first website, you can do without working with code. Just select a more or less suitable theme and use its standard settings to customize the design. Most useful actions, such as creating a site menu, are performed using visual editing tools. If you have a budget, you can shift some of the responsibilities for setting up the appearance of the site to specialists - finding an offer of such services for Joomla is not a problem.
Search Engine Optimization (SEO)
You can carry out minimal optimization immediately after installing the engine. This is done through the “Site” tab in the section with general system settings.
- Enter the name of the site - it will be displayed in search results and on a tab in the browser.
- Write down a description and key phrases by which search robots will identify the site.
- Enable CNC generation and forwarding.
- After filling the site with content, make it public so that other users can see the pages.
- Allow indexing so that pages appear in search results.
These are standard SEO optimization features that Joomla offers. This setting will be enough to ensure that search engines do not ignore the site and it gets at least some position in the search results. If you are creating a project in a competitive environment and want to get to high positions, then you need to work on further optimization and promotion.
To add additional SEO tools you need a plugin. Joomla has free and paid extensions. The choice depends on what functionality is required. You can start with one of the free plugins - EFSEO or SEOBoss. After installing them on Joomla, you will be able to add and edit meta tags on each page or post.
If the capabilities of free plugins are not enough for promotion, you can switch to the licensed version of the iSEO extension. It costs $147 and offers maximum optimization tools.
Rates
Joomla is a free system. The engine distribution can be downloaded from the developer’s website or automatically deployed through the hosting administrative panel. There is also no need to pay for templates and plugins - there are usually free alternatives that do the job well. This is possible, in part, thanks to the user community that has formed around the system. At some point, you may want to purchase a paid solution because it will solve an important problem, but in any case, it will be your choice and not an obligation to invest money.
Mandatory expenses include domain and hosting costs. The size of the budget depends on what kind of website you are creating and in which domain zone you are going to place it. For example, to launch a blog or a small store in zone.ru or.рф you will need about 200 rubles per month for hosting and 100-200 rubles per year as payment for the domain. In total, maintenance will cost approximately 2,500 rubles per year.
The larger and more functional the site, the more expensive hosting you will have to buy. Large projects may require hosting on VPS and dedicated servers due to the lack of resources on shared hosting. But if you are making your first website, then the budget will most likely increase gradually. The situation is similar with the cost of a domain: you can limit yourself to a simple address in zone.ru or buy a whole pool of domain names in different zones - the choice is up to you.
Advantages and disadvantages
The main advantage of Joomla is its flexibility, which is achieved due to the open source code and a large number of plugins to expand the basic functionality. The free distribution of the engine has made it so popular among webmasters and helped to form a user community, which, among other things, creates additional materials: templates, plugins, instructions. Among other advantages we note:
- Easy installation. On most hosting sites, Joomla is deployed automatically. Some hosters even offer special tariffs optimized for working with this CMS.
- A convenient admin panel that doesn’t take much time to master.
- Localization of the system and popular plugins into Russian.
- Regular updates of the system and its components.
One of the disadvantages of Joomla is the high percentage of hacked sites. True, this is primarily due to the popularity of the system. The engine is often used by novice webmasters who do not immediately understand security settings. On commercial systems there are fewer threats due to the closed core, but for those who like unauthorized access, Joomla is an open book. In addition, vulnerabilities are often hidden in extensions, so their selection must be approached with great care.
Problems may also arise when updating the system. The main difficulty is the incompatibility of engine and plugin versions. This is especially true for free add-ons, whose developers do not always manage to release updates on time or completely stop supporting the product. Because of this, malfunctions occur. Therefore, before updating the engine, it is recommended to make a backup copy and disable all plugins, and then enable them one by one, checking their functionality.
Many professional developers are also dissatisfied with Joomla, who believe that there are flaws in the CMS structure that complicate its customization, and excessive code in the templates and the engine itself lead to slow loading of pages. However, if these shortcomings affect the popularity of Joomla, it is minimal - the system continues to be used to implement a variety of ideas.
Hello, dear readers of the blog site. This article is dedicated to those new to website building. When you yourself have long passed this stage (which occurs in the development of absolutely any webmaster), then it seems that everything is already clear.
Indeed, after immersing yourself in the topic, everything turns out to be much simpler than it seemed on the surface. But for this you need to dive in, and it’s best to do this with someone’s help (at least in the form of instructions for beginners).
We will talk about working with the wonderful Joomla 3 engine, which in its current incarnation is a pretty solid product that meets modern layout standards (supported, for example), security and functionality (using extensions on this engine you can, catalogs, blogs, photo galleries and much more).
Today we will touch on the key points for understanding the essence of working with this CMS, wander through the admin panel, look at the structure of posting materials in Joomla 3, and even work with tools for creating a hierarchy of categories. In general, let's get acquainted with the engine, learn not to be afraid of it, and try to understand the logic of fruitful work with it.
How are a Joomla site and the admin panel of this CMS connected?
We create a public version of the site on Joomla (or any other engine) from scratch - we install a template, fill it with materials, add modules with menus and other necessary tools. This version of the site will be the way you want to make it yourself. At first, immediately after installing the engine (if you didn’t install demo data), it will be something completely unsightly (the name of the site, a couple of menu items - an empty shelf for your thoughts splashed out on the Internet).Despite the fact that the main part of your site is definitely that part of your site that will be accessible to everyone, you will spend almost one hundred percent of your time allotted to working with your Internet project in the admin panel.
Logging into the Joomla admin panel and security issues
How to get into the Joomla 3 admin panel? Quite simple. It is enough to add “administrator” to the URL of the main page of your site using a slash. If my blog were running this engine (in fact, I have WordPress), then to access the administrative panel it would be enough to type in the address bar:
Https://site/administrator/
If you connect to your site via FTP (or go to the local server folder), then in the root (this is the place where you go immediately after connecting) you will actually find the “administrator” folder, and inside it the file index.php, which launches admin. Everything is fair.

Php"? This is possible, but it is not at all necessary. The fact is that a web server (a program running on a real or local hosting) when accessing a folder will try to find an index file in it (with a php or html extension) in order to open it. By the way, there is an unpleasant moment associated with this (read the link to see how this can and should be dealt with).
Actually, when you enter the URL of the main page of your site into the address bar of your browser, you also access a real file. And it is again called index.php, but it lives in the very root of the site (at the same level as the administrator folder). This is exactly what it is a classic example of the appearance of mirrors(for example, two URLs https://site and https://site/index.php will open the same page - why this is bad, read the link given in the previous paragraph).

Naturally, anyone will not be allowed into the admin area. The defense lies in the request enter login and password, which you specified when installing this engine (on local or real hosting). We must not forget that sites on the Internet are very often broken (for example, in order to use it as a doorway). Moreover, it is not done purposefully, but “on the fly.” Therefore, the not-so-great importance of your resource will not protect it from encroachment. and a non-trivial login can serve you well.

For the forest site safety You can use various plugins that allow, for example, to hide your admin area. That is, when you go to the address “http://yourdomen.ru/administrator/” you will not be prompted to enter a password. To log into the admin area, you will need to use the path that the plugin will indicate to you. In this case, I described the work of the jsecure plugin, but there are many other options, for example, creating another pair of login and password that will need to be entered after the official login from Joomla. But that's not the point.
The reverse side of a Joomla-based site (through the looking glass)
So, we found ourselves in the holy of holies of Jumla - the admin panel. Only you and those to whom you have granted this privilege have access here (you can assign different access levels, at which different sets of admin features will be available). If you have worked with before, then you will not have any special questions, because the “three” and “two and a half” have a common essence and have not changed since then. Added convenience, beauty and safety. The difference lies in the nuances that I will not fail to mention.
How does the Joomla 3 admin panel work?
If you have never dealt with Joomla at all, you will have to work a little harder to understand the essence of its structure. In general, this is not difficult, but for a person who has never dealt with a CMS, the logic of its operation may not be obvious. I judge, of course, by myself, but you may turn out to be much more savvy. Nevertheless I will continue assuming that you are a beginner. For the rest, please forgive me for the unnecessary details. Thank you.

The main admin page of Joomla 3 is similar to what we saw in version 2.5 and even 1.5 (it is no longer officially supported, which may affect security). Actually, you can read about leapfrog at the link. In short, until 3.5 comes out, 2.5 will be considered the most stable. All versions of 3.x are preliminary and not all extensions can be installed on them (for example, your loved one on the RuNet is not yet friends with three rubles, but he is).
At the top of the admin panel there is a permanent drop-down menu that contains everything you might need. As new extensions are installed, this menu will grow and expand in capabilities. The principles for classifying extensions have not changed since Joomla 1.5 and therefore I can advise you to read the article that explains how to install them.
In the central part of the main page of the admin panel there is currently no particularly significant information, but as the site develops you will be able to track quite interesting information here. Left menu replaced the toolbar, which was in one and a half and two and a half. There are “quick links”, which essentially duplicate some items in the top menu, but allow you to get to the desired settings a little faster.
If you are not on the main page of the admin panel, but go to one of the items in the top menu, then the left menu will display related items. "Quick links", which again speeds up the process of working on a site in Joomla 3. For example, when you go to the tab for creating a new user, a menu will be displayed on the left with all the “quick links” you need in this difficult task:

That's all, now it's time to climb inside and immerse yourself in the wonderful world of creativity (website creation).
But no. The screenshot also shows a remarkable change that I personally missed in version 1.5 - Joomla automatic update option to the latest current version by simply clicking a button in the admin panel. Previously, you had to do this, but now you can even do it directly from the admin panel (with some minor nuances). Beauty. So I’ll just update to the new version 3.3.3.

In just a couple of minutes, the update files will be downloaded, unpacked and installed (you will be informed about this in real time). Much more convenient than doing it manually.
What's interesting in the Joomla 3 admin panel? What to grab first? What is important and what is secondary? Why is there so much stuff and what to do with it all? How to finally create a page, menu, add an image or video? Well, it’s not at all clear, looking at this whole mess of menu items in the admin panel. At least this was my personal impression from the first “combat” with the Joomla administrative panel.
Let's start with orientation in the sense of understanding how to return to the starting point, namely to the main admin page, if you are deeply buried in the settings of something (although I mentioned that you can get anywhere from the top menu, which remains unchanged for all admin pages). To do this, use the Joomla logo located in the upper left corner, as well as the top menu item “System” - “Control Panel”.
The second issue to be addressed is usually - how to go to the site from the admin panel to see the results of what you did there. This is again very simple to do - just click on the name of your site located in the upper right corner. This button is also duplicated in the lower left corner of the admin panel - "Site View".

Initially, however, your site will be a pitiful sight, but after filling it out and structuring everything will become “blue and green” (in the sense of beautiful) and your soul will “sing and rejoice.” But to achieve this you will have to work hard.
What can you immediately change in the general settings of Joomla 3?
It makes sense to change some general Joomla settings immediately before starting work. Let's try to do this. You can get to them from the top menu: “System” - “General settings”. Right at this point it becomes very scary, because there are so many of them here (and this is only on one of the five possible tabs - “Site”, and I don’t even want to imagine what will be on the others):

But again, there is no need to be afraid, because I will try to guide you through these jungles in the simplest and most effective way. Together we are strong (don’t forget to subscribe to the newsletter so that the next article from this section does not pass you by).
So, firstly, here you can change the name of the site, which you came up with when installing the engine (you could have rushed or simply written something “out of the blue”, just to get behind). Here you can change the settings field of the same name (using it you can format the texts of added articles). True, you will first have to install the new editor plugin, and only then go to the general settings and select “Default editor” from the drop-down list. In general, the built-in TinyMCE has great functionality, but it will need to be configured (I think we’ll talk about this separately).
But we’ll wait a bit with these settings, but for now we’ll make the admin panel easier to use. It’s better to go to the “System” tab (from the top menu of General settings) and look in the “Session Settings” area at the number in the line "Session lifetime". By default it is set to 15 (meaning minutes):

At first, this infection frayed all my nerves, because as soon as I stopped being active in the admin panel for more than 15 minutes (distracted by mail, went to drink tea, etc.), I was immediately thrown out of the admin panel and had to log in again and look for a place my last stay in the depths of the admin panel. The thread of the actions being carried out was broken, and given the fact that at that time I was already behaving like a “blind kitten” (I couldn’t always remember how I got to this settings page), this circumstance did not bring anything positive to the work.
It is clear that this is done for safety reasons, but 15 minutes (especially for a beginner) is not enough. Therefore, I advise you at the stage of development and getting acquainted with Joomla to increase this number ten times (and do not forget to click on the “Save” button located at the top), at least for the time while you are actively working on creating the site (then you can set a smaller number ). .
Categories and materials - what they are and how to use them
Further. In Joomla, everything is built around such a concept as materials (content). Actually, any website is, first of all, content, simply wrapped in different candy wrappers (templates). Without materials, the site will be of no interest to anyone (except you, of course). Users who accidentally end up on it will simply have nothing to do there, which will provoke their rapid departure and deterioration.
Articles in Joomla are added on the “Materials” tab - "Material Manager". But don’t rush to go there, because you will need to prepare first. What I mean? If we speak in the language of the average person, then we need to prepare folders where we will store these same articles. And not only to store. Joomla has great tools for displaying all the contents of these folders (in the form of a list or in the form of small announcements) to users who visit your site. This is very convenient and we will talk about it in detail.

To create these same folders, we need to select the “Materials” tab - "Category Manager". Previously, in Joomla 1.5 it was possible to create folders of only two levels of nesting - healthy folders called Sections, which could contain smaller folders - Categories.
This was not enough for many users and in subsequent versions of this engine they abandoned sections, but now you can nest some categories (folders) inside others to any depth (level). Let's say that you put category B into category A, and then category C into it - you ended up with three levels of nesting. Plague (although until you are faced with the need to use such a structure in practice, you will not be able to fully appreciate the importance of this innovation).
So, go to “Materials” - “Category Manager” - “Create” and open an account for categories on your site. In fact, by doing this you determine the structure of your future website— group future materials that will be posted on it. This structure can then be used in the menu on the site to make it easier for your visitors to navigate it.
What categories can there be? It all depends on the theme of your site. But it is better to think carefully about this issue in order to make provisions for the future and not to redesign an already well-functioning site, because in some cases this can cause some negative consequences (with the right approach, only temporary).
For example, for a tourism website, you can create top-level categories with the names of regions of the world, and nested categories with the names of specific countries. You can also create a third level of nesting - regions or cities already within these countries themselves.
Creating categories and subcategories in Joomla
An abundance of possible settings when creating a category in Joomla 3 somewhat discouraging, but you need to understand that in most cases you will only need to enter its name (this is the only required field in this form) and select the level of its nesting in the “Parent” field (select one of the already existing categories from the list, inside which will be invested in the one that you are now trying to create), if this is required according to the plan you previously developed (in our case, there is nothing to invest in yet, because this category will be the first).

Field "Alias"(alias) has not changed its purpose since Joomla 1.5 and allows you to adjust the URL of the menu item that will link to this category (you can use the symbols ,,,[_],[-]).. If this field is not filled in , then the system itself categories and uses this in the URL address (it will turn out something like this - “https://site/novsti”).
The “Description” field does not need to be filled in, but if you do this, then when displaying a list or announcements available in this category of articles (by creating a corresponding menu item on the site - we’ll talk about this in more detail), the description you made will be displayed at the very beginning (you can also use pictures for its design).
Save changes made Now you can use as many as three buttons (in Joomla 1.5 there were only two options):
- Save - you will save the changes made and remain on the same page
- Save and close - the changes will be saved and you will be transferred to a higher level (in our case to the Category Manager)
- Save and create - after saving, the window for creating a new category will open. Convenient when creating the entire category structure on your site.
Naturally, when creating child categories (subcategories), you will also need to select a parent category (in our example, “News”), within which it will subsequently live.

If you look closely at the drop-down list, you will notice a category with the name "Uncategorized". You didn't create it - so where did it come from? Everything is very simple. This virtual category was created by Joomla 3 itself and will store articles that you do not dare to assign to any category. This could be, for example, a page with contacts, directions, and the like. They will all live in Uncategorised.
In the category manager, child and parent elements are easy to track thanks to their visual display with an em dash in front of the name and offset to the right relative to the parent (category names of even higher nesting levels will be displayed with an even longer dash):

There you will also find Uncategorised. If you want to edit something in the already created ones, just click on their name. To remove unnecessary categories, just check the box (to the left of their name) and click on the “Add to Cart” button located at the top. But as get into this very basket? For example, to permanently delete everything from there or restore something accidentally deleted.
To do this, you will need to click on the “Search Tools” button located just above the list of categories, and in the panel that appears just below, find the “In Cart” option in the “Select Status” drop-down list. A table will open with a list of the cart contents. To permanently delete a category, check the box next to it and use the “Empty Trash” button located at the top.

If you want to restore something from a previously deleted item, click on the trash can icon located to the left of the name (Publish).
If you want to shelve something without deleting it, just click on the checkbox on the left to remove this category from publication(it will not be displayed on the site). You can view the list of unpublished items in the same way as we just viewed the list of items in the cart.
Actually, according to the proposed scheme create a category structure for the entire future site. If you haven’t had time to think through everything yet, then you create something that you’ve already decided exactly how it will look. Next, we will look at creating new materials, menu items, setting up templates, installing the necessary extensions and much, much more. I hope it will be interesting.
It’s better to see once than to hear a hundred times - isn’t it? It seems so to me too, so I suggest you take a look 15 lessons on how to quickly start using Joomla 3. They will be played one after another automatically, and if you want, you can switch to the next lesson using the corresponding button on the player panel or select the desired lesson from the drop-down menu in the upper left corner of the player window:

Enjoy watching!
Good luck to you! See you soon on the pages of the blog site
You might be interested
 The Joomla site began to produce a bunch of errors like - Strict Standards: Non-static method JLoader::import () should not be called statically in
  Creating a map for a Joomla site using the Xmap component
  Modules in Joomla - viewing position, setting and output, as well as assigning class suffixes
  Updating Joomla to the latest version
  Contacts for the site and feedback form using the built-in Joomla component
  Extensions for Joomla - what they are and where to download components, modules and plugins for Joomla, how to install and remove them
  K2 component for creating blogs, catalogs and portals on Joomla - features, installation and Russification
  What is Joomla
  CMS Joomla - principles of operation of a free content management system, page creation and caching
As part of an online interview for the vacancy “Technical Support Specialist,” I was offered to take a test task, the purpose of which was to write instructions on how to install the environment for joomla and how to deploy the joomla system itself on a local computer. Also in the instructions it was necessary to describe the process of installing a ready-made joomla template on the site.
While completing the assignment, I decided that it would be a good idea to publish this material for public viewing in case it might be useful to someone. The material turned out to be quite weighty, so for convenience I implemented a small navigation menu that will allow you to quickly find the information you need.
How to download Denwer
To install joomla on your local computer you will need a virtual server. Most often, for these purposes they use a software shell called “Denwer”, which must be downloaded from the Internet, preferably from the official website denwer.ru.
After going to the site, you will see a large orange button with the inscription: “Download Denver 3”, and after clicking on it, you will be asked to download the program for the newer version of PHP 5.3 or for the older version of PHP 5.2 which includes more different modules and special utility Zend Optimizer.

Let's focus on PHP 5.3. After selecting the version, click the “Download” button.

At the next stage, you will have to indicate your first name, last name and a valid email address, to which a personal link to download the Denwer program will be sent. After filling out all the fields, click “Get download link” and if everything is filled out correctly, a message will appear in front of you:
Check your email
A link to download Denver has been sent to your E-mail "*****@gmail.com".
The letter usually arrives within a few minutes.
If you still don't receive the email, check your Spam folder just in case.
Go to your mailbox and you will find a new letter with the subject “ Denwer download link for package Base", which will contain a link to download the program. Follow this link and save the program on your local computer.
By the way, you can install Joomla not only on Denwer but also, for example, on OpenServer.
Denwer installation
After downloading the program, in the downloads folder you will have an EXE file “Denwer3_Base”, which now needs to be installed.
We launch the installer and wait until it extracts the necessary files. Immediately after this, the “Denver Installation” window will appear in your browser, which must be closed.
When the browser is closed, a message with the text “To continue, press Enter” will appear in the command line window on a black background - press Enter on the keyboard.

In the next step, you will have to specify the full address for the folder in which you want to install the Denver program. By default, this folder is called “WebServers” and is located on the “C” drive - we won’t change anything and just press “Enter”.

In order to confirm this action, you must press the “Y” key (from English - Yes) on the keyboard and press Enter again.
Now the installer will create a virtual disk, which is necessary for the program to fully operate. To continue, press Enter.
At this stage, you have to select the letter of the future virtual disk; by default it is the letter Z, but if desired, it can be replaced with any free letter in the system. We don’t change anything and press Enter again.

Now, all that remains is to copy all the files and settings to the C:/WebServers directory we created. To continue, press Enter.

We are waiting for the file transfer to complete.
The Denwer program can be launched in two modes:
- The virtual disk is created automatically when Windows boots.
- When Windows boots, a virtual disk is not created, but shortcuts for manual start and stop will appear on the desktop.

Enter the number 1 and press “Enter” on the keyboard, after which we confirm the creation of shortcuts to launch the program on the desktop - enter “Y” and press Enter again.
If you did everything correctly, a browser window with the title “ Denver installed successfully"And here you can familiarize yourself with the initial steps for using the program.
If suddenly something goes wrong, you can read the official instructions for installing the program on the developers’ website, which is located at the following address - denwer.ru/base.html
First of all, to install the Joomla management system on your local computer, you need to download it from the Internet. Preferably from the official website joomla.org.After going to the site, in the upper right part you need to click on the orange “Download” button. On the next page - the download page, you need to click on the blue button “Download Joomla! 3.6.2 English (UK), 3.6.2 Full Package.”

When the download is complete, an archive will appear on your computer in the downloads folder “ Joomla_3.6.2-Stable-Full_Package", which must be unpacked into the local web server directory.

But before you do this, you need to create a folder with the name of your future site. To do this, go to the following address C:\WebServers\home\localhost\www\ on your computer and create a folder inside with a name, for example, “ mysite.ru».

Now everything that will be inside this folder will be your site. Perhaps it's time to unpack Joomla there.
Right-click on the previously downloaded archive and select “Extract files” from the list that appears.

In the next window, you need to select the location of the newly created folder with your future site.

Selected - click “OK” and wait for the files to be unpacked.
Joomla setup
After extracting the necessary files, your the new website is almost ready to go. Now all that remains is to configure the connection to MySQL, unpack the site and select the appropriate template for it.First of all, open your website page http://localhost/mysite.ru in the browser and complete the site configuration by filling out all the required fields. Choose a language, come up with a name and a short description for your site.

Enter your current e-mail as the administrator's e-mail address, create a username and password. Be sure to write this information down somewhere and click “Next” at the bottom of the page.
The next stage is MySQL configuration Database.
In order to create a database for Joomla in the browser you need to open the page http://localhost/tools/phpmyadmin/ and go to the appropriate category called “ Database».

- On the next page we indicate the name for the new database - joomla.
- And choose the site encoding - it is most often used utf8_general_ci.

Click “Create”. If everything is in order, you will see the message “The joomla database has been created.”

Next, go to the “Users” tab and click on the link “ Add user».

In the window that appears, you need to fill in the information for the new account. Create a username, password and select localhost. If desired, you can generate a password. Be sure to write down all this information somewhere.
- Username: joomla
- Host: Local (localhost)
- Password: *********

Filled it out. Now let’s go a little lower, find the “Global Privileges” block and select “Mark all” to set the maximum set of privileges for our user.

Filled out everything, noted it - click “Add user” and if everything is done without errors, you will immediately see a pop-up message “A new user has been added.”
Now we return to the database configuration page of our site and indicate the previously missing data - username, password and database name, and leave the table prefix unchanged.
If you are creating your first website and you do not have additional databases, you can safely select “Delete” in the “Actions with existing tables” field.
If this is your first time encountering Joomla, in the “Installing demo data” block, I recommend that you check the box next to the tool you are interested in (depending on what you are creating - a business card website, blog or something else) in order to receive additional tips that will be available to you while working and studying this control system.
Just in case, check your site configuration again, pay attention to the result of the initial check, recommended settings and, if everything is in order, it’s time to activate our site. To do this, click on the “Install” button.


After a few seconds, the message “” will appear in front of you
Before you start working with the site and the admin panel, be sure to delete all installation files, including the “INSTALLATION” folder. To do this, simply click on the orange “” button and wait for a message that this directory has been successfully deleted.

Ready! Your website is installed, configured and ready to go. Now you can open the site itself for viewing and enter the control panel to edit and add new materials.
You can open the site and control panel using the corresponding buttons.
![]()
How to install Russian language for Joomla
By default, the control panel is in English, but changing it is not at all difficult. To do this, go to the “Extensions” tab and select “Language”.
At the top left of the page, find and click the “Install Languages” button.
Enter “ru” in the search bar and click on the search icon. In the search results, select the desired option by checking the corresponding checkbox, opposite - Russian.

Now click on the “Install” button, which is located at the top of the page.
Now that the language pack is downloaded, all that remains is to change it. Again, open the “Extensions” menu, point to “Language” and select installed languages from the list – the “Installed” item.
Just below, in the drop-down list, select the “Administrator” item, select the Russian language and click on the “Switch Language” button, which translates as “Change language”.

If everything is correct, immediately after reloading the page you will see the message: “The language of the administration panel has been switched to “Russian”” and all elements of the control panel will already be in Russian.
How to install a template for joomla
Great, we have done a lot of work and now that our site is seemingly completely ready, it would probably be nice to change its appearance, and for this we will need to download the template we like best for Joomla from the Internet.Today there are a huge number of different templates on different topics. These can be adaptive templates, templates for gaming sites, templates for business sites, online stores, and so on. Most templates are distributed free of charge, but there are also some that cannot be downloaded for free.
And so, you can download a template for joomla from different sources, for example, here are some of them:
- joomla24.com
- joomla3x.ru
- joomla-site.ru
It is also worth noting that there are universal versions of templates that look like “Joomla 3x Templates”, where 3X means that this template is suitable for all versions of Joomla 3.
Let's say you found and downloaded a template you like - what next?
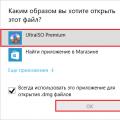 How to open a DMG file on Windows, Ubuntu and Mac OS X
 VK-Downloader - a program for downloading audio and video on VKontakte
 Computer shortcut to windows 10 desktop