Open iis. Installing and Configuring IIS
Good afternoon, dear readers and guests of the blog, today we will continue to study Windows-based web services, namely, let’s see how setting up SSL on IIS for one or several sites, both with one IP address and with several. To complete this task, you must have an iis web server installed on Windows Server from 2008 R2 and higher, currently the latest is Windows Server 2016.
Setting up an https site on IIS
And so about creating an iis website on windows server 2012, I already told you, it is assumed that you have it. Next, when you registered all the DNS records, you generated a request to issue a certificate and only then received your certificate from the certification authority, but it still had to be customized for iis, since it needs the pfx format.
A little more theory and limitations
If you have one site on https on your iis server, then there will be no problems with the certificate, but if you plan two sites, then there are already options:
- Buy a wildcard certificate to be able to add SSL to any IIS site
- Buy an additional IP for each site
- Use the script and apply the required SSL binding to the desired site on one IP address
- Use SNI (Server Name Indication) technology
Installing SSL in PFX
First of all, to create websites using the https protocol, you need to import the required certificate; this is done very simply. You open IIS Manager and go to "Server Certificates"


Through the review, indicate your pfx archive.

Specify the password, in the “Select certificate store” line, specify either “Personal” is suitable for regular hosting, but the “Web services hosting” item is needed for SNI technology.

In fact, this is a complex installation of SSL in iis, how do you like it.

Now we will bind the SSL certificate to the desired site. First, I'll check my site on the http protocol, as you can see everything works fine.

Now right-click on the desired site and select “Change bindings”, this is where we will configure https in iis.

As you can see, your site will work using the http protocol by default, click the add button.

We indicate for the site:
- The https type and port number, by default, is port 443, make sure it is open in your firewall.
- In the node name, write the full name of the site.
- SSL certificate > select the one you need and save the settings.

We check your site using the HTTPS protocol, if everything is fine, then you will see a closed padlock, this means that the ssl certificate is installed correctly in IIS.

Setting up multiple HTTPS sites on different IPs
Let's assume you have two sites:
- api.pyatilistnik2010.ru
- new.pyatilistnik2010.ru
You need each of them to have its own IP linked to the DNS name and also a separate certificate, everything is simple. You also raise individual sites, with the only difference being that in the IP address field, you indicate the required one and in the field the host name, the address of your resource, and the actual certificate you need.

We save and check, everything should work on any version of the IIS server from 7.5 to 9.

Setting up multiple HTTPS sites on one IP
Now let’s imagine the situation that you have one external IP address, what should we do? Let’s try to hang everything on it. As a result, one of your sites will receive a 404 error. If you don’t know what this is, then here you go.

The whole problem is that in IIS, according to this scenario, only a domain certificate in the wildcard *.site format can work in the web interface. The asterisk means that you can use SSL on any third-level domain. But don't dare give up, there are two options:
- The use of SNI (Server Name Indication) technology in IIS is suitable for everything older than version 7.5, so Windows Server 2008 R2 and lower are in the air.
- Use a script from Microsoft.
Here is an example of such a certificate.

If you have a wildcard, then everything is simple, either you change everything through the IIS manager, or through the configuration file.
C:\Windows\System32\inetsrv\config\applicationHost.config

Open it, IIS settings are stored here. And you can set binding to different domain names:
Now the method, if you do not have a wildcard and only one external ip on the server, is suitable for IIS 7.5 and higher. The first thing we need to do is find out the ID of your site, this can be done simply, or through the IIS Manager console

Or everything is in the same applicationHost.config file

%SYSTEMDRIVE%\Inetpub\AdminScripts

If you, for example, on IIS 8 and older do not have this file in this folder, then you need to deliver IIS Management Scripts and tools
).
1. First create a directory TestSite to keep the site in the directory c:\inetpub on server. This can also be done from the base OS: using Explorer, open the \\win_web_srv\c$ directory and create a folder or in the command line on the server using the command mkdir.
2. In the catalog test site create a file index.html following contents
Test site for experiments
3. On file host in the base OS we will register the correspondence between the IP address of our web server and the name of the new TestSite site.
4. Launch Internet Information Services Manager in the base OS.
5. Connect to our remote web server.
6. On the right panel "Connections" select a node "sites", on the left panel "Actions" choose "Add website"
7. In the window that opens, we define the main parameters of the site:
site name – TestSite(you can specify an arbitrary one, it will only be used to identify the site within the web server)
content directory, physical path – c:\inetpub\testsite
We will bind using the host header.
node name – TestSite(this is the name by which visitors will access the site)
8. Thus, we created a new site and linked it by host header (host name).
9. Check if the site is working. In your browser, in the URL bar, write http://testsite/ You should see the page index.html created site.
10. Configure "Default Document"
11. On the connection panel in the node sites choose our site TestSite and in the central part of the main window select the item "Default Document"
12. There may be several default documents; the administrator can organize the list of these documents, thereby determining the sequence in which they are searched in the catalog. If the default document is not found, it is taken into account by setting the parameter Directory Browsing
13. Please note that the settings for our site have been inherited from a higher level. Because we only have a page index.html and nothing else is expected yet, then we will edit these settings. Use the options available in the Actions panel on the right:
· remove all file names from the list except index.html
· add a new name default.html
· move the index.html file to the very top
14. The result should be something like this:
15. After the changes, look in the main directory of our site c:\inetpub\TestSite file appeared web.config, which contains site-specific configuration changes only related to settings Default document
16. Let's create a virtual directory.
17. In the catalog c:\inetpub\testsite create a subdirectory on the server vd.
18. In IIS Manager, right-click on the name of our site and select Update
19. Please note that a folder has appeared in the site structure, but it is more of a real folder and not a virtual one. it is located in the physical directory structure of our site.
20. In your browser, write http://testsite/vd in the URL bar, you will receive the following error message
21. This reaction of the web server is explained by the fact that in the directory vd there are no files specified in the settings Default document, and the setting Directory Browsing inherited from the site has the parameter value Enabled=False, i.e. directory browsing is prohibited.
22. Allow directory browsing for the vd folder
23. Select a folder in the site structure VD, and on the page Opportunities in the IIS group select the item Browse the catalog.Thus, we will be able not only to configure the parameters for displaying the contents of the directory, but first of all, enable this feature for the VD folder.
24. Click on the left side of the panel Actions paragraph Turn on. In the central part of the window, the corresponding options for displaying the contents of the catalog will become available for change.
25. Refresh the page in the browser
26. Please note that a file was created automatically in the VD directory web.config, which defines the directory browsing permissions
27. Trying to create a “real” one Virtual directory outside of our site's directory structure. For example, at the root of the disk WITH let's create a directory VD_TestSite. Accordingly, unlike the VD folder, this folder was not automatically included in the structure of our site.
28. In IIS Services Manager, right-click on the node of our site (TestSite) and select "Add virtual directory"
29. All that remains is to determine the parameters of the virtual directory and indicate its physical location
30. In the window "Adding a virtual directory" We define the parameters of the virtual directory: alias and physical location. Please note that the alias does not correspond to the folder name. In the browser line in the URL you will need to use the specified alias.
31. Pay attention to the difference between the icons of the two folders in the site structure
32. To catalog c:\VD_TestSite create a primitive html page with the name index.html
33. In your browser, in the URL bar, type http://testsite/vd1. Make sure that the created page is displayed. In general, a virtual directory can refer to a directory located even on another physical machine, in which case the path is specified by a UNC path.
34. Let's try to experiment a lot with different methods of linking a site.
35. We are trying to bind the site to the port.
36. B Internet Information Services Manager, on the panel "Actions" choose "Bindings", then "Add" and specify a non-standard port 4545
37. In your browser, in the URL bar, write http://web_win_srv. Must see the page Default Web Site, i.e. default site.
38. Let's now try to write http://web_win_srv:4545 in the URL line. The page of our website – TestSite – should open.
39. Thus, we got that our site is linked in two ways:
port 80 and host header TestSite
port 4545
40. Let's take a look at the restrictions settings for our site.
41. On the panel "Actions" select an item "Extra options"
42. Strangely large numbers for the Maximum Bandwidth and Maximum Number of Connections parameters indicate that no limits have been set.
43. Restrictions can be changed using the item "Restrictions…" on the panel "Actions"
44. Now let's experiment with error messages with which our server responds to incorrect actions of visitors or applications hosted on it.
45. In your browser, try to open a obviously non-existent page on our website, for example http://testsite/test.html. Because there is no such page, the server will return an error message with the code 404 . This message can be changed and made more “friendly” towards the visitor.
46. Let's look at all pages corresponding to errors for the TestSite site, which it inherited from the Web server level
47. Let's try to change the message when an error occurs 404 .
48. Let's create our own html page with the name 404.htm and place it in the catalog c:\inetpub\TestSite\err.File Contents 404.htm
File not found
Unfortunately, the content you were looking for is not here.
Please try to select the information you need by going to the main page of the site:
49. On the panel Actions select an item "Change…"
50. In your browser, try to open a obviously non-existent page on our website, for example http://testsite/test.html
51. We look at the page we created specifically for the 404 error.
52. Now let’s experiment with connecting to our site and working with it via the secure HTTPS protocol based on SSL certificates.
53. Let's look at the certificates that are present on our local computer (base OS) and web server. To do this, we will use the appropriate snap-in of the MMC management console.
54. Launch the management console from the command line cmd.
55. Let's add the equipment we need.
File –> Add or Remove Snap-in
56. From the list of available equipment, select "Certificates" and press the button "Add".
57. In the window that opens, select the option "computer account", click "Further" And "Ready"
58. After this, the equipment will appear in the list "Selected equipment...", click to complete "OK"
59. In the same way, add a snap-in to the same console "Certificates" for a remote web server. Only during the setup process specify the name of the remote web server.
60. Thus, we gain access to managing certificates located in storage on the local computer (base OS) and the remote web server.
62. To work using the HTTPS protocol, you must have a server certificate, and this certificate must be certified by a certification authority. As part of the laboratory work, we will not “bother” with creating a “full-fledged” certificate that would be correct to use. We will validate the certificate for our web server with a self-signed root certificate, which we ourselves will create and transfer to the trusted root certificate store on the local machine (base OS). It is clear that this is “not sporty” and cannot be used in real life, but for our experiments it will do just fine. This is a consequence of the fact that in our laboratory network there are too many conventions and there is no main Certification Authority or at least a working domain controller.
63. Another obstacle is caused by the installation mode of the web server – Server Core, which does not have an “IIS Services Manager”, so all configuration actions are carried out mainly remotely or in command line mode. When managing IIS remotely using the IIS Manager, there is no access to the certificate management function for IIS (for comparison, see the pictures below, screenshots from the web server in Full installation mode). But we are not looking for easy ways.
64. So, we create all the certificates using the command line. For this we will use the utility makecert.exe from Windows SDK for Windows Server 2008 and .Net Framework 3.5
65. Create a self-signed root certificate. On the web server in the command line (cmd) enter the command
makecert.exe –ss root –sr localMachine –n “CN=TestCompany” -eku 1.3.6.1.5.5.7.3.1 –r
–ss root specifies that the certificate will be created in the trusted root certificate store
–r– create a self-signed certificate
–eku 1.3.6.1.5.5.7.3.1– certificate identifier for Server Authentication; for the client you need to use Client Authentication (1.3.6.1.5.5.7.3.2)
66. Create a certificate for the website, signed by our root certificate. It is important that the parameter value CN matched exactly the site name URL. For example, the generated certificate will only be valid for the testsite site, but will not be valid for www.testsite.
makecert –pe –ss my –n “CN=testsite” –b 01/01/2013 –e 01/01/2036 –sky exchange –in “TestCompany” –is root –eku 1.3.6.1.5.5.7.3.1 – sr localMachine
67. As a result of the manipulations performed, we have a created root certificate in the “Trusted Certification Authorities” storage and our own certificate for the website in the “Personal” storage
68. Find these certificates yourself in the management console of the base OS.
69. Open the “IIS Services Manager” and bind the test website to ensure that it can be accessed via the HTTPS protocol. Please note that when binding we select the HTTPS protocol and as the SSL Certificate we indicate the certificate we created with the name “testsite”
70. In the browser, we try to access the test site using the HTTPS protocol.
https:\\testsite
71. Please note, because the organization “TestCompany” is not known to our local machine, then the browser issued a warning
72. Despite the warning, we continue to work with the site.
73. To make everything beautiful, we need to place the root certificate of our test organization (TestCompany) in the trusted root certificate store on the local computer (base OS). Let's export the root certificate to a file (for example, TestCompany.cert) using the management console.
74. Let's import a certificate from a file TestCompany.cert in the trusted root certificate store on the local machine (base OS).
75. Let’s open our test site again in the browser, using the HTTPS protocol to access it. We see that the certificate identification was successful.
76. Try using the HTTP protocol to work with a test site.
http:\\testsite
77. We see that the site can process both HTTP and HTTPS requests. To prohibit the use of the HTTP protocol, and to process all requests only via the HTTPS protocol, you must go to the website settings "SSL Settings" select option "Require SSL". In addition, here you can configure the website’s behavior with respect to the client’s SSL certificate.
78. Now we try to access the test site using the HTTP protocol. We see that access is denied.
79. If we try to use an SSL certificate issued for the TestSite site for another site (for example, for the default site), we will receive an error message in the browser window.
80. Binding the site yourself by default to use the HTTPS protocol and the SSL certificate created for the TestSite site and make sure that an error occurs.
81. Create your own SSL certificate for the default site and change the binding for the default site to work correctly using the HTTPS protocol.
82. And finally, the most interesting thing...
83. We will provide the ability to host sites created using PHP on our web server.
84. First of all, we check that our CGI web server is supported. Make sure that during installation the IIS-CGI component was not installed
oclist | more
85. Install the IIS-CGI module
Hello. Let's install ISS. First of all, let’s find out what IIS is?
IIS (Internet Information Services, up to version 5.1 - Internet Information Server) is a proprietary set of servers for several Internet services from Microsoft. IIS is distributed with operating systems of the Windows NT family.
The main component of IIS is the web server, which allows you to host websites on the Internet. IIS supports HTTP, HTTPS, FTP, POP3, SMTP, NNTP protocols.
Great. Now we know what we will bet. Let's get started.
Installation
First of all, go to the main menu “Start” (Start) further
Control Panel -> Programs -> Turn Windows features on or off.
Find "IIS Services" in the list and select the required components

- Safety. All components except “Certificate Matching Authentication...”.
- Application development components. PHP requires a CGI component.
- Common HTTP Features. We tick all the boxes.
- Functional testing and diagnostics. Select "HTTP Logging" and "Request Monitor".
- Performance enhancement functions. We tick all the boxes.
- Website management tools. We only mark "IIS Management Console».
Personally, I deviated a little from this description and added FTP, since for my needs I will need to test working with FTP.
After the necessary items have been selected, click “Ok” and all that remains is to wait until the components we need are installed. after which you can reboot the machine. this will not prevent her from starting all the required services.
All. We can say that our ISS Server is installed. Let's move on to its initial configuration.
Configuration
Go to computer management (right-click on the "Computer" icon -> Manage), then "Services and Applications" -> "IIS Service Manager" or happy owners of Windows 7 can go to another "Start" and in the "Search programs and files" enter "IIS" and the treasured "IIS Service Manager" will appear in the list

Let's go to the sites. I deleted the default site immediately, deciding that I didn’t need it and for clarity, I would create a new one.
Right click on "sites" -> "Add web site"

and create our first website

Please note that "localhost" was not chosen randomly. Since this directive is the “default” one, it has a local address of 127.0.0.1 and a name written in the hosts file lcalhost. I advise you to read more on Wikipedia
Usually, when people talk about a web server, they mean solutions based on the Linux platform. But if your infrastructure is based on Windows Server, then it would be logical to use the IIS web server. Contrary to popular belief, this is a very popular platform that allows you to work with most popular CMS, and has a wide range of systems designed to work specifically on Windows and IIS.
The undoubted advantage of IIS is its close integration with other Microsoft technologies and development tools. In particular, web solutions for IIS can leverage the rich capabilities of .NET and easily interoperate with desktop applications on that platform. If you are not interested in this yet, then a wide selection of ready-made CMSs are at your service, including those written specifically for IIS. Today we will look at how to install and configure IIS to work with ASP.NET-based web solutions and install one of the popular CMS for this platform.
To install a web server on the Windows platform, let's go to the snap-in Roles V Server Manager and select install roles Web server (IIS) And Applications server.
But don’t rush to click Next, on the left, under the name of each role, the option is available Role Services, go to it and set the following options for the Application Server: Web server support (IIS), TCP port sharing and Activation via HTTP.
And for the web server, install the FTP server service.
Then install the selected roles. To check the functionality of IIS, enter the IP address of your server in your browser, you should see a standard web server stub page.
Now let's move on to setting up the server, for this we will open Internet Information Services Manager(located in Start - Administration).
First of all, let's create a new site, to do this, right-click on the item Websites in the IIS Manager side menu and select Create a new site.
In the window that opens, specify the name of the site, the path to the root folder (by default, user sites are located in C:\inetpub\wwwroot), which should first be created and specify the host name (site domain name), in our case iissite.local
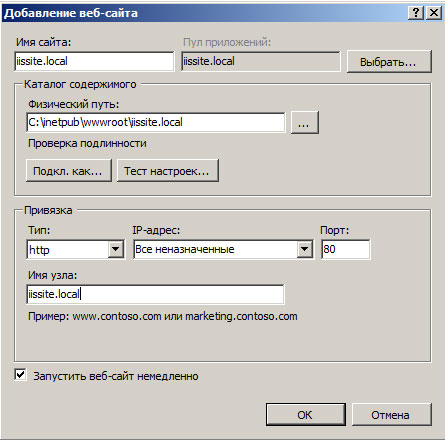
Don't forget to add an A-record with the name of your site to the DNS server or write the necessary lines in the hosts files of those workstations from where you will access the site
In principle, you can already place web pages in the site folder and access them through a browser, but to fully work with the site, FTP access to it will not hurt. To do this, right-click on your site name in the side menu and select Add FTP publication
Next, specify the binding of the FTP service to network interfaces and ports, and also configure security settings. If you're going to use SSL, keep in mind that you'll need a certificate, although if you'll be using FTP access only for your own needs, you can get by with a self-signed certificate. Don't forget to check the box to automatically launch the FTP site.
On the next page, specify the server access parameters; we recommend specifying specific users who will work with this site.
The web server is configured and you can use it to host HTML pages, however, modern sites use a DBMS to store their data, so the next step is to install MS SQL Express 2012, the capabilities of which are more than enough for our tasks. Installation is performed with default values, except Authentication Mode, which should be switched to Mixed mode and set a password for the SQL server superuser sa.
Now let's try to install any popular CMS created on the basis of ASP.NET technology; a wide selection of such solutions is presented in the Microsoft web application gallery. Please note that by clicking the download button you will receive a package for installation via Web PI; to install on IIS you will need to go to the developer’s website and download the full package from the CMS
We will install Orchard CMS, to get the package follow the link and select Download as zip, unpack the resulting archive and upload the contents of the Orchard folder to the root of the site.
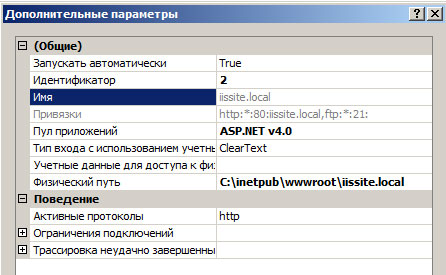
This CMS is based on ASP.NET 4, so we will configure our site to use the necessary technologies. To do this, right-click on the site name in the side menu and select Website Management - Advanced Options
In the window that opens, change the parameter Application Pool, indicating there ASP.NET v.4
Then set the necessary rights to the site folder, you need to add the IIS_IUSRS user the ability to write and change the contents of this folder.

Also, do not forget to create a database for the site, to do this, go to SQL Server Management Studio and by right-clicking on the item Database in the side menu, create a new database.
A web server is a program (service) that accepts HTTP requests from clients, usually web browsers, that processes those requests and provides them with a response, usually along with an HTML page (site), image, file, media stream, or other data. Below we will consider in detail the installation process of such a service, namely the IIS 8 (Internet Information Server) web server included in the package.
1. Installing an IIS web server
Launch Server Manager. It can be launched from a shortcut on the taskbar, or by running the command servermanager.exe(To do this, press the key combination Win + R, in the window that appears, in the “ Open"(Open) write the command name and click " OK»).

In Server Manager, in the menu located in the upper right corner of the window, select “ Control" (Manage) - " Add roles and features» (Add Roles and Features)

The Add Roles and Features Wizard will launch. Click " Further» (Next) on the start page.

Installation Type check “ Installing roles or features" (Role-based or feature-based installation) and click " Further"(Next).

Select the current server from the server pool (Select a server from the server pool) and click “ Further"(Next).

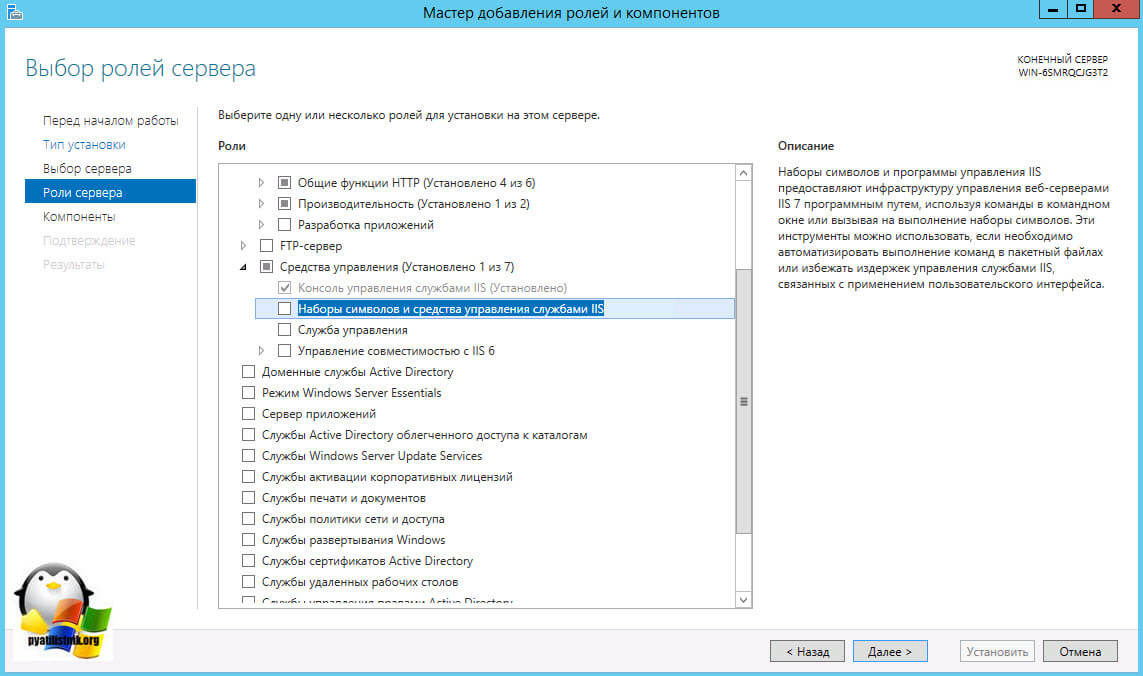
In the next step, select the role that needs to be installed. In our case, this is the role " Web server (IIS)"(Web Server). Let's mark it on the list.

At the same time, the wizard will prompt us to add the components necessary for the Web server, namely “ Internet Information Services Management Console» (IIS Management Console). We agree to install additional components by clicking “ Add components"(Add Features) and click " Further"(Next).

Leaving the list of components unchanged, click “ Further"(Next).

After reviewing the information about the web server role, click “ Further"(Next).

Next, you need to select the role services that will be installed for the web server. This set depends on the specific tasks that the IIS server will perform.

You can also view this site from any other computer on the network by typing in the IP address of the computer where the IIS web server is installed.

The files of this site, like the files of all other sites added later, are located in the directory by default C:\interpub\wwwroot.

Well, and accordingly, in order for sites located on this web server to be accessible from the Internet via an external IP address or domain name (read about how to link a domain name to an IP address), you need to perform forwarding on the router 80 th port on the computer with the IIS web server installed.

2. Restart the IIS server
Sometimes you need to restart the IIS web server. This can be done either from the IIS Service Manager by right-clicking on the server in the connections window or from the menu " Actions" (Action)

and from the command line by running the command
Iisreset /noforce<имя_компьютера>
- parameter /noforce is optional and is used to protect against data loss in the event that IIS services cannot be stopped within the one-minute timeout period.
- parameter <имя_компьютера> also optional when working on a local computer. In the case of remote administration of the IIS server, as a parameter<имя_компьютера>Specifies the NetBIOS name of the computer on which IIS is being restarted.

When you restart the IIS web server, the following services are restarted (if they were installed when installing the IIS components):
Did this article help you?
 Sound signals when turning on the PC
 How to revive a locked iPhone Found iPhone 4 how to unlock password
 Installing and Configuring IIS