Flashing ZTE Blade: instructions, firmware, download links. Flashing ZTE Blade: instructions, firmware, download links Universal instructions for flashing ZTE Blade using CWM
How to update the software?
We provide you with different ways to update the software, namely: update using a memory card or update over the air.
To update over the air, you need to connect to a Wi-Fi wireless network or GSM Internet connection and check for updates in the settings.
What should I do if the operating time of the device does not coincide with the operating time declared by the manufacturer?
A smartphone is a complex electronic device that includes the functions of a pocket computer and a cell phone and consumes a large amount of energy to operate these functions. The main amount of energy is spent on the operation of the display module and the GSM transmitting and receiving path. The display brightness is automatically set to maximum in a very bright environment (sunny day) or set manually by the user. Maximum brightness consumes maximum energy. When GSM is operating and with stable and stable reception “at maximum”, the device consumes a minimum amount of energy to maintain communication. If the network signal is unstable and weak, the device requires more power to maintain communication. In the case of “Network Search” in an area where there is no network, the device consumes the maximum amount of energy, which is spent on searching for nearby base stations. To reduce your phone's energy consumption you need to:
1. Disable GPS if not required.
2. Disable mobile Internet if not needed.
3. Disable or remove unnecessary unused applications, because they are in an active state and consume the internal resources of the device.
What should you do if your phone freezes, won’t turn on, or reboots?
The cause of rebooting or freezing in most cases is third-party software or programs.
1. Initially, we recommend that you restore the default factory settings (after saving the information you need). If the phone turns on, select the "factory reset" option from the device menu. If the device does not turn on, turn on the device in "Recovery mode" and select "wipe data/factory reset". The method for entering “Recovery mode” is described below in the paragraph “How to enter Recovery mode?”.
2. If resetting to factory settings does not help, update the software. Methods for updating the software are described in the paragraph "How to update the software?".
3. If the software update does not help, contact your nearest ZTE Authorized Service Center.
How to make a backup of data, a notebook or a “Back-up”?
There are 3 ways to do a “Back Up”:
1. In the phone settings, in the "Backup and reset" submenu, check the box for recovery.
2. You can transfer the necessary information to your computer using a USB cable.
3. You can make a “Back Up” using a third-party program.
What should I do if I don’t remember the password or pattern to unlock the screen?
If you have forgotten the pattern or digital password to unlock the screen, you need to perform a reset to factory settings: 1. Turn on the device in “Recovery mode” and select “wipe data/factory reset”. 2. If the procedure is not completed, you must contact the ZTE Authorized Service Center.
How to use wireless networks (Wi-Fi, BT)?
1. In the device settings, turn on Wi-Fi. Click on the Wi-Fi icon and you will be taken to the Wi-Fi network management screen.
2. The device will automatically begin searching for active Wi-Fi networks in the access zone from 5 to 50 meters from the access point (depending on the power of the access point).
3. Select the network you need and click on it. If your wireless network is password protected, enter it.
4. Once connected to the desired network, the Wi-Fi icon will appear on the main screen of the device.
How to enable Internet distribution on your phone (USB modem or WiFi router)?
There are two ways to enable Internet sharing on your phone. The first way is to enable distribution as a USB modem, the other is to enable distribution as a WiFi router. Make sure that your device has access to the Internet in order to distribute it:
1. USB modem - this method is used to distribute the Internet to a computer. Connect your phone to your computer using a USB cable and allow data access. "Settings->Wireless networks->More" Modem mode - check the USB modem box." Then the phone will start distributing the Internet to the computer. To stop the distribution, uncheck the USB modem or simply disconnect the cable connection.
2. WiFi router - make sure you have a stable Internet connection via a mobile network or USB. "Settings->Wireless networks->More" Modem mode - check the "WiFI access point" box. To secure your wireless connection, tap the hotspot icon and then tap WiFi Hotspot. In this menu you can set a name and password for your wireless WiFi connection. Your phone will start working as a WiFi router. To stop distribution, uncheck "WiFi router"
How can I quickly see the charging status?
During charging, press the power button. The battery charge status will be shown on the main screen of the phone.
Why is the amount of free memory on the device less than stated by the manufacturer?
Unlike the processor, which has its own built-in memory, other devices, such as a video processor, audio processor and other devices included in the elemental base of the device’s central board, consume user memory resources. A certain amount of memory is reserved in advance for internal needs, but in case of overflow, user memory is used.
What types of device locking can be used?
There are 3 types of screen lock. Select one of the lock types in Settings -> Security -> Screen lock.
1. Locking with a graphic key
2.PIN code lock 3.Password lock
What is the operating temperature of ZTE phones?
The operating temperature ranges from (-10C) to (+50C).
What does ROOT mean?
ROOT is "administrator rights". ROOT makes it possible to change system files, change the system, install test programs and perform other actions. ROOT rights are hidden from users, but can be activated if necessary.
Be careful, careless handling of ROOT rights can harm your operating system.
How to enter Recovery mode?
In the off state, simultaneously hold down the volume button (increase +) and the power button.
What should I do if the battery is not charging 100%?
The device's battery is designed in such a way that it dissipates part of the received charge and can subsequently be recharged. This feature is designed to protect the battery and increase its performance. If the battery does not charge more than 80%, contact a ZTE Authorized Service Center.
How can I add a Google account to the device?
1. When you turn on your smartphone for the first time, you will be prompted to register a new Google account or use an existing one. But this is not a mandatory procedure.
2. To add an account at any time, you can register a new one or use an existing account: Settings->Accounts and “add account”.
How to enable USB debugging? How to get access to the "For Developers" menu?
Enter "Settings->About phone->Tap on "Build number" several times. Then you will have access to the "For Developers" submenu. In this submenu, "USB debugging" and other functions for developers are available
How to connect your phone to PC?
To install the driver (automatically), do the following:
1. Connect your phone to your computer.
2. When connecting, select "Virtual Disk" or "Virtual CD" depending on the model.
3. The computer should detect an additional disk, run “Autorun.exe” on it and install the driver
4. If the drivers are not installed, go to "Settings->For Developers" and enable the "Disk driver". (click on "Build version" 10 times
5. When you turn on (USB Debugging), the driver will also be automatically installed.
What do the letters E, G, H mean?
When the phone's data transmission is active, the following symbols appear on the status panel (indicating signal reception, battery capacity, etc.):
- E means EDGE protocol is active
- G means active operation of the GPRS protocol
- H means active operation of the HSDPA protocol, which is part of WCDMA
ZTE Blade L4 is a branded Chinese smartphone that received 5 points in terms of performance. Here you can download firmware (for all operators, firmware ROM), find out how to reset settings or get root. There are also instructions on ZTE. This smartphone is high-performance. On board it has - Qualcomm Snapdragon 210 MSM8909, 1000 MHz
Root ZTE Blade L4
How to get root for ZTE Blade L4 see instructions below.
Below are universal programs for obtaining root rights for devices on Qualcomm Snapdragon
- (need PC)
- (Root using PC)
- (popular)
- (root in one click)
If you could not obtain superuser (root) rights or the program did not appear (you can install it yourself) - ask a question in the topic. You may need to flash a custom kernel.
Characteristics
- Type: smartphone
- Operating system: Android 5.1
- Case type: classic
- Case material: plastic control: touch buttons
- SIM card type: micro nSIM
- Number of SIM cards: 2
- Multi-SIM operating mode: alternating
- Weight: 165 g
- Dimensions (WxHxD): 72.8x145.5x9.4 mm
- Screen type: color TFT, 16.78 million colors, touch
- Touch screen type: multi-touch, capacitive
- Diagonal: 5 inch.
- Image size: 854x480
- Pixels per inch (PPI): 196
- Automatic screen rotation: yes
- Camera: 8 million pixels, LED flash
- Camera functions: autofocus
- Video recording: yes
- Front camera: yes, 2 million pixels.
- Audio: MP3, FM radio
- Headphone Jack: 3.5mm
- Standard: GSM 900/1800/1900, 3G, 4G LTE
- LTE bands support: band 3, 7, 20
- Interfaces: Wi-Fi 802.11n, nBluetooth 4.0, USB
- Satellite navigation: GPS
- Processor: Qualcomm Snapdragon 210 MSM8909, 1000 MHz
- Number of processor cores: 4
- Video processor: Adreno 304
- Built-in memory: 8 GB
- RAM capacity: 1 GB
- Memory card slot: yes, up to 32 GB
- Battery capacity: 2200 mAh
- Charging connector type: micro-USB
- control: voice dialing, voice control
- Airplane mode: yes
- Sensors: light, proximity
- Flashlight: yes
»
Firmware for ZTE Blade L4
Official Android 5.1 firmware [stock ROM file] -
Custom ZTE firmware -
Firmware for ZTE Blade L4 can be done in several ways. If the firmware file has not yet been uploaded here, then create a topic on the forum, in the section, specialists will help you and add the firmware. Don’t forget to write a 4-10 line review about your smartphone in the subject line, this is important. The official ZTE website, unfortunately, will not help solve this problem, but we will solve it for free. This ZTE model has a Qualcomm Snapdragon 210 MSM8909, 1000 MHz on board, so there are the following flashing methods:
- Recovery - flashing directly on the device
- A special utility from the manufacturer, or
What custom firmware are there?
- CM - CyanogenMod
- LineageOS
- Paranoid Android
- OmniROM
- Temasek's
- AICP (Android Ice Cold Project)
- RR (Resurrection Remix)
- MK(MoKee)
- FlymeOS
- Bliss
- crDroid
- Illusion ROMS
- Pacman ROM
Problems and shortcomings of a ZTE smartphone and how to fix them?
- If the Blade L4 does not turn on, for example, you see a white screen, hangs on the splash screen, or the notification indicator only blinks (possibly after charging).
- If stuck during update / stuck when turned on (needs flashing, 100%)
- Doesn't charge (usually hardware problems)
- Does not see the SIM card (SIM card)
- The camera does not work (mostly hardware problems)
- The sensor does not work (depends on the situation)
Hard Reset for ZTE Blade L4
Instructions on how to do a Hard Reset on ZTE Blade L4 (factory reset). We recommend that you familiarize yourself with the visual guide called on Android. . 
Reset codes (open the dialer and enter them).
- *2767*3855#
- *#*#7780#*#*
- *#*#7378423#*#*
Hard Reset via Recovery
- Turn off your device -> go to Recovery
- "wipe data/factory reset"
- “yes - delete all user data” -> “Reboot System”
How to log into Recovery?
- hold down Vol(-) [volume down], or Vol(+) [volume up] and the Power button
- A menu with the Android logo will appear. That's it, you are in Recovery!
Reset settings on ZTE Blade L4 You can do it in a very simple way:
- Settings->Backup and reset
- Reset settings (at the very bottom)
How to reset a pattern key
How to reset your pattern key if you forgot it and now you can’t unlock your ZTE smartphone. On the Blade L4 model, the key or PIN can be removed in several ways. You can also remove the lock by resetting the settings; the lock code will be deleted and disabled.
- Reset graph. blocking -
- Password reset -
ZTE Blade L4 Pro is a branded Chinese smartphone that received 3 points for performance. Here you can download firmware (for all operators, firmware ROM), find out how to reset settings or get root. There are also instructions on ZTE. This smartphone is quite productive. On board it has - MediaTek MT6735P, 1000 MHz
Root ZTE Blade L4 Pro
How to get root for ZTE Blade L4 Pro see instructions below.
Initially, try universal utilities to get root on MTK for the Blade L4 Pro model
- (root in one click)
- (a collection of root utilities in one)
If it doesn’t work and SuperUser doesn’t appear, then ask for help in a special topic
Characteristics
- Battery capacity: 2200 mAh
- Charging connector type: micro-USB
- Type: smartphone
- Weight: 165 g
- Control: touch buttons
- Case material: plastic
- Operating system: Android 5.1
- Case type: classic
- Number of SIM cards: 2
- Multi-SIM operating mode: alternating
- Dimensions (WxHxD): 72.9x145.5x8.75 mm
- SIM card type: micro SIM+nano SIM
- Screen type: color IPS, 16.78 million colors, touch
- Touch screen type: multi-touch, capacitive
- Diagonal: 5 inch.
- Image size: 1280x720
- Automatic screen rotation: yes
- Camera: 8 million pixels, LED flash
- Camera functions: autofocus
- Video recording: yes
- Front camera: yes, 5 million pixels.
- Audio: MP3, FM radio
- Headphone Jack: 3.5mm
- Interfaces: Wi-Fi 802.11n, Bluetooth 4.0, USB
- Standard: GSM 900/1800/1900, 3G, 4G LTE
- DLNA support: yes
- Satellite navigation: GPS
- LTE bands support: Bands B3, B7, B20
- Processor: MediaTek MT6735P, 1000 MHz
- Number of processor cores: 4
- Built-in memory: 8 GB
- RAM capacity: 1 GB
- Video processor: Mali-T720
- Memory card slot: yes, up to 32 GB
- Control: voice dialing, voice control
- Sensors: light, proximity
- Airplane mode: yes
»
Firmware for ZTE Blade L4 Pro
Official Android 5.1 firmware [stock ROM file] -
Custom ZTE firmware -
Firmware for ZTE Blade L4 Pro can be found in the thread. In addition, first download the necessary software for flashing
What information do you need to know for flashing?- Brand/model [preferred] - ZTE/Blade L4 Pro
- Processor - MediaTek MT6735P, 1000 MHz
- LCD Driver (version)
- Kernel (version) [desirable]
Before flashing and during the firmware selection process, check the basic technical characteristics (technical characteristics) through the program
What custom firmware are there?
- CM - CyanogenMod
- LineageOS
- Paranoid Android
- OmniROM
- Temasek's
- AICP (Android Ice Cold Project)
- RR (Resurrection Remix)
- MK(MoKee)
- FlymeOS
- Bliss
- crDroid
- Illusion ROMS
- Pacman ROM
Problems and shortcomings of a ZTE smartphone and how to fix them?
- If the Blade L4 Pro does not turn on, for example, you see a white screen, hangs on the splash screen, or the notification indicator only blinks (possibly after charging).
- If stuck during update / stuck when turned on (needs flashing, 100%)
- Doesn't charge (usually hardware problems)
- Does not see the SIM card (SIM card)
- The camera does not work (mostly hardware problems)
- The sensor does not work (depends on the situation)
Hard Reset for ZTE Blade L4 Pro
Instructions on how to do a Hard Reset on the ZTE Blade L4 Pro (factory reset). We recommend that you familiarize yourself with the visual guide called on Android. .
Reset codes (open the dialer and enter them).
- *2767*3855#
- *#*#7780#*#*
- *#*#7378423#*#*
Hard Reset via Recovery
- Turn off your device -> go to Recovery
- "wipe data/factory reset"
- “yes - delete all user data” -> “Reboot System”
How to log into Recovery?
- hold down Vol(-) [volume down], or Vol(+) [volume up] and the Power button
- A menu with the Android logo will appear. That's it, you are in Recovery!
Reset settings on ZTE Blade L4 Pro You can do it in a very simple way:
- Settings->Backup and reset
- Reset settings (at the very bottom)
How to reset a pattern key
How to reset your pattern key if you forgot it and now you can’t unlock your ZTE smartphone. On the Blade L4 Pro model, the key or PIN can be removed in several ways. You can also remove the lock by resetting the settings; the lock code will be deleted and disabled.
- Reset graph. blocking -
- Password reset -
Perhaps no ZTE model has as many official and custom firmware as the ZTE Blade. It is difficult to say which of them is the best firmware for ZTE Blade, it depends on personal preferences.
Before considering any ZTE Blade firmware options, it is necessary to mention that this smartphone comes in two versions: Gen1 and Gen2. You can determine Gen using the Ask Mr Pigfish application, developed specifically for ZTE Blade. You can download it for free in the Google Market. Gen2 has some advantages over Gen1, for example, better signal strength, HSUPA support, 850mhz band for GSM and 3G, as well as the ability to install new versions of Cyanogenmod in the future.
Instructions for moving from Gen1 to Gen2
It is assumed that ClockworkMod Recovery and drivers are already installed.
- Download the firmware or and put it on the phone’s SD card.
- Download and transfer the stock one to the memory card.
- With the smartphone turned off, hold down the volume “-” and “on” and go to ClockworkMod Recovery, then install the downloaded recovery via CWM as an update. After installation Reboot
- Download the archive with partition redistribution (cache; system; data). In this case, 136 MB are allocated for the system, and more than 2 megabytes are allocated for the cache.
- Unpack the archive on PC
- Turn off the smartphone, then hold down the volume “-” and “on”, when the FTM message appears, connect the phone to the PC.
- In the unpacked partition redistribution archive, run download_nochecksGen2.exe, click Start and do not touch anything until the installation completion notification appears. After completion, click OK.
- Go to “advanced” and select “Reboot Recovery”.
- CWM will restart, after which we install SS RLS4b or CyanogenMod from CWM (when installing SS RLS4b it will write your device generation Gen2).
- We make a Backup of the Channel1.nvm file, which will appear after switching to Gen2, in the folder from which download_nochecksGen2.exe was launched. This is necessary to save IMEI data in case of switching back to Gen1.
If after the transition there are problems when starting CWM, but the firmware has been installed, then download and install OneClickRecovery_ver2.apk and launch it. You can download the file.
Universal instructions for flashing ZTE Blade using CWM
It is assumed that CWM and firewood are already installed on the phone. It is advisable to install CWM version 3.0.1.4, which is suitable for firmware 2.2 and 2.3.
- Download the required firmware.
- Connect the USB cable.
- Go to Recovery.
- If there is no a2sd in the firmware, then continue from the next point, otherwise we format/partition the flash drive by selecting “advanced” in the menu - “partition sd - ext=512, swap=0, fat = the rest will be automatic”. A cheap flash drive can cause problems. In this case, you need to format the SD card on your computer in fat32, and then install the firmware, then split the flash drive and perform a full wipe. If suddenly the firmware becomes crooked, you need to flash it again.
- Doing “wipe data/factory reset”, “wipe cache partition” is not necessary, but you can also do “wipe battery”
- We copy the firmware to the flash drive without unpacking it (so that the PC can see the smartphone in CWM, in the “mounts-and storage” menu, select “mount USB storage”; when we have copied everything we need, click “unmount”).
- In Recovery, select “install zip from sdcard” and install the firmware.
- Finally, select “reboot system now”, after which the phone reboots.
This method is also suitable for installing updates on ZTE Blade.
As for updates, you can easily update your device’s OS to version 2.2 through the settings. You can download the firmware update for ZTE Blade to version FRY_RU_P729VV1.0.0B01 (OS Version: Android 2.2). The archive contains instructions for installing the update in Russian.
A significant number of official firmware for ZTE Blade is presented here. A large number of firmware can be found here. In addition to the fact that you can download firmware for ZTE Blade there, for clarity, a table with firmware versions of OS 2.1 and 2.2 is also presented, from which you can find out a lot of information about the required firmware When downloading, do not forget to check the compatibility (TFT or OLED).
You can watch the installation of firmware 2.3 7 on ZTE Blade in this video.
You can watch an overview of the ZTE Blade 4.0.4 firmware, as well as get some information about the installation from this video.
To install the ZTE Blade android 4.0 firmware, partition redistribution is required, but the author claims that he did not do this, and everything installed fine. In this case, ICS ColdFusionX CM9 Release 9 was installed. Those. This firmware was installed like any other custom firmware.
We have:
- ZTE Blade;
- boring, old, buggy (underline as appropriate) firmware on it;
- a little time;
- a bit of gray matter;
- a drop of money (for immersion in Zen).
Task: completely immersed in Zen (make a candy out of your phone and forget about flashing it).
Let's get started!
Turn off the phone.
If ClockWorkMod (alternative Recovery mode) is not installed, install ClockWorkMod 5.0.2.0, if already installed, install it. Quick installation of ClockWorkMod 5.0.2.0 via Bootloader
1) Download the archive ZTE Blade (ZTE Libra) - ClockworkMod 5.0.2.0
2) Unpack it into a folder.
3) Load the phone into BootLoader. To do this: Turn off the phone. We press and hold down the buttons "Home" + "Volume down"and turn on the phone, after 6-8 seconds it shouldhover Green Androy (or ZTE logo) And Red "Back" button), release the buttons.
4) Connect USB cableto the phone, after which an unidentified “Android” device will appear in the device manager, force install the driver from the folder that was in the archive. (Note: absolutely all drivers for ZTE Blade are available in Windows 7 Update. Therefore, you just need to enable automatic search for drivers in Windows 7 and have internet.
4) Launch from the folder"Install ClockWorkMOD 5.0.2.0.bat".
5) After closing the window, disconnect the cable and give the battery.
Create a Backup of the old firmware
We press and hold down the "Volume Down" buttonand turn on the phone - We get into ClockWorkMod 5.0.2.0
Buttons "Volume down"“Volume up”, select (Home) go to backup and restore - Backup.We are waiting for the end of the procedure.
Go to mounts and storage - mount USB storage. We connect the phone to the computer, copy the folder from the card to a safe placeclockworkmod, which contains our Backup.
Click Unmount on your phone. We take out the cable.
Installing new firmware
The best, in my opinion, firmware based on source code at the moment CyanogenMod 7.2.0-RC1 from a friend BurgerZ(website BurgerZ.pro). download the latest firmware (at the time of writing cm-7.2.0-RC1-Blade-KANG-13APR).
Go to the initial menu of ClockWorkMod 5.0.2.0.
wipe data/factory reset - Yes
wipe cache partition - Yes
advanced - partitioning SD card - 1024 mb (EXT partition) - 0 mb (SWAP partition) (I believe that it is not needed with such an amount of RAM). We are waiting for the operation to complete.
mounts - mount SD card
We connect the phone to the computer. We unpack the archive (Download from DepositFiles MD5:807418DE2B7A5276F72867B942AC5ADB) with a modification of the original firmware, where the data section is increased to 240 Mb. Copy the folder "image" from the archive "Modified (240 MB free).rar", firmware from BurgerZ, gapps from 04/08/2012 (gapps-full-20120408-Blade.zip MD5: 2C96C534ECDCABB5027B1DAB8780D411), Darktremor Apps2SD (dtapps) to the root of the memory card 2sd -2.7.5.2-1-signed.zip MD5: 8AF9E161B5DE47DD857BEF5638EDFBE8) ( Note: After updating the firmware, the archive must be re-flashed).
Unmount
Power off
When loading the android, remove the battery (as soon as the green android appears).
Insert the battery
We take out the battery
Volume Down+Power (boot into ClockWorkMod 5.0.2.0)
Install zip from SD card - choose zip from sdcard. Select one by one: cm-7.2.0-RC1-Blade-KANG-13APR.zip, gapps-full-20120408-Blade.zip, dtapps2sd-2.7.5.2-1-signed.zip.
Power off
Power on
Select Launcher
Next, I will give the basic phone settings that are comfortable for me. Perhaps you will learn something interesting for yourself.
Settings - language and keyboard - Russian
Settings - Wireless networks - Mobile network - Data transfer (uncheck)
Open the status bar - CM stats - disable collecting statistics Cyanogenmod
Removing all widgets
Settings - Calls - Incoming call in background
Settings - Cyanogenmod Settings - Applications - Allow moving applications
Settings - Cyanogenmod Settings - Screen - Screen turn on animation
Settings - Cyanogenmod Settings - Interface - Buttons in the notification bar - Hide the scroll bar
Settings - Cyanogenmod Settings - Interface - Widget buttons - widget buttons (add: 2G/3G, data, backlight; remove: sound) - Network modes (2G/3G+2G) - Network modes automatically (2G/3G) - On. With this, I use one data transfer button in the status bar to switch between phone states: (3G+2G+Internet network)/(2G network only+no Internet). That. We save battery and time.
Open the notification panel and click 2G/3G (to switch to 2G only mode)
Settings - Cyanogenmod Settings - Interface - Redrawing after enlargement
Settings - Location and security - GPS satellites (uncheck)
Settings - Location and security - GPS source - Use. built-in GPS
Settings - Location and protection - Set up screen lock - Pattern (set your own key)
Settings - CyanogenMod Settings - Lock Screen - Widgets - Battery Status
Settings - CyanogenMod Settings - Lock Screen - Unlock - Skip when protecting device
Settings - CyanogenMod Settings - Lock Screen - Unlock - Menu Unlock
Settings - CyanogenMod Settings - Lock screen - Delays and timeouts - Auto shutdown delay - 10 sec.
Settings - CyanogenMod Settings - Performance - CPU Settings - Set on boot
Settings - CyanogenMod Settings - Performance - CPU Settings - Maximum Frequency - choose at your discretion no more than 748 (I have 710)
Settings - CyanogenMod Settings - Performance - Off. boot animation (phone boot time is reduced)
Settings - CyanogenMod Settings - Sound - Silent State
Settings - CyanogenMod Settings - Sound - Quiet hours - Enable quiet hours (Disable notification sound, selection response, mute trackball). We set the beginning and end at our discretion (mine is 00:00 - 6:00)
Settings - Cyanogenmod - Sound - Mute camera sound
Settings - Device settings - Calibrate proximity sensor (perform in light, there should be no objects in front of the screen, including you, closer than 2 meters for 15 seconds). Without this procedure, the proximity sensor will not work.
Settings - Sound - Key sound (uncheck)
Settings - Applications - Unknown sources
Settings - Language and keyboard - Android keyboard - Input languages - English (US) + Russian
Application menu - Spare Parts - End button behavior - Sleep mode (should reduce battery consumption)
Application Menu - Spare Parts - Intermediate Animations - Quick
Connect Wifi or 3G
Setting up a Google account
Install Superuser from Google Play
We add to the card applications that you usually install not from Google Play.
Install from Google Play:
- Go Launcher EX (Russian) (optional)
- Go Contacts EX (optional)
- Go SMS Pro (optional)
- A2SDGUI (required) - needed for linking the EXT section of the card and transferring programs there.
Let's go to Titanium Backup delete (the "Backups" tab, short tap on the application, first delete the data, and then the program itself):
- Cmstats (CMStats.apk);
- Google One Time Init (OneTimeInItializer.apk);
- Launcher;
- Launcher Pro (optional, I use Go Launcher);
- Gallery (it’s better to use QuickPic instead);
- Music;
- News and weather (GenieWdget.apk);
- Screen control tips (Protips.apk);
- Notifications about cyanogenmod updates (CMUpdateNotify.apk);
- File Manager (FileManager.apk).
- Latin Input Method Tutorial(LatinImeTutorial.apk);
- Setup Wizard (setupwizard.apk).
Google Play - updating Maps and Street View in Google Maps.
We will integrate the Google Play update (you can also integrate other Google applications that will be updated in the future):
Titanium Backup - long tap on the application - Integrate updates into ROM.
We also integrate (to save space in the data section):
- Cards
- Street View in Google Maps
 Lena Miro's blogs on LJ - the most interesting things in blogs
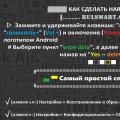 Flashing ZTE Blade: instructions, firmware, download links Universal instructions for flashing ZTE Blade using CWM
 PowerMaster - application for managing energy consumption ZenFone Max Fast charging does not work zenfone 2