Reset by selection of Epson l1800 ink. EPSON
"During the active use of an inkjet printer, there comes a moment when the printer refuses to work and displays an error message, requiring you to contact a service center. Depending on the printer model, this error is notified in different ways, but the most standard way to display an error message is to turn blinking of two red LEDs under the printer buttons, and an error window pops up on the computer monitor.
Moreover, a warning about the imminent end of the life of the absorbent pad (diaper) also pops up in the form of a system message on the computer monitor.

After the warning message appears, you have the opportunity to print another 15-20 images (photos) of A4 format, after which the printer will refuse to print until the waste ink counter is reset.
All inkjet printers use a special container to collect waste ink (Waste Ink), which is often called a “diaper” quite often. This "diaper" is a container in which there is an absorbent material that absorbs waste ink well.
Where does waste ink come from in an inkjet printer? Each time it is turned on, the print head is automatically cleaned - a small amount of ink is pumped from the cartridges into the print head, which at that moment is in the extreme right (left) position of the printer, and the ink is "dumped" into the "diaper". Also, when regular cleanings are started through the printer driver, ink is pumped from the cartridges through the print head into the absorber.
Since the volume of the ink collection tank with the absorber in it has a certain limitation, sooner or later, there comes a moment when the tanks overflow and the ink begins to leak out, which causes pollution of both the printer itself and everything that surrounds it. .
To avoid such an extremely unpleasant situation, absolutely all inkjet printers are equipped with a system for monitoring the amount of waste ink. In reality, this system is nothing more than a software counter that counts the number of times the printer has been turned on and all head cleaning procedures performed. Since the volume of ink pumped out of the head during cleaning procedures is approximately known, and the capacity of the sump is also known, it is not difficult to calculate when it is full.
When the value of the counter for the amount of waste ink, supposedly drained into the sump, reaches the value preset in the printer's control program, the printer first issues a warning about the imminent end of the life of the absorbent pad, and soon completely blocks the ability to send a print job.
When the "diaper" of the inkjet printer is overfilled, the service specialist must take the following actions:
- replace absorbers - "diapers"
- reset (reset) the Waste Ink Counter).
You can reset the "pampers" waste ink counter using the special PrintHelp service program from the SuperPrint development team (Resetters). PrintHelp- universal service program for printers Epson, Canon.


The program can perform the following functions for Epson printers (not for all models):
- checking the current value of the waste ink counter
- reset the waste ink counter (some models require a RESET CODE)
- cleaning the print head
- enhanced cleaning of the print head during initial refueling
- read and write printer serial number
- read and write USB ID
- read and write HEAD ID
- creating an EEPROM backup dump
- paper feed test
- nozzle check and test
- printout of color fills
- initialize (disable) PF deterioration offset
- getting the status of the printer
- read ink level
- reset Ink Level and reset Pampers in printers L100, L200, L800 free
List of supported Epson printer models:
Models for which the diaper reset is carried out WITHOUT the Reset Code are highlighted in green. Resetting a diaper WITHOUT Reset Codes is possible only for countries: Ukraine, Russia, Kazakhstan, Belarus, Moldova, Georgia
Artisan: Artisan 50, Artisan 1430, Artisan 700, Artisan 710, Artisan 725, Artisan 730, Artisan 800, Artisan 810, Artisan 835, Artisan 837
B: B40W, B42WD, B1100, B1110
BX: BX300F, BX305, BX310FN, BX320FW, BX525WD, BX600FW, BX610FW, BX620FWD, BX625FWD, BX925, BX935
C: C58, C59, C62, C63, C64 , C65, C67, C68, C76, C77, C78, C79, C82, C83, C84, C85, C86, C87, C88, C90, C91, C92 , C93, C94, C95, C97, C98, C99, C110 , C120
CX: CX2800 CX2900 CX3100 CX3200 CX3300 CX3400 CX3500 CX3600 CX3650 CX3700 CX3800 CX3900 CX4000 CX4080 CX4100 CX4500 CX460 0, CX4700, CX4800, CX4900 , CX5000, CX5700F, CX5900 , CX6300, CX6400 , CX6500, CX6600 , CX7300 , CX7700, CX7800, CX8300 , CX8400, CX9300F, CX9400Fax, CX9500F
D: D68, D78, D88, D92, D120
DX: DX3800, DX4000, DX4200, DX4800, DX5000, DX5050, DX6000, DX7400, DX7450, DX8400, DX9400F
EP: E-600, EP-302, E-600, EP-702A, EP-703A, EP-705A, EP-706A, EP-775A, EP-801A, EP-802A, EP-804A, EP-804F, EP- 901F, EP-902A, EP-903
K: K100, K101, K200, K201, K300, K301
L: L100, L110, L120, L200, L210, L300, L350, L351, L355, L550, L555, L800, L1300, L1800
M: M100, M105, M200, M205
ME: ME2, ME-10, ME-20, ME-30, ME-32, ME-70, ME-80, ME-82WD, ME-100, ME-101, ME-200, ME-300, ME-301, ME-303, ME-320, ME-330, ME-340, ME-360, ME-401, ME-403, ME-510, ME-520, ME-530, ME-535, ME-560, ME- 570, ME-600F, ME-620F, ME-650, ME-900WD, ME-940FW, ME-960FWD, ME-1100
NX: NX110 NX125 NX127 NX130 NX200 NX210 NX215 NX220 NX230 NX300 NX305 NX330 NX400 NX410 NX415 NX420W NX430 NX510 NX515 NX530 N X620, NX625
P: P50, P60
PX: PX610FW, PX650, PX659, PX660, PX700W, PX710W, PX720WD, PX730FWD, PX800FW, PX810FW, PX820WD, PX830FWD, PX-203A, PX-V600, PX-V630
Photo: Photo 820, 830U, 890, 900, 950, 960, 1280, 1290, 1390, 1400, 1410, Photo 1430, Photo 1500, 2100, 2200
picturemate: PM100, PM210, PM215, PM225 PM235, PM240, PM250, PM260, PM270, PM280, PM290, PM310. diaper reset is NOT available. Reading is available.
PM: PM-3500C, PM-4000px, PM-G800, PM-G4500, PM-G5000, PM-A820, PM-A890
R: R200, R210, R220 , R230, R240, R245, R250, R260, R265, R270 , R280, R285, R290 , R295, R300, R310, R320 , R330, R340 , R350, R360, R380, R390, R800, R1800, R1900, R2000, R2400, R2880 , R3000
RX: RX420, RX425, RX430, RX500, RX510, RX520, RX530, RX560, RX580, RX585, RX590, RX595, RX600, RX610, RX615, RX620, RX630, RX640, RX650, RX6 80, RX685, RX690, RX700
S: S20, S21, S22
SX: SX100 SX105 SX110 SX115 SX117 SX125 SX130 SX200 SX205 SX210 SX215 SX218 SX230 SX235 SX400 SX405 SX410 SX415 SX420W SX425W , SX430, SX435, SX510, SX515, SX525WD, SX600FW, SX610FW, SX620
T: T10, T11, T13, T20, T21 , T22, T23, T24, T25, T26 , T27 , T30, T33, T40W , T42WD, T50 , T59, T60 , T1100 , T1110
TX: TX100 TX101 TX102 TX103 TX105 TX106 TX109 TX110 TX111 TX115 TX116 TX117 TX119 TX120
TX200 , TX209 , TX210 , TX219 , TX220 , TX230 , TX300F , TX320F
TX400 , TX405 , TX408 , TX409 , TX410 , TX419 , TX420W
TX510FN, TX515FN, TX525, TX550W , TX560WD, TX600FW , TX610FW, TX620FWD, TX650 , TX659
TX700W , TX710W , TX720WD , TX800FW , TX810FW , TX820FWD , TX830FWD
Workforce: WorkForce 30, 40, 42, 310, 315, 320, 323, 325, 500, 520, 600, 610, 615, 630, 635, 840, 1100
WorkForce WF-7010, WF-7011, WF-7012, WF-7015, WF-7018, WF-7510, WF-7511, WF-7515, WF-7520, WF-7521, WF-7525
WorkForce WF-2010, WF-2510, WF-2520, WF-2528, WF-2530, WF-2538, WF-2540, WF-2548
WorkForce WP-4011, WPM-4011, WP-4015DN, WP-4020, WP-4022, WP-4025DW, WP-4092, WP-4095DN,
WP-4511, WP-4515, WP-4520, WP-4521, WPM-4521, WP-4525, WP-4530, WP-4531, WP-4532, WP-4533, WP-4535, WP-4540, WP- 4545, WP-4590, WP-4592, WP-4595 - diaper reset is NOT available. Reading is available.
XP: XP-20, XP-30, XP-33,
XP-100, XP102, XP-103, XP-111,
XP-200, XP-201, XP-202, XP-203, XP-204, XP-205, XP-206, XP-207, XP-208, XP-211, XP-212, XP-214, XP- 215, XP-216, XP-217
XP-300, XP-302, XP-303, XP-305, XP-306, XP-311, XP-312, XP-313, XP-315,
XP-400, XP-402, XP-403, XP-405, XP-406, XP-411, XP-412, XP-413, XP-415, XP-510,
XP-600, XP-610, XP-605, XP-615, XP-700, XP-710, XP-750, XP-800, XP-810, XP-850, XP-950
For those printers in which the diaper is made in the form of a separate cartridge with a separate chip, it can only be reset by chip programmers.
Using the program free. All functions are supported incl. and diaper reset function. For some models, this function works after entering
epson. Diaper reset, service manuals, user manuals, service utilities (Adjustment Programs).
Modified 06/05/2016
List of changes and additions:
1. Added service manuals.
2. Brought the file names of the service manuals in accordance with the full list of models.
3. Added user manuals in Russian.
4. Added PartsCatalog_FieldsRepairGuides_NumberedServiceParts
5. Added the Russian free service utility SSC_ServiceUtility_ForEpsonStylusPrinters_v_4_30 (It has sufficiently developed service functions for more than a hundred Epson models released before 2008. Russian interface. Sharpened under Windows 95/98/ME/2K2/XP, can work with LPT and USB ports)
Key Features of SSC Service Utility for Epson:
Spoiler
1) Works directly with CSIC in Epson Stylus printer cartridges.
2) Reset and flashing any chips using an additional device.
3) Allows you to "freeze" the internal ink counters.
4) Reset internal ink counters (even with empty cartridges).
5) Separate cleaning of color and b/w heads for all models of Epson inkjet printers, forced cleaning mode.
6) Support hot-swap cartridges.
7) Reset the counter of drained ink (diaper), even if it is already full.
8) Support for more than 100 different models of Epson printers.
The program is especially useful for people who print large volumes of documents, as it allows you to significantly save on ink and cartridges.
At the moment the program works in Windows 95/98/ME/2K2/XP with both LPT and USB printers.
ATTENTION! Deciding to refill cartridges, use the ink freeze function, reset ink counters, etc., you lose the warranty provided by Epson for the heads of your inkjet printers.
New in latest versions.
New in version 4.30
- R270 support
- R240 support
- R340 support
- CX2800 support
- CX3900 support
- CX4900 support
- CX5900 support
- C58/C59 support
- RX640 support
- improvements for C2100/2200
- improvements for RX700
- improvements for R2400
- improvements for 785EPX/825/895/915
New in version 4.20
- support CX4200/CX4700/CX4800/DX4200/DX4800
- C47/C48 support
- RX430 support
- support for CX6500/CX6300
- improvements for CX6400/CX6600
- improvements for RX500/RX510
- improvements for RX600/RX610
- improvements for R1800
- improvements for CX3700/CX3800/DX3800/DX3850
- improvements for C67/C68/D68
- improvements for C87/C88/D88
- a number of new chip models are now supported
- a number of other improvements and fixes
New in version 4.10
- PM-970C support
- PictureMate support
- RX700 support
- R2400 support
- PM-A700 support
- PM-G720 support
- RX520 support
- CX7800 support
- CX4100 support
- DX3800 support
- support for CX3800/CX3810
- CX3700 support
- support for C67/68 and Photo Edition
- support for C87/C88/D88 and Photo Edition
- Support R220 /R230
- R320 support
- CX4500 support
- CX3650 support
- fix some bugs
New in version 4.00:
- functions of working with an additional reset device
- CX4600 support
- CX5300 support
- CX5100 support
- RX420 support
- RX425 support
- R1800 support
- RX620 support
- improved support for almost all printers
- improved ink level freezing
- improved functions for resetting the mining counter
- improved ink monitor, added printer status information
- fix some bugs
A complete history of changes and additions in each version is in the help file of the program.
Spoiler
Epson Stylus Color 400
Epson Stylus Color 440
Epson Stylus Color 480 LPT
Epson Stylus Color 480SXU/580
Epson Stylus Color 600
Epson Stylus Color 640
Epson Stylus Color 660
Epson Stylus Color 670
Epson Stylus Color 680 / 777
Epson Stylus Color 740
Epson Stylus Color 760
Epson Stylus Color 800 / 850
Epson Stylus Color 860
Epson Stylus Color 880
Epson Stylus Color 900 / EM-900C
Epson Stylus Color 980
Epson Stylus Color 1160
Epson Stylus Color 1520
Epson Stylus Color 3000
Epson Stylus C20 / C40 / CL-750
Epson Stylus C41/C42/C43/C44/C45/C46/C47/C48**
Epson Stylus C50
Epson Stylus C60
Epson Stylus C61/C62**
Epson Stylus C63/C64**
Epson Stylus C65 / C66 and PE **
Epson Stylus C67 / C68 / D68 and PE **
Epson Stylus C70**
Epson Stylus C80**
Epson Stylus C82**
Epson Stylus C83/C84**
Epson Stylus C85 / C86 and PE **
Epson Stylus C87 / C88 / D88 and PE **
Epson Stylus Photo RX420/RX425/RX430**
Epson Stylus Photo RX500 / RX510**
Epson Stylus Photo RX520**
Epson Stylus Photo RX600 / RX610**
Epson Stylus Photo RX620**
Epson Stylus Photo RX700**
Epson Stylus CX3100 / CX3200**
Epson Stylus CX3500/CX3600/CX3650**
Epson Stylus CX3700**
Epson Stylus CX3800 / CX3810 / DX3800**
Epson Stylus CX4500**
Epson Stylus CX4600**
Epson Stylus CX4100 / CX4200**
Epson Stylus CX4700 / CX4800**
Epson Stylus DX4200 / DX4800**
Epson Stylus CX5100 / CX5200**
Epson Stylus CX5300 / CX5400**
Epson Stylus CX6400 / CX6600**
Epson Stylus CX6300 / CX6500**
Epson Stylus CX7800**
Epson PictureMate
Epson Stylus Photo
Epson Stylus Photo EX
Epson Stylus Photo 700 / IP-100
Epson Stylus Photo 750 / PM-770C
Epson Stylus Photo 780 / 790 / PM-780C
Epson Stylus Photo 810 / 820
Epson Stylus Photo 820**
Epson Stylus Photo 825 / 915
Epson Stylus Photo 830/830U**
Epson Stylus Photo 870 / PM-875DC
Epson Stylus Photo R200 / R210**
Epson Stylus Photo R220 / R230**
Epson Stylus Photo R300 / R310**
Epson Stylus Photo R320**
Epson Stylus Photo R800 / PX-G900 **
Epson Stylus Photo R1800**
Epson Stylus Photo R2400**
Epson Stylus Photo 890
Epson Stylus Photo PM-890C
Epson Stylus Photo PM-A700 **
Epson Stylus Photo PM-G720 **
Epson Stylus Photo PM-970C**
Epson Stylus Photo 895/ 785EPX
Epson Stylus Photo 900**
Epson Stylus Photo 925 / 935**
Epson Stylus Photo 950 / 960 / PM-950C**
Epson Stylus Photo 1200 / PM-3000C
Epson Stylus Photo 1270 / PM-3300C
Epson Stylus Photo 1280 / PM-3500C
Epson Stylus Photo 1290
Epson Stylus Photo 2000P
Epson Stylus Photo 2100**
Epson Stylus Photo 2200 / PM-4000EPX**
Epson Stylus Pro 5000 / PM-5000C
** - it is not possible to reset the ink counters for these models by software.
For these models, it is necessary to use the "freeze" of the ink level and the replacement of the cartridge "hot".
Or use an additional device.
Archive size: 1.86 GB (2,000,493,199 bytes)
Unpacked size: 2.74 GB (2,942,634,718 bytes)
Hi all! Today I will show how to reset the diaper on the Epson XP-302 printer, but this example can be reset on other models. At relatives, the printer began to print in black and yellow. They sent it in for repair, they were told that it was impossible to make it, some codes were needed ... Well, I decided to figure it out ...
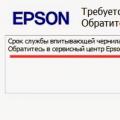
At first I thought, I'll do a few calibrations and everything will be decided ... But the printer began to give out this message: The life of the ink-absorbing lining has expired.
I started to google what it is in general) On the Internet there is a program for resetting epson counters, called PrintHelp, but it asks for codes that you need to buy! Well, this is not the case) But on some printers, it turns out to reset Epson diapers for free.
If PrintHelp did not reset the counter for you for free, then on the Internet there is the Epson Adjustment Program (epson forbade it to be uploaded).
If the program does not help, then you can try the SSC Service Utility or. We launch the program to reset the epson diaper. It's called the Epson Adjustment program. So if suddenly it doesn’t work for your printer, then look for another version.
And so, after starting, select the model and port:

If your model is not available, it's okay, just choose like mine.

The main thing is that the drivers are installed. Otherwise, the program will not see the printer port. Click OK and then select Paricular adjutment mode.

Select the waste ink pad counter. This is an ink and diaper counter.

We put all the checkboxes and click Check, thereby we will check the counters.

I have already reset the counter and managed to print a certain number of pages. But if your printer swears at diapers, then in the lower field you will have a value of 100%. Select the top counter and click Initialization, i.e. Epson counter reset.

The program will ask you to turn off the printer.


We press ok, after it turns on and we can check. Highlight the top checkbox and click check again.

As you can see, the Epson diaper reset was successful! But do not forget that Epson does not give out such an error for nothing. In addition to resetting, I also recommend cleaning the gasket under the cartridges.
Each Epson device, whether it's a printer or an MFP, has a special container with an absorbent filler (drive), which is popularly called a "diaper". The diaper absorbs excess ink that is formed when printing an image to the edge (without a frame), and it also collects waste ink used when cleaning the print head. Each diaper has its own resource, or rather, the amount of ink that it can absorb. If the printer floods more, then excess ink will begin to flow from the printer. To prevent this from happening, sensors are installed in the devices that block the operation of the printer and give an error: the life of the printer's ink-absorbing lining is ending. In this article, we will tell you how to reset the diaper on Epson, and thereby get rid of this error. We will restore the operation of our device, and also tell you how to prevent the physical overflow of the container with absorbent filler.
When and in which Epson devices does the diaper overflow error occur?
Let's start with the fact that diapers are installed in all Epson printers. However, depending on the class of the device and its performance, they differ. So in wide-format devices (print format A2 and above), the diaper is made in the form of a removable container. It is easily changed by the user independently within a few minutes. The official names for this consumable may vary: waste ink bottle, waste ink container, absorbent tank, or Maintenance Tank. The cost of the container, depending on the model of the plotter, does not exceed 4000 - 6000 rubles. The diaper resource, depending on the model, ranges from 10,000 to 35,000 pages, depending on the model of the device. When a diaper overflow error occurs, you simply pull out the old one, insert a new one and continue typing. But in household appliances, everything is a little different.
Choosing a waste ink container (diaper) for Epson plotters.
Usually, in printers and MFPs (up to A3 format inclusive), the diaper is built into the device itself. That is, it turns out that this is not a consumable material, but a spare part. The user cannot change it himself. It is necessary to take the device to a service center, where an engineer will disassemble it and replace the absorbent filler. After that, using special software, it will reset the digital counter error so that the printer starts printing.
The diaper resource, depending on the device, is from 3,000 pages to 5,000 pages. Although there are lucky ones whose diapers overflowed by 10,000 - 12,000 prints. The thing is that the less ink pumping we do in order to clean the print head, the higher the diaper resource. And thus we can print more pages. In addition, if we print images with margins, we will also increase the life of the diaper. However, if you print infrequently and your printer has been sitting for a long time without printing, you need to clean the print head, otherwise you risk getting more expensive repairs. In any case, a physical diaper change is cheaper than a print head change. Typically, the cost of the print head is estimated at half the cost of the machine. Therefore, in any case, I recommend doing a print head cleaning when the picture is a comparison of a diaper plotter and a conventional printer.

Physical overflow of the diaper.
As we have already found out, the diaper overflow counter usually gives an error after printing 3000-5000 pages. Then it stops the printer until the error is corrected and the diaper is physically replaced. The manufacturer, in this case Epson, always plays it safe and makes a container with absorbent filler with a large margin. In some cases, the device can be reset several times. Usually, it is 2-3 times. After that, the diaper will need to be replaced. If this is not done in time, then the ink will begin to flow out of the case. There are several options for getting out of the situation:
1) take the device to an Epson service center for specialists to replace it!
2) replace on your own or organize the draining of waste ink into a special container.
Within the framework of this article, we will not describe how waste ink is drained into a special container, but we will only say that this process is performed differently for different Epson devices. But at the same time, the meaning is the same: we attach a container for draining to the ink output tube using a silicone cable. In order to get to the waste ink output tube, depending on the model of the device, you must either remove the cap from the back of your device, or unscrew one or more bolts, after which you can pull out the diaper and get to the output tube. In some cases, you will have to get confused and disassemble the case.
Epson diaper reset software.
In most cases, we need two programs that will allow us to reset the diaper overflow error - these are the Adjustment Program and PrintHelp. The first is free and in English, and the second is in Russian and most of the functionality is paid. Personally, I like the Adjustment Program, because in my case this program coped with the reset of the absorbent filler overflow error on the L1800 printer (a3 format printer with a proprietary continuous ink supply system) without any problems. And most importantly, I managed to do it for free. But in the PrintHelp program, this is already a paid procedure and costs almost 600 rubles for one reset. However, printhelp has its merits. Let's figure out which program is better to use?
As you may have guessed, the choice of program depends on your Epson model. We use the Adjustment Program if you have the following model of printer or MFP.
PrintHelp can be used with almost any model of Epson device for a fee, when using a reset code, and free of charge for some models.
Software selection:
| Software | Supported Epson printers and MFPs. |
|---|---|
| CX9300, L111, L210, L301, L351, L551, L1300, L1800, L130, L220, L310, L360, L455, L565, L605, L655, L801, L805, L810, L850, ME620F, R270, R330, R 390, SP1430W, WF7018, WF7521. | |
| for free counter reset for the following models: | L110, L210, L300, L350, L355. |
| Download PrintHelp for a free counter reset for the following models: | Photo 1410 Photo 2100 Photo 2200 L100 L200 R1800 R1900 P50 T50 T59 T60 T1100 T21 T26 T27 T30 T33 T40W R270 R290 R295 R300 R310 R320 , R360, R380, R390, R800, RX610, RX615, RX620, RX690, RX700, SX125. |
Attention! Resetting the counters on your device is done at your own peril and risk! The author of the article is not responsible for damaged equipment as a result of such a reset! Any manipulation of the printer may void the manufacturer's warranty. Therefore, if the device is under warranty, it is better to contact the service center. If there is no warranty or you are not afraid to lose it, then you can proceed to reset the Epson diaper according to the instructions below. In fact, in almost 100% of cases, you should not be afraid. However, there may be difficulties with some models. I will show on the example of the Epson L1800 device. In addition, there were no problems when resetting the counters on the T50 printer.
How to reset an Epson diaper using the Adjustment Program using the L1800 model as an example?
Download the archive for a suitable Epson model. Unzip and run the program. On the initial screen, click Accept. We turn on our Epson printer or MFP and connect it to the computer if it is not connected.

Select the device model from the table and click Start. I will show on the example of the L1800 printer. In the window that opens, select Select. Here we need to select the connection port. For starters, you can put Auto selection in the port item. Or select the port manually, in my case it is usb003 and click OK.


In the window that opens, for starters, let's check the counters. To do this, put a tick in the small boxes next to the numbers 0 and 80, and click Check. If your printer is already blocked, then it will show 100% filling in two windows (depending on the model, there may be one or several windows, the epson l1800 has two).

Since I have already reset the counters, it currently shows:
- the first counter is filled by 9% out of 100%, while gaining 1111 points out of 12476.
- the second counter is not filled at all and shows 0%, having scored 0 points out of 6788.
As you can see, epson l1800 has two counters. The first one (up to 12476 points) is the main printer (diaper) counter. The value of this counter increases when printing, and when cleaning and pumping ink. So keep that in mind. The second (up to 6788 points) is an additional counter, which is an absorbent pad under the print head. The counter increases when printing borderless and some special print modes.
And now let's reset the counters on Epson in order to unlock the printer and print on it again. To do this, check the boxes next to the first and second counter and click Initialize. Next, a warning pops up that after pressing OK, the counter will be reset. Click OK. After the reset, a warning pops up to turn off the printer: Please turn off the printer. Turn off the printer with the button on the printer case and press the OK button. Next, we get a warning that you need to restart or turn on the printer: Please reboot the printer. Turn on our printer and click OK.

We do not close the program on the computer yet. We managed to reset the waste ink container counters on Epson absolutely free. Now let's check the counters. Check the boxes and click Check. I forgot to say that when checking, it is not necessary to check the boxes in front of the counters. However, when we reset, they must be set. When checked, the counters are 0 points or 0%. That is, the reset of the diaper counters was successful. The printer is unlocked and now we can continue printing without any restrictions until the next counter is triggered.
How to reset an Epson diaper using the Printhelp program using the L1800 model as an example?
First you need to download the Printhelp program, and then install it. We open the program and turn on our Epson device, it can be either a printer or an MFP. In my example, I show on the example of an Epson L1800 A3 printer. Of course, the printer must be connected to the computer. In the Printhelp program, click the Update Printer List button. Our device should be displayed in the upper left corner.

Now click on the button Read processing counters. And we see results. In my case, the counters have not yet overflowed. Only 3.32% filled. You can print for a long time without fear of overflow. I just reset it with the Adjustment program, and after that I did a few head cleanings. In your case, the counters will show 100% completion. In this case, the device is locked and does not print. Now our task is to reset the counters so that the device starts printing. As you remember, the Printhelp program is not completely free. There are models for which you can do a free reset, but they are few. Basically, you need to pay an average of 600 rubles for one reset. However, the program allows you to reset the counters once with a trial code for free. In this case, you can reduce the counters from 100% to 90%. If you need to reset completely, you will have to buy a code.
In order to reset the counters, you need to select our device in the upper left corner and click on the button Reset working counters. If your printer is included in the list of devices where a free reset is performed, then you will not have to pay. But if the printer is not in this list, then a window will pop up asking you to enter the code. If you do not have a code, then you need to buy it by clicking on the Buy reset code button. If you do not want to buy a code, you can use a free trial code that will reset the counter from 100% to 90%. When you click buy code, you will be taken to the printhelp program website, where you will need to buy the code. Buy and then enter. I will not buy, but I will use the free code: trial. Enter this word instead of the code and click OK. After this procedure, the counters will be reset to the level of 90%. In my case, this does not happen, since the level of counters is only 3.32%. After that, you will be able to print a little for a while, but after that you will have to buy the code.

That's all, in this article, using the L1800 printer as an example, we showed how to reset the Epson diaper counter. We hope you found this article very helpful. Which program to reset the counters is up to you. I like the Adjustment Program better because it's free and not too complicated.
 Reset epson l1800 ink selection
 How to perform automatic download and update
 Drivers and utilitiesᐅfor printers and multifunction devicesᐅCanonᐅPIXMA MP495