How to merge two photos in photoshop. How to merge photos in Photoshop? Smooth transition from one image to another
Instruction
If you want to use one photo as a background and put the second one in front, start by loading a background photo into Photoshop by dragging its file into the editor window. Then create a duplicate of the only image layer - select it in the layers panel and press the key combination Ctrl + J. Perform all subsequent operations with the duplicate, the original layer can come in handy if something goes wrong during processing.
Expand the "File" section in the menu and select the "Place" command. A standard file open dialog will appear, with which you need to find the second photo, select its file, and then click the "Place" button.
The foreground photo will be placed in the center of the background photo and Photoshop will immediately turn on its transform mode. Use the anchor points on the frame around the pasted image to resize the photo. To maintain proportions, move the corner points while holding down the Shift key. Then use the mouse or navigation keys to drag the photo to the desired location in the background and press Enter.
If you decide to place both photos side by side, you will need to resize the canvas. Open the "Image" section in the menu and select the "Canvas Size" item to open a window with the settings for this operation. You can use the key combination Ctrl + Alt + C instead of the menu. In the "Width" and "Height" fields, set new values for these parameters - they do not have to be exact, enter numbers with a margin.
Click one of the layers in the panel and turn on the "Move" tool - press the V key. Use the mouse or arrow keys to move one of the photos to the left edge of the canvas. Then select the second layer and move the other photo to the right place. If necessary, adjust the dimensions by turning on the Free Transform mode with the keyboard shortcut Ctrl + T.
Trim excess canvas space - open the "Image" section in the menu and select the "Trimming" line. In the operation settings window that appears, simply click the OK button.
Save the combined photo using the dialog called by the Ctrl + S key combination.
In the active window of the program, click on the "File" menu. Immediately after that, you will see a drop-down in which you need to select the "Open" command. The loading window of the program will appear in front of you. In this window, click on the "Desktop" icon (previously you moved here Images) and select the ones you want for . After the pictures are selected, execute the "Open" command by clicking on the appropriate button. The images will be opened separately in the program. There is also an alternative way to open two images at once in the program. You don't even have to run the program to do this.
Arrange the necessary Images so that they can be immediately separated together. After Images will be highlighted, right-click on one of them. A menu will appear where you need to select the "Open with" command. In the next step, you need to click on the "Browse" link and select. The application will be launched with already open Images mi.
Related videos
The ability to combine several photos in one image can be very useful in many cases - if you are making a friendly holiday card, a wedding wall newspaper, an art collage, a work presentation and much more. Creating collages from multiple photos is very easy if you are fluent in Adobe Photoshop.

Instruction
With the main photo selected, duplicate its layer by clicking on the Dulplicate layer item in the layers palette. Using the Move Tool, drag one of the three photos onto the duplicated layer by holding down the left mouse button.
On the main photos a third layer will appear - it will have the one you just transferred. Place the new layer between the duplicate and the original layer. In order for one photo to fit organically on the background of another photos, you need to cut out the main object from it. Use the Lasso Tool for this, which you will find on the toolbar of the program.
Highlight the part you want photos, and then invert the selection (Ctrl+Shift+I) and delete the extra fragments. Use the move tool to cut out the part to the desired location. To deselect, choose the Deselect option from the Select menu.
You may need to adjust the size and shape photos under the new background - to do this, press the key combination Ctrl + T to call the free transformation tool. In order not to break the proportions photos while changing it, hold down the Shift key. Reduce or enlarge and, if necessary, expand it to the left or right, changing the angle.
Now take the third photo that you want to combine with the first two, and do the steps already described - crop the excess and place the photo in the right place, transforming it if necessary.
Sources:
- connect 3 photos online
Quite often, when working in Adobe Photoshop, it becomes necessary to combine fragments of several photos. But how to do it if you are not so familiar with this graphic editor. How to open multiple images at once?

You will need
- -computer;
- -Adobe Photoshop software;
- -files-photos.
Instruction
If you need to open photos in separate bookmarks, then go to the "File" section, then click "Open", thereby launching the image selection program for loading into Photoshop. You can do all this faster if you simultaneously press the key combination CTRL + O. Then select the photo you need in the program and left-click on it. On the second selected photo, click with the mouse while holding down the CTRL key. After that, you will notice that two photos are displayed in the "File name" line. In this way, you can select as many files as you need. When all photos are checked, click "Open" and the selected files will load into Photoshop in separate tabs.
If you don't have to use search directly through Photoshop's menus, then open Windows Explorer. To do this, double-click on the shortcut "My Computer" ("Computer") or press the WIN + E keys at the same time. Next, find the folder where the photos you are interested in are located. Launch Photoshop and minimize it to a window, positioning it in relation to the folder of images so that you can easily drag and drop them. Select the desired photos by holding down the CTRL key and drag them with the mouse into the editor window. It will open each of the marked photos in a new tab.
If you want one photo to be placed inside another, then press CTRL + O at the same time and open the first photo. As soon as the editor loads it, open the "File" section and click on the "Place" item. A file selection dialog will open again in front of you, and open the second photo in it. After these steps, both photos will be placed on the same layer. You can resize an image by moving the dots located at its corners.
A series of shots that share common elements can be combined into a panorama using Photoshop's Transform and Move tools. To achieve the same result, the Photomerge option of this graphic editor is suitable.

You will need
- - Photoshop program;
- - photos.
Instruction
Load the first shot from the series into the editor using the Open option of the File menu if you are going to stitch frames manually. Unlock the image by double clicking on the layer.
Increase the size of the canvas so that all the pictures you are going to glue fit on it. To do this, open the settings using the Canvas Size option of the Image menu and enable the Relative option. Depending on the number of images you are working with, increase the value of the Width parameter. To glue two pictures, you will need to change the canvas size to one hundred percent. If you are going to connect graphics not horizontally, but vertically, increase the value of the Height parameter.
Insert the remaining images one by one into the open document using the Place option of the File menu and apply to each photos the Rasterize Layer option from the context menu.
Using the Move Tool, arrange the pictures so that their matching fragments are superimposed one on top of the other. Decrease the value of the Opacity parameter to distinguish the details of the layer being moved and the photo below it.
If, due to a change in the shooting point, the parts on the neighboring ones do not exactly match in size, transform the images using the Distort option of the Transform group of the Edit menu. You can avoid the appearance of a sharp border between frames by hiding part of the top layer using a mask. To do this, make black the main color, turn on the Brush tool and reduce the value of the Hardness parameter in its settings. Using the Add layer mask button, add a mask to the layer and paint over the part of the photo that should be transparent.
Pictures taken with the same manual settings are suitable for merging into a panorama. Photos taken in Auto mode may vary in contrast and color balance. To smooth out this difference, apply the Curves option of the Adjustments group of the Image menu to each of the layers and edit the colors of the combined images.
You can merge several pictures using the Photomerge option of the Automate group of the File menu. To upload images, use the Browse button and select photos for the union. Enabling the Attempt to Automatically Arrange Source Images option will allow the program to try to adjust the order and position of the images in the panorama without your participation. With good image quality, this attempt may be successful.
By default, pictures will be flattened. By turning on the Perspective option in the Settings panel, you will get a panorama with imitation of perspective. If the result of automatic merging of photos does not suit you, you can move or rotate individual frames using the tools located in the upper left area of the Photomerge window.
Check the Snap to Image checkbox if you want to get the image flattened into one layer. The result of applying the Keep as Layers option will give a panorama consisting of several layers, which will open in the usual Photoshop editor window. In the CS3 version, duplicate areas of images will be hidden under masks; in earlier versions of the program, layers will open without any masks.
Having obtained a flattened panorama in one way or another, turn on the Crop Tool and cut off the excess parts of the canvas and the protruding edges of the deformed frames. Save the glued image using the Save option of the File menu to a jpg file.
Sources:
- Create a Panorama in Photoshop
Quite often, to reduce the weight of the image, photographers turn off layers. Such a step allows you to significantly reduce the size of the image, which is especially important when downloading a file from the Internet to save traffic.

When creating a festive design for postcards, all kinds of collages, or just interesting, unusual photos, you will need instructions on how to combine 2 photos. Photoshop is a great program for doing this. Of course, it may seem to new users of Photoshop that this is a rather difficult task, but this is not at all the case. Having mastered a few simple operations, it will be possible to give free rein to all your imagination in photo editing.
Combining images
So, the process of combining two photos in Photoshop is as follows:
- First you need to select two photos that you want to merge into one. To do this, first open the first photo. This can be done using the keyboard shortcut "CTRL + O", after which you should select the desired file and click on the "Open" button - "Open". So the editor will load the desired image.
- Then you should open the menu section "File" - "File" and select "Place" - "Put". After that, the file selection window will open again and you will need to find the second photo. After the “Open” button is pressed, Photoshop will load the second image into the same layer, which also contains the first photo.
- In order to increase or vice versa reduce the second photo, you need to start moving the anchor points with the mouse, which are located in the corners of the rectangular selection around the second photo. While doing this, hold down the "Shift" key. In addition, the position of the second photo can be changed relative to the background of the first. To do this, drag it with the mouse or simply press the arrow keys.
- After the positioning of the inserted object is completed, it is necessary to press the "Insert" - "Enter" key.
- After finishing the preparatory work described above, we will finally figure out how to combine photos in Photoshop, you should pay attention to whether you need to lower or, on the contrary, raise the bottom layer of the photo. If the need for this arose, then you should press the combination "Move Tool" + "V" - "Move Tool" + "V" and start moving the lower image.
- If an error message appears, you need to rename the bottom layer. To do this, press the "Alt" button and double-click on the "Background" - "Background" command.
- Now you need to blend the layers. To do this, you need to select the top layer and click on the add layer mask button. This icon will appear after selection, opposite the selected layer. It will be painted white.
- After that, fill the layer mask with a black and white gradient. To do this, select the command "Fill" - "Gradient Tool" on the toolbar. Having opened the settings, you need to select a black and white color in the table. Then press the "Shift" key and, while holding it, mark the place between the layers where the gradient should begin and end according to your idea.
- If the result does not satisfy you, then you will need to press the key combination "Ctrl + Z", and then select the blending field again.
- Then you can start merging both layers into one. You need to select the command "Layer 1" - "Layer 1" and press the following key combination: "Ctrl + Shift + Alt + E". Thus, a new layer called "Layer 2" is obtained. It is in the list of layers third in a row.
- At the end, you should save the resulting image by clicking on the "Save" - "Save" button.
As you can see, it is not at all difficult to combine two photos. Photoshop offers a lot of other possibilities for creating an original photo. For example, before combining images, you can crop them or deform them in an arbitrary direction using the appropriate tools. You can also apply different frames to your photos.
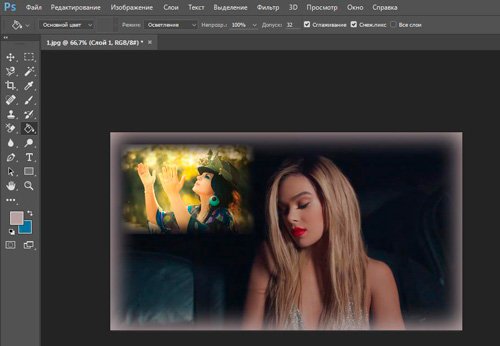
One of the most interesting and popular features of a graphic editor is photomontage, which can have a lot of variations. For example, you can combine two photos in Photoshop to make an interesting collage where one image blends seamlessly into the other. This effect can be used for various purposes, most often in this way images with a romantic mood are created. Often this technique is used when editing wedding photos.
First you need to choose the right source photos. Imagine how they will look together. It's good if the images have something in common: plot, style, color, or something else. Although this is not required. It is also desirable that the quality and size of the photos do not differ much.
In order for an image assembled from two pictures to look organic and beautiful, it is not enough just to overlay one photo on another, cut off unnecessary fragments, or use an eraser. There is a common technique when using the capabilities of the Gradient tool.
How to combine photos using a gradient in Photoshop?
So let's start merging images. For example, we took a picture with a girl, the background of which on the left side is not very interesting. We'll pair this image with a vibrant photo of a sailboat at sea,
Open both photos in the program.
Select "Move" from the toolbar and drag one photo onto another. If the dimensions don't match, use the Free Transform setting in the Edit menu to fit the photo you placed on top to the size of the bottom layer.

Activate the "Gradient" tool, in its options at the top, under the main menu, select the standard black and white gradient (if there is another one installed there) and the type "Linear gradient".
On the toolbar, click the "Quick Mask" button, which is located at the very bottom.
Now draw a line on the part of the image that you want to leave unchanged, the part of the photo will turn red.

Everything else that is not painted over in red, you will subsequently delete. You can draw several lines, adjusting the painted area in order to eventually achieve the coloring of the fragment you need. Skill is required here, but the number of attempts is not limited - you can draw as many lines as you like, while the painted area will change.

Now press the DEL key - the selected fragment will be deleted. In this case, the transition from one photo to another will be smooth.

If you are not satisfied with the result - too much has been deleted or, conversely, not enough, you can click "Step Back" in the "Editing" menu and try again.
After removing the fragment, people remained in our photo, which slightly spoil the picture. We took a regular eraser with soft edges and removed people. Here's what happened in the end.

And here is another version with other photos,

You can combine two photos in one in Photoshop not only using the usual linear gradient, but also its other types. Here, for example, a radial was applied.

A rich imagination, desire and perseverance combined with this technique will help you create amazing collages from various photographs.
1 voteHello dear readers of my blog. Today we will talk about one very simple manipulation, thanks to which you can create quite beautiful objects. It's great when just one function is enough to make something complete, unique and useful. This is exactly such a case.
Today I will tell you how to combine two pictures in Photoshop. You will receive not only step-by-step instructions, but in the future, thanks to this article, you will be able to process the edges of the image: outline the borders, and also create smooth transitions. All this will add elegance to your work and allow it to look good on the wall if you want to print a collage.
Such portraits can even be sold if you have a share of ambition, an entrepreneurial streak and a subscription to my blog. I often talk about easy ways to promote your business on the Internet, you just have to choose the right tips and use them.

Well, now let's go directly to working on photographs. How to combine them?
Merging photos together
For work, I downloaded 2 photos from . You can have several pictures, it's not that important. Save them in a folder, open up Photoshop and get ready to move on.

There are several ways to add an image to the program. For example, the item "File" - "Open" in the top menu. I love the different method which is perfect for making collage. I just drag one image into the working field of the program from the folder, and then another.
In general, this method is considered “correct” for this work. In the article, I explained why. If you add a picture in the usual way, then a few manipulations with the size can lead to the fact that the pixels in the photo will be broken and the quality will suffer. If you paste a picture from a folder, then Photoshop treats it as a Smart Object and prevents pixel breakage.

If you drag several pictures at once, they open in neighboring windows. If you first add one to the working field, and then the second or third, and so on, then they are superimposed on the original image.
It will not be difficult to reduce, enlarge or drag a new photo. All this is done with the mouse. The only thing I can reveal a few useful secrets. If you hold down Shift and then start manipulating the cursor, the proportions will be preserved. The picture will not be "stretched" horizontally or vertically.
Another useful keyboard shortcut is Ctrl+T. Let's say you've already worked on an image and hit enter to apply formatting, and then want to change the image's size or location again, these hotkeys will help you call the same function again.

Are you generally well versed in the term ""? If knowledge is not enough, I recommend reading the publication on my blog, in which I talk in detail about this Photoshop feature. There will be no white spots in knowledge.
Now I will only recall the main points. Do not forget that clicking on one of the layers will activate it, you can work with the selected one, and the rest will remain untouched. However, if you now want to do this, then many functions will be closed to you. What is the reason?
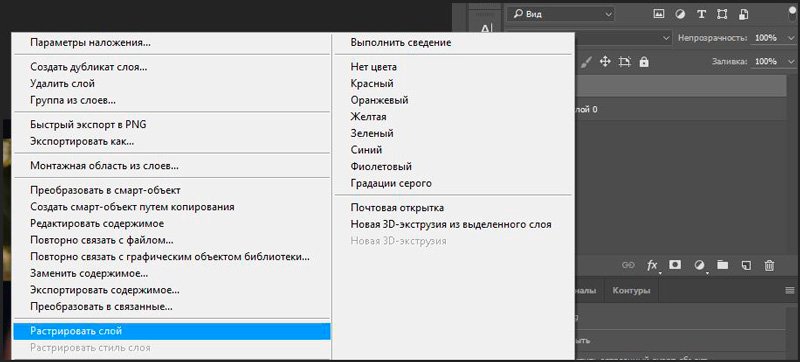
The top layer (under the number "2") is not rasterized, and the second ("Background") is closed from editing. Click on the padlock on the right to unlock the options on the bottom.

With what I called "2" will have to do differently. Right-click, and then in the menu that appears, select the "Rasterize Layer" function.
That's it, now you have access to all the features of Photoshop and can apply them on both photos.
Stroke
This blog already has, in it you can learn how to work with complex contours. Now, I think we need a simple version of the design of the frame for the image.
To do this, I click on the Fx function in the right menu and select “Stroke” in the window that appears. Do not forget that it will be applied to the layer that you clicked on, and it was subsequently highlighted. In this case "2".

Understanding the settings is easy. The size determines the width of the frame, you can choose the position (from the center, outside or inside the picture), make the hue more or less saturated - the "Opacity" parameter is responsible for this, and, in fact, the color itself, which, if desired, can be replaced with a gradient or pattern in the Type menu.
Play around with these settings yourself. Don't forget to enable Preview by ticking the appropriate checkbox under the New Style buttons on the right.
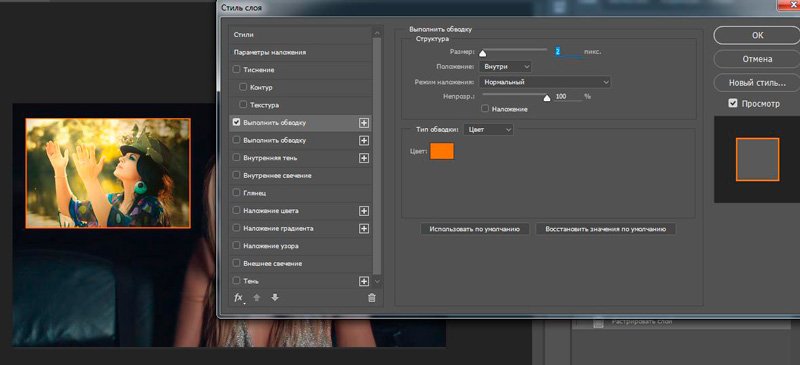
I will apply a stroke to both images located side by side.

Smooth transition
In order for one image to merge with another, it is necessary to do something a little differently. Now I will show an easy way for beginners.
First I will choose a rectangular selection, you can read in the last post. Then I select the borders of the image, which will be blurred, and then the "Select and mask" option.

To better see the result, select the "On Layers" view.

There are also a lot of settings here, but for now we will only need Feather and maybe Offset Edge. Drag the sliders, and then click "Invert".

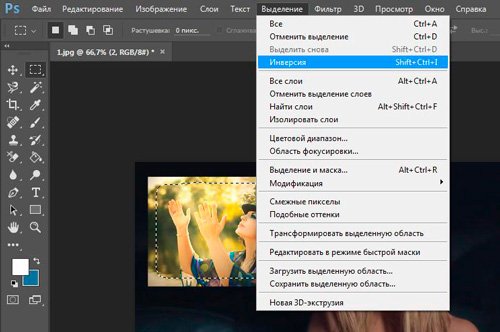
Now, to make everything work out in the best possible way, select the "Select" item in the top menu, and then "Invert". You can just use the hotkeys Shift+Ctrl+I.
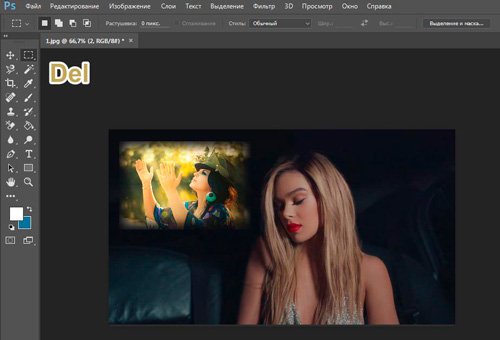
Done, press the Del button on your keyboard. If you had not applied the “Invert” parameter, then now it would not be the edges of your picture that would be removed, but everything that is in the center.
You can do it a little differently than in the previous example. First, select the layer (now I'm working with the background), then circle the image with a rectangular selection, then apply the invert, and finally open the "Select and Mask" function.

Ready. This is what the photo looks like now. You forget to press Del. By the way, to get rid of the excretory ants around the border of the picture, use the Ctrl + D combination.

Our drawing is translucent. Read if you want more details. I suggest you create a new layer as a background. Next to the "Trash" icon in the menu on the right, you find a button to create a new layer. Then drag it below the background image.

Choose the appropriate color and fill tool and apply it to the picture. By the way, I think that now you may need an article about how to image. In this publication there are many interesting simple ways and techniques for creating by hand.
That's basically it.
Video instruction
If you still have questions, you can watch a video on how to merge two pictures side by side.
Well, this tutorial is for you if you want to take a photo with a smooth transition. There are settings in this video that I didn't talk about in the text of this article, so don't pass by.
Well, I just have to remind you that if you want to learn more about the tools that are in Photoshop, then this course will help you « Photoshop from scratch in video format » . A lot of detailed information for a novice user, especially if in the future you are thinking about making money on your skill.

Well, for those who want to achieve maximum results in their hobby - a course « Magic collage » . An incredibly useful thing, in which more attention is paid to the artistic component of the work: light, shadows, and so on, as well as the maximum of professional secrets of drawing processing.

That's all for me. Don't forget to subscribe to group Start-Lak Vkontakte so you don't miss anything useful. See you again and good luck.
Merge two photos into one task is quite difficult for beginners who have just started to learn Photoshop In this article we will combine two images into one using Photoshop and Pixlr service (photoshop online).
Why combine two photos into one, what is a photo collage
Hello, friends! You have probably seen photos on the Internet more than once, where other images are displayed on the same background of one picture. Why combine pictures in this way? Mainly to create a new unique photo. This is necessary for those people who, for example, work on freelance and make similar pictures to order. Or users who own their own websites, blogs, groups in social networks.
Such a drawing is called a photo collage. What is a photo collage? This is one picture, which contains many other pictures. For example, people are walking against the backdrop of nature. Next, we will learn how to merge 2 photos into one.
Merge two photos into one online, Pixlr Express
In addition to Photoshop, there is a special Pixlr Express service on the Internet that can combine two photos into one and thereby create a photo collage. It is quite easy to work with him. First, let's open its main page at this address - (pixlr.com/express). (I will say that this service will not work if you have ad blockers enabled).
To create a photo collage, click on the button – Collag. Next, we will open the editing panel. Four panels will open, you can click on them and select from the computer those photos that we want to connect. (Picture 1)

So we have two photos. Now, in order to combine them into one, click on the Layout button, select a double layer and “Finished” to save the picture. (Picture 2)

Subsequently, there are two functions Save, which means to save. Click on this function twice and save the photo collage to your computer. So, we have created a photo collage (Figure 3).

This tool will help you combine many other different pictures.
Merge two photos into one in Photoshop
So, to combine two photos into one, we use the second option - the Photoshop program. Open Photoshop, click on the "file" button, then "open" and select from the computer the picture that you want to change.
Then add the second photo in the same way. There are two image tabs in Photoshop. We need to move to the second one in order to move the image to the first photo. Click on "layers" then double click the left mouse button and click "ok". This must be done in order to be able to edit the image. (Figure 4).


After this action, the picture will be removed from this background and it can be inserted on another background. To insert a picture, again go to the first picture in the “editing” section “insert” In this case, you should definitely be able to combine two photos into one. If the background in the second photo interferes with you, then you can remove it. Go to the "layers" tab, select the "vector mask" then click on the brush and slowly remove the unwanted background. Thus, the pictures are fully connected.
Conclusion
So, in this article we have considered the question - how to combine two photos into one in Photoshop and using the Pixlr service. This photo merging method will help many users, especially in terms of making money online.
Created collages, unique pictures can be placed for sale on the Internet on special services - photo stocks and earn money on it. Good luck to you!
Sincerely, Ivan Kunpan.
Get new blog articles straight to your inbox. Fill out the form, click the "Subscribe" button
 How to fix it: the sensor on the phone does not work
 Memory card issues Performance and software platform
 Why Viber is not working Why they can disable the viber service