How to remove a printer - an easy removal method. How to remove a printer driver: instructions and tips Remove printer drivers from your computer
Manual removal
To remove the printer driver manually, you need to follow these steps:
- Go to the operating system control panel;
- Select “Devices and Printers”, after which a list of devices installed on your computer will appear on the screen;
- Delete the desired printer by right-clicking on its image with its name.

To continue removing the remaining software for the printer, go to the services menu by entering the Services.msc command in the Run menu (Win + R) or through the command line (Start ⇒ Programs ⇒ Accessories);

In the menu that opens, find “Print Manager”, right-click and select restart the service;

In the “Run” menu, enter the command printui /s /t2, which is necessary to go to the print server window;

Remove from the list all drivers with the name of your printer.
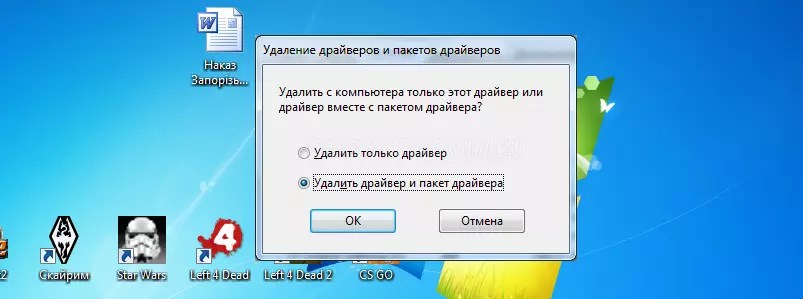
Advice: When uninstalling, a message may appear asking whether to remove the drivers along with the packages. It should be answered in the affirmative.
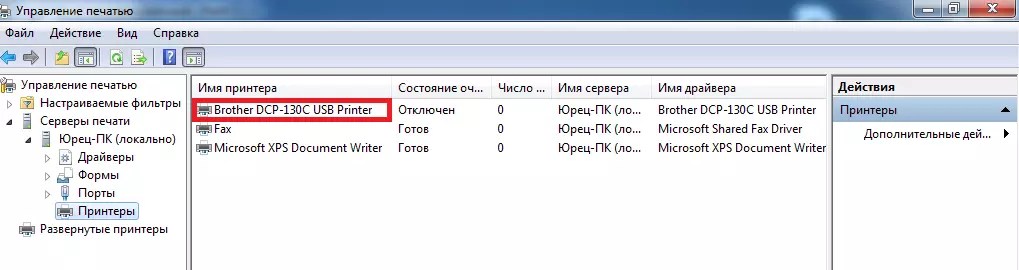
- Go back to the execution menu again and enter “printmanagement.msc”;
- Find the “print server” item, select the “Printers” sub-item and remove all drivers.
After completing all the necessary actions and rebooting, the system should not retain any traces of installed printers and those drivers for them that were loaded by the user or automatically after connecting the devices.
In this case, Windows will leave several universal control programs included in the OS.
Using special utilities
To make the task of removing printer drivers easier, you should use special programs.
This will allow you to avoid running system utilities and save time.
One of these utilities is, with which you can get rid of unnecessary drivers for any device.
To work with it you will need:
- launch the utility by selecting the Russian interface language;
- go to cleaning the system by clicking the “Analysis” button (in some versions – “Analyze”);
- after the utility collects information about drivers and errors in the system, make sure which of them should be removed and remove them;
- remove unnecessary control programs (in this case, for the printer).

Some printer manufacturers write applications to simplify driver removal on discs that come with the equipment.
They are even easier to use - when the media autostarts, a menu usually appears on the screen prompting you to install or remove drivers.
But even in the absence of such a window, it will not be difficult to remove drivers.

Cleaning up trash
After removing the drivers, the printer may leave traces that will be almost invisible, but still interfere with the installation of new control programs and printing of documents and images.
In order to make sure that there are no entries related to the printing device, you should use the registry editor. To do this you should:
open the run window (Win + R) and enter the command regedit

- when the program opens, select the “Edit” item in the top menu and the “Find” sub-item;
- enter the printer model (or part of it) in the field, for example, DCP-130C or simply DCP-130;
- select “Find next”, after which all files, libraries and drivers whose parameter names match the specified “mask” will be found in the registry in turn.
Most likely, the search will have to be repeated several times. After this, the computer is restarted, and now the damaged or non-working printer drivers can be reinstalled.
Solving related problems
Sometimes during the process of removing drivers, various problems arise and messages like “ driver in use" or " driver is busy».
Information may also appear indicating that it is impossible to remove the control program. If these problems occur, doing the following may help:
- Try again to do all the same steps as when manually removing drivers (remove the printer from the list of devices, remove drivers and packages, restart the print manager);
- Open the registry editor and find the item HKEY_LOCAL_MACHINE\SYSTEM\CurrentControlSet\Control\Print\Environments\Windows x64\Drivers\

- Select the name of the printer whose driver the system for some reason does not allow you to remove, and rename it (for example, from DCP-130C to DCP-130C1). Now Windows does not recognize the program as a control program for this device;
- Continue trying to remove drivers. In most cases this works. If not, in the same branch of the registry editor, open not Print, but Print Processors and rename the drivers here too.

Another option for troubleshooting printer driver problems is suitable for devices from well-known brands such as Canon and HP. To do this you will need:
- Open a command line (required as administrator);
- Enter the command “net stop spooler”, stopping the print spooler;
- Go to the system disk in the folder Windows\System32\spool\;
- Find the Printers folder and clear its contents (without deleting the directory itself);
- For HP printers, you should also completely clear the contents of the drivers\w32×86 folder located there;

- Enter the net start spooler command to start Print Spooler;
- Reinstall the drivers using already known methods;
- To restart a computer.
Results
After you have removed a printer driver you no longer need using one of the above methods, you should immediately install a new one - otherwise the device will not print or will not be recognized by the system at all.
Although, basically, after loading the Windows 7 system, a message will appear on the screen about the automatic installation of control programs or an offer to find them and install them yourself.
As a result, the printer restores its functionality again. If this does not happen, there may be a problem with the device itself.
Video:
How to remove a Windows 7 printer driver, It does not work? By mistake I installed the wrong driver, when I delete the printer in the Control Panel, in the Devices and Printers tab it is deleted, then I reboot and the faulty printer driver is restored, the device driver software is installed -> The device is ready for use. I tried to reinstall without rebooting, it says This version is already installed. Installation cancelled. I tried to Delete the driver package in Print Management, it says that the driver is busy, at least reinstall the system, tell me something.
Georgy.
How to remove a Windows 7 printer driver
Removing a Windows 7 printer is associated with certain difficulties and there is no easy way to remove the wrong driver. Let's do this operation together, screenshots of each of our steps are at the end of the article.
- First thing to do: Go to Control Panel–>Devices and Printers and delete our printer until we reboot.
- Second: Start->Run, type Services.msc and go to the tab Services restart Print Manager.
- Third: Start->Run, type printui /s /t2 we get into the window Print Server Properties and remove our printer driver. We can choose Remove driver and driver package.
- Fourth: Opening Print management Start->Run, type printmanagement.msc. In folder Custom filters need to choose All drivers, right-click on our driver and select from the drop-down menu Remove driver package. If an error appears, it means it has already been deleted.
Also in Print Management, in the tab Print servers, select the item Drivers And Printers remove our driver.
Basically remove Windows 7 printer driver Now we have already succeeded and after a reboot the new driver should be installed successfully, but you can still do the rest of the manipulations to be sure.
- Fifth: Look at the menu Uninstalling or changing a program Is there any mention of your printer, if yes, then click Remove, then remove all components of your printer software. Delete all files related to the printer from your computer, starting with the folder Program Files.
- Just in case, look through the registry for the presence of keys with the name of your printer.
Reboot and install a new printer driver.
You can read our article -> and


In the modern world, the computer plays an important role in human life. It has simply become an integral part of life. However, sometimes in the process of work peculiar nuances arise that are difficult to solve without help and hints. When a person starts installing software on different operating systems, there is difficulty in uninstallation. Let's look at how to get rid of the HP printer driver on various operating systems.
Uninstalling the driver
Operating system Windows XP
There are several standard ways to completely remove the HP printer driver in Windows XP:
- If you cannot remove the HP printer driver completely in automatic mode, then you should use the manual method. To do this, you will need to perform a number of manipulations: enter the “Start” menu; go to the “Control Panel” tab; click on “Printers and Faxes”; right-click on this tab to bring up the context menu; select “Properties”; In the “Driver” attachment, highlight the highlighted “delete” button and click on it. After carrying out simple manipulations, you will be able to completely remove the printer driver from the Windows XP operating system.

- The second method for removing the XP printer driver: you need to go to the \WINDOWS\system32\spool\drivers\w32x86\3\ folder (this folder stores the drivers for all installed printers); delete all contents of the folder (just do not delete the folder itself); reboot the system. This method allows you to completely remove the drivers of all printers installed on the system.
- The third removal method is through the system registry. Go to the Start menu and select Run. In the pop-up window you need to enter “RegEdit”. Next, we go through the following sections: HKEY_LOCAL_MACHINE/SYSTEM/CurrentControl/SetControl/Print/EnvironmentsWindowsx86/Drivers/(printer name). We remove it from the Windows XP system. After these steps, restart the computer.

Operating system Windows 7
To remove the printer driver in Windows 7 manually, there are several effective methods. Let's look at the best method: remove the “device” in the “Control Panel” / “Printers and Devices” tab; in the command line enter the action “Services.msc”; restart Print Manager.

In the command line write “printmanagement.msc”, which will allow you to use print management. Go to the folder “Custom filters” / “All drivers”. In the window that opens, you need to call up the context menu on the driver that you want to remove from Windows 7. Next, press the “Remove driver package” button.
The second method to remove the printer driver in Windows 7 (identical for Windows 8.1):
- Go to the taskbar “Start” / “Control Panel” / “Devices and Printers” (see the photo below for what the window looks like).
- Afterwards, you need to simultaneously press the “Win + R” keys and enter the “Services.msc” command (or enter the “Start” / “Run” menu).

- Right-click on “Print Manager”. In the window that appears, click “restart”.
- Next you need to execute “printui /s /t2” (in a similar way as described above).
- The “Print Server” tab appears in the pop-up window (in this window you need to remove all installed driver packages for the printer. After clicking the “delete” button, a system message confirming the action will appear. We accept it and move on).
- Go to the command line again and run the command “printmanagement.msc”.
- In the pop-up window, also delete all installed drivers for MFPs or printers.
- Go to the “Program Files” folder and clear folders related to printer names.
- Go to the command line and enter the action “Regedit” (in the pop-up window, click “Edit” / “Find”. In the pop-up window, write the name of the printer or MFP and delete the entries in the registry).
- Restart the Windows 7 operating system (Windows 8.1 OS) for the changes to take effect.
Operating system Windows 10
Windows 10 has its own specifics about completely removing the printer driver. First, you need to uninstall the device software that was installed earlier, and then start cleaning up the garbage.
- The very first thing you need to do in the Windows 10 operating system is to launch an administrator account (to access administrator rights). Open the context menu on the Start taskbar. In the pop-up window, go to “command line (administrator)”. In the window that appears, enter “net_user_administrator/active:yes” (if the computer is running a Russian-language version of Windows 10) or “net_user_administrator/active:yes” (for an English-language version).

- Go to the “Control Panel” tab, then to “Uninstall a program”. We expect the creation of a general list of installed programs. We are looking for the name of our printer that needs to be removed. Press the “Delete/Change” button. We are waiting for the printer software removal process to complete.
- The next step will be “removing the device”. Go to “Start” / “Control Panel” / “Hardware and Sound” / “View devices and printers”. Right-click on the printer icon. From the context menu, select “Remove device”. We confirm.
- Press the Windows + X key combination and select Run. Enter the command “printui /s” and click “OK”. Go to “print server” / “properties”, find the “Drivers” section, select the required driver and click “Delete”. In the pop-up window, select “Remove driver and driver package” / “Ok”. After this, a system message will appear confirming the removal of the driver. Click “Yes”. Again the system returns to the “Uninstall driver and driver package” tab. Click “Delete”. In the Windows 10 operating system, after uninstalling the printer driver, the package remains. It will not be possible to completely remove it.

Click reboot (after rebooting the Windows 10 operating system, all changes will take effect).
A device driver is a software package that is designed to communicate installed equipment with the operating system. The development of this software is carried out by programmers from device developers (printers, video cards, and so on). Modern Windows can work with some components using built-in drivers, but for printers you often have to install them manually.
You may need to uninstall the printer driver in two cases:
- A failure occurred and the device began to malfunction due to faulty software.
- A new printer was purchased, but its driver conflicts with the old one (from the previous equipment) - that is, a software conflict has arisen.
To solve the problem, you should uninstall the printer driver. The sequence of actions will be different for different versions of Windows.
Important! The printer must be disconnected from the computer when removing the drivers, and if you need to reinstall the software, then turn it on again.

Windows XP
Step 1. Call the “Start” menu, hover the mouse cursor over the “Settings” line, then select “Printers and Faxes”.
Step 2.

Step 3. A window will open, in it click on the “Drivers” tab.

Step 4. Now select the printer whose drivers you want to remove and click the corresponding button.

The software will be removed from the system.
Windows 7 or Vista
Step 1.

Reference! If there is no “Devices and Printers” line in the “Start” menu, open “Control Panel” and go to the specified item in it.


Step 2. In the window, select the appropriate printer and click on it. Click “Print Server Properties”.

Step 3.

Step 4. If there is more than one printer in the system, then you need to select the one whose software you want to remove and click on the corresponding button.

Windows 8 and 10
Step 1. Call "Control Panel". This process must be performed through the search bar, or by pressing the key combination “Win” + “X”.

Step 2. In the “View” mode, select the “Category” value. At the very bottom - “Uninstall a program”.

Step 3. In the list, you should find your printer and delete everything associated with it by selecting the lines with the left mouse click, after holding down the “Ctrl” key, and clicking on the “Delete” option.

Step 4. Then return to the “Control Panel” - “Hardware and Sound” section and click on the “View devices and printers” link.

Step 5. If there is a previously deleted model in the list, then you need to delete it here too - call the context menu with the right mouse button - and click the “Delete device” item.

Cleaning traces in the registry using the CCleaner utility
The last point is . It is best to do this not manually, but using the CCleaner utility, which is free. It can be downloaded and used to remove system junk. As a result of regular installation and uninstallation of programs and updates, unnecessary files accumulate on the hard drive that need to be periodically deleted. The utility will also cope with cleaning the registry - a system database that stores data about all software (settings) and about Windows itself.
After downloading and installing, you need to run the program. The first time it will check for updates.
Step 1. In the right column, click on the “Register” item.

Step 2. In the central part there is a list of error checking options. All items will be automatically checked, if not all, we will mark them. Click "Search for problems".

Step 3. A list of errors will appear in the center - right. If they are all checked, then you need to click on the “Fix selected” button.

Step 4. You will be prompted to create a backup copy; it is better to do it and save it on an external drive.

Step 5. Next comes the error correction process. The program will ask how to fix each error. If there are a lot of them, for example, 100 errors. Making a decision every time is too tiring. It is better to entrust this matter to the utility by clicking “Fix marked”.
Removing drivers using Driver Fusion
This utility helps you work with drivers. Suitable for those who do not want to delve into the operation of the system or the structure of the Windows registry.

Main functions of the program:
- checking drivers installed on the system (searching for more recent versions);
- complete removal of system software;
- creating a backup driver archive.
The utility is able to identify devices from most manufacturers. When performing critical actions (installing/uninstalling drivers), Driver Fusion always creates a restore checkpoint. If the Windows system becomes unstable, you can undo all changes.
Advice! If problems arise when uninstalling software, it is recommended to restart Windows in by pressing and holding the “F8” key. A boot menu will appear, in which you should select “Safe Mode”.
How to download and install
Step 1. We go to a reliable website or the website of the developer of this utility by entering a query in the search bar of any browser.

Step 2.

Step 3. In the page that opens, click the “Download” button. You must specify the folder in which the file will be placed.

Step 4. As a result, there will be an executable file on the hard drive - about 4 MB. It needs to be launched.

Step 5. Click "OK".

Step 6. The installation wizard will inform you that there is a premium version that can be purchased, click “Next”.

Step 7 A license agreement will appear, read it if you wish, and click “I Accept.”

Step 8 Select the installation location as desired by clicking on the “Browse” button. Or leave it as default - “C:” - “Program Files (x86)” - “Driver Fusion”, clicking “Install”.

Working with the Driver Fusion utility
Step 1. An executable file will appear on the Windows desktop; run it by double-clicking the mouse.

Step 2. In the main program window, expand the “Driver family” section.


Step 4. In the open window you will see a list of almost all printer manufacturers; you need to left-click on the icon with the name of your printer.

Step 5. After selection, the “Delete” option will become active at the bottom of the window; you need to click on it.

The program will ask for confirmation twice. In some cases, you will have to restart your PC.
Ways to find the right driver for a new printer
There are times when no CDs (or DVDs) with software are found for the printer. This often happens if equipment is purchased secondhand or on the market. Then you will have to look for software on your own - on the Internet. First you will have to find out the brand and model of the MFP or printer.

If the brand name is often printed on the front panels - Canon, HP (and others), then it is recommended to look for the model name either at the bottom of the device or on the side panel (usually on the back). A rectangle (nameplate) indicating technical information and manufacturer data must be glued. The model is indicated in the format (example in the photo): Lexmark MS510dn.

Step 1. We enter this information into the search line of the system (Google or Yandex). It is important to focus on the website of real manufacturers.

All manufacturers post driver files on their own official websites.

Step 2. Now you need to select the OS type, its version and software language and download drivers, setup instructions (if any), as well as the programs included with it.

Possible problems with installing and uninstalling MFP or printer software
In rare cases (especially if multiple printers are connected to the same PC), problems may occur. The device begins to work incorrectly or stops functioning altogether. If sequential removal and reinstallation of drivers does not lead to anything, then it is recommended to perform the following steps:

If any device is removed from the system, it is recommended to remove it. If errors occur, you need to use special utilities or uninstall the software manually. Before purchasing used equipment, check its functionality.
Also carefully study the documentation: some printers need to be configured correctly, especially if two or more devices are connected to one PC.
Video - Completely uninstalling printer drivers manually
How to remove a Windows 7 printer driver, It does not work? By mistake I installed the wrong driver, when I delete the printer in the Control Panel, in the Devices and Printers tab it is deleted, then I reboot and the faulty printer driver is restored, the device driver software is installed -> The device is ready for use. I tried to reinstall without rebooting, it says This version is already installed. Installation cancelled. I tried to Delete the driver package in Print Management, it says that the driver is busy, at least reinstall the system, tell me something.
Georgy.
How to remove a Windows 7 printer driver
Removing a Windows 7 printer is associated with certain difficulties and there is no easy way to remove the wrong driver. Let's do this operation together, screenshots of each of our steps are at the end of the article.
- First thing to do: Go to Control Panel–>Devices and Printers and delete our printer until we reboot.
- Second: Start->Run, type Services.msc and go to the tab Services restart Print Manager.
- Third: Start->Run, type printui /s /t2 we get into the window Print Server Properties and remove our printer driver. We can choose Remove driver and driver package.
- Fourth: Opening Print management Start->Run, type printmanagement.msc. In folder Custom filters need to choose All drivers, right-click on our driver and select from the drop-down menu Remove driver package. If an error appears, it means it has already been deleted.
Also in Print Management, in the tab Print servers, select the item Drivers And Printers remove our driver.
Basically remove Windows 7 printer driver Now we have already succeeded and after a reboot the new driver should be installed successfully, but you can still do the rest of the manipulations to be sure.
- Fifth: Look at the menu Uninstalling or changing a program Is there any mention of your printer, if yes, then click Remove, then remove all components of your printer software. Delete all files related to the printer from your computer, starting with the folder Program Files.
- Just in case, look through the registry for the presence of keys with the name of your printer.
Reboot and install a new printer driver.
You can read our article -> and
 PayPal wallet verification procedure
 Pirates of the Caribbean: Dead Men Tell No Tales post-credits scene Pirates 5 ending post-credits
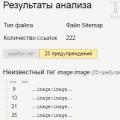 Detailed Sitemap Guide