Setting up printing forms in 1s 7.7. Publications
How to independently connect external reports and external print forms to the configuration in 1C:Enterprise 7.7
Copying an external report to the infobase directory.
The external report file has the "ert" extension. This is a direct external report. Typically, an external report file is accompanied by a description file with the "efd" extension. This file is necessary so that the program "finds" the report immediately and does not need to be connected manually. For example, if the external report file is called "Application Log.ert", then the description file will be called "Application Log.efd". These two files (or one if there is no file with the efd extension) must be copied to the working base directory. To do this, you first need to find the working base directory. After that, you need to find the "ExtForms" directory in the directory of the working base.
If you are copying an external printing form, then you need to find the "PrnForms" directory in the "ExtForms" directory. Copy both files to the found directory (ExtForms for external reports and PrnForms for external printables).
Connecting to an external report program using special processing.
To connect to the database of an external report, you need to open the "Additional Features" report by going to the "Tools" - "Additional Features" menu.
If you copied the external report and the efd file correctly, your external report will appear in the list of external reports.
If the efd configuration file is not copied, then you need to do the following:
Press the "Change" button and select "Add to list" from the menu.

From the drop-down list, select the required external report file (which was copied to the ExtForms directory). If the required file is not in the list, this may be due to two reasons: 1) The file was copied to the wrong folder, i.e. you need to carefully check once again that the copy was correct according to the chapter "Copying an external report to the infobase directory." 2) The file was copied correctly and is already in the list of external reports. In this case, you need to carefully review the list of external reports and find the newly added report.
After selecting the file, a window will open in which you need to specify the name of the external report. Enter an arbitrary name. Press the "OK" button.

After that your external file will appear in the list of external files.
Connection to the program of an external (additional) printing form.
To connect an external printing form, select "Service" - "Registration of external printing forms" from the menu.

Next, select for which document, or for which element or list of the directory you need to connect an external printable. For example, let's connect an external printable for the document "Shipment of goods, products". To do this, you need to put in the group "External printing forms for" the switch to the "Document" item. Then select "Shipment of goods, products" from the menu.

Connected external printing forms should appear in the table. If the table has the form that you need, then it was connected automatically.
If the required form is not in the table, do the following: Click on the "Change…" button and select "Add to list" in the drop-down menu.

In the list that opens, select the form that you copied to the PrnForms directory.

If the form is not in the list, then you copied the form to the catalog incorrectly. Read the chapter "Copying an external report to the infobase catalog" carefully again.

To test the performance of a new external printable, you need to open the document, list or directory element to which you connected the form and click on the button with a small triangle next to the "Print" button.
Select a new printable from the drop-down list.
According to simple instructions, an account agreement for 1C Accounting. And naturally, there was a need to make adjustments to the text of the account agreement. To do this, you do not need to hire a 1C programmer. After reading the simple explanations below, you can easily cope with the task yourself in 10 - 15 minutes.
A little bit of theory.
The invoice contract you downloaded for 1C Accounting 7.7 is an external printed form of the “account document”. In fact, these are two separate files, the first with the .ert extension - the actual form of the account agreement (what you will see on the screen) and the second with the .efd extension - a file that determines the correspondence of a specific printed form to the type of document (in our case, an account) in 1C 7.7. We are interested in the file with the .ert extension - "Dog-chb.ERT". It's pretty simple, let's get started.
To edit the form of a document, in other words, change, change the text at the beginning
Open your base in the "Configurator" mode.
Then open the file Dog-chb.ERT, it is located in the folder Path to your database\ExtForms\PrnForms\

Select "Table" at the bottom of the screen. Now you can start editing the text of the invoice agreement. You can adapt the content of the document to your current business needs in any way you like. Any changes you make will not affect the data in 1C in any way.

Let us draw your attention to the fact that in the printed form of the invoice agreement there are often words enclosed in square brackets - these are variables and formulas into which values from the document will be substituted when printed. For example, the [OrganizationName] variable will be substituted with the name of your organization. The name of the variables should not be changed. Otherwise, you are not limited by anything. Bring the text of the account agreement in line with your business activities. Moreover, you can create several standard invoice agreements, for example, for the provision of services with an advance payment of 50%, 100% and without an advance payment.

Below are the typical, most popular examples of changes in the account agreement for 1C Accounting 7.7.
Editing the invoice agreement form. Example 1
It is necessary to change the prepayment conditions in point 4.1 of the invoice agreement. Let's say the desired amount of prepayment is 30%, then we change the calculation formula to [(Document.Total("Total"))* 0,3 ], respectively, in paragraph 4.2 we change the surcharge by 70%, i.e. [(Documentary Total("Total"))* 0,7 ]. As you can see, everything is very simple.

Editing the invoice agreement form. Example 2
You need to change the validity period of the invoice agreement until the prepayment is received in paragraph 5, by default - 5 days. To change this figure, find [Format ((Doc.DateDoc+ 5 )] and change the five at the end of the formula to any number you need, i.e. to get 3 days, put a three.

That's all. I hope the material will be useful to you. If something doesn't work, please contact
Download:
Distribution terms:
It is distributed completely free of charge (no charge), without any licenses or restrictions, as is. No obligation for updates, upgrades, etc. You have the right to do whatever you want with the files. We are not responsible for any kind of possible damage or dissatisfaction when using our free developments. If you have downloaded the file(s), then you have agreed to the terms of distribution.
Tags: Agreement-invoice edit form, invoice-agreement edit form, agreement-invoice quickly change text, invoice-agreement quickly change text, agreement invoice quickly change text, agreement-invoice for 1C edit form, agreement invoice for 1C edit form, printed form for 1C to edit, change the external printed form of the contract invoice, edit the printed form of the contract invoice.
It is carried out in accordance with the standard layout of the printed form built into the application by developers (it is called the "supplied" layout).
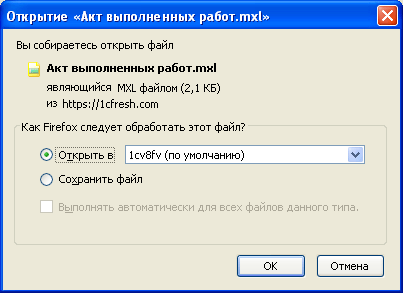
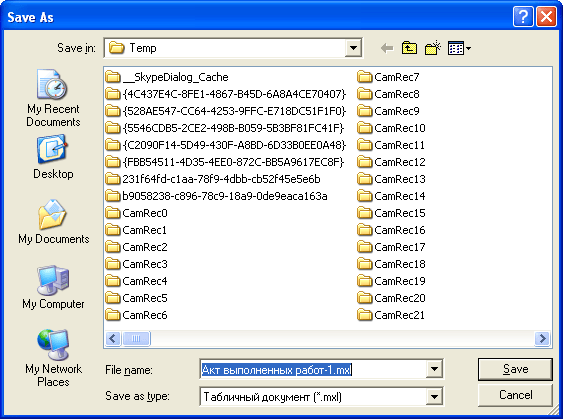
If necessary, you can change the standard layout and, in the future, print the document based on your personal ("custom") layout. To edit the layout of the printed form, a mechanism for uploading to a local computer is provided. The layout is edited in the local version of the 1C:Enterprise application (in particular, you can use the free application 1C:Enterprise - Working with files).
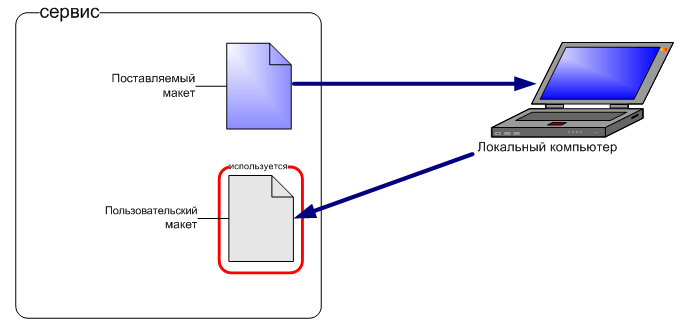
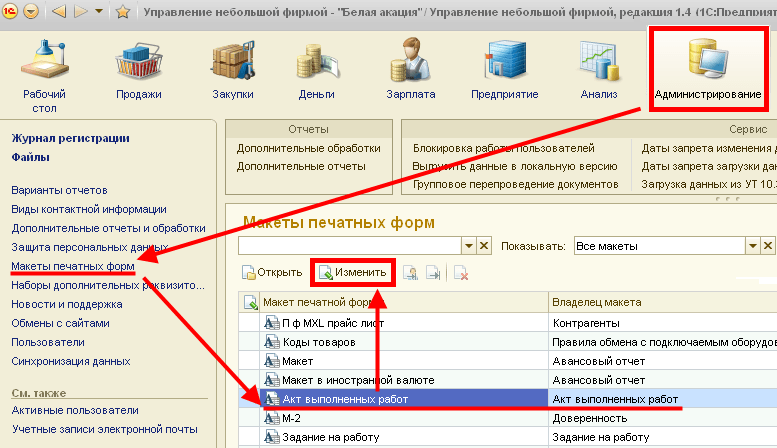
Follow the steps below to change the printable layout.
Editing the layout of the printable is completed, when printing the document, the layout to which the changes were made will be used.
If you would like to return to the previous printable layout, click the button Use Standard Layout. In this case, the edited layout will still be present on the server, and it can be re-enabled by pressing the button Change.
We wish you pleasant work!
How to insert a company logo into the layout of the printed form?
Let's take a concrete example layout editing printed form Invoices for payment, namely, consider how to insert an image into it, for example, a company logo (this image must first be prepared and saved as a graphic file, for example, in png or jpg format).

Thus, now the invoices for payment that you prepare for transfer to your counterparties will have your company logo. In order to add the logo to other documents, you will need to repeat the described steps for the corresponding printed forms of these documents.
We wish you pleasant work!
 Basic user interface elements
 Error "The integrity of the configuration structure has been violated The integrity of the configuration structure has been violated 8
 Description of errors. Hasp security key. Description of errors License key not found writes when updating