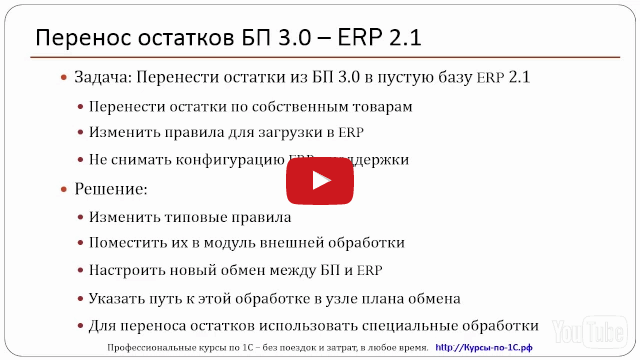
Editing exchange rules.
Each plan has a certain list of elements, information about the change of which it can store. This list is called the “Composition of the exchange plan”. The composition can be expanded, but configuration support is removed.
The "Plan Layout" stores the very rules on the basis of which synchronization works. It is this conversion package (Registration Rules, Exchange Rules, Correspondent Exchange Rules) that we need for further study.
Consider an example of data synchronization between the configurations "1C: Payroll and HR 3" (ZUP) and "1C: Enterprise Accounting 3" (BP). We note right away that in this task we will have to remove the configuration from support. This is required by condition.
A living example of the need to refine the model exchange rules
For example, a customer contacted us with the following problem: when synchronizing between ZUP and BP, it is not possible to transfer the data of the “Registration with the tax authority” directory, which are necessary to fill out the “Reflection of wages in accounting” document. Now the tabular part of this document on the side of the BP receiver contains an empty "Registration ..." and users have to manually create such entries in the directory. Agree, it's inconvenient. We can improve this point. 
Solution to the problem: we will finalize the conversion package from the exchange plan ExchangeSalary3Accounting3. Let's add to the standard "1C Exchange Rules" a new "Object Conversion Rule" (PKO) for the "Registration with the Tax Authority" directory and, accordingly, the "Property Conversion" of this directory (PKS). We will definitely finalize the standard "Rules for registering objects", because there was a need to register the directory changes on the exchange node. And we will revise the "1C Exchange Rules" of the correspondent's base.
Where will we edit this? to write and change the rules, we need the "1C: Data Conversion 2" configuration.
Refinement of standard conversion rules from the PZUP-BP exchange plan
So, let's start finalizing the 1C exchange rules by adding a new element to the composition in the configurator for the exchange plan ExchangeSalary3Accounting3 - the RegistrationIn Tax Authority directory. We will make this change in both configurations "1C: Salary and Enterprise Management 3" and "1C: Enterprise Accounting 3".

Save and update the configurations.
In the enterprise mode, for each database, we will upload a description of the metadata structure using the processing of MD83Exp.epf for the 1C:Enterprise 8.3 platform. Processing can be found in the "1C: Data Conversion" kit.
At the next stage, we will unload the conversion package from the ZUP and BP. The package should consist of 3 files: Registration Rules, Exchange Rules, Correspondent Exchange Rules.
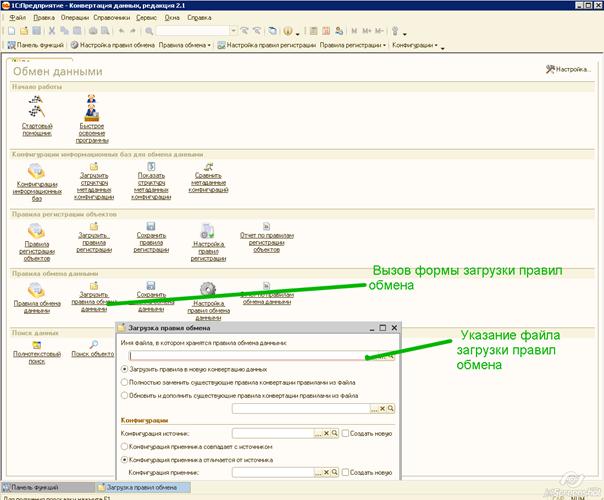
Within the framework of this article, there will be no description of how data synchronization is configured, you can read it on the Coderline website in the Expert Articles section or watch webinar recordings. Now this option is already configured in the databases. Therefore, go to the synchronization settings (Administration -> Data synchronization -> Data synchronization settings), click the "Load rules" button. We will see the form "Rules for synchronization". Click the "More" button and select the "Save rules to file" option.

Here is a package after unloading we should get.
We will perform similar actions for another information base "1C: Enterprise Accounting".
As a result, all the preparatory work for editing the rules is ready. We have:
Description of the metadata structure for loading into "1C: Data Conversion 2" (for ZUP and BP);
A conversion package that contains 1C exchange rules and registration rules required for uploading to 1C: Data Conversion 2 (for ZUP and BP).
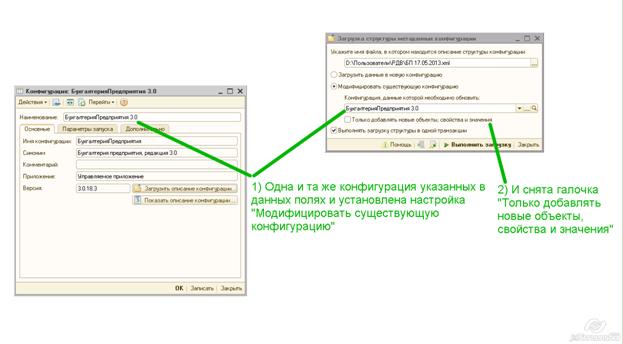
Go to "1C: Data Conversion 2". Perform the following steps in order for both infobases:
Loading the metadata structures of our configurations;
We create conversions and load 1C data exchange rules from conversion packages (the rules file is called ExchangeRules);
Create registrations and load registration rules from conversion packages (rules file is called RegistrationRules).

We proceed directly to our refinement. We add a new object conversion rule (PKO) to the 1C exchange rules - the "Registration with the tax authority" reference book. We add a property conversion rule (PCS) for this directory and a data upload rule (PDS). This kind of refinement must be performed both for the rules from the ZUP package and for the exchange rules from the BP package. We unload our exchange rules into the corresponding files ExchangeRules.

Let's move on to the rules for registering a new element. We add the reference book "Registration with the tax authority". Upload the registration rules to the appropriate file from the RegistrationRules package. This action is also performed for both bases.

Modified exchange rules and registration rules are ready. Now we copy the contents of the exchange rules (ExchangeRules) from the BP package into the correspondent rules (CorrespondentExchangeRules) from the ZUP package. In the correspondent rules (CorrespondentExchangeRules) from the BP package, copy the contents of the exchange rules (ExchangeRules) from the ZUP package.
The result should be the following:
This completes the work in "1C: Data Conversion 2". The modified packages of conversion rules are ready, it remains to upload them back to the infobases and check the synchronization.
We archive the files from the packages to the ZIP archive and upload our conversion packages to the ZUP and BP.

Everything is ready. It remains to be tested.
Let's remember the conditions of the problem. It was necessary to register for unloading the directory "Registration with the tax authority" and check how the PM of the document "Reflection of wages in accounting" is filled out on the side of "1C: Enterprise Accounting 3".
In the source "1C: Salary and Enterprise Management 3" we register our directory for unloading. We perform synchronization. We go to the receiver database and also perform synchronization to receive data. Please note that now the necessary directory for registering changes has appeared in the exchange plan.

We check on the side of "1C: Enterprise Accounting 3":


Summarize. The result of the task was completed successfully. We have finalized the plan for the exchange of ZUP - BP, adding a new element for registering changes and completing the conversion rules for data synchronization.
If an exchange is configured between 1s databases using exchange rules. Then, as a result of finalizing the configurations or updating to a more up-to-date release, the task of updating the exchange rules arises.
INTRODUCTION
If an exchange is configured between 1s databases using exchange rules. Then as a result of finalizing the configurations or update to a more current release, the task of updating the exchange rules arises.
A schematic process of updating the rules is presented below:
I draw your attention to the fact that the first paragraph in this scheme is not relevant if you already have exchange rules in the data conversion database.
Creating and updating conversion metadata objects
Uploading exchange rules from the database to an XML file (for new conversion)
In order to unload the exchange rules, in typical configurations, you need to go to the data exchange settings directory and click the "Save exchange rules" button

Loading exchange rules into CD 2.0 configuration (for new conversion)
After starting the Data Conversion, you need to open the form for loading the exchange rules, and specify the file with the data exchange rules.
Upload configuration changes to an XML file (MD81Exp.epf, MD82Exp.epf)
The configuration is unloaded by processing MD81Exp.epf, MD82Exp.epf for versions 1c 8.1 and 8.2, respectively. 2_1_7_1).
Let's unload the BP 3.0 configuration.
Open the processing of MD82Exp.epf, in it we mark to unload document movements without posting and click unload (Fig. 3.)
Replacing the changed configuration in the exchange rules.
Let's open the list of exchange rules (Fig. 4.)

We call the form of the exchange rules element (Fig.5). Next, we call the configuration form of the configuration to be replaced.

The form of the configuration directory element will appear (Fig. 6), in which you need to replace the old configuration with the current configuration that we received in the second step.

In the configuration metadata upload form, note that you are actually replacing (rather than adding to or creating) the desired configuration.
Editing exchange rules
Updating of PKS and PKO
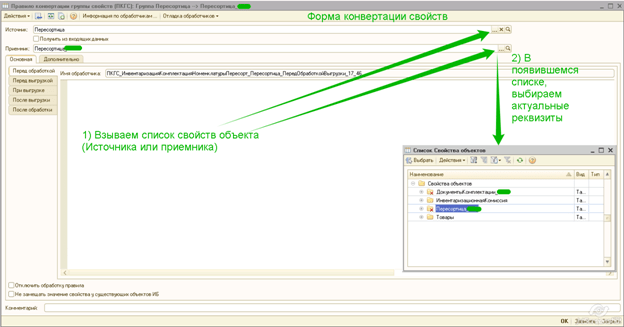
When editing exchange rules, pay attention to the lists of object conversion rules and lists of property conversion rules. If an object or property is removed (perhaps renamed) in the new version of the configuration, then the line with this field will be highlighted in red. A similar example is shown in Fig. 8, as a result of updating to the new configuration, the “Resort” tabular part and the “ReceivedFromAstor” attribute were deleted, therefore, these rows are highlighted in red.

To correct these shortcomings, you need to change the source and destination of the property being converted. To do this, double-click on the selected line, and in the property conversion rule form that appears (Fig. 9.), view the properties of the source and the properties of the receiver. If details or tabular parts were deleted in the configuration, then in the data conversion during loading, these properties will be marked for deletion. Therefore, the properties marked for deletion must be reassigned to the newly appeared properties, or perhaps the given property conversion must be removed from the FSP.
Similarly, you need to update the rules for converting objects.
Handler code update
There are currently no tools for updating the code of handlers to detect syntax errors.
Saving exchange rules and loading them into the database

A form for saving the rules will appear, in which the file for saving the exchange rules is specified.

Now, in the form of an element of the data exchange settings reference book, we load the exchange rules into the database. Now you can exchange.
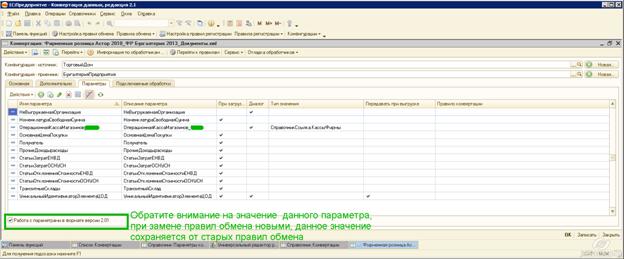
You also need to pay attention that when replacing the exchange rules in the data conversion configuration with a new version of the exchange rules, the new rules are not always loaded correctly. In particular, if your configuration has data conversion rules in which the checkbox "Work with version 2.1 parameters" is disabled, and is enabled in the downloaded exchange rules, then the expected result that the checkbox will be enabled will not be confirmed, i.e. you will need to manually enter and check this box (Fig. 12.).
In the files posted for download, it is sequentially described how to save the new configuration, replace it in the exchange rules and modify them in accordance with the new changes. I tried to draw attention to important points in solving this problem.
I would welcome additions and comments
And we show how with its help STRONGLY simplify the solution of your tasks
Today we will analyze how to set up and make a simple transfer of directories and initial balances in literally 10-15 minutes.
And this is bulk and regular task, which is almost inevitable for most new configurations being launched.
Therefore, call your colleagues, it will also be very useful for them.
Especially if they have already seen CD 3 and got scared :)
Yes, when you see her for the first time, it’s not clear at all.
But in fact - everything is VERY simple. So simple that you will even get bored later :)
What exactly is in today's videos
These are 4 videos on sharing data via universal EnterpriseData exchange format.
In addition, we will show an example refinement of standard exchange rules in 1C: Data Conversion 3.0
Total duration - 34 minutes. Content:
- Setting up an exchange using the example of 1C: Accounting 8 and 1C: ERP
- How to load standard rules and universal exchange format in Data Conversion 3.0
- Transferring the metadata structure to CD 3.0
- How to perform the first exchange of data
- Refinement of the rules conversions
- How to load new rules without changing configuration ( without withdrawal from support)
note that when solving this problem, the loading rules change only in the receiver configuration. And the source configuration works according to standard rules.
If such a task were solved in Data Conversion 2.0, then changes would have to be made in the rules of both the source and the destination.
These video tutorials are relevant for BSP revision 2.3.2(for any build older than 2.3.2.43).
If you are using an older version of BSP,0 make a "correction" for the changed interface and extended functionality. To do this, repeat the example from the video yourself.
Video 1:
Loading exchange rules between typical configurations in Data Conversion 3.0
In this lesson, we will perform preparatory actions when making changes to the exchange rules between typical configurations:
- Loading the structure of the exchange format into the CD (
- Creating a conversion
- Uploading rules files from a typical configuration
- Unloading the exchange manager module
Video 2:
Refinement of exchange rules in CD 3.0
In this tutorial, we'll show you how to fill in the details of objects when loading data.
The task will be solved - when loading objects from the source configuration, set the comment “Loaded from BP 3.0”.
To solve the problem, you need to make changes in object conversion rules, in the event “Before writing received data”.
The developed rules will be saved as external processing for further use.
Video 3:
Setting up a universal exchange between typical configurations
In this tutorial, we'll show you how to set up a new type exchange.
The settings will be made in the source configuration and then loaded into the destination configuration.
Also in this video we'll show you how without changing the configuration upload new exchange rules.

Video 4:
Transferring opening balances using exchange rules
In the lesson, we will show a typical functional for transferring initial balances.
P.S.
Yes, exchanges via txt / dbf / ole etc. have the right to exist. In some special cases, such as docking with a web server or transferring from a ready-made external application format.
However, for standard exchanges - standard methods are both faster and much simpler.
And if someone reinvents the wheel when there is a ready-made universal solution - it’s like writing on your forehead “I don’t own an instrument, I don’t want to learn, I will build crutches for your money” .
P.P.S.
We want to show that Data Conversion 3.0 is not difficult.
Unusual - yes. Not everything is immediately clear - yes. There are very ambiguous moments - yes.
But with the help of ready-made instructions and videos, it can be mastered in just 1-2 weeks.
Tutorial on 1C Data Conversion (edition 2) Detailed acquaintance with the exchange rules
We know what exchange rules are and why they are needed. Let's get acquainted in more detail with the additional functionality of working with exchange rules. Let's open the settings for data exchange (conversion) rules:
The exchange rules define the source and destination configurations for data, in addition:
Tab "Advanced":

You can specify the default file name for saving the exchange rules, modules for uploading and downloading data for 7.7, the name of the exchange rules.
"Parameters" tab:
Suppose the office accepts orders exclusively for goods, so it is desirable to establish a ban on unloading services. If the item of the catalog Nomenclature has the requisite Service set to True, then it is guaranteed not to be unloaded. It is best to make the control of unloading services optional immediately so as not to change the rules if the remote office begins to accept orders for services as well.
For this case, we will have to learn two new tricks for working with the "Data Conversion" configuration - using handlers and setting parameters.
Parameters are a specialized data structure in upload algorithms that can be used to access processing variables. Setting the structure of parameters for conversion rules is carried out in the "Data Conversion" configuration, and setting parameter values is possible in the form of processing data upload and download.
To edit the parameters, open the form of the element of the Conversions directory for editable exchange rules and go to the parameters tab. Let's create a new element of the Parameters directory. Let's assign the name of the parameter - Unload Services. The parameter name is used to refer to it in the Parameters structure when writing program code in handlers. The name will be displayed in the tabular section of the Parameters in the form of processing the universal data exchange. In order for the parameter to be visible in the dialog when setting up unloading, you need to check the "Set in dialog" box and select the type of parameter value. To work with parameters in the dialog, you must also check the box "Upload parameters in version 2.01 format" in the form of an element in the Conversions lookup.

It is not enough just to specify the parameters, it is necessary that the unloading algorithm "understand" in which case to unload the element, and in which not. For such (and many other) cases, the handler mechanism is used. Its essence lies in the fact that at the key points of execution of all the basic algorithms for uploading and downloading data, the code written by the developer when creating the exchange rules is processed. Naturally, the use of such a delicate tool requires caution and thoughtfulness. Before writing your own handlers, we recommend that you carefully read the help for the "Data Conversion 2.0" configuration, which describes all the variables available in handlers and how to use them, as well as lists the types of handlers and the features of their call in data exchange algorithms.
For our purpose, we need to use the "Before Unload" unload rule handler. Open the Nomenclature data upload rule and place the following program code in the "Before upload" field on the "Events" tab:

What does our handler do? When writing the program code, we used the variables of data unloading algorithms. The Parameters structure is used to refer to the UploadServices parameter, which is set in the data exchange processing form. The object variable provides access to the object being unloaded. And the Refusal variable allows you to control the refusal to unload the current object. The handler is executed just before the object is unloaded, which makes it possible to cancel the unloading of the object.

ONLY FOR EXCHANGE V8 - V8 AND PROCESSING DOWNLOAD AND DOWNLOAD NOT BELOW 2.0.18.1
It is possible to pass parameters from one configuration to another. To do this, on the "Parameters" tab, check the "Transfer parameter when unloading" checkbox and this parameter will be placed in the exchange file and its value can be accessed when loading data. You can specify a conversion rule for a parameter, according to which the values will be converted. Using the "Pass parameter when uploading" checkbox, you can only transfer those parameters that are edited in the dialog when uploading data. If you need to pass a parameter that is not present in this dialog, then you need to call the procedure:
The Unloading parameters tab now has a parameter, changing the values of which services are either unloaded or not unloaded.
In this article, I will describe how a typical data exchange between BP 3.0 and UT 10.3 is configured. (exchange with BP 3.0 is available starting from release 10.3.20)
I set up the exchange according to the following requirements: the movement of goods in batches should be transferred to the BP; only information on bank movements is unloaded from the BP.
To set up an exchange, follow these steps:
1. Determine from which database the first unloading will be made. In principle, you can do the first unloading from any database, for example, I did the first unloading from UT 10.3. To do this, in UT you need to do:
1.1. In the accounting settings, check the box "Use data exchange" and specify "IB prefix" (unlike BP 2.0, the number of characters in the prefix is limited to 2).
1.2. Launch the assistant for creating an exchange plan ("Tools->Data exchange with products on the 1C: Enterprise 8.2 platform->Data exchanges") by clicking the "Set up data synchronization" button.
I will only briefly describe the configuration steps in the assistant:
a) "Selecting the data synchronization setup step", there are two options for creating a new exchange plan or continuing an already created one, in my case in UT 10.3 I choose to create a new one, and in accounting continue the settings.

b) The data transfer method is selected, I use a file in a shared folder.


c) Setting up synchronization parameters, here you need to specify the name of another database (not necessarily exactly, I indicated "BP") and prefix (here you need to specify exactly), and you must also specify parameters related to the upload rule (such as "Start date for uploading documents" , "Upload analytics by warehouse", "Reschedule write-off cost", configure upload selections, etc.)


2.1. In the program settings (Section "Administration", item "Program settings"), you must set the "Use data synchronization" flag on the "data synchronization" tab.

2.2. Launch the exchange plan creation assistant (Section "Administration", item "Data synchronization"). Click the "Set up data synchronization" button and select the type of synchronization UT 10.3.

2.3. The helper says:
a) Settings file saved from the UT 10.3 database (see section 1.3.(d)) This file stores data about the configuration name, prefix, connection method.

b) Setting the synchronization parameters. It specifies: "Exchange mode" (one-sided or two-sided, I'm only interested in two-sided), "Start date for uploading documents", "Filtering by organization", "Setting default values".


2.4. During the first download, the user will be given the opportunity to manually specify unmatched data (this function will be available when synchronizing with additional parameters, both in the UT and in the BP).
After the first exchange, synchronization is considered completed, but data exchange settings are available, as well as additional functionality for working with the exchange. To correct it, you must click the Change button on the synchronization form.

Here are some particularly important features:
1. "Load object conversion rules", here it is possible to set a file with exchange rules. To work with them, you need to use the "Data Conversion" configuration. In this configuration, it is possible to load, modify, compare with each other (an important function when updating), save conversion rules.


2. "Loading object registration rules", here you can specify a file with registration rules. To adjust the rules, the "Data Conversion" configuration is also used. In these rules, you can set additional conditions for registering objects in the database for the purpose of participating in the exchange.

3. "Message transport settings", here you can change the connection settings for the exchange (for example, the folder or ftp resource used for the exchange has changed).

4. "Get synchronization settings for another program", in this item it is possible to re-upload the settings file for another configuration.

5. "Composition of sent data" (This item is available only in BP 3.0, in UT 10.3 the function of this functionality is implemented by the built-in processing "Change registration for exchange") Using this function, it is possible to change, delete the registration of configuration objects in the exchange.

6. "Delete synchronization setting", deletes the setting.
7. Synchronization with additional parameters. Here you can manually configure the mapping of the transmitted data. Also add additional documents for exchange.

 Basic user interface elements
 Error "The integrity of the configuration structure has been violated The integrity of the configuration structure has been violated 8
 Description of errors. Hasp security key. Description of errors License key not found writes when updating