The process of installing Windows 10 from a USB flash drive.
Hello dear visitors. In this tutorial, I will show you how to install the latest Windows 10 on your computer or laptop. I'm glad that you came to this page and give me the right to teach you how to install Ten on your computer. Let's start!
We will install Windows 10 from a flash drive, because it is much more convenient and faster than using classic DVDs. Using a Windows installation flash drive, we can install the system on computers, laptops and netbooks.
What do you need to do to install Windows 10 from a flash drive?
Creating a bootable USB flash drive
First of all, prepare an 8 GB USB flash drive and move ALL important files to other drives. Next, download the UltraISO program from the official website. We will use it to record the system. We will also need a Windows 10 image, preferably in ISO format. You can also download it from the Internet.
Download UltraISO and run it.


The program is paid, but fortunately Trial period will allow you to use it free of charge for 30 days. To install Windows 10 from a flash drive, we need UltraISO only once.
When you launch UltraISO, click the Trial button.

The flash drive should already be inserted into the computer.
Now in the UltraISO program, click the menu File - Open.

In the window that opens, indicate where the Windows 10 image is located on the computer and click Open.

The image files were successfully opened. Now click on the menu - Burn a hard disk image.

In the window that opens, it is important to make sure that in the Disk Drive item the flash drive we need is selected. If this is not the case, then select it manually from the drop-down list. There is no need to change anything else. Click the Burn button to begin creating a bootable USB flash drive.


Writing Windows 10 to a flash drive usually lasts about 10 minutes. When finished, close all unnecessary windows and let's move on to the next step.
Install BIOS and boot from flash drive
When starting to install the system, we need to go into the BIOS and put booting from a flash drive in the first place. Turn on the computer or restart it if it is already turned on. To enter the BIOS, immediately start pressing the DELETE or F2 key (depending on motherboard). We press the desired key for several seconds until we see the BIOS itself. This is roughly what it looks like:

We can navigate through this program using the arrows and the Enter button on the keyboard.
Go to the BOOT tab and find the item Hard Disk Drives. Let's open it.

We go to the first item and press Enter.

In the window that opens, select your flash drive and now it will be in first place. Great!


Press the ESC key to return to the previous window. Now select the first item Boot Device Priority.

Go to the first item and press Enter.

We select the flash drive again and now it is in first place in the download priority.

Great! Now the computer will boot from the flash drive. To save the changes made, press the F10 key and press Enter.

The computer is rebooting...
It is worth saying that in some BIOSes the interface is slightly different. In this case, you will have to look for similar buttons.
Installing Windows 10 from a USB flash drive
If we did everything correctly, then after restarting the computer, reading data from the flash drive will begin. This is indicated by the following Windows icon:

The start of the installation is indicated by a window in which we will need to select the system language, parameters and keyboard layout. Leave Russian everywhere and click Next.

In the next window, click the Install button, which is located in the middle of the screen.


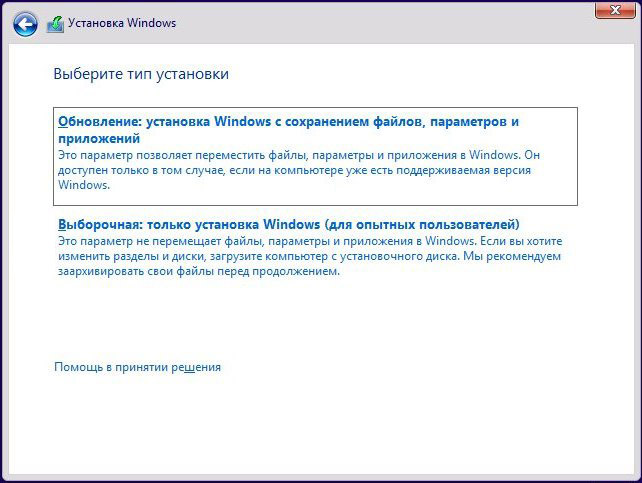
In the next step we need to select the installation type. Select the second item " Custom: Windows installation only". Just what we need.

Now is a very important moment! We need to select the disk to which we need installWindows 10 . The disk on which the system was previously installed has type System. If you have other disks, then it is better not to install the system on them, so as not to lose important data.
As for the disk on which the system was already installed, it is better to format it, that is, delete old programs, Windows and other files. To do this, you need to specify the drive and select Format.

You can, of course, not format the disk, but in this case the previous files from the system disk will be placed in a new folder called WINDOWS.OLD.
I usually format the disk to remove all the junk accumulated on the old system!
Regardless of the choice you make, specify the disk for installation and click Next.

This is the main window where Windows 10 is installed in five steps. Here the files are copied and installed, that is, the process of writing the system to our computer occurs. You will have to wait 15 minutes.

Attention important point! When you see that the 5 steps are completed and after a few seconds the computer reboots, be ready to remove the flash drive from the computer.

The computer starts to reboot, and we immediately remove the flash drive! If this is not done, then Windows 10 installation may start again.
Fine. The system is almost ready for use. There are still some settings left to do. After the reboot we will be asked to connect to our wireless network. But note that you can skip this step. There is a link for this below " Skip this step".


I connected to WI-FI, so at this step I’m still downloading and installing updates.

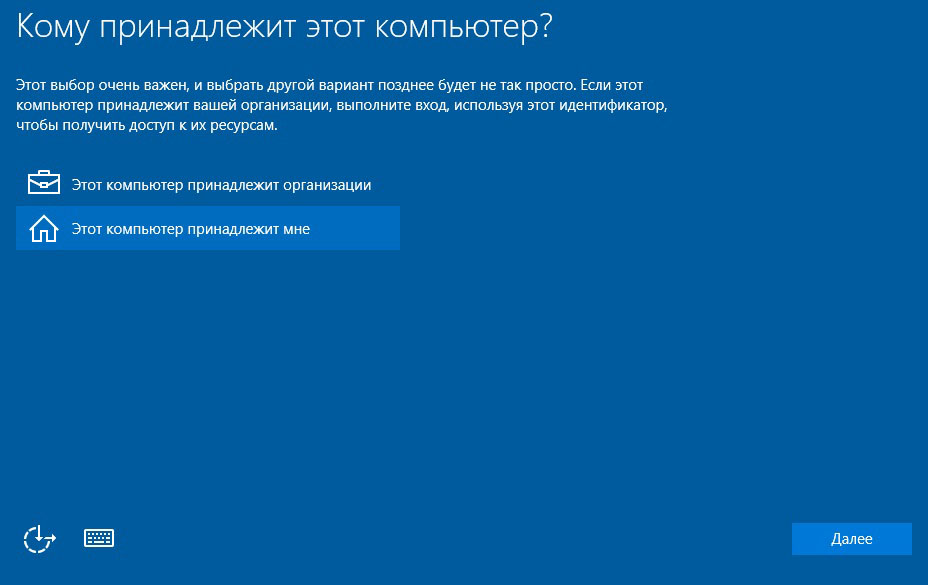
Finally, we need to select the computer type. Of course, select the item " This computer belongs to me".

Then enter the login and password for your Microsoft account, if you have one. Or just click " Skip this step".

We give the account a name and, if necessary, come up with a password for it.

Great! So we figured it out, how to install Windows 10 from a USB flash drive and configure it before the first launch.

RESULTS
Let's summarize briefly. So, to install Windows 10 from a USB flash drive, we need to complete the following tasks:
1. Create a bootable USB flash drive
2. Set the BIOS to boot from a flash drive
3. Install the system from a flash drive
That's basically all. This concludes my lesson, I thank you for your attention and look forward to your comments.
This guide, “Installing Windows 10 from a USB Flash Drive,” tells you how to create a bootable USB flash drive and use it to install Windows 10 from a USB flash drive on your computer and laptop.
If you already have Windows 7, you can upgrade to Windows 10 using the standard system update mechanism - just turn on the Windows 10 Update service.
Installing Windows 10 from a flash drive may only be necessary if you bought a new computer without an operating system and separately purchased a disk with the OS. Installation (installation) of Windows 10 from a flash drive occurs in almost the same way as the “seven” (Read: How to install Windows 7 from a flash drive), but, as always, there is one point.
As a rule, the licensed version is supplied on a DVD. But some modern computers no longer have a DVD drive. Examples of such computers are compact PCs designed for media centers, ultrabooks and netbooks. These are all compact devices, and there is simply no room in their case for a bulky DVD drive. What to do? You need to somehow place it on a flash drive, boot from it and install Windows 10 from the flash drive.
Creating a bootable USB flash drive for Windows 10
Creating a bootable USB flash drive can be done in different ways (for more details, How to create a bootable USB flash drive for Windows 10). The first of them is to use a standard tool from Microsoft - Installation Media Creation Tool, which can be downloaded at: https://www.microsoft.com/ru-ru/software-download/windows10.
Using this tool is quite simple. Launch it, choose which edition you prefer. The tool also allows you to select the bit depth. If your computer has less than 4 GB of RAM, then you don’t need to bother it with a 64-bit build.
When the program asks where to put the distribution, select the USB flash drive. At the end of the program, you will have a ready-made bootable media (namely, a flash drive). Instructions: How to download and create a bootable Windows 10 USB flash drive in Rufus
To install Windows 10 from a flash drive, enter the BIOS SETUP of your computer and select boot from the flash drive (depending on the media type). On desktop computers, the DEL key is usually used to enter BIOS SETUP. Laptops may have different keys and even key combinations. The F2 key is used quite often. Some BIOSes display a prompt similar to this:
Press
After loading from you will be taken to the language selection menu. As a rule, the Russian language will be immediately selected, and you just need to click Next. If you've ever installed previous versions of Windows (versions 7 and 8), then this window will seem painfully familiar to you.

After that, you will see a window with a single Install button. To be honest, I always wondered why it was needed and why not go straight to the window with the license conditions?

After you accept the license terms, you will have to select the installation type. Since the computer is new, you need to select - Custom: (for experienced users).
Immediately after this you need to select a disk. Why haven't we discussed system requirements before? Yes, because the “ten” will work on any modern and not so modern computer. If you're interested, you can install Windows 10 in a virtual machine with a single-core processor and one gigabyte of RAM. Why virtual? Yes, because it is very difficult to find a real machine with 1 GB of RAM in 2016, and I wanted to check the minimum system requirements stated by Microsoft. The system worked fine. Of course, to the best of your ability. But I think you will be fine with the hardware.
The only thing that the “ten” (as well as the “eight”) is demanding is free disk space. The minimum (as Microsoft claims) is 20 GB for the 64-bit version and 16 GB for the 32-bit version. But Microsoft is lying a little. The 64-bit assembly literally grew to 25 GB in a matter of hours. But with the 32-bit one, everything is much nicer - it took up 6 GB immediately after installation and update. It will grow during operation, but I think the declared 16 GB corresponds to reality.

The system installation process will begin, after which it will reboot. Depending on the performance of the hard drive, this process can take from several minutes to several tens of minutes. On SSD drives it takes a few minutes.

After reboot
After the reboot (which will be completely automatic), you will have to contemplate for some time a black screen with the Windows 10 logo and the words Preparing in progress. The settings can be changed after completion, so I suggest not wasting time and clicking the “Use standard settings” button.
Next, the OS will try to get critical updates from the Microsoft website, but this is only if the computer is immediately connected to the Internet, for example, using a local network connection (to an ISP or router); all other types of connections require preliminary configuration.
Who owns the computer?
Who owns your computer - you personally or your organization? Select the appropriate option when Windows asks you to do so. If you accidentally select that the computer belongs to the organization, but in fact it does not (there is no Active Directory deployed on the network), then you will see a message that you cannot log on. No problem, just click the Skip button.

Create a user account
The next installation step is creating a user account. In Windows 10, unlike G8, they do not offer to create a Microsoft account during installation. This is understandable: there is not always a connection to the Internet at the system installation stage, and users are more willing to use regular local accounts. Later, if you want to use certain system features, you will be asked to create a Microsoft account.
So, enter your username and provide your password. You can not specify a password - in this case, you will be able to log in without a password. However, the presence of even the simplest password significantly increases security when encrypting data using standard system means. Therefore, if you plan to work with data on your computer that you want to encrypt using EFS, be sure to set a password.

There's very little left
After creating a user, the system will ask you to wait a little while it configures the applications. After setting up the applications, the system will ask you to choose whether you want to allow other computers and devices on the same network to discover your PC. If there are other computers on your network, select Yes; if there are no other computers and you do not plan to work on the local network, then select No.

Actually, that's all. You will see a desktop with the new version of Windows. Don't switch: the next article will look at the new features of the Tens.
Video - Installing Windows 10 from a USB flash drive
As you know, many modern laptops no longer have a DVD drive. In addition, installing Windows 10 from a USB drive is much faster than from an optical drive. Therefore, this article specifically describes step-by-step instructions for you on how to how to install Windows 10 from a bootable USB flash drive. Almost every action has a screenshot attached.
Recording to a USB flash drive
After selecting boot from USB drive you should see a message Press any key to boot from CD or DVD… and press any key as quickly as possible:

If after this the Windows 10 logo appears on a black background, then the installation program has started downloading and you did everything correctly:

Installing Windows 10 from a USB flash drive on a computer or laptop
So, after successfully loading from a USB drive, we begin the actual process of installing Windows 10 from a flash drive, in which your direct participation will be required.

Now Install:

Check the box I accept the license terms and again Further:


If your hard drive is completely empty, you can simply press Further. In this case, the boot and system partitions of Windows 10 will be created automatically. And later it will be possible, if necessary.

If the hard drive contains the necessary information, format only the boot (100 MB or 350 MB) and system partitions, and leave the rest alone.
There is no need to delete individual sections!

If there are partitions on the disk without important information, we advise you to delete them all and repartition the disk. By the way, it is advisable to allocate at least 100 GB for the system. There is no need to create a 350 MB boot partition manually! Otherwise, you will end up with two such batches. The fact is that the Windows 10 setup program will one way or another create one itself.
After this, the installation process will start and all you have to do is wait:

On this screen, you can configure some Windows 10 settings or select the default settings:

Click Continue or Continue:


Enter your username, password, password confirmation, and hint. After that click Further or Next:

This completes the installation of Windows 10 from a USB flash drive. Now you can start installing drivers, programs and customizing the operating system to your liking.
You will need a bootable USB flash drive to start the installation process. However, if your computer is modern enough, then there is a good chance that it is using the Unified Extensible Firmware Interface (UEFI) instead of the traditional BIOS. In this case, you need to make sure that the bootable media also supports the corresponding firmware interface, otherwise you will not be able to start the installation process.
Luckily, there are several ways to create bootable media for UEFI computers. For example, you can use Microsoft's Media Creation Tool, which makes it easy to copy Windows 10 installation files to a removable drive and supports both classic BIOS and UEFI. Alternatively, you can use a third-party tool called Rufus, which can create bootable USB flash drives specifically for UEFI devices.
This guide will show you the steps to create a bootable UEFI-enabled USB flash drive using Media Creation Tool and Rufus.
How to Create a Windows 10 Boot Disk Using the Media Creation Tool
If you are planning to upgrade or clean install Windows 10 on a UEFI PC, you can use the Media Creation Tool to create compatible bootable media. Simply connect a USB drive of at least 4GB capacity to your computer and follow these steps:
Download the latest version of the Media Creation Tool:
- Double click on the file MediaCreationToolxxxx.exe to launch the utility.
- Click the “Accept” button to agree to the terms of the Microsoft License Agreement.
- Select an option Create installation media (USB flash drive, DVD, or ISO file) for another computer.
- Click "Next".
- Select language, architecture processor and release Windows 10 if the defaults don't suit your preferences. Tip: In the Architecture section, you may notice the “Both” option, which is designed to create a universal bootable media for 32- and 64-bit processors.

- Click "Next".
- Select an option USB flash memory device.
- Click "Next".
- Select the removable drive you want to use from the list (if you don't see your drive, click the "Refresh drive list" button).
- Click "Next".
After completing these steps, the Media Builder will begin downloading Windows 10 installation files and create a bootable USB device for your UEFI or BIOS computer.
How to Create a Windows 10 Boot Disk Using Rufus
Using the Media Creation Tool is the recommended method for creating a bootable USB flash drive. However, if for some reason this option doesn't work for you, you can download a Windows 10 ISO from another source and use the Rufus tool to create UEFI-enabled installation media. Simply connect a USB drive of at least 4GB capacity to your computer and follow these steps:

- Double click on the file Rufus-x.x.exe to launch the utility.
- In chapter Device Select a USB storage device with at least 4GB capacity.
- In chapter Loading method press the “SELECT” button.
- Go to the folder with the Windows 10 ISO image.
- Select the image file.
- Click the “Open” button.
- In chapter Partition scheme select option GPT.
- In chapter Target system select option UEFI (non-CSM).
- In chapter New volume label Choose a meaningful name for the drive, such as "win10_boot_drive".
- In sections File system And Cluster size leave the default values.
- Click the button Show advanced formatting options and make sure the “Quick format” and “Create an extended device label and icon” checkboxes are checked.
- Press the “START” button.
- Click “OK” to confirm that the USB flash drive will be erased.
After completing these steps, the Rufus tool will create a bootable Windows 10 media with UEFI support.
Many users know how to install Windows 10 using an installation CD. But now new computers increasingly lack an optical disc drive, which creates some difficulties when installing an operating system, because now you must use a bootable USB flash drive for this.
If you also encounter a similar problem, we suggest that you familiarize yourself with this material. Here we looked in detail at the entire process of installing Windows 10 from a USB flash drive. Using this material, you can easily install Windows 10 on a computer without an optical drive.
Preparing a flash drive for installing Windows 10
If you need to install Windows 10 from a flash drive, then you need to start by preparing a bootable flash drive that will be used during the installation process. You can prepare such a flash drive in different ways. You can explore some of these methods in other articles on this site, for example:
Here we will look at only one, the most popular and common way to create a bootable flash drive, which is to use. This program is designed to work with disk images in ISO format, as well as in other popular formats. Using UltraISO, you can perform almost any operation that is generally possible with disk images. The only downside to UltraISO is that it is a paid program (the license costs about $30). But UltraISO has a free trial period, which you can use to create a Windows 10 installation flash drive.
So, download UltraISO and install it on your computer. Next, connect the USB flash drive and run the UltraISO program. After launch, you will see a window similar to the one in the screenshot below. To start creating an installation flash drive, click on the “Open” button and select the ISO file with the image of the Windows 10 operating system. As a result, the files from the ISO image will appear in the UltraISO program interface. This is normal, this is how it should be. Now you can move on to the next step - writing these files to a flash drive.
To write files to a flash drive, you need to open the “Boot” menu and select “Burn hard disk image”

As a result, a window for recording the image will open. There is practically no need to change any settings in this window. All you need to do is make sure that the files will be written to the flash drive you need. To do this, check the drive letter that will be selected in the “Disk Drive” drop-down list. The same letter that was assigned to the flash drive when it was connected to the computer should be indicated there. In this case, drive F is selected in the screenshot. After checking the drive letter, you can start creating an installation flash drive with Windows 10. To do this, simply click on the “Burn” button.

Next, UltraISO will warn you that all data will be deleted from the selected flash drive. To continue the process, click on the “Yes” button and the program will begin creating an installation flash drive with Windows 10. After completing this process, you will receive a bootable flash drive that can be used to install the Windows 10 operating system.
Preparing the BIOS for installing Windows 10 from a USB flash drive
Once you have received the Windows 10 installation flash drive, you are almost ready to start installing the operating system. All that remains to be done is to configure the BIOS so that when the computer starts, it starts booting from a flash drive rather than from a hard drive or optical drive.
In general terms, this stage of installing Windows 10 on a flash drive can be described as follows:
- We connect the USB flash drive with Windows 10 to the computer and turn it on;
- using the Delete, F2 or other key that is used on this computer;
- Open the section with boot settings, usually called “Boot”;
- We change the boot order so that the flash drive is in first place;
- We save the settings, exit the BIOS and after reboot we begin installing Windows 10 from a flash drive;
It sounds simple, but this explanation may not be enough for users who are installing Windows 10 from a USB flash drive for the first time. Therefore, next we will show how this is done using the example of a fairly old computer with an AMI BIOS.
So, we connect the flash drive to the switched off computer and start it. At startup, click on the Delete button to enter the BIOS settings. After entering the BIOS, immediately go to the “BOOT” section, a link to it will be at the top of the screen. The “BOOT” section contains a general list of boot order, as well as a separate boot list for each type of drive. In order to configure booting from a flash drive, we first need to configure the boot list for USB devices. Therefore, first of all, go to the “USB Floppy Drive BBS Priorities” section.

Once in the “USB Floppy Drive BBS Priorities” section, you need to open the “1st Boot” item and select your flash drive in the list of devices that appears. This will select the connected bootable USB flash drive as the first USB device that should be used to install Windows 10.

After this, you need to press the ESC key to return to the “BOOT” section. Now here we need to change the general load order list. To do this, select the “1st Boot” item again and in the list that opens, select “USB Floppy: the name of your flash drive.”

This completes the BIOS setup. All that remains is to save the settings and restart the computer. This can be done using the “Save & Exit” menu or by pressing the F10 key.
Unfortunately, it is impossible to create universal instructions for setting up a BIOS, since there are many different types and versions of BIOS that differ significantly from each other. Therefore, it is likely that the BIOS on your computer will look different. In this case, you need to act by analogy, since the principle is the same everywhere.
Installing Windows 10 from a USB flash drive
If everything was done correctly at the BIOS setup stage, then after rebooting the computer it will start booting from the flash drive, and you can proceed directly to. The process of installing Windows 10 from a flash drive is no different from installing from a CD. Therefore, if you have already installed Windows from a disk before, installing from a flash drive will not create any difficulties for you.
After booting from the flash drive, you will see the Windows 10 installer start window. Here you need to select the language you want to use, the time and money format, and the keyboard layout. After selecting these options, click on the “Next” button.


The next step is choosing the installation method. Here you can choose to upgrade to Windows 10 (Upgrade or Update) or install from scratch (Custom or Custom installation). The first option will allow you to upgrade your existing version of Windows to Windows 10, and the second involves deleting the old Windows and all files from the system disk and then installing Windows 10 on a blank disk. In this article we will consider the second option, since in most cases it is used.

Next you will be taken to the disk settings menu. If you are installing Windows 10 on a new computer, then there will only be unallocated disk space. If you previously had some kind of system installed, then the old partitions will be visible here. Using the buttons available here, you can delete and create partitions, which allows you to organize a suitable partition of your hard drive.
It is important to understand that deleting a partition or formatting it will result in the loss of the data that was stored on it. Therefore, if there is important data on the computer, then you need to work very carefully here.
If Windows was already installed on your computer, then you need to select the partition that was previously the system drive, format it using the “Format” button and continue installing Windows 10 on it.

If you are installing Windows 10 on a new hard drive, as in our case, then you need to create a new partition for the operating system using the “New” button and continue installation on this new partition.
It should also be noted that when creating a new system partition, the Windows 10 installer can create several additional partitions for system needs. This is quite normal, there is no need to be afraid of this, these sections will be hidden and will not be displayed when working.

Once you have organized the partition structure that suits you, you need to continue installing Windows 10 from a flash drive. To do this, simply select the partition that should become system and click on the “Next” button.


At the final stages of installation, the system will prompt you to select some settings and create a user. This process is quite simple and should not cause any problems. At the end of the installation, you will see the desktop, and the installation of Windows 10 from a flash drive is complete.
 Apple's Siri voice assistant
 Solving the problem of fast discharge of iPhone
 Bitcoin how to earn money from scratch step by step instructions