Graphic file with bmp extension. What is the BMP file extension? File structure overview
The bmp file format is a raster image and is quite popular. It is well “understood” by any Windows operating system.
Opening a file with the bmp extension on your computer should happen automatically - just double-click on it with the left mouse button.
If this does not happen for you, then most likely the file association is broken, then the system needs to manually specify what to open it with.
To do this, right-click on your bmp file, move the cursor to the “open with” line and select any program (if installed) of your choice, for example Paint.
Which program to open the bmp extension
The easiest way to open the bmp format is in the Windows photo album program. There is no need to download it - it comes with the operating system, that is, everyone should have it.
The second program is “Paint”. There is also no need to download it - it is built into Windows by default, in addition, you can not only edit the bmp extension, but also, after opening, save it in another format, for example jpg - for viewing on your phone.
The third program is “PhotoScape”. You will have to download it. It is free, in Russian and with its help, in addition to viewing, you can process bmp images.
The fourth Paint.NET application. It is also free, has a Russian interface, is convenient and very easy to use, with many tools for adjusting and editing images and photos - it’s like a substitute for the standard “Paint”
Fifth program "GIMP". It is compared to photoshop. This is a free graphic editor for professional use that has all the necessary functions and is characterized by simplicity.
The programs provided above that open files in this format are not all. There are dozens of them, but these are quite enough for the average computer user. Good luck.
How to hide text in a bitmap image. Unfortunately, I did not find any topics on this topic and decided to fill this gap. Under the cut you will find a way to hide text in a bitmap, as well as an implementation in C#.
Formulation of the problem
Hide arbitrary text in windows-1251 encoding into a 24-bit bitmap image and output it back without distortion.bmp file structure
First, let me remind you what a bitmap file is. I am sure that you know all this very well, it will just be more clear to describe the algorithm for hiding text based on the material presented. So. Any bmp file consists of four parts:- File header
- Image title (may be missing)
- Palette (may be missing)
- The image itself
Now let's move on to the image itself. As you know, the bmp format does not provide compression by default (although there is support for compression using the RLE algorithm). Thus, each pixel in our case is encoded with 24 bits, one byte for each color component. Therefore, we can encode no more, no less, but exactly 16777216 colors. For clarity, here is a picture:
The idea of a text hiding algorithm
You probably already guessed what the idea is. The thing is that the eye of an average person (not a professional artist or photographer) distinguishes much fewer colors than indicated above. Not a single book has a clear answer to the question of how many colors the eye can distinguish, but the largest figure I have come across is 10 million. It follows that several of the least significant bits of the eight allocated to each color component can be borrowed for our selfish purposes. goals.A few numbers: for example, let’s take and blatantly subtract two low-order bits from the RGB component. That is, out of 24 bits we will have 18 left, which can encode exactly 262144 colors. Now let's take text in windows-1251 encoding, in which each character is represented by 8 bits. Through simple mathematical calculations, we find that 3 characters can be stored in 4 pixels. Thus, in a 1024x768 image, where there are 786432 pixels, you can store 589824 characters. Not bad, right? For clarity, I will give two pictures. On the first is the original image, and on the second is an image in which the least significant two bits of each color component are filled with text. Let me make a reservation right away that the images are converted to png to save traffic.
Original image:

Image containing text

If you look closely, the colors appear duller in the second image. Yes it is. But you and I know that there is something wrong in the image presented, and if we didn’t know, we wouldn’t have guessed that there was some kind of text hidden in it. By the way, hidden in the image is the phrase “Hello World!!! =)" multiplied 100 times.
That's all. As you can see, the idea is extremely simple. By the way, the presented method is called LSB (thanks to frol for the tip). Finally, you can look at the implementation in C#.
Implementation in C#
The presented implementation does not qualify for a “Perfect Code” award; it only demonstrates the described algorithm in practice. In this case, I was not chasing the beauty of the code, but rather the clarity.A small program was considered that moved the sprite around the screen, but, unfortunately, it did not look as we would like. In this article we will try to “tidy up” the sprite.
We obtained the sprite image from a Bmp file; from the same files we can take the image of the background, mouse cursor and interface elements. However, what we see on the screen is not exactly what we expected: the image turned out to be upside down and, moreover, with different colors than required. So, let’s learn how to read Bmp files correctly and turn the picture “from head to toe.”
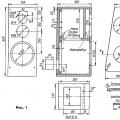
By decision of the developers, the Bmp file format is not tied to a specific hardware platform. This file consists of four parts: a header, an information header, a color table (palette), and image data. If the file stores an image with a color depth of 24 bits (16 million colors), then the color table may be missing, but in our 256-color case it is there. The structure of each part of a file storing a 256-color image is given in , and the corresponding record types are given in .
The file header starts with signatures"BM" followed by the length of the file, expressed in bytes. The next 4 bytes are reserved for further format extensions, and this header ends displacement from the beginning of the file to the image data recorded in it. With 256 colors, this offset is 1078 - this is exactly how much we had to skip in our previous program to get to the data.
The information header starts with its own length (this can vary, but for a 256-color file it is 40 bytes) and contains the image dimensions, resolution, color presentation characteristics and other parameters.
Image width and height are specified at raster points and probably do not require explanation.
Number of planes could be used in files with low color depth. When the number of colors is 256 or more, it is always equal to 1, so this field can now be considered obsolete, but for compatibility it is retained.
Color depth is considered the most important characteristic of the way color is represented in a file and is measured in bits per dot. In this case it is equal to 8.
Compression. It is usually not used in Bmp files, but a field in the header is provided for it. Typically it is 0, which means the image is not compressed. In the future we will use only such files.
Image Size- the number of bytes of memory required to store this image, not counting the palette data.
Horizontal and vertical resolutions measured in raster points per meter. They are especially important for maintaining the scale of scanned images. Images created using graphic editors usually have zeros in these fields.
Number of colors allows you to reduce the size of the palette table if the image actually contains fewer colors than the selected color depth allows. However, in practice such files are almost never found. If the number of colors is the maximum allowed by the color depth, for example 256 colors at 8 bits, the field is set to zero.
Number of primary colors- comes from the beginning of the palette, and it is advisable to display it without distortion. This field is important when the maximum number of display colors was less than in the Bmp file palette. When developing the format, it was obviously assumed that the most frequently occurring colors would be located at the beginning of the table. Now this requirement is practically not followed, i.e. colors are not ordered by the frequency with which they occur in the file. This is very important, since the palettes of two different files, even composed of the same colors, would contain them (the colors) in a different order, which could significantly complicate the simultaneous display of such images on the screen.
The information header is followed by a color table, which is an array of 256 (in number of colors) 4-byte fields. Each field corresponds to a color in the palette, and three of the four bytes correspond to the blue, green, and red components of that color. The last, most significant byte of each field is reserved and equal to 0.
After the color table there is image data, which is written along the raster lines from bottom to top, and inside the line - from left to right. Since on some platforms it is impossible to read a data unit that is less than 4 bytes, the length of each line is aligned to a boundary of 4 bytes, i.e., if the line length is not a multiple of four, it is padded with zeros. This circumstance must be taken into account when reading the file, although it may be better to ensure in advance that the horizontal dimensions of all images are a multiple of 4.
As we have already said, the file format was designed to be universal for various platforms, so it is not surprising that the palette colors are stored in it differently than is customary for VGA. During the reading procedure, the necessary recoding is performed. (We will talk about what the VGA palette is and how to work with it in the following articles.)
The module for reading 256-color Bmp files has only two procedures. As can be seen from the listing, the image dimensions must be passed to the ReadBMP file reading procedure. This is convenient if the image does not need to be read completely. When the sizes are known in advance, this does not cause problems, but it would be good if, using our module, it was possible to read any images, including those whose size is unknown in advance. For this purpose, the ReadBMPheader procedure is provided, which reads only the file header. By calling it, you can check whether the image is recorded in the selected 256-color format, find out its dimensions, and only then allocate memory for it and place it in the allocated buffer.
Now let's connect a new module to our program. To do this, we will write its name in the uses directive, and also provide an array for storing data about the palette, which can be described like this:
P: arrayof byte;
The CreateSprite procedure, which calls the operation to read a file from a new module, has been simplified (see).
Bmp file structure
|
||||||||||||||||||||||||||||||||||||||||||||||||||||||||||||||||||||||||||||||||||||||||||||
Listing 1
unit bmpread; (procedures for working with Bmp) interface type artype = arrayof byte; arptr = ^artype; bmFileHeader = record (file header) Typf: word; (signature ) Size: longint; (file length in bytes) Res1: word; (reserved) Res2: word; (reserved) OfBm: longint; (image offset in bytes (1078)) end; bmInfoHeader = record (information header) Size: longint; (header length in bytes (40)) Widt: longint; (image width (in pixels)) Heig: longint; (image height (in pixels)) Plan: word; (number of planes (1)) BitC: word; (color depth (bits per dot) (8)) Comp: longint; (compression type (0 - no)) SizI: longint; (image size in bytes) XppM: longint; (horizontal resolution) ((dots per meter - usually 0)) YppM: longint; (vertical resolution) ((dots per meter - usually 0)) NCoL: longint; (number of colors) ((if the maximum allowed is 0)) NCoI: longint; (number of primary colors) end; bmHeader = record (full file header) f: bmFileHeader; (file header) i: bmInfoHeader; (information header) p: arrayof byte; (palette table) end; bmhptr = ^bmHeader; (reading an image from a Bmp file) procedure ReadBMP(image:arptr; (array with image) xim,yim:word; (dimensions) pal:arptr; (palette) filename:string); (file name) (reading Bmp file header) procedure ReadBMPheader(header:bmhptr;filename:string); implementation ($R-) (reading an image from a Bmp file) procedure ReadBMP(image:arptr; xim,yim:word; pal:arptr; filename:string); var h: bmHeader; i:integer; bmpfile: file; s: longint; begin assign(bmpfile,filename); reset(bmpfile,1); blockread(bmpfile,h,sizeof(h)); (read header) for i:= 0 to yim-1 do begin (read line by line) blockread(bmpfile,image^[(yim-i-1)*xim],xim); if (xim mod 4)<>0 then blockread(bmpfile,s,4 - (xim mod 4)); end; close(bmpfile); for i ^= 0 to 255 do begin (palette transformation) pal^ := h.p shr 2; (blue) pal^ := h.p shr 2; (green) pal^ := h.p shr 2; (red) end; end; (reading the header of a Bmp file) procedure ReadBMPheader(header:bmhptr;filename:string); var bmpfile:file; begin assign(bmpfile,filename); reset(bmpfile,1); blockread(bmpfile,header^,sizeof(header^)); close(bmpfile); end; end.Listing 2
( sprite) procedure CreateSprite(s:string; x,y,dx,dy:integer); var f: file; (file with sprite image) begin getmem(Sprt.Img,sizeof(SpriteArrayType)); (allocate memory for the sprite) getmem(Sprt.Back,sizeof(SpriteArrayType)); (allocate memory for the buffer) Readbmp(@(Sprt.Img^),Xsize,Ysize,@p,s); Sprt.x:= x; Sprt.y:=y; (set the initial values) Sprt.dx:= dx; (coordinates and increments) Sprt.dy:= dy; end;The BMP file format (short for BitMaP) is the native raster graphics format for Windows because it most closely matches the native Windows format in which that system stores its raster arrays. The filename extension most often used in BMP format is BMP, although some files have the extension RLE, which stands for run length encoding. The RLE extension of a file name usually indicates that the file's raster information has been compressed using one of two RLE compression methods that are valid for BMP format files.
In BMP files, the color information of each pixel is encoded at 1, 4, 8, 16, or 24 bits (bits/pixel). The number of bits per pixel, also called color depth, determines the maximum number of colors in an image. An image with a depth of 1 bit/pixel can have only two colors, and with a depth of 24 bit/pixel - more than 16 million different colors.
The diagram below shows the structure of a typical BMP file containing a 256-color image (8 bits/pixel depth). The file is divided into four main sections: the raster graphics file header, the raster array information header, the color table, and the raster array data itself. The header of a raster graphics file contains information about the file, including the address at which the raster array data area begins. The raster array information header contains information about the image stored in the file, such as its height and width in pixels. The color table provides the RGB (red, green, blue) primary color values for the colors used in the image. Programs that read and display BMP files, when using video adapters that do not allow displaying more than 256 colors, can programmatically set such RGB values in the color palettes of the adapters for accurate color reproduction.
The format of the actual raster array data in a BMP file depends on the number of bits used to encode the color data for each pixel. With a 256-color image, each pixel in the part of the file that contains the actual raster array data is described by one byte (8 bits). This pixel description does not represent RGB color values, but serves as a pointer to enter the file's color table. Thus, if R/G/B=255/0/0 is stored as the first RGB color value in the color table of a BMP file, then the value of pixel 0 in the raster array will be assigned the color bright red. Pixel values are stored in left-to-right order, starting (usually) at the bottom row of the image. Thus, in a 256-color BMP file, the first byte of raster array data is the index for the color of the pixel located in the lower left corner of the image; the second byte represents the index for the color of the pixel adjacent to the right, etc. If the number of bytes in each row is odd, then an extra byte is added to each row to align the raster array data on 16-bit boundaries.
Not all BMP files have a structure like the one shown in the diagram. For example, 16- and 24-bit/pixel BMP files do not have color tables; in these files, the pixel values of the raster array directly characterize the RGB color values. The internal storage formats of individual sections of the file may also differ. For example, raster array information in some 16- and 256-color BMP files can be compressed using the RLE algorithm, which replaces sequences of identical image pixels with tokens that specify the number of pixels in the sequence and their color. On Windows, you can work with OS/2-style BMP files that use various raster array header and color table formats.
Very often, when working with graphics, many users encounter images in the BMP format. Today, few people know what it is. Now we will look at the BMP graphic format in more detail. Moreover, we will not only trace the history of its origin and evolution, but also offer some simple methods for converting it to other popular formats.
What is BMP format?
Let's not go into too much technical detail. Note that BMP is a format for storing graphic images in the form of a bitmap based on single-layer rasters.
Yes this is true. Initially, the BMP image format was applied exclusively to raster images and was a universal (standard) extension for all graphics in general.
History of origin
The history of the creation of this format is inextricably linked with the Microsoft Corporation, which first implemented it in its main brainchild - the Windows operating system. In addition, despite constant competition with Apple, support for this type of graphics was later announced for the OS/2 operating system.
True, since then the BMP graphics format has undergone many changes. It was originally assumed that the structure of an image was built on a combination of small squares, today known as pixels. It is believed that each pixel in an image can contain data about a different color depth (the number of bits per such graphic unit). The values used to indicate the color bit depth are as follows: 1, 2, 4, 8, 16, 24, 32, 48, 64 bits.

In this case, for values less than 8, the color is indicated only using the index of the palette (table) of shades, and for values above the index is taken from the standard RGB model. The latter contains color variations obtained by mixing red, green and blue.
As is already clear, the higher the bit depth, the larger the size of the final image will be. It must be said that the BMP file format, both in those distant times and today, looks like a kind of mastodon, because its size is quite large. This is due to the fact that the image itself is uncompressed, compared to, say, the same JPG format. The size of files with different types of extensions containing the same image can differ not only hundreds - tens of thousands of times.
How to open the BMP file format?
As for opening images of this type, any Windows operating system has built-in tools for this.

Until viewing applications were created, the main editing tool remained the native Paint program included with any version of Windows. At that time, this application exclusively supported the BMP format.
As is already clear, with the development of technology and the evolution of the format itself, the program also changed. Today, Paint's capabilities are much greater than those of its initial versions.
In addition, with the advent of programs for viewing and editing graphics, the BMP file format was announced in technical support and in them. It is not surprising, since it was he who was the “great-grandfather” of almost all image file extensions known today.
You can find a lot of programs for working with such graphic data. Among viewing tools, for example, in Windows you can use a standard tool; among third-party applications, software packages such as ACDSee or Irfan View and many others are quite popular.
As for editing, you can use anything for work, for example, the same Adobe Photoshop, Corel Draw or any other graphic editor that has even a minimal set of tools and capabilities.
The simplest way to convert BMP format
Now let's see how to change the BMP format in the simplest ways. To do this, you can use the same graphic editors.

If we take the standard Paint application as an example, first the desired BMP file is opened in it, after which the “Save As...” command is selected from the “File” menu, where in the root, in the bottom line (drop-down menu), you can find supported formats.
Actually, in any other graphic editor, the technology for converting a bitmap is similar to that described above. In some applications you can also find export commands, which, in principle, are not particularly different, since when using them the whole procedure again boils down to selecting another supported graphic format other than the original BMP.
Using converters
One of the easiest ways to convert a different type of image into BMP format, not to mention using standard Windows tools and graphic editors, is to use specialized converters that work automatically.

Everything is simple here. The user adds graphic files to be converted into the program window, then selects the final format (in this case BMP) and presses the button to start the conversion process. The final files in the new form will be saved in the folder whose location is set by default in the application or specified manually.
By the way, the same applies to the reverse process, when you need to convert the BMP format to some other one.
With all the many programs in this area on the Internet, you can find many resources that allow you to carry out such transformations online. Only in this case, the user uploads files to the site, selects the final format, and then downloads the result to his computer. Agree, compared to the first two methods, it is not very convenient.
Conclusion
That's all that can be said about the BMP graphics format in a nutshell. For obvious reasons, the technical side of the issue in terms of file structure was not considered. Such data is unlikely to tell the average user anything.
But in conclusion, I would like to add a few words about converting graphic files into the uncompressed BMP format. Of course, its current version takes up less disk space. But it still differs from more modern compressed data types. In principle, the BMP format itself can even be called somewhat outdated, since few people use it today. Therefore, converting compressed formats into the type of graphic files with the .bmp extension seems clearly impractical at the present stage.
 High efficiency loudspeaker
 Dictionary of hi-fi terms. Acoustic system. General concepts and most frequently asked questions What is an AC working axis
 Frequency response