How to remove unwanted factory apps. How to uninstall applications (including
Programs are different - useful and useless, simple, complex and dangerous. And users will find out which of these qualities belongs to a particular software product, unfortunately, in most cases only after its installation in Windows. The buttons click, the settings sliders are moved, and then the picture becomes clearer. What you need to do with the software: execute, that is, uninstall, or pardon, leave it in the bowels of a computer or laptop.
This guide will tell you how to completely remove the program from your computer using utilities and manually.
Method number 1: manual cleaning
Launching the uninstaller
Almost every program has an uninstaller in its directory (folder) - a file, usually called "uninstall", "uninstaller", etc. It is designed to remove application elements from the operating system (file directories and registry).
To run the program's uninstaller, follow these instructions:
1. In the taskbar (the strip with buttons at the bottom of the display), click on the “Windows” icon.
2. In the Start menu that pops up, click Control Panel.

3. Set the "View" setting to the "Category" view.

4. Click the "Uninstall a program" section.
5. In the directory of installed software, left-click to select the application to be removed.

6. Follow the instructions of the opened uninstaller (if necessary, click the buttons "OK", "Next", "Delete", etc.).
You can also run the Uninstall module directly from the Start menu (without going to the Control Panel):
1. Click: "Windows" button → "All Programs".

2. Click to open the desired program folder.
3. Click on the list item named "Remove ...", "Remove ..." or "Uninstall".

If you cannot find the uninstaller either in the "Uninstall a program" section or in the "Start" menu, do this:
1. Right click on the application shortcut on the desktop.
2. Select "Properties" from the context menu.

3. In the properties panel, click the "File Location" button.

4. In the program directory that opens, find and run the uninstaller.

Well, if there is no shortcut on the desktop, look at the "Program Files" and "Program Files (x86)" folders. Often, by default, applications are installed in these directories.

Removing entries from the registry
To remove the software keys left after uninstallation from the registry, perform the following operations:
1. Open the "Run" panel by pressing the key combination "Win + R".

2. Type in the command line - regedit (registry editor).
3. Click OK.
4. In the menu, click: Edit → Find.

5. In the "Search" window, type the name of the remote program and click "Find next".

6. Delete the found key here (through the registry editor): right-click on the key → click "Delete" in the list.

7. Resume the search for entries in the directories by pressing the "F3" key. Or go to the menu: Edit → Find next.

8. Keep checking until you get a message that the entire registry has been scanned.
Deleting files
To get rid of the remaining folders and files of a remote program:
1. Press the key combination "Win + E".
2. Go to the "Disk C" section.
3. In the upper right corner of the window, in the "Search" field, type the name of the application that was uninstalled from the system.
4. Press "Enter".

5. Get rid of the detected elements via the context menu: right mouse button → Delete.

If any object is not removed, try to get rid of it using the iObit Unlocker program.
After installing it, also open the context menu, select the utility icon in the list. And then in the window that opens, set the drop-down list to "Unblock and remove" and run the selected command.

Disabling system programs
Programs installed with Windows - Internet Explorer, a package of games (Solitaire, Spider), etc., cannot be removed using the regular function. But you can turn it off: they will be present in the system, but will not be displayed in the interface, they will start.
1. Click: Start → Control Panel → Uninstall a program → Turn features on or off.

2. Click the mouse to uncheck the boxes next to the applications that you want to disable.

3. Click OK.

4. Wait for the procedure to complete, close the window.
Method number 2: cleaning with uninstall utilities
The algorithm for automatic uninstallation and removal of application remnants using uninstaller utilities is as follows:
1. Run the built-in uninstaller.
2. Standard removal provided by the program.
3. Search for elements left after uninstallation (files, registry keys) and their removal.
The most popular among PC users are the following solutions:
An easy-to-use yet powerful Windows cleanup tool. Quickly and accurately finds all the remnants of the removed software. It has a "Forced Deletion" feature.

Supports batch removal: automatic sequential uninstallation of several programs.

A paid product with a large number of functions for cleaning hard drive partitions and system directories from useless elements, registry optimization. Starts uninstalling the program with one click. Has the most convenient interface.

A faithful assistant in the most difficult cases of cleaning the OS from unnecessary applications. Distributed conditionally free of charge (test version - 30 days). Endowed with advanced and lightning-fast algorithms for finding the remaining objects of uninstalled programs. Cleans well and meticulously.

Attention! Antivirus
If you are faced with the task of removing an antivirus, the first thing to do is to ask on the official website of the developers if there is a special utility for removing it. It greatly simplifies the uninstallation and saves you a lot of time.
Happy cleaning Windows!
The firmware of many smartphones and tablets running Android contains the so-called bloatware: applications of dubious utility pre-installed by the manufacturer. As a rule, removing them in the usual way will not work. Therefore, today we want to tell you how to uninstall such programs.
In addition to bloatware, virus software cannot be removed in the usual way: malicious applications use loopholes in the system to pretend to be the administrator of devices for which the uninstall option is blocked. In some cases, for the same reason, it will not be possible to remove a completely harmless and useful program like Sleep as Android: it needs administrator rights for some options. System apps like the Google search widget, the default dialer, or the Play Store are also protected from uninstallation by default.
The actual methods for removing non-removable applications depend on whether your device has root access. It is not mandatory, but with such rights it will be possible to get rid of unnecessary system software. Options for devices without root access are somewhat limited, but in this case there is a way out. Let's consider all methods in more detail.
Method 1: Disabling Administrator Rights
Many applications use elevated privileges to control your device, including screen locks, alarm clocks, some launchers, and often viruses that disguise themselves as useful software. A program that has been granted access to Android administration cannot be uninstalled in the usual way - if you try to do this, you will see a message stating that uninstallation is not possible due to active device administrator options. What to do in this case? And here's what you need to do.
- Make sure you have developer options enabled on your device. Go to "Settings".

Pay attention to the very bottom of the list - there should be such an option. If not, then do the following. At the very bottom of the list is "About phone". Go into it.

Scroll to the item "build number". Tap on it 5-7 times until you see a message about unlocking developer options.
- Enable USB debugging in developer options. To do this, go to "Developer Options".

Activate the options with the toggle at the top, and then scroll through the list and check the box next to "USB Debugging".
- Return to the main settings window and scroll down the list of options to the general block. Tap on an item "Security".

On Android 8.0 and 8.1 this option is called "Location and Defense".
- Next, you should find the device administrators option. On devices with Android version 7.0 and below, it is called "Device Administrators".

In Android Oreo, this feature is called "Device Administrator Applications" and is located almost at the very bottom of the window. Enter this setting item.
- A list of applications that are allowed additional features will appear. As a rule, inside there are remote control of the device, payment systems (S Pay, Google Pay), customization utilities, advanced alarm clocks and other similar software. Surely in this list there will be an application that cannot be uninstalled. To disable administrator privileges for him, tap on his name.

On the latest versions of the OS from Google, this window looks like this:
- In Android 7.0 and below, there is a button in the lower right corner "Switch off" to be clicked.
- You will automatically return to the previous window. Please note that the checkmark next to the program for which you turned off administrator rights has disappeared.


In Android 8.0 and 8.1 - click on "Disable device admin app".


This means that such a program can be removed in any way possible.
This method allows you to get rid of most non-removable applications, but may be ineffective in the case of powerful viruses or bloatware, sewn into the firmware.
Method 2: ADB + App Inspector
Complicated, but the most effective method of getting rid of non-removable software without root access. To use it, you will need to download and install the Android Debug Bridge on your computer, and the App Inspector application on your phone.
Having done this, you can proceed to the procedure described below.
- Connect your phone to your computer and install drivers for it, if necessary.
- Make sure that the archive with ADB is unpacked to the root of the system drive. Then open "Command line": call "Start" and type letters in the search box cmd. Right-click on the shortcut and select "Run as administrator".
- In the window "Command line" write the commands in sequence:
cd c:/adb
adb devices
adb shell - Go to the phone. Open App Inspector. A list of all the applications available on your phone or tablet will be presented in alphabetical order. Find among them the one you want to delete and tap on its name.
- Take a close look at the line "Package Name"- the information recorded in it will be needed for us later.
- Return to the computer and "Command line". Type in the following command:
pm uninstall -k --user 0 *Package Name*

Instead of *Package Name*, write the information from the corresponding line from the page of the application to be removed in the App Inspector. Make sure the command is entered correctly and press Enter.
- After the procedure, disconnect the device from the computer. The application will be removed.


The only downside to this method is that it only removes the app for the default user (the "user 0" statement in the command in the instructions). On the other hand, this is a plus: if you deleted a system application and encountered problems with the device, just do a factory reset to return the deleted one to its place.
Method 3: Titanium Backup (Root only)
If your device is rooted, the procedure for uninstalling non-removable programs is greatly simplified: just install Titanium Backup on your phone, an advanced application manager that can remove almost any software.

This method is the simplest and most convenient solution to the problem of uninstalling programs on Android. The only negative is that the free version of Titanium Backup is somewhat limited in its capabilities, which, however, are sufficient for the procedure described above.
Conclusion
As you can see, non-removable applications are pretty easy to deal with. Finally, we remind you - do not install dubious software from unknown sources on your phone, as you risk running into a virus.
To make sure that any program can be removed from your computer, you must read the article completely and carefully. Before we begin to figure out how to uninstall a program from a Windows 7, XP or 8 computer, we must first mention the standard procedure, since perhaps unsure computer users do not know how to do this.
Removing programs is possible without installing additional programs, to do this, go to "Start" - "Settings" - "Control Panel" - "Add or Remove Programs" (Windows XP), and for other versions, "Start" - "Control Panel » — «Uninstall a program» — the standard way to uninstall programs.
But when deleting in this way, it is likely that registry entries and folders will remain in the system. In a word, garbage that will remain on your device. This data can cause crashes, system freezes and, of course, they take up space on your hard drive.
To solve this problem, we will use the free Revo Uninstaller program, which will quickly remove the program and even the program that cannot be removed in the standard way. Revo Uninstaller is a good addition to the system, because with this utility you will remove non-removable programs with created registry entries, folders, settings files, and more. A little lower, I will talk about how to remove a program that is not removed, and even when it is not on the list for removal.
Now let's get started, install the program and I'll show you how to uninstall the program using this utility. You can download the program.
Installing Revo Uninstaller to remove programs
After downloading the program, run the installation file. Select "Russian" and click "OK".


Check the box "I accept the terms of the agreement." Click "Next".

Click "Install".

The program is installed on your computer. We click "Finish".

How to use Revo Uninstaller
After installation, run the program, and the main window of the program will open on the screen. You will have to wait a little while the program collects data about the programs that are installed on your computer. After a few seconds, the program is ready to work, now select the program you want to remove and press the "Delete" button, which is located in the upper horizontal menu. Using the AIMP player as an example, I will clearly show what to do if the program is not removed from the computer. Select AIMP with the left mouse button and click the "Delete" button.

The program will ask you to confirm the deletion, click "YES".

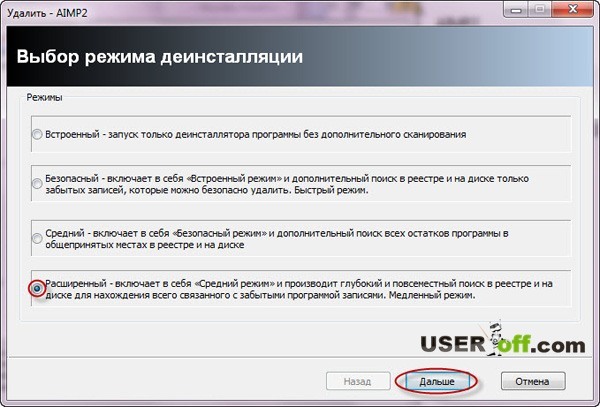
In the next window, you need to select the uninstallation mode. There are 4 types of modes in this program: built-in, safe, medium and advanced. We choose advanced, as it performs a deep analysis of the registry, folders and program links. This mode is slower than all the others, please be patient. We press "Next".
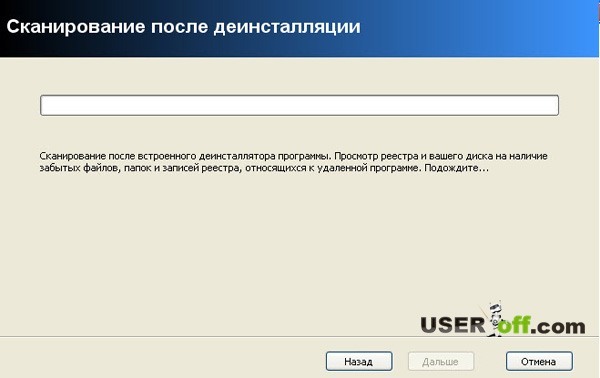
The program will analyze and run built-in program uninstaller, which is built into AIMP. If you are prompted to click "Next", "Next", "Uninstall", "OK", or something like that, then feel free to click. If you do not have a built-in uninstaller, then you need to go the other way, which is described below (Hunting mode). After uninstalling the program, you need to click "Next" to search for files, folders and entries in the registry.

On average, scanning takes about 10 to 60 seconds, depending on the amount of information being processed. When the scan is finished, click "Next".
When scanning: entries in the registry, files and folders, they may not be found, which means that the uninstaller has worked its function 100 percent. If the scanner found entries in the registry, check the "My Computer" box. Click the "Delete" button and click "Next".

In the screenshot above, we only deleted branches and settings in the registry, but we delete shortcuts, folders and data in the next step. To delete the data found by the scanner, click "Select All", so as not to check the box next to each line, click "Delete", and the last step is "Next".

The removal procedure is completed, click "Finish".

If the program is not in the list for uninstalling programs (Hunting mode)
It happens that the program is not in the list, but is in the tray or there are pop-ups of the program that needs to be removed. Especially for such cases, Revo Uninstaller has a "Hunting Mode" function, which often saves me.
Attention! Sometimes when aiming at a program being removed, it works falsely. That is, point to the program you want to remove, and a message appears that you are going to remove a completely different application or this action is impossible. In this case, you need to try to find other windows to use the hunting mode.
How to work with "Hunt Mode"
To switch to the “hunting mode”, you need to click on “Hunting mode” in the program window.
The program window will automatically minimize and a blue sight will appear in the upper right corner of the desktop, which you need to point at the program by holding the left mouse button.
We aim at a shortcut, a message, a window, a tray icon, in short, at any program object. Releasing the left mouse button, you will be offered a choice, in our case, to remove the program, click "Uninstall".
To complete a review of this program, I'll tell you a little about the additional features of Revo Uninstaller.
The program has tools for optimizing Windows:
- Autorun Manager - disable / enable programs that are loaded with Windows. This procedure can be done without programs, to understand how to disable autorun programs, read the article.
- Windows Toolkit - allows you to start services on the system .
- Junk File Cleaner - Removes temporary files, browsers and Microsoft Office.
If you can't uninstall the program, you can try to do it manually. Check out the following article: "".
I will not talk in detail about the work of additional features, they are easy to manage and with a Russian description.
In today's blog article, we will talk with you about how to remove a program from a computer, how to completely remove a program. As you know, unnecessary things litter the apartment, and unnecessary programs - the computer. But, if a thing can simply be thrown into the trash, then various applications and programs on the computer must be uninstalled (i.e. deleted), and this must be done correctly so that system errors do not occur. However, not all users know how to do this correctly. Therefore, in this article, let's look at how to remove a program from a computer, removing not only the shortcut and executable files, but also entries in the registry.How to uninstall a program from a computer?
Control Panel.
The very first way to uninstall (remove) applications or programs that every user should become familiar with is to use the function "Remove Programs" in "Control Panels".
- Expand the menu "Start" and go to "Control Panel".
- Find a section "Remove Programs" and open it by clicking the left mouse button.
- Wait for the full list of installed applications to load. Highlight the program you want to get rid of and click the button "Delete".
Follow the uninstall wizard through all the steps to uninstall the selected application. Restart your computer if necessary to complete the uninstallation process.
Start menu.
Another convenient way to resolve the issue of how to remove a program from a computer is to use the built-in uninstaller of the program, which appears in the system along with the application itself after it is installed. It can usually be found through the menu "Start":
1. Click the button "Start" and expand the list "All programs".
2. Find the line with the utility or program that you want to remove from the system and left-click on it.
3. Among the items that appear should be an uninstaller that bears the name "Delete", "Uninstall" or "Uninstall". Click on it to launch the Uninstall Wizard.
You can also find the built-in uninstaller in the directory of the program itself. It is usually a file uninstall.exe, after launching which the Uninstall Wizard window appears.
Third party software.
If the standard Windows tools do not help resolve the issue of how to remove a program from a computer or you want to immediately clean the registry from traces of a remote application, then it is better to use special multifunctional utilities that can be downloaded for free.
That's all for now! I hope you found something useful and interesting for yourself in this note. Good luck! 😎


The context menu item "Open With List" is often used to open startup programs. The Windows operating system offers programs to open the corresponding file. Over time, quite a few programs can accumulate in this list, sometimes not designed to open the file you want to open.
Quite often, there are situations when, in order to open a file unknown to the operating system, programs that are not at all designed to work with the file that needs to be opened get into the context menu of Explorer “Open with”.
You can simply mistakenly try to open a file and after that such a program will be added to the list of programs that are designed to open this file. Therefore, it is desirable to remove the entry about an unnecessary program from the context menu.
- Attention! Before making changes to the registry of the Windows operating system, it is advisable to create a point, or make a backup. Thus, you will protect your operating system from possible malfunctions or failures that may occur due to erroneous actions with the system registry. After a problem occurs in the operating system, you will need to do a system restore, or restore the registry from a previously created registry backup.
Let's consider a situation where the list of programs that are designed to view images has hit, for example, the Word text editor. In fact, I myself put this program in this list in order to show how to remove an unnecessary program from the "Open With" context menu list.
For example, an image file in the "JPEG" format. When opening a file using the context menu - "Open with", among the programs designed for this, there is a Microsoft Office Word text editor.
You can select the context menu item "Select a program ...". In this case, the "Select a program" window will also contain a program that is not designed to open a file of this extension.
Removing from the "Open with" list in the Registry Editor
An incorrectly selected program will need to be removed from the context menu using the "Registry Editor". Only one entry will be deleted in the system registry, which refers to a specific program.
You can enter the "Registry Editor" by pressing the "Windows" + "R" keys on the keyboard, and then in the "Run" window you will need to enter the expression "regedit", and then click on the "OK" button, or press the key on the keyboard Enter.
You can get into the "Registry Editor" in another way. To do this, enter the "Start" menu, enter the expression "regedit" in the "Search" field, after displaying the search results, you need to click on the image of the "regedit" program.
After the "User Account Control" window appears, in which you need to agree to the changes, the "Registry Editor" window appears.

In the "Registry Editor" window, you will need to double-click sequentially on the listed items (folders) "HKEY_CURRENT_USER" => "Software" => "Microsoft" => "Windows" => "CurrentVersion" => "Explorer" => "File Exts".
Full path of file extension location:
HKEY_CURRENT_USER\Software\Microsoft\Windows\CurrentVersion\Explorer\FileExts\.file extension\OpenWithList
In the "File Exts" folder, you must select the file extension, in which you need to delete the entry about the program with which you can open the file in the context menu. In our case, this is the ".jpg" extension. Then, in the "OpenWithList" folder, select the program whose record you want to delete. In our example, this is "WINWORD.EXE".

In the window with the warning that appears, you need to click on the "Yes" button.
After these steps, you can close the "Registry Editor". The changes made in the registry took effect without restarting the computer.
In the future, when you open a file using the "Open with" context menu item, there will no longer be an unnecessary program entry.

Deleting entries in this registry branch does not always succeed.
Look at two more branches of the registry, which may contain entries about "unnecessary" programs:
HKEY_CLASSES_ROOT\.file extension\OpenWithList HKEY_CLASSES_ROOT\SystemFileAssociations\.file extension\OpenWithList
If the entry in the context menu remains, check also these registry branches.
Fix wrong file association
For difficult cases, when applications are incorrectly selected to open many types of files, use any of the 7 methods in Windows.
After following the steps to change the file association, the files will open with the correct applications.
Article Conclusions
In this way, you can remove unnecessary entries about programs that were included in this list by mistake from the context menu "Open with". The next time you start the program, unnecessary entries will no longer mislead the user.
How to remove a program from the "Open with" list (video)
 What do page out errors indicate?
 Synchronous and asynchronous I/O Asynchronous I/O
 Finite state machines, how to program without messing up