iPhone lock (on) button does not work - Anatomy of a Breakdown. iPhone lock (on) button not working - Anatomy of a Breakdown How to remove the iphone 5 power button
Fair, not too high or too low. There should be prices on the Service website. Necessarily! without "asterisks", clear and detailed, where it is technically possible - the most accurate, final.
If spare parts are available, up to 85% percent of complex repairs can be completed in 1-2 days. Modular repairs take much less time. The site indicates the approximate duration of any repair.
Warranty and Liability
A warranty should be given for any repair. Everything is described on the site and in the documents. A guarantee is self-confidence and respect for you. A 3-6 month warranty is good and enough. It is needed to check the quality and hidden defects that cannot be detected immediately. You see honest and realistic terms (not 3 years), you can be sure that you will be helped.
Half the success in Apple repair is the quality and reliability of spare parts, so a good service works directly with suppliers, there are always several reliable channels and a warehouse with proven spare parts for current models so that you do not have to waste extra time.
Free diagnostics
This is very important and has already become a rule of good form for the service center. Diagnosis is the most difficult and important part of the repair, but you should not pay a dime for it, even if you do not repair the device after it.
Service repair and delivery
A good service values your time, so it offers free shipping. And for the same reason, repairs are carried out only in the workshop of the service center: it can be done correctly and according to technology only at a prepared place.
Convenient schedule
If the Service works for you, and not for itself, then it is always open! absolutely. The schedule should be convenient in order to be in time before and after work. Good service works on weekends and holidays. We are waiting for you and working on your devices every day: 9:00 - 21:00
The reputation of professionals consists of several points
Age and experience of the company
Reliable and experienced service is known for a long time.
If a company has been on the market for many years, and it has managed to establish itself as an expert, they turn to it, write about it, recommend it. We know what we are talking about, since 98% of incoming devices in the SC are restored.
We are trusted and passed on complex cases to other service centers.
How many masters in the directions
If you are always waiting for several engineers for each type of equipment, you can be sure:
1. there will be no queue (or it will be minimal) - your device will be taken care of immediately.
2. You give Macbook repair to an expert specifically in the field of Mac repairs. He knows all the secrets of these devices
technical literacy
If you ask a question, the specialist must answer it as accurately as possible.
To give you an idea of what you need.
Will try to solve the problem. In most cases, from the description, you can understand what happened and how to fix the problem.
This guide will help you replace the home button on your iPhone 5s yourself.
Note that Touch ID can only work with the factory installed button. If you replace the home button yourself, you won't be able to unlock your iPhone with your fingerprint. Only a replacement at an Apple Authorized Service Center can keep Touch ID functional. .
This instruction is a translation of the article: https://www.ifixit.com/Guide/iPhone+5s+Home+Button+Replacement/24983 .
We also have instructions on how to, if you're interested.
Warning
This article is not a guide to action! You are solely responsible for the collection and disassembly of your device.
Many manufacturers do not carry warranty obligations if the device has been disassembled by the user. If you do not want to lose the warranty for your device, check the terms of the warranty in the documentation or with the device manufacturer.
Tools Used
|
If your iPhone screen is broken, then first we will seal it with adhesive tape so as not to damage ourselves and the phone with small pieces of glass.

Apply several strips of tape until you cover the entire screen area. First of all, this will protect you and the phone from small fragments, and secondly, it will help maintain the integrity of the screen when we get it out of the case.

I highly recommend using goggles and gloves. Getting shards of glass out of the eye is a very unpleasant experience :(
 1
1
Turn off your phone before starting work.
Then remove the two 3.9mm Pentalobe screws that are on the sides of the Lightning connector.

Use a suction cup to remove the screen module. Place the suction cup on the screen next to the home button and apply pressure so that the suction cup sticks and holds well.

The display module is held in the housing with latches, and is also connected to the motherboard with several cables. One cable is located under the home button, the rest at the top of the iPhone. Your task is to open the iPhone exactly enough so that you can disconnect the cable under the home button.

Do not rush, this procedure may take some time. The display of the iPhone 5S is fixed quite firmly in the case. Do not try to immediately open the phone completely, do not forget about the cable.

As soon as the display is held only on the cables, you can remove the suction cup, to do this, pull the tab on the suction cup, or, if it is not there, lift one edge of the suction cup with your fingernail.

Filming…

Now we raise the display module from the side of the "home" button just enough so that you can disconnect the cable.
Do not lift the screen too high, you may damage the cable or connector. The cable must not be stretched.

Use tweezers to remove the bracket from the connector.

During assembly, install the bracket correctly. The side with the small tooth should be facing down the machine and the side with the two slots should be towards the battery.

Use tweezers to disconnect the cable connector from the connector on the motherboard.

Make sure the connector on the cable is indeed disconnected from the connector on the motherboard. The connector on the motherboard is glued on and can be torn off the motherboard if you're not very careful, but the connector itself will still be connected to the connector on the ribbon cable.

After the home button cable is disconnected, open the phone 90° from the side of the home button, as if it were a hinge at the top of the phone.

During the next few steps, keep the screen up 90° as shown in the picture.

Unscrew the screws marked with circles:
- 1.7mm Phillips #000 Phillips head screw;
- 1.2mm Phillips #000 Phillips head screw;
- 1.3mm Phillips #000 Phillips head screw;
- 1.7mm Phillips #000 head screw. This screw is not magnetized with a screwdriver. Don't lose it.
It is very important not to mix up the screws during assembly. If you screw in a 1.3mm or 1.7mm screw instead of a 1.2mm screw, you can seriously damage the motherboard and brick your iPhone.
Do not overtighten the screws. If the screw does not go easily, then you may have made a mistake, do not apply force.

Remove the protective screen.

Use a spatula to disconnect the selfie camera and sensor cable connectors.


Keep the screen up 90°. Now disconnect the cable from the display.

During reassembly, the display connector may not fully latch and you will see white lines on the screen when the iPhone boots up. If this happens, unplug the display connector and plug it back in, then restart your iPhone. The best way to reboot is to disconnect the battery for a few seconds.

Now disconnect the touch screen connector.


Now you can remove the screen.

On the back of the screen, remove one Phillips #000 Phillips head screw that holds the home button.

The unscrewed screw is fastened to the train with a clasp with a contact spring. During assembly, make sure that the contact spring is installed, as before, between the screw and the screen.

Bend the train.


Remove two 1.4mm Phillips #000 Phillips head screws.

Remove the bracket that holds the home button.

Slide the "shovel" under the cable coming from the "home" button. The cable is slightly glued to the display module.

Gently move the spatula to the left and right to peel off the cable.
Do not remove the button yet, it is still connected to the display module.

If necessary, remove some of the tape you applied at the beginning from the outside of the display.
Gently press the top left corner of the button from the outside.

Do not try to squeeze out the entire button at once, your task is to release only one corner, and then insert the "shovel" there and pry it off.
The membrane around the button is very thin, if you think it will break now, heat it up a little with a hair dryer and try again.

Remove the button from the display module by carefully prying and bending it with a spatula.

Like this…

Button removed. You may need to transfer the rubber band from your old button to the new one.

Gently peel off the rubber band from the button with tweezers. The rubber is very thin and can be easily torn. If you feel like you might break it, heat up the button with a hair dryer and try again.
A lot of people turn to service centers with one of the most common problems in the iPhone 5 - a broken on / off button (the same button functions as a lock and unlock phone). It is located on the top right side of the iPhone 5.
Apple has opened a special repair program for the power buttons in the iPhone 5. But it is designed for devices with certain serial numbers. The program applies to a number of iPhones released since March 2013. Apple reports that the program has been launched due to the fact that in a small number of devices, the power button may stop working or work incorrectly. The one-year warranty has expired for them, but for devices with certain serial numbers, free repair of the switching mechanism is now possible within two years from the date of purchase.
Whether a particular device falls under the program for extending the warranty period of the power buttons can be found by the serial number of the smartphone in the list on the Apple website. If your device is eligible, repairs can be made free of charge at Apple Service Centers.
If the device does not fall under this program, then it will have to be repaired at the service center at its own expense. In this article, we will consider in detail what could be the cause of the breakdown and possible solutions to such a problem.
Reasons for the failure of the on / off button in the iPhone 5:
Liquid ingress or severe contamination;
Violation of the integrity of the membrane;
Strong physical impact on the button;
Manufacturing defects.
Button failure can look different, regardless of the reason for which the button failed.
There are three types of incorrect operation of the on / off button:
1. The button is not pressed, it is pressed into the body. In this case, the membrane has burst and does not perform its function of pressing the button.
2. The button is pressed, but rarely works and pressing requires a lot of effort. The reason is also in the membrane, but at the same time it is not completely pressed through and still works with strong pressure.
3. The button is pressed, but it does not work. The reason is a malfunction of the loop. Most likely, oxidation appeared in some places, the contacts were broken and the cable stopped working.
In all of the above cases, the on / off button needs to be replaced along with the cable, since the button is not replaced separately. Let's analyze the steps for replacing the on / off button cable.
First of all, you need to completely disassemble the phone
We will show the process of replacing the loop in more detail.
1. First of all, you need to unscrew the two screws near the charging connector.


3. Unscrew the screws holding the metal plates (battery and display connection cable)


disconnect the battery

and disconnect the display cable

5. The battery is strongly glued to the case. Therefore, we will use a metal spatula to lift the battery.

6. Disconnect all cables going to the motherboard


7. General view of the iPhone 5 disassembly stage

8. Now you need to remove the motherboard. Remove all screws holding the board to the case


9. General view of the second stage of disassembling the iPhone 5

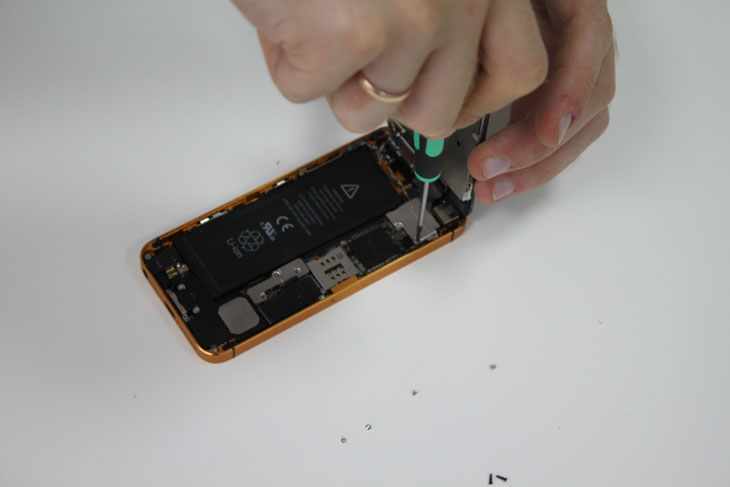
10. Now we got close to the faulty iPhone 5 power button cable. First, remove the vibration motor.

11. Remove the screws of the power button cable itself


Please note that the cable is glued to the case!


We change the non-working cable to a new one and assemble it in the reverse order!


Replacing the lock button is not often required, usually as a result of really serious damage due to contact with liquid or mechanical shock, and of course, over time. Due to the above circumstances, the on / off button may cease to function, which, of course, always causes a number of inconveniences to the user. After all, we use it not only to turn off the phone, but also, for example, to take a screenshot of the screen (simultaneously holding it with the central key), set silent mode during a call (single press), reset the call (double press), to go to the desktop , and not in the application (single press during notification). Of course, it is not necessary to be surprised at the failure of the lock button after a couple of years of such intensive use. Contact our masters, and a similar replacement will be made for you within 40 (or even less) minutes!
When you need to fix the top lock button on your iPhone
There are not so many cases when you need to fix the top lock button on the iPhone. The button mechanism can be severely loosened if struck or dropped. If severe deformation occurs, then the cable, which is the connecting bridge between the button and the motherboard, will probably fail. The wear and tear mentioned above over time cannot, of course, be left out. Well, the most unpleasant breakdown is water ingress. The corrosion that has begun spreads at lightning speed through the contacts, incidentally affecting all new parts. In addition, metal pushers can be damaged - and here you definitely can’t do without replacing the on / off button. By the way, in almost 90% of cases, a parallel replacement of the upper cable is, unfortunately, necessary.
If you are interested in where to fix a smartphone and the price of repairing the lock button on the iPhone 5 in Moscow, create a task for Yuda, and experienced specialists will answer all your questions. Here are registered qualified craftsmen who:
- have extensive experience
- offer favorable conditions - low cost and maximum quality assurance
- know the specifics of repairing Power keys on iPhone 5, 5C, 5S, as well as on models of mobile phones 4 and 3 series
The lock button stops working for various reasons, the most common among them are:
- mechanical impact - impact, strong pressure on the iPhone 5 lock button area; the smartphone can fall, then often a lot of parts break
- moisture ingress - sometimes even condensation can cause a breakdown
- manufacturing defect or the use of low-quality spare parts in a previous repair
In all cases, the reason for the failure of the iPhone 5 lock key, as well as in mobile 4 and 4S models, is microcracks on the power button cable, which could be formed as a result of broken contacts, their oxidation or corrosion. In order to fix the on/off button, the specialist will have to change the upper cable in the iPhone.
How long does it take to repair the lock key?
Replacing the lock button on the iPhone 5, 5C, 5S, models 4 and 4S, as well as iPhones of the third series takes about an hour. However, in some cases, the repair may take a little longer. Bad if:
- no original parts available
- the busyness of the master does not allow him to carry out urgent repairs
- the service is far away and you will have to spend a lot of time on the road
Specialists registered in Yuda will change the button on the iPhone 5 as soon as possible, and will give all the necessary guarantees. They work in all districts of Moscow, and there is probably a free master not far from you who is ready right now to replace the top cable in order to fix the faulty Power key.
You do not have to look for the address of the nearest workshop, because in order for the shutdown button to be restored as quickly as possible, you can call the master home. He will arrive at any convenient time, conduct a free diagnosis, name the cost and time required to repair your iPhone 5, 5C, 5S or 4 and 4S.
After that, if possible, he will change the faulty parts at home or deliver the smartphone to the service for a more complex repair. In any case, you will receive a guarantee that the button will be repaired as quickly as possible in this situation.
How much does it cost to fix the lock key?
In different cases, when it is necessary to replace a faulty iPhone 5 lock button, the price can vary significantly. The cost depends on:
- what spare parts the master uses - if original, then the price will be higher, high-quality analogues are used for inexpensive repairs
- how many components need to be changed - sometimes the phone can fall so that replacing the power button on the iPhone 5 will not help, it is often necessary to replace the power connector, headphone jack, and often the screen breaks when dropped - such work is not cheap
- how much time the specialist will have - if the master is given a limited time to work, in this case the repair price is likely to be higher
Also, the cost of repairing a faulty shutdown / lock button is often affected by the need to deliver the smartphone to the service and its subsequent transportation after repair to the specified address - home or office. In some cases, Yudu performers deliver phones for free, but if you are hoping to fix your gadget cheaply, check this point in advance.
At Yuda, all specialists change the lock buttons on the iPhone 5, repair the top cable and eliminate other malfunctions without intermediaries, thanks to which they provide inexpensive services. You do not need to overpay for mediation, and this allows you to make the price about 20-30% lower than the cost of similar work in official service workshops.
In order to find out how much it costs to repair your iPhone, send an application to Yuda. Specify in it:
- the brand of your iPhone - 5, 5C, 5S or it belongs to the third or fourth series
- what exactly does not work - only the Power button does not respond well to pressing or it is also worth repairing the power connector, the sensor does not work and some other malfunctions are noticed
- How urgent is the repair?
- approximate price
Yudu service works around the clock, you can send a request at any convenient time. Specialists who are ready in Moscow to carry out an urgent repair of your iPhone, which is not working well, will contact you and offer their services. Choose someone who can repair the lock key cheaper than others, and at the same time give maximum guarantees. Please note that the iPhone 5 lock button repair price is acceptable and place an order.
 How to remove scratches from the touch screen?
 Preparations for September: what new Apple will show users in the fall
 Why is the iPhone 4s catching the connection