Smartphone backup. Creating an Android backup
A full backup of Android prevents the loss of important information for the user during software and hardware failures, a virus attack, as well as when the device fails, that is, it turns into "". Backup is recommended to be used on all mobile devices, especially since there is nothing complicated about it. Let's take a look at how to create a backup copy of the Android operating system.
Android Data Backup Methods
Today, the owners of smartphones and tablets are endowed with ample opportunities to preserve personal information in case of various failures and other unforeseen situations. As with Windows, Android also has certain tools for backing up the system, that is, for creating a restore point. Perhaps on a smartphone.
Backing up data hosted on Android can be done using:
- Built-in resuscitation service android backup service;
- Additional software installed on a PC or directly on a smartphone (tablet).
Considering what a backup is, it should be noted that to back up Android along with the firmware on the device, you must activate root access. In the absence of Superuser rights, you will only be able to save personal data (SMS, contacts, photos, music, etc.), as well as the settings of some applications.
Creating a backup using native Android capabilities
All gadgets running Android OS have the ability to connect to Google and enjoy many of the benefits of this service absolutely free (synchronize with a PC, write personal data to a cloud drive, etc.). One of Google's very useful tools is the android backup service. It allows you to create Android backups and back up data from your phone to virtual storage in automatic mode.
Before making an Android backup via the android backup service, you need to create your Google account and assign your mobile device to it. This is done as follows:
After Google is connected, we make a backup of the system:

To return data to Android via the Android backup service (for example, after a hard reboot), it is enough to re-link to your Google account, enter the "Restore and reset" section and start the resuscitation procedure.
System redundancy through the Recovery environment
Every Android mobile device is equipped with. However, the standard program has somewhat limited capabilities that do not allow you to make a full backup of the firmware. Therefore, many owners of smartphones and tablets install a custom version of it instead of the usual Recovery.
Let's consider how to make a backup of Android through:

It may take some time to create a copy of the firmware. When backing up, it is forbidden to do anything with the device (for example, install / remove a micro sd card), as this may adversely affect the final result.
Considering the Recovery area, you should also know how to restore the system from a previously created backup. To do this, in the backup and restore section, select the restore item. After the smartphone restarts, all your data, along with the firmware, will return to its place.
Creating a backup using additional software
A backup copy of data can also be recorded using special programs installed on a computer or mobile device. There are a lot of similar software on the network, but the most effective applications in this area are:
- TWRP Recovery.
Let's see how to backup Android of each of these programs.
This utility backs up your Android system to your computer. Therefore, before starting work, you need to prepare a USB cable for connecting a PC with a phone. The sequence of work will be as follows:
- Download and install the application on your computer.
- Turn on USB debugging on the smartphone. To do this, go to the "For Developers" section and select the appropriate item.

- Launch MyPhoneExplorer and connect the gadget to the PC.
- Go to the "File" menu and select the type of commutation, as shown in the image.

- To create an Android backup, open the "Miscellaneous" tab and click "Create".

- We indicate the place where the copy will be stored.
- We mark what needs to be saved and start the backup process.

- If necessary, restore Android using the created backup by selecting the "Restore" function in the "Miscellaneous" window.
TWRP Recovery
This backup software is installed directly on your mobile device. However, before making a full backup, you need to unlock the Superuser rights.
Modern smartphones store a huge amount of necessary and important information, and each user customizes the phone individually for himself. And now, switching to a new device, the owner of Android is faced with a situation when the operating system needs to be re-configured. The ideal solution here is deep or partial backups.... But not everyone knows how to make a full backup of Android quickly and safely using a tablet or phone without losing important data.
How to make a backup of individual applications on Android
It is not always necessary to copy the entire system, and the process is quite painstaking. If you need to save only specific programs, we recommend using this particular method. And here the Helium application is the ideal option.
This tool can be freely downloaded from. It works on two "bases": either provision and all frauds are carried out only on a smartphone, or access to a PC, if you do not have the "Superuser" mode.
The application allows you to save copies to and in cloud storages, namely Drobox, Google Drive and Box, which is very convenient.
She can:
- Back up the history of incoming and outgoing calls;
- Backup applications and their settings;
- Back up SMS and contacts.
The paid premium version has more advanced functionality, but if you only need to save, for example, games, the free version will suffice.
The application works perfectly on the latest versions of the operating system, mainly on Android 7.0, 7.1 and 8.0. Now let's consider what actions we will perform in it:
- Download and install the application on your phone. If there is no root-rights, we repeat this procedure on the computer. Versions are available for both Windows and Mac. Drivers are also required for the PC. You can find them on the official website of the manufacturer of the connected smartphone.
- Now we proceed directly to the backup operation itself. To do this, open the application on the device. If necessary, we connect via a wire to the computer. We are offered several options: a full backup of the phone or only specific applications. Please note that you can copy the entire program with data, or only the data.
- After all the checked boxes, click "Backup"... Choosing where to save. If in the Cloud, then we indicate the address, if in the computer - open the service with the IP-address and transfer it to the browser search bar. Copying is allowed there. Ready. Copies have been successfully created.
 But here things are already a little more complicated, since we need a complete saved copy of Android. Of course, it will take up more space, and there are several different ways to create it.
Backup via system option (No Root)

The easiest and most comfortable option, suitable for beginners and users who did not want to waste their time. We open "Settings", go to item "System" – "Backup", in the location we choose Google Drive. Made. The following information will be saved:
- Standard settings (language, time and date);
- Wi-Fi hotspots and passwords, if activated;
- Screen settings (wallpaper, themes, brightness);
- Applications (in most cases, just a list, but not internal settings and achievements in games);
- Content hosted on Google Calendar;
- Content stored in Gmail, personalized mail settings.
Root rights are not required, their presence does not affect the quality of the backup in any way.
Unfortunately, failures during the backup process are possible, which is why many users complain about the insufficient amount of saved information. And on some devices, such a system function generally refuses to work, this may affect phones with an operating system below Android 6.0.
Backup Android using FlashTool (No Root)

This is already a more serious and difficult procedure, allowing you to back up the entire firmware. There will be many stages, and we do not recommend this option for users who are not confident in their abilities and technical knowledge! But if you are an expert on Android "with experience", then you can safely proceed.
To begin with, we prepare all the necessary materials so that during the backup process you do not have to be distracted by them.
- We download directly the program itself from the official website of the developer ( flashtool.net);
- We find original firmware made specifically for your smartphone;
- If there are no MTK drivers on the computer, load them.
- We get access to the PC, since without it a backup is impossible here, we check the operability of the USB cable and the serviceability of the connectors.
- Next, we extract two files from the firmware, namely the name of the license plate with permission txt and weg_l.bin. We move these materials to a separate, empty folder.
- We also put the folder where the software is stored there.
- Run the previously downloaded FlashTool program as administrator, this is a prerequisite.
- The page on which you want to specify the path to scatter.txt using the built-in regular explorer.
- A new screen should appear where the memory blocks are located. With them, you need to make a backup. For this go to the "Memory Test" tab. We put a checkmark in front of the first five items.
- Turn off the phone, click on the computer "Start".
- Now we connect the smartphone using USB.
- The information starts to be read and displayed on the screen. As soon as the process is completed, the device is disconnected from the personal computer.
- We open "Notebook" and transfer the received data there. Note that empty sectors do not need to be copied. We save and close the notebook.
- We return to the main page of FlashTool again, uncheck the checkbox opposite the first item.
- Opening the section "Readback" - "Add". A new line appears, on which we double-click.
- We indicate where exactly to save the backup and come up with a name.
- A small menu appears asking you to specify the settings for each sector. Yes, a separate memory block needs to be configured separately. Change only the "Length" column, to which we add block data from a saved notepad.
- Click "OK" and press the top button Read Back.
- And the last final action: we reconnect the phone and observe the copying process. At the end, a green icon should appear, indicating that the operation is complete. Made! Now we repeat the same actions with the remaining sectors.
After the end of the backup, the files can be moved to any cloud storage, because if any major trouble happens to your computer or hard drive - the saved information will be lost, do not risk it!
So we made a backup on Android via FlashTool using a computer, now we are trying the next method.
Backup via Titanium Backup (Root)

Quite lightweight and comfortable option using special program Titanium Backup. You can download it without any problems on Google Play and install it in the standard way.
Now we launch the application and provide it with root access. Yes, the "Superuser" mode is required here, and this is, in principle, the main disadvantage of this utility. We click on the checkmark image in the upper right corner, we get to the page "Batch Actions" and choose which data we want to save. Opposite the desired one, click "Start".

Another decent option that works on all devices, but from experience I will say that it is much easier than the c FlashTool method... For this we need a recovery mode. Of course, the most popular and most functional is TWRP, allowing you to install custom firmware, various kernels, but for backup is fine and stock... Begin:
- Make sure your smartphone is charged over 60%.
- We turn off the phone, after about 30 seconds we hold down the power button and the volume rocker up or down, on different models in different ways.
- Next, an image of an Android robot with an exclamation mark may appear. If this happened - hold down a similar key combination, but do not hold it down. Did you switch to recovery right away? Then we skip this point.
- Now we find ourselves in the recovery menu itself, but here the touch input no longer works. We will switch with the keys: the volume up rocker, respectively, is a command "up", volume down rocker - "way down", on / off button - "OK".
- We go down to the point "Backup / restore» , click "Backup". The copying procedure begins, which takes up to 10 minutes on average. During this period of time, we do not press anything, we do not turn on the smartphone, we just wait.
- When the operation ends, we overload the smartphone. That's all, it's done, the firmware has been backed up for Android.

IMEI, as we know, is a unique identification number of a smartphone. And quite often there are situations when this number needs to be saved, that is, to make a backup. For this we will use special program Root Explorer. Root rights are also required for it to work.
We open the application, through it we go to the root of the device, where the we need is located efs folder. We carry out a long press, after which an additional mini-menu appears, where we select "Create archive"(the permission of the archive is at your discretion).
For backup messengers
For a modern user, messengers are simply a necessary thing that helps to communicate with friends, and, for example, send a photo of the work done to the boss. Consider WhatsApp as an example... It stores a huge amount of necessary information: important messages, images, phone numbers. And the ideal way not to lose such materials is to make a backup. How do you do it on WhatsApp?
Backup by built-in option
All popular instant messengers have their own backup function that allows you to save the necessary materials directly from the application itself. Whatsapp is no exception.
Begin:
- Find the application, open the menu;
- Push "Settings", now go to the tab "Chats" and click "Backup copy".
- We choose saving to Google Drive and adjusting the frequency of saving.
- If you have several Google accounts, select the desired one in the window that appears. Haven't signed up or signed in yet? Then click "Add account".
- And in the last column, select the network under which the copying will take place. Do not forget that using the mobile Internet may result in additional charges for the megabytes used.
The scheme of working with this application is very simple: after installation, go into it, click "Applications", put a tick opposite "WhatsApp" - "Save". The backup made, or rather the path to save it, can be found in the section "Archived".
Backing up using Restore Transfer
Another decent app made by a developer Trustlool Apps. Fully translated into Russian, the interface is simple and straightforward. Besides, there is a huge plus for beginners and inexperienced users - root rights are not needed.
How can I restore a copy made in Restore?
To do this, go to the application, open the section there "Archive", find the materials you need, and after the checkmark, click "Restore".
Is Super Backup Free? I heard that you have to pay for it.
There are two versions of this tool: basic, that is, with a small but useful functionality, and extended premium. In the first option, no fee is required, but for the second you will have to pay. Both versions are freely available on Google Play.
As you can see, it is enough to simply make a backup on Android, you can save firmware, instant messengers, applications, and always have the necessary information at hand. The most important thing is attentiveness and strict adherence to instructions. Good luck!
Navigation
After purchasing a new gadget, you may sometimes need to create backups. And most people are looking for opportunities to do this.
But not every new user of the Android system knows about the capabilities and functionality of the system, therefore they do not know about information recovery either.
So, how do you make a backup on Android and restore the information you need?
How do I restore apps?
Log in to your Google account to start the process.
The latest version of Google Play has the function of saving all applications previously installed by the user. For this :
- Turn on PlayMarket
- Go to the Main Menu
- Find My Apps
- Select the section All
- Next, select the application you want
- By the way, if you need to erase an application from the list that you are not going to use, then click on the crossed out circle, disposed on the right side of the program name
The disadvantage is that if you have saved some information directly in the application, it will not be restored.
Contacts, mail, calendar

To be able to restore contacts, gmail and calendar events without any problems, activate synchronization with your Google account in the device settings.
For this :
- Enter settings
- Open the accounts section
- Select the account you want
- Configure options
How do I recover photos?

Android backup - what does it mean?
So that you can restore no photography hassle, be sure to make yourself a google account. Now you can save your pictures to Google +, and then you can download them to any other device.?
The service has a limit on the amount of stored data. Information can be downloaded up to 5 GB.
Moreover, if in the settings you have the item "Backup and reset", then use this function.
When your device is reset to factory settings or you purchase a new device, then when you turn on the Internet, you can restore any information, passwords, and so on. But in such a situation, you need a stable internet connection. However, before replacing a gadget or resetting to factory settings, be sure to turn on synchronization.
Video: How to backup and restore data on Android?
Last month, we looked at a great backup implementation for Apple iOS devices. What about other platforms? Today we will take a look at the main iOS antagonist - the Google Android platform. How to save data with and without root access? How can you restore data from a backup, is it possible, and most importantly - should it be done?
Backups: Google Android
Let's define the terminology. In this article, we will write exclusively about the Android flavor that comes with Google services. Open source code, AOSP, third-party firmware are not of interest to us now: the number of their users is minimal, while these users are excellent at creating and restoring data backups when flashing the next "custom". The topic of today's conversation concerns the remaining 99% of users who want to open the box, enter the username and password for the account and get something workable.
In this study, we used about a dozen devices from ASUS, Google Nexus and Pixel, LG, Motorola, Sony. We tested both data recovery to the same device after a factory reset and data migration to another device.
So what are the backup mechanisms available in Android? From the diversity of available solutions, your eyes just run up. Let's start with the applications that are supplied by the device manufacturers.
Manufacturer solutions
Device manufacturers often offer proprietary backup utilities. Some (for example, SONY) offer to install the application on a computer, others (ASUS, LG, Xiaomi) build the corresponding functionality into the firmware. Samsung offers to create backups in its own "cloud".
There are two things that unite solutions from manufacturers. Firstly, the created backup will be complete enough, which allows you to fully restore data after a device reset, firmware update or upgrade. Secondly, it will not be possible to restore a backup from a SONY phone to a tablet from ASUS (and vice versa): you need to restore it with the same software for a model of the same manufacturer. But Xiaomi backups will be compatible with most devices running the MIUI firmware family. The flip side of the coin is the complete absence, even in the international versions of MIUI, of the standard "cloud" backup in Google Drive, which Google offers in Android 6.0, 7.x and 8.0.
However, if the device is going to be used for a long time, why not create a backup? Yes, this is not always convenient, and yes, it is not automated in any way, but is there a possibility? And if something happens to the phone, and if the user decides to replace it with a device from the same manufacturer, then it may be possible to restore it from a backup. Of course, there is no guarantee: the manufacturer guarantees a successful recovery only to the device of the very model from which the data was copied.
Backup: Google version
Android devices come in a variety of platforms, architectures, manufacturers, hardware and software configurations. It is difficult to ensure that backups created from a phone from one manufacturer do not destabilize the operation of a smartphone running on a completely different architecture. This is probably the main reason for the speed at which Google is implementing backup mechanisms.
Historically, the backup mechanism appeared in Android 4.3. It was only available in development mode and only through adb - Android Debug Bridge. In other words, it did not exist for "regular" users.
At some point, Google began to sync some data with the cloud. Now, when restoring a device, it was suggested to restore data (shortcuts, applications and settings) from one of the previous devices. This functionality, strictly speaking, is not part of Android, but is implemented in proprietary Google services.
Since Android 6.0, cloud backup has officially become part of the operating system. Now it is enough for the developer to include a checkbox in the application manifest that allows data backup, and the system will automatically copy them to the "cloud". Of course, the "cloud" is from Google, and the data is tied to a Google Account, so users of AOSP assemblies without Google services are left out.
Let's consider these mechanisms in more detail. Breaking the chronology, let's start with the most modern and interesting mechanism introduced in Android 6.0 and logically developed in versions of Android 7 and 8.
Android 6.0: we did it!
New in Android 6.0 includes the ability to automatically back up application data at the system level. Now applications do not need to create their own backups. To automatically create backups of data in Google Drive, the application developer just needs to specify the corresponding checkbox in manifest.
In theory, everything looks more than interesting. After resetting to factory settings or purchasing a new device, the smartphone will automatically pick up the settings from the "cloud", install the applications that worked on the old device itself, and automatically configure them, restoring the saved data. Almost like Apple! This is how the system worked in pre-release builds of Android M until release.
In the official version of Android 6.0, Google developers decided to be careful. If in preliminary assemblies automatic backup worked for all applications whose authors did not explicitly block this feature (opt-out flag in manifest), then in the official version of the system, backups are created only for applications whose authors explicitly requested the service ( opt-in via manifest) and prescribed support for Android 6.0 (targeting API level 23).
How many developers have taken advantage of this opportunity? At the time of the release of Android 6.0 - not much, as expected. And six months after - too. In the article Android 6.0 has a great auto backup system that no one is using (yet), the journalists took a closer look at which applications use and which do not use the backup mechanism built into Android 6.0.
The results were surprising. Primarily the built-in backup mechanism DOES NOT USE Google apps. The developer of the new backup system himself decided to do without it. The basic system settings, alarms, "quiet mode" are restored, but the data of Google applications is not restored; they have to be re-configured. And large social media apps, email clients, games, and other popular apps are in no rush to add support. Of course, the situation is slowly changing over time. After resetting the Nexus 5x and recovering from the cloud, the following happened:
- all applications have been restored. However, they were installed from Google Play, i.e. the latest versions were always restored
- some of the settings have been restored: languages of the built-in keyboard, “quiet mode” settings, alarms.
- the history of calls and SMS has not been restored. (More on this below).
- Facebook settings were not restored.
- the data of some of the applications was restored, the other part was not.
You can read more about the Android Backup Service on the Google page
Android 8.0
Let's skip Android 7.x, which differed little in terms of backups from the 6th version of the system, and consider the innovations in Android 8.
In the eighth version of the "green robot" was added back up SMS text messages... Moreover; backing up SMS to the Google Drive cloud was implemented much earlier, back in Android 7.x, but exclusively for Google Pixel devices. And starting with Android 8.0, SMS backup became available to all users of the system.
Call log backup
Call log backups are available on some devices. It looks like Google has been testing this system since early versions of Android - we were able to observe the backup and restore of call logs even on smartphones with Android 6.0 installed. Despite this, the call log backup was unstable for a long time. It seems that the Google developers managed to finally debug the mechanism only with the release of Android 8, and it worked simultaneously on all devices, including smartphones with Android 7 and 6 on board.
Extracting data from the cloud
First of all, just like downloading data from iCloud, we need a username and password for a Google account. If two-factor authentication is enabled in the account (and it is being activated more and more often), then a one-time code will also be required, which will be generated by the Google Authenticator application, Microsoft Authenticator or any of the many third-party ones (they work on the same principle, and only the cryptographic initialization code differs, which issued to the user in the form of a colored QR code).
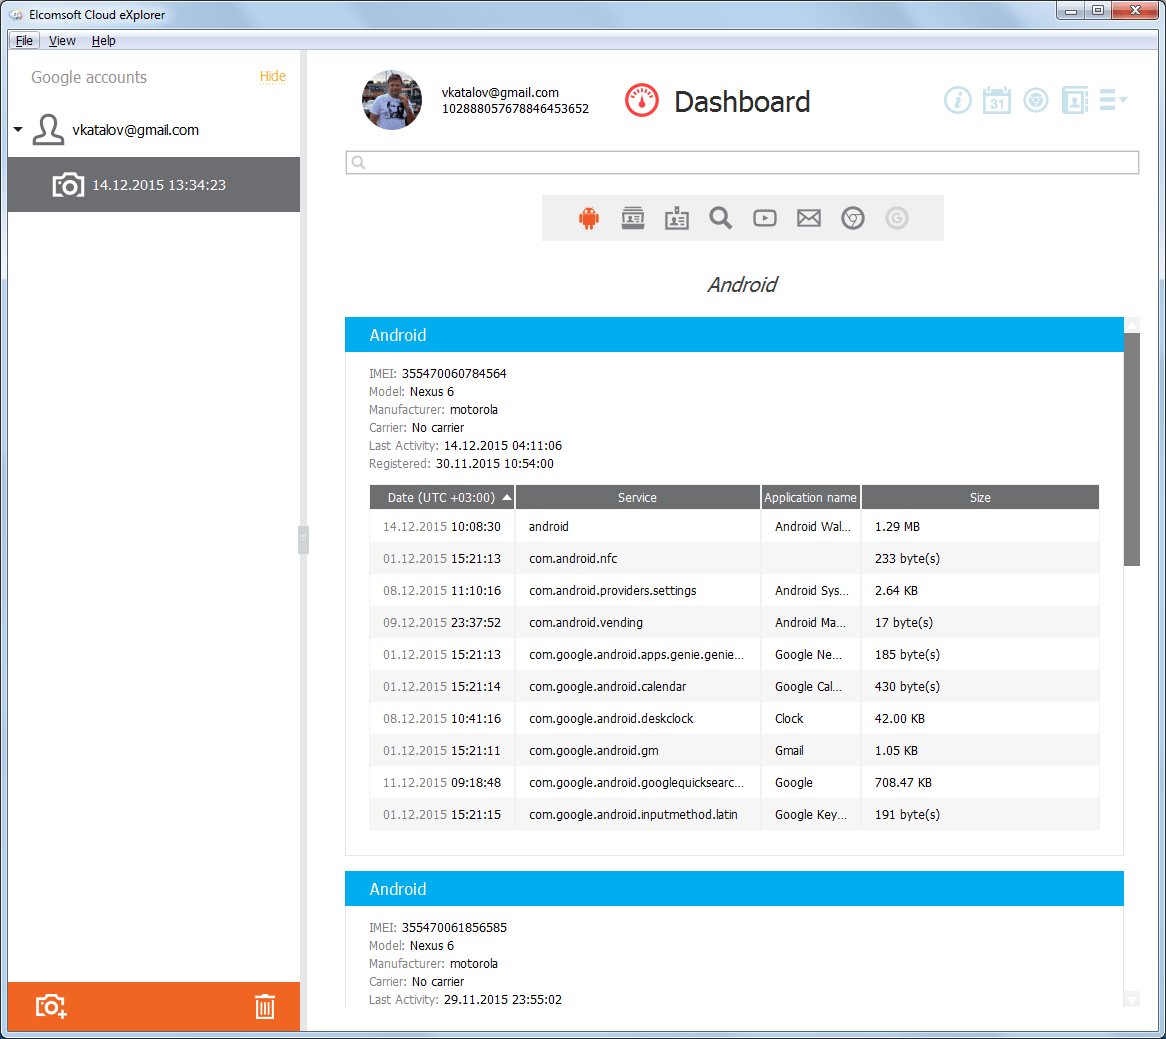
Elcomsoft Cloud Explorer is used to extract data
After completing the process, we get access to information from the user account:

The amount of information Google collects is overwhelming and shocking. Yes, in the abstract, we know that Google collects data from Android devices. We know that every web page you open, every browser bookmark, and every search for the Good Corporation is saved (looking for a recipe for making a nuclear bomb at home is not a good idea.)

A list of devices, applications installed on them and application data itself is available:
Of course, there is access to photos (hello iCloud!):

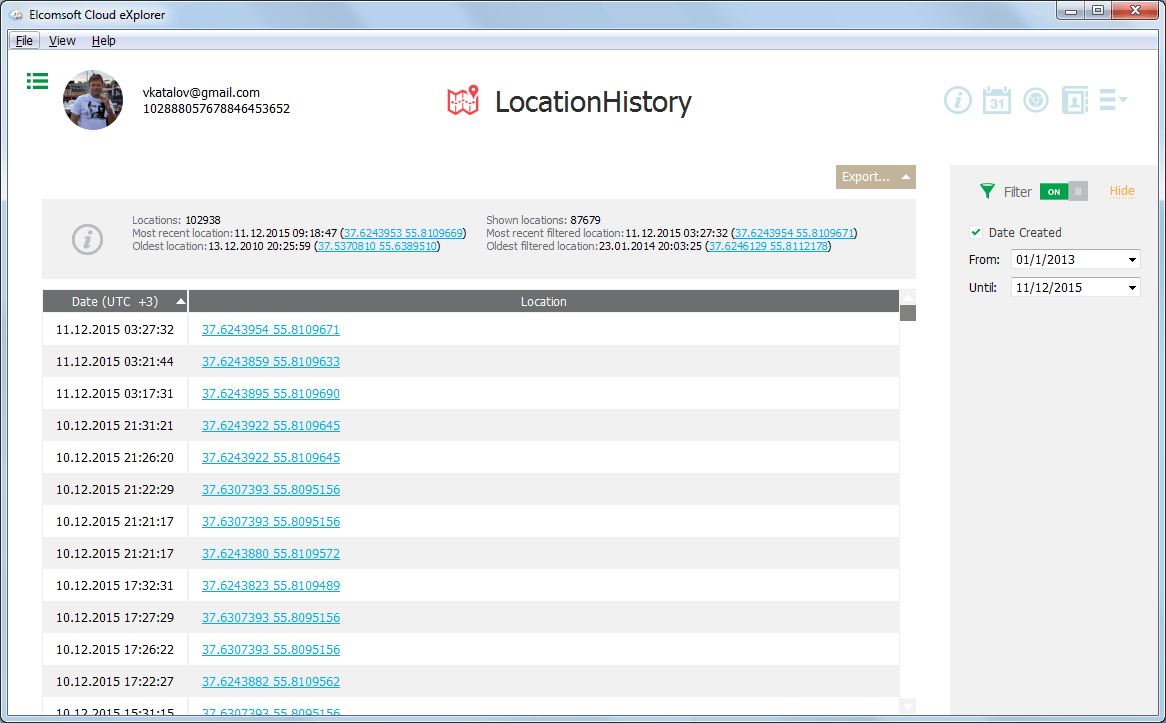
The most detailed history of movements is saved:

And here is the same in text form:
There is a ton of interesting data available. There is far more to be found in the Google account than Apple's solutions have ever dared to save.
Where and how is all this data retrieved from? And this is perhaps the most interesting thing. Google has a policy of maximum information transparency. The user at any time can view or download all the information that the corporation has collected about him. Any data can be deleted, and for this you do not need to destroy your account. Finally, you can turn off the collection of certain types of data (for example, you can configure your phone so that its location information is not sent to Google).
You can download information from your account through the Google Takeout service: https://takeout.google.com/
Here we can choose which types of data we want to download:

The selected data will be packed into a file and provided as an archive:

What's the catch? Why do you need Elcomsoft Cloud Explorer if you have Google Takeout?
In addition to the fact that Google Takeout does not give out all the data (for example, it is impossible to download SMS messages), the problem arises with the analysis of the information received. To store and export data, Google uses a lot of different formats (mostly open). For example, movement data is returned as a JSON file, and Google is not an assistant in its analysis. He is not an assistant to the special services either: according to the company's official position, Google obeys the law and transmits data in open form and in a standard format ... the company does not care what they will do with it next. But the very fact of issuing information to special services Google will record, save and will publish.
One more point. When downloading via the Google Takeout service, the user will definitely receive a notification that warns that such and such data was downloaded from such and such an IP. Using Elcomsoft Cloud Explorer significantly reduces the likelihood of such notification.
And the last thing. Google Takeout for some reason does not allow downloading passwords synced in Chrome. Elcomsoft Cloud Explorer retrieves them without any problems:

Generally speaking, Google provides access to this information, but using standard tools is extremely inconvenient. With the help of Google itself, passwords are available one at a time through the site https://passwords.google.com/
In conclusion, we note that the use of third-party tools for downloading and analyzing data from a Google account is not only convenience, but also the completeness of the extracted data, and cleaner extraction, leaving fewer traces on the user account.
Backup via ADB
Starting with Android 4.3, the system has a standard way to create a backup via the Android Debug Bridge (ADB) interface. To do this, you need to download the minimal ADB set, which consists of adb.exe, fastboot.exe and the required libraries (no installation required). In addition, you will need to download and install the ADB drivers for your device. As a rule, the drivers are the same for devices operating under certain sets of system logic. For example, Qualcomm's ADB drivers are universal and fit all Snapdragon-based devices. Let's assume that the USB debugging mode is already activated, and the computer is authorized.
So, to create a backup, you need to use something like this command:
adb backup -apk -shared -system -all -f C: \ fullpath \ backup.ab
Why "approximately"? Due to the same variety of devices and firmware. We tested a large number of devices from different manufacturers running different versions of Android from 4.4 to 8.0 inclusive. On some devices, the command worked in the specified form, on some, specifying the -system or -shared keys led to the creation of an empty file, and some refused to accept the -all key. We could not catch any logic in the behavior of the adb command; One thing is for sure: its behavior depends a little on the version of Android. Rather, the dependence here is on the settings given by a particular manufacturer.
For example, on a Nexus 5x running Android 7.1.1, the following command went through:
adb backup –all –f c: \ temp \ nexus.ab
But the -noapk option "broke" the backup: an empty file was created.
And ADB backup may not work if encryption of the data partition is enabled. As a reminder, encryption is enabled by default on Nexus devices, as well as (at Google's request) on all devices that come with Android 6 preinstalled and are equipped with 64-bit processors.
One more point. Adb backup is designed in such a way that a backup created on one device can be restored to another without any problems. And the key word here is not "restore" at all, but "no problem": the device must work absolutely correctly after restoration. Accordingly, only those data and settings are saved and restored that will definitely not harm stable operation even when data is transferred from a 32-bit smartphone with a MediaTek chipset (ARMv7 architecture) to a 64-bit tablet with Intel Atom (x86-64 architecture).
The ADB backup command has the following syntax:
adb backup [-f - write an archive of the device's data to If no -f option is supplied then the data is written to "backup.ab" in the current directory. (-apk | -noapk enable / disable backup of the .apks themselves in the archive; the default is noapk.) (-shared | -noshared enable / disable backup of the device's shared storage / SD card contents; the default is (-all means to back up all installed applications) (-system | -nosystem toggles whether -all automatically includes system applications; the default is to include system apps) ( package list is optional. Applications explicitly given on the command line will be included even if Nosystem would ordinarily cause them to be omitted.) It will be easy to restore data from a backup using the adb restore command. What goes into such backups? Again, the answer depends on the manufacturer of the device. For example, in SONY smartphones, contacts, call log and SMS are not included in ADB backups, and Samsung phones save this data. The same applies to device settings (which are often manufacturer-specific) and system application data. The list of installed applications is exactly included in the backup. .Apk files are extracted and saved (if the corresponding option was specified during the copy creation). But application data may or may not be saved: it depends on the developers who may or may not allow backups in the application manifest file. That being said, restoring from an adb backup is a lottery: on most modern devices applications (.apk) from the backup will not be installed on the device... Thus, in modern conditions, backup via adb cannot be recommended to the average user, but it can be useful for conducting expert analysis of the device's contents. From a practical point of view, we have not been able to derive much value from such backups. When working with adb backup, you still have to log in to Gmail, Facebook and other mail and social network clients. The settings of FBReader and Nova Launcher (which, by the way, has its own mechanism for creating backups) were not saved. What has survived? I can hardly remember that on some devices it was possible to restore the call log and the archive of SMS messages. Backups created via adb are pretty simple. The output is an archive containing application data (depending on the settings - and actually.apk). Application data is saved as the application itself stores it. As a rule, applications use the SQLite format, less often - XML, even less often binary data in its own format. There are so many tools invented to analyze SQLite that a separate article would be required for the very brief overview. Let's just say that with the help of such tools, you can pull out deleted records. Example? Please. If we are lucky, and the manufacturer of your phone has allowed copying the call and SMS log, then it will be possible to restore messages and calls that were deleted by the user. Today we looked at some of the backup mechanisms available in Android devices. The fragmentation of the platform does not allow us to consider all existing methods and applications designed to facilitate backup and migration of data, but even those that have been considered demonstrate rather strict limitations both in compatibility and in the completeness of the data being copied. In general, our conclusion is as follows. When using Android 6.0 and newer versions, it makes sense to activate both "cloud" synchronization of contacts and photos, and "cloud" backup to Google Drive. The built-in ADB backup mechanism can help extract some of the user data from the device. Unfortunately, for its intended purpose - for backup and painless data recovery - abd backup cannot be used. As a result, the backup system in Android gets a rating of "better than nothing." No one could do worse than in Android: even in old Windows Phone 8, backup (and restore!) Works much better. And what about backups for the outsiders of the market, phones running a mobile version of Windows and BlackBerry 10? More on this in the next issue! Android smartphones and tablets have become the custodians of important information, the loss of which can be very upsetting. We are talking about photos, contacts, music, SMS-messages, settings and much more that have been accumulating for a long time. Have you all faced a situation when the "flying" Windows took all the data with it? Something similar can happen with Android, but, in most cases, it is the owner's fault. To prevent the loss of useful information, the developers have created a backup or backup tool. We will tell you what it is, why you need it and how to implement it. Attention. All applications and methods discussed in the instructions do not require root rights and are available to any user. Immediately, we note that in any version of Android (4.0 and higher for sure), regardless of the proprietary firmware, there is a backup menu built by Google developers. To get into it, follow the instructions: Settings> Backup & reset> Data backup (enable). The data will sync with your Gmail account, provided sync is enabled. You can check this as follows: Settings> Accounts> Google. Select your account and enable / disable syncing of certain apps: Chrome, Gmail, Google Photos Auto-Download, App Data and others. In other words, all the essentials will be copied. To make a backup copy of your photos, we recommend using the official Google Photo application - when logging in, enable the "Auto-upload and sync" item. If you are already logged in, go to the application settings and enable the same function. As for other data (documents, music, etc.), the easiest way is to copy everything of value to your computer using one of the simple methods that we talked about in the article about from Android to PC. You can find a huge amount of software on Google Play. Backup tools are represented by several dozen applications with similar functionality. We downloaded the best of them (by rating and number of reviews) and tested them. The programs turned out to be identical, so we won't even describe them separately. The utilities provide functionality for backing up applications, SMS, contacts, call log, bookmarks and calendar. By default, copies are uploaded to the smartphone's memory (you can select a folder manually), but there is a function for uploading to cloud storage (Google Drive, Dropbox, OneDrive and others). Compared with the standard method, the only difference is that you can save installed applications in video * apk files. As mentioned above, progress is preserved only with root rights. Many users probably want to save the progress of the games they have passed, but this is only possible with. The exceptions are applications that store data online. As a rule, these are multiplayer games and applications, the entrance to which is carried out via the Internet (by login / password, via a social network or phone number).ADB Backups: What's Inside?
Conclusion
Backup with basic tools


Backup applications
Backup Android applications
 How to install CyanogenMod on your Android Why there is no 3g on cyanogenmod 12 firmware
 Living with the virtual assistant Alexa
 The phone does not connect via USB to the computer, but only charges