Turning on the webcam on the computer. How to set up a webcam on a computer
The use of video communication via a computer has gained popularity. It's great that we can see our loved ones, regardless of where they are and where they live. The main thing is that we can do it. But what to do when we bought a new computer, bought a new web camera, connected it to the appropriate connector, but it does not work?
Is that not a working camera? No. The camera is most likely working, because it is new. And there are especially no problems here. Here you need to know how to install a webcam on a computer, and especially when there is no disk yet, because not every camera is equipped with software today.
What to do? How to solve this issue without being an expert on the system administrator? The main thing is that we have the Internet. Therefore, we disconnect our camera from the connector. We turn on the Internet, and now we put the camera back into the USB connector. We are waiting for the system to inform that a new device has been found, on which you need to install drivers.
After the device is found, the system will most likely start looking for the necessary drivers on the network on its own. What do we need to do? Not that, just wait. Ultimately, she will report the search result. If the system finds the driver and installs it says that the operation was completed successfully, you turn on Skype and use the camera as expected. But, what if the system reported that the drivers were not found and not installed.
In this case, we ourselves will have to do this work. There are two ways. The first one is to search for drivers by the name and model of the camera, and the second is to search for the camera ID. First way. In Google or Yandex, we set the search parameters - download drivers for such and such a camera. We will see a whole list of sites that provide this opportunity.
We will download and install as, more on that later. It is best to look for such drivers on the forums, because there is also a discussion that will help you a lot. The second way is by identifier. So, we open the desktop of the computer.
On my computer, hover the mouse and right-click "control", then "device manager", then we find a driver that is not installed, it is usually highlighted with an exclamation mark in a yellow triangle. Right-click on this device and select "properties", then "information", then in the properties field, select the equipment ID and at the bottom we have a list of letters and numbers, we need to copy the very bottom line, it is the shortest.
And again in Google, where we will ask you to help download a diver with these parameters. Download and install. To do this, open the device manager again, right-click again, but only now the Driver tab, where we select to update, select the location where the driver was downloaded and wait.
If a question arises that the driver somehow does not fit and asks - should you continue anyway? Agree. All the camera is installed and working.
Good afternoon, dear readers of my blog! Now I will share tips on how to set up a webcam on different devices.
Recently, a funny incident happened to my friend's mother - she brought a laptop to the service, complaining that she could not make video calls on Odnoklassniki. Imagine her indignation when the master said that her model had no "web" at all. It turned out that the laptop is old and the camera is not built-in. I made sure that you and I don't get trapped. So I'll start from the very beginning.
The webcam is not so much a device for shooting as for live broadcasts. With its help, you can take both photos and videos, but their quality will be below average. Exceptions are expensive ultramodern models. But they are usually used for professional online surveillance.
The task of the "home" "web" is to adequately reproduce the image during a conversation on Skype or in other messengers. The color rendition will be average, the functions will be minimal, but if the picture is the same in speed as the sound, the camera can be considered adjusted.
Setting up a webcam on a laptop
The vast majority of modern laptops are already equipped with a "web".
To configure the built-in camera, follow these steps:

Additional security
| Application Name | How to use | My mark |
| Fly ds | 1. Download the latest version of the program from the developers site. 2. When launching the application, select the source of the video signal ("Webcam"). 3. Going into the settings, select the "Capture" section and adjust the image parameters. | Solid "5" - using the application, you can not only make video calls, but also watch a movie through the tuner on the TV. |
| WebCam Monitor | After downloading, a window will pop up on the monitor - tick the necessary items to adjust the clarity and sound of the webcam. This must be done using a virtual joystick controlled by the mouse. With it you adjust color, sharpness, contrast. | Five out of five for ease of use. |
| Cyberlink youcam | In the program settings, select the item "TrueTheater", where you set the necessary parameters. | "5+" for multifunctionality and compatibility with any operating system. |
Usually, setting up an accessory on a PC is not much different from installing and adjusting a "web" on a laptop.
Setting up a webcam on a computer
First of all, you need to purchase a separate accessory - there are no built-in PCs. I recommend Logitech devices - reliable, functional, affordable.

Then it is necessary - it is very convenient, since it allows you to work not only with Windows, but also with other OS.
If you bought a stationary device, fix its leg on the table. The clip-on accessory attaches to the middle of the monitor.
Before setting up a webcam on a computer, insert the included disk, download drivers or find a program suitable for your operating system on the Internet.

Turn on the camera - the image should appear automatically in the form of a pop-up window. Adjust the height of the lens, depending on what you see - slide the accessory left-right or up / down if the picture is cropped.

In case the camera did not start automatically and the pop-up window did not appear, click the "Start" menu, then go to the "File Manager", select "All Programs". In the drop-down list, find the name of your "web", click on it.

The easiest way to adjust the device in Skype is to install the service (if it has not been downloaded yet), register, start. In the "Tools" menu, look for the "Settings" section - you need the "Video Settings" sub-item. Here, check the box next to the name of your webcam. Usually after that, if the device is connected to the network and the necessary utilities are installed, you immediately see your image.
Flip the picture
The windows 10 operating system is designed to make life easier for users. But only if we are talking about a licensed OS. In the case when you installed Windows yourself, and even downloaded the drivers from a third-party resource, the image from the webcam may not be displayed correctly. Most often, upside down.

In this situation, you need to go to the official (!) Support site of your developer - for example, asus.com/ru/support. Drive in the model of your laptop into the search. When the name pops up in the drop-down list, click on it. Next, the system will ask what OS you have and its bit depth (x32, x64, etc.). This is the most important parameter. By clicking on the bitness - for example, Windows 7 32 bit - you will see a list of drivers. Choose "global" and download, not forgetting to "demolish" the old one beforehand.
It happens that the image is upside down even in the licensed "top ten". Then regular Skype or the ManyCam program will help. In the settings of any service, select "Display vertically". This feature is sometimes referred to as Flip Vertical / Rotate.
I wish you good luck with setting up and using your camera. Look at the light!
Thank you for your attention! Until next time on my blog. Best regards, Rostislav Kuzmin.
How to turn on a webcam on a laptop is a very frequent and popular question lately. The fact is that modern laptops and netbooks are equipped with built-in cameras so that the user can talk via video over the Internet from anywhere in the world. And today we will just talk about such cameras that are built into laptops, how to turn them on correctly, what to do if they do not work. This information will be relevant for computer users. In this article, I will talk about several activation methods, and also describe some possible malfunctions that make the camera not work entirely correctly. Let's go!
The first step is to contact the owners of external webcams who are not satisfied with the quality of the built-in one. As a rule, such devices are connected via a USB cable, so if it does not turn on or is not detected for you, check the connection, try to insert it into another USB connector. Did not help? Or do you still have a built-in webcam? Maybe you forgot to install the drivers? Read on!
Webcam drivers
Drivers are special utility utilities that “tell” the computer about a new connected device so that the system “understands” it and works correctly. You probably have drivers installed on your laptop for a printer, scanner or some other thing? Well, the webcam is no exception. She also needs her own drivers, and if you do not have them installed, then be sure to download them from the Internet and install.
I want to note that now very often you can find webcams that do not require special drivers from the manufacturer. It is enough to insert the camera into the desired connector, after which the system will install the drivers for the webcam, which were already preinstalled in the system. This is especially true for users who have installed systems: Windows 7 and Windows 8.
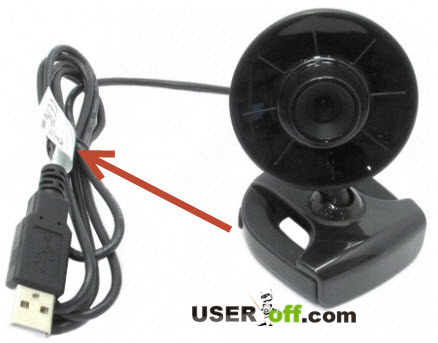
If you need to find a driver for a webcam, then do not worry, finding them will not be difficult, you need to know the model of the camera, or the laptop, if the camera is built-in. In order to determine the model, pay attention to the packaging (when you bought) the webcam or on the webcam itself or on the wire, there may be a sticker in which the model is written, see the image below.
How to install drivers on a webcam
For example, I decided to take a non-embedded webcam into a laptop so that you know how to turn on a webcam on a computer. So, if you know the model, now you can start searching. We hammer into Google something like this: "(model) driver" and you will be happy! In order not to be unfounded, let's look at a live example. I have an old webcam, for which we will now find the necessary driver.
I recognized the camera model by the sticker. I go to Google and enter "ilook 300 drivers", after which I look at the links so that they lead to the manufacturer's website, and not some sharashkin office.

I opened two links, one in Russian and the other in English. Let's figure out how to download a driver for a webcam using the example of a Russian-language site. I go to the site, but there is no link to download the drivers, so I press "Specifications".

This is where the drivers are located. I choose the one I want and download.

After downloading, we simply install them, agreeing with all the requirements and agreements in the software installation wizard. You can then restart your computer, although this is usually not required.
Skype to help you
What if the drivers didn't help? How to turn on the webcam on a laptop then? First, there is no need to delete them, let them be. And secondly, we should check the Skype settings and see if there is a signal at all or not. To do this, turn on the program, select "Tools" - "Settings" in the top menu. Next, in the "General" tab, click on the item: "Video settings".
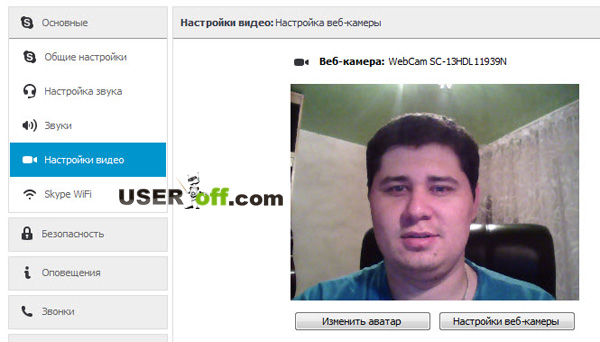
If you have a video broadcast in the window that opens on the right, then the camera is configured correctly. By the way, in this window you can also adjust the camera, for example, make the picture lighter or darker, if you play around with these settings a little, you can improve your image.

And in the case when no video broadcasting appeared, and instead you saw the inscription: "Skype did not find a video camera", then you have a problem either with Skype, or with wires or connectors, which, by the way, is more likely.
Reinstall Skype, and if this does not help, deal with the technical side of the issue, and not with the software, since you are fine with it. But I will remind you once again that the correct driver is the key to the successful operation of the device. If you install the wrong driver or not for your version of the system, then you will not see any image. Therefore, I advise you to install the correct driver for your webcam.
Additional options for turning on the webcam
You can also check the correctness of the webcam using standard Windows tools. To do this, go to the "Start" menu - "Control Panel" - "Hardware and Sound".

In the "Devices and Printers" section, select the "Device Manager" subsection. In the window that opens, look for "Image Processing Devices". If you don't have anything there, then the problem is really from the technical side.

You can try to enable and then disable your webcam. To do this, right-click on it and select "Disable".

We reboot the computer. Then go back to the device manager, and select "Enable" by clicking on the webcam with the right mouse button.
The following information will be relevant for users who use the built-in webcam. Thus, I will show you how to turn on the webcam on a laptop. The following option can be proposed as a way to include. Among the F1 ... F12 keys, we are looking for the one on which a blue icon with a camera is drawn. After that, we hold down the combination of buttons Fn + the desired key. This activates and deactivates the webcam.
So, you have figured out how to turn on the camera on a laptop and on a computer. Now let's check it out not via Skype.
There are special programs that are designed to work with web cameras, but to check the performance of a web camera, Skype programs are usually used, or in other similar clients where there is the possibility of video conversations, for example, Mail Agent.
As for online services, here we can cite as an example or a world-scale project "". Both sites offer their users to chat online with a randomly selected interlocutor from among those who are now also on the site. It doesn't really matter, we are here to check the webcam.
I'll look at an example of the first service. Hover the mouse over the lower screen on the left and click "Allow access to devices."
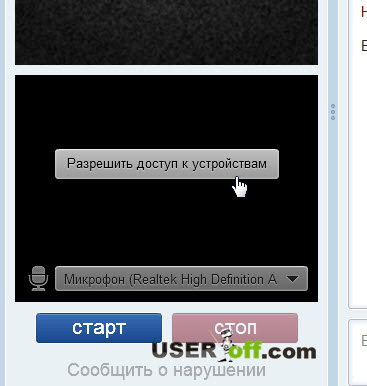
A window will appear, select "Allow" and click "Close".

Basically everything, after which you will be able to see yourself on the screen, which is what we needed.
Webcam software
I didn't want to talk about the programs, but after finishing the article to the end, I decided to supplement the article. I think this add-on will be important for some users.
The most popular, as I know, is the WebcamMax program. This program is paid, but for those who have studied my video course and more experienced users, I think they understand how and where to get it.
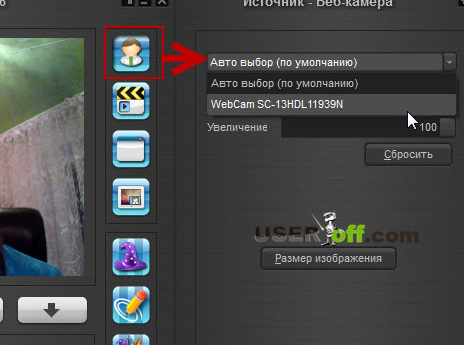
The program is simple, after opening, click on the picture of the "little man", a menu will appear on the right. Here you can select your webcam if it doesn't want to show.
Also, the program has all sorts of effects to apply to you. How to do it? Click on the hat.
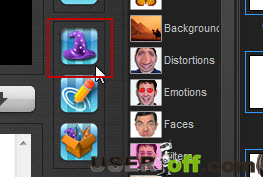
Effects that you can use will appear on the right.

To apply multiple effects, select 3 hats from the top menu, then navigate through the categories on the left, where you will find different overlays. The funniest thing is that when you move your head, these overlays move with you. I experimented a little and this is what happened:

That's all I wanted to tell you on this topic. I hope that now the question of how to turn on the webcam on a laptop will not arise anymore. If it did not work to turn on the webcam, then you can try to connect it to another computer and check for operability. And don't forget to install drivers.
A webcam ("webcam") is a digital device for recording video information that can be transmitted over the network. “Webka” is an attribute of any laptop: the manufacturers of these equip their products with web cameras “by default”. Also, a lot of their types are sold separately.
The difference between "webcams" and full-fledged video cameras is the focus on the capabilities of network programs with multimedia functions, that is, the emphasis is not on the quality of shooting, but on the ability to quickly transfer the image to the network. Therefore, most of the models have a low resolution, not the best color reproduction and a minimum of settings. The most expensive web cameras are capable of shooting at the level of a “middle hand” camera.
How to install and configure a webcam on Windows 7
Installing and configuring the built-in camera
The built-in webcams of laptops are usually ready to work right away, it is enough to launch a network application, for example, Skype, and set the desired video parameters in it.

If the program says that you do not have a camera, but you are definitely sure of the opposite, then it is disabled or not installed. On some laptop models, first of all, you need to turn on the "webcam" physically - simultaneously press the Fn key + one of the F1-F12 keys. A miniature in the form of a camera drawn on the button will help to determine the desired combination.

Find “Imaging Devices” in the hardware list and expand the tab. If the webcam is installed, but not active, you will see an icon in the form of a circle with an arrow next to it.
To turn on a device, open its context menu and click “Activate”. When prompted by Windows, restart your computer and the camera will start working.

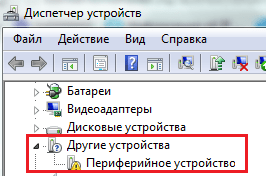
If there is no web camera in the device manager, but there is unidentified hardware, as in the picture, then you need to install the driver.
You can try to install the driver for the webcam using the system tools - most likely, Windows will find something suitable in its databases, and the device will work. To do this, select the "Update drivers" command from the context menu of the unknown hardware.

and specify the search method - automatically or manually. If the web camera was not installed before, then there are probably no suitable drivers on the computer. An automatic search will find them on the Internet.

You can also find out the model of the "webcam" from the documentation for the laptop, go to the website of its manufacturer and download the drivers from there.
Along with the driver, not always, but often a program is installed to configure the built-in web camera. For example, Cyberlink YouCam on HP laptops:

With its help, you can not only adjust the shooting parameters, but also edit the image.
Installing and configuring an external camera
By external, we mean "webcam" as a separate device that is connected from the outside to the peripheral port of the computer. Most of these cameras have a USB interface, that is, they are universal, capable of working on any PC and not only for Windows.

External webcams come in completely different designs and shapes, many are equipped with a built-in microphone, and some have a separate switch on the body. To connect them, it is best to use active extension cables that can additionally power the device, thereby improving the signal quality. An active cable allows you to move the camera away from a computer at a distance of 10 meters or more, and a passive (normal) cable - a maximum of 5 meters.

The delivery set of an external web camera always includes a CD / DVD disc with the manufacturer's drivers and software. To configure the camera, just connect it to a PC port, turn it on, if there is a button for this, insert a disc into the drive and install the software. The included program will allow you to adjust shooting settings, as well as enable or disable options such as microphone volume, password protection and much more.

However, thanks to plug & play technology, most "webcams" can work without manual installation of drivers. Once physically connected, Windows recognizes and configures them automatically.
Programs for working with webcams
If webcam control software is not included, you can install it separately. There are many applications for Windows 7 that allow you to customize your camera more subtly than the standard ones. And their additional features make video chatting more fun.
ManyCam

This program will not only improve the quality of the picture transmitted to the interlocutor, but also add a special charm to your appearance - cartoon eyes or mouth, glasses, mustache, beard, horns, etc. Or change the background of the room, for example, to a seascape. The program can recognize movement, so all visual overlays will move with your face. In addition, ManyCam allows you to draw on the image directly online.
If you communicate in video chat with several interlocutors, you can enable for each a separate window with different special effects.
ManyCam is fully compatible with Windows 7.
iSpy

iSpy is a video surveillance program with the function of transmitting footage over the Internet. Allows to partially replace the more expensive IP video surveillance technology and can be used to protect premises and outdoor areas.
To work with iSpy, you can configure an unlimited number of web cameras, including those connected to different computers on the same local network. The recorded material is saved in Flash format and transferred to the server for storage. The user can view both archives and real-time images at any time, as well as remotely enable or disable cameras.
iSpy is supported by all versions of Windows and has no special hardware requirements.
LiveWebCam

LiveWebCam is a program for taking photos using a webcam. It can work in manual and automatic modes. To use the latter, it is enough to adjust the time interval between shots. Images are automatically saved to disk and can be viewed as a slideshow.
LiveWebCam is simple and free. To create a home security system based on it, you only need a computer with Windows 7 and an ordinary web camera.
Modern technologies allow you to connect a video camera to a computer and make video calls from it, keep a video blog or install a home video surveillance system.
To connect your webcam to your computer, you need to follow a series of fairly simple steps.
Step 1. Attach your webcam to your PC monitor. Many webcams have a mount at the base that allows you to install it on the top of the monitor by snapping it into place with a special clip.

Step 2. If there is no such mount on the webcam, you need to find a level, high place where you can place the webcam so that its peephole is directed at the face of the person sitting at the PC.

Step 3. Connect the USB webcam cable to one of the computer's USB ports (rectangular) located on the side, front, or back of the computer.

The USB connector can only be inserted into the USB port one way. If the connector does not fit into the port, you must rotate it 180 degrees and try again.

Important! It is important to make sure that you are connecting directly to your computer and not to a USB hub. USB hubs often lack power to control the webcam.

If the USB webcam connects to a MAC computer, you will most likely need to connect it via a USB-C to USB adapter.
Installing and configuring software
Step 1. Insert the CD that came with the webcam into the CD (DVD) drive, making sure that the manufacturer's logo is at the top of the disc.

Since most modern MAC computers do not come with CD drives, you must use a separate CD drive connected via USB.
Step 2. After the CD is inserted into the CD / DVD drive, you must wait for the software installation window to start.
On a note! If the installer does not start, double-click the Computer icon on the desktop.

Step 3. Click on the CD / DVD drive icon with the inserted disc to open its folder.

Step 4. Run the software setup file Setup.exe by double-clicking it.

Important! If the webcam CD is not supplied, or the CD / DVD drive is not available, skip these steps.
Downloading software from the site
You can find and download the software for a specific webcam in the Download section of the webcam manufacturer's website.

Step 1. Before downloading the software, you must select the operating system in which the software will be installed and click "Download".

Step 2. After downloading the installation file, launch it with a mouse click. The software installation window will start.

Software setup (example)
Step 1. Select a language and click "Forward".

Step 2. If the webcam is connected, click "Next", if not, connect it to the computer and click "Next".

Step 3. Select the software to be installed and where to install it (it is recommended to leave "Default"). Click "Forward".

Step 4. After installing the necessary files, check the camera settings, its image should start in the central window. If necessary, adjust the webcam to look at the face from the preferred angle.
Check the sound of the webcam. When pronouncing words into the webcam, you can see the activity bar bursts next to the "Audio" section (or similar) in the webcam window. Click "Forward".

Reference! If you can't see your webcam microphone activity, it probably isn't working and you might need to turn it on through your webcam settings or operating system.
Step 5. To exit the installation process, click "Check my webcam".

Step 6. The camcorder software starts up. Its window usually has a settings section, often in the form of a gear icon. You can click the icon to view and change camera settings, including contrast, brightness, sound settings, and more.

Reference! If the webcam software does not open automatically after the installation is complete, you must locate its icon on your computer and manually launch it with a mouse click.
Step 7. After completing all the webcam settings, click "Save".

Some settings of the webcam can also be made when putting it into working mode.

Connecting a webcam without software
It is possible that the webcam comes without drivers and software. Usually, you can purchase a camera from a Chinese manufacturer in this version.
When the webcam is connected, the message “Found new hardware” will appear.

A message may appear stating that the webcam is ready for use. In this case, you do not need to take further steps to connect it.

A message may also appear stating that the webcam cannot be installed if the operating system has not found the drivers it needs.

In this case, you need to find the video camera driver using a special wizard.
Installing the driver using the wizard


Installation via device ID
If the system cannot find the driver, you must manually find the driver on the Internet using the ID of the installed hardware.
Step 1. In Device Manager, right-click on Unknown Device and select Properties.

Step 2. In the next window, go to the "Information" tab and select "Equipment ID" in the list. At the bottom in the "Value" field, the ID code of the installed equipment will appear.

Step 3. Select the top line with the code with the mouse and press the combination "Ctrl + C" on the keyboard, copying it.
Step 4. Follow the link: https://devid.drp.su/?l=ru and paste the copied information into the search line using the "Ctrl + V" key combination. Select the type of operating system and its bitness by checking the box for x64 or x86. Click "Find Drivers".

Step 5. A suitable download driver will appear. Press the "Download" button.

Step 6. After downloading the file, launch it with the mouse button. The DriverPack Solution installation window will appear. Click "Install manually".

Step 7. The "Install Device Driver Wizard" starts. Click "Next".
Step 8. After installing the video camera driver, click “Close” (“Finish”).

The installed webcam will appear in the device manager.
Configuring the webcam microphone
It is possible that the video from the webcam is transmitted, but the sound is not. In this case, it may be necessary to configure the webcam microphone in the operating system.
Step 1. Right-click on the "Volume" icon in the clock area and select "Playback Devices" with the left mouse button.

Click on "Volume" and select "Playback Devices" with the left mouse button
Step 2. Go to the Recording tab and right-click on the Microphone icon by selecting Properties.

Step 3. In the "General" tab in the "Controller" column, make sure that the required audio source (webcam) is selected. In the "Device Application" item it is also necessary to set the "Use this device (on)" value.

Step 4. Go to the "Levels" tab, where make sure that the microphone is not turned off (the crossed out circle next to the speaker icon) and set the microphone volume in Desktop Microphone at 95-100%. You can also adjust the Microphone Boost level - it is usually set to 0 dB.

Step 5. To adjust the sound of the microphone, having heard your voice in the speakers of the computer, you need to go to the "Listen" tab by ticking the "Listen from this device" checkbox. After completing all the settings, click "Apply", then "OK".

For normal operation of the video camera, it is also necessary to monitor whether it is being used at this moment by other programs in the OS. In addition, when setting it up, you should refer to the Instruction Manual for specific recommendations for using the camera.
Video - How to connect a webcam to a computer without an installation disc
 The computer freezes tightly: what are the reasons and how to fix it?
 Factory reset Windows
 Morton Telecom - "Internet from Morton Telecom: pros, cons, features