We make a micro-earphone with our own hands. High-quality headphones at an affordable price Homemade headphones for your computer
Some fans of listening to music in the evening occasionally encounter breakage of their headphones. It is extremely annoying to constantly acquire new headphones... The most primitive way out of this situation is to stop listening to your favorite songs in the evening or not fall asleep, but it is not so primitive to give up sleep or pleasure, the one that a music lover gets. A particularly advantageous solution would be to assemble the headphones from the remaining ones.
You will need
- Non-working headphones, soldering iron, scissors, electrical tape.
Instructions
1. As usual, only one of a pair of headphones breaks continuously, respectively, the other will invariably be whole. There is no point in throwing out one of your work headphones. With a little effort, it is allowed to collect personal headphones... If your headphones do not work only because of the bent cable, it is allowed to replace the rod plug with a new one or try to finish the existing one.
2. Use thin scissors or a sharp knife to remove the plastic part from the plug. Strip the wires, remember their position when cleaning the plug from plastic. After cleaning the plug, try soldering the wires to the plug connectors. Remember, the signal is transmitted more than each one through the wires that have been soldered, and the twisted wires lose some of the signal during transmission. Note that when connecting two wires, you must make sure they are the same color.
3. If a breakdown appears in the earpiece itself, it is allowed to replace it with another one, say, from another broken pair. If the wires are unsoldered from the speaker itself, they can also be easily soldered. It is worth noting that you should not confuse the left and right speakers when replacing them. If the soldering iron has too thick a tip, it is allowed to purchase a similar one and easily grind it off. The smaller the tip diameter, the lower the output power of the soldering iron.
4. Later, after the headphones have been fully restored, you just have to test them on any music device.
The headset is most often used with a mobile phone or player. Sometimes it is different in cost and quality: from inexpensive to sophisticated and stuffed with the latest developments in the field of electronics. Here the choice falls entirely on your shoulders and head. But it is allowed to do it easier, and not even toil with a choice in the store. Collect your headset... This is not at all as difficult as it might seem at first glance.

You will need
- - adapter;
- - the wire;
- - insulating tape;
- - soldering iron;
- - microphone;
- - speaker.
Instructions
1. Take a shabby one for confidence headset... It is not even necessary that it fit the standard connector on your phone. For this purpose, an adapter will serve, one that you need to buy or dig up in your treasury. It is needed so that later you can connect any headphones more closely. It is allowed to use an adapter, the one that often comes with a particular player.
2. Take the adapter and cut off the part that will fit into the player. The wires that appear (there should be three of them) you need to strip, that is, cut off the top film with a knife or scissors. After that, take care of the headset itself.
3. Disassemble the place where the headset has a microphone, sound button and / or call button. Cut the wire that goes to the earphone so that the ends of the wires are visible. That is, do not cut at the root.
4. Next comes the process of adhesion. Connect the wires based on color. They must be the same. Solder scarlet with red, white with white, etc. After connecting the wires, wrap them with electrical tape. This is necessary both for the strength of the structure and for your safety.
5. Place the soldered wires back into the microphone box. Plug in all sorts of headphones and you're done. Enjoy the quality of the sound and the knowledge that you have assembled this little miracle of technology with your own hands.
6. Recommendations for setting up a wireless headset and phone: The secret is primitive. All devices (both phone and headset) must be turned on. On your phone, start searching for devices in the bluetooth menu. Press the headset power button at the same time until the indicator comes on. Make sure it is on and not blinking. The phone should detect headset and connect with her. If this does not happen right away, easily repeat the search for devices with a tighter headset turned on.
Note!
This headset is no different from the purchased one in terms of its collations, so you can adjust the volume and equalizer as you like without horror.
Helpful advice
The possibilities of using a headset are not limited to its wired types. Users are gradually switching to wireless communication. The truth here, as they say, is not for everybody!
Ready headphones, even solid ones, fail relatively quickly. In the hands of a home master, they traditionally begin to work again, but it is much more comfortable to have head headphones that won't break. You can make them yourself.

Instructions
1. Purchase a plug that matches the type of headphone jack on the unit. Particularly common are the 6.3 mm (1/4 ") and 3.5 mm (1/8") diameters of the 3-pin stereo jacks. The former are used mainly in stationary equipment, the latter are used in portable equipment, but there are exceptions.
2. Remove the cover from the plug. Pass a flexible but durable four-core cable through the hole. A fairly frequent oversight of novice craftsmen is further: they solder the conductors to the contacts of the plug, forgetting to pass the cable through the cover in advance.
3. Locate the cable support on the plug. It has a hole in it. Solder two of the four cable conductors to this hole. Solder two more conductors, respectively, to one small contact and to the other, having put small insulating tubes (cambric) on them in advance. After soldering, close the contacts with these tubes.
4. Wrap the cable with two layers of electrical tape, and then fix its wrapped section in the rack.
5. Close the plug. Use an ohmmeter to check that there are no short circuits.
6. Place two identical small speakers with an impedance of 8 ohms in round resonator casings, for which it is allowed to use perfectly cleaned plastic jars from shoe polish. Step by step with each of them, turn on a resistor with a nominal value of about 30 ohms. They also have to be identical.
7. Bend the headband from a metal ruler. Mount the emitters on it using any method that is comfortable for you. These can be, say, screws and nuts. Headphones are not required to have sharp protrusions that could scratch your ears.
8. Connect two wires to each emitter (consisting of a speaker and a resistor), one of which in both cases should be combined with a stubborn plug, and the second with one of its small contacts.
Related Videos
This element is quite primitive in execution, but at the same time it is very significant, because it is the basis for other, more difficult elements. Regardless of what build you are, you will be able to make an exit on one hand.

Instructions
1. Pull-ups and push-ups. In order for you to easily perform this element, learn to pull yourself up on the horizontal bar 10 times, without pulling your legs, but keeping them straight, and push up from the floor at least 20 times.

2. Checkbox. The next step is to fix the checkbox as shown in the picture. In order to make it easier to make this part of the element, after pulling up it is allowed to put the forearm parallel to the crossbar, and later go to the flag.

3. Push up on the horizontal bar. Later, after you go out into the box, you need to fix the second hand above the horizontal bar, as shown in the picture. To make it easier for you to do this, you can swing a little. From this location, you need to squeeze out of the horizontal bar and get out on even hands.

Note!
Be neat when you fix the flag, because if your hand comes off, it is permissible to injure your big finger.
Helpful advice
It may not work right away, but the main thing is persistence and regularity. If you develop these two factors, you can achieve tremendous results.
Headphones were invented in the 19th century. They have been greatly improved since then, and various form factors have emerged as well. Nevertheless, the thesis of their work remained the same.

Instructions
1. Headphones are based on emitters. The most famous emitter circuit is dynamic, with a moving coil. The continuous magnet is permanently attached to the earphone housing and creates a static magnetic field. Magnets can be ferrite (in more inexpensive models) and neodymium. In this magnetic field, a coil of wire is located, through which an alternating current modulated by a sound signal passes. When the current in a conductor changes, the surrounding magnetic field also changes.
2. A thin membrane is fixed on a flexible suspension, and a coil is attached to it. The latter moves due to the interaction of the continuous field from the magnet and the alternating field from the coil. The membrane begins to vibrate due to the movement of the coil. This vibration is transmitted through the air, and the ear perceives it as sound. The sound largely depends on what material the membrane is made of. It can be a synthetic polymer film in cheaper models; cellulose, mylar and other materials in mid-range headphones and titanium in more expensive devices.
3. This scheme is used in about all modern headphones of various form factors. Dynamic emitters also have a number of disadvantages. So, due to the relatively low speed of reaction to the metamorphosis of sound, the membrane is often not able to perfectly reproduce low and high frequencies in an identical manner. This snag is extremely demanded for "inserts" and "inserts". Consequently, there were models of dynamic headphones with two emitters. Another snag is the unevenness of the magnetic field where the coil moves. This makes the sound somewhat unexpected and unstable. For this reason, some other emitter schemes were invented, with their own advantages and disadvantages.
The smartphone, which Apple will release next year, is rumored to have a standard 3.5mm audio output. This means that music on this device can only be listened to through wireless headphones or headphones with a Lightning connector (probably compatible plugs will be included in the kit). But what to do for those who have already picked up headphones of the perfect design with decent sound - do not give them up because of a new whim of Apple? Fortunately, you can build a wireless adapter for any headphones with your own hands, especially since almost no skills are required for this, and it will cost very cheaply.
How to make wireless headphones with your own hands?
In addition to the actual headphones, you will need two more components: a Bluetooth sound adapter and a portable charger to power it.
A Bluetooth adapter usually looks like a USB flash drive with a 3.5mm audio jack. It costs less than two hundred rubles on AliExpress.

Portable chargers come in different sizes, but for these purposes the smallest one - the size of a lighter is best suited. For example, something like this:

It is powered by two batteries or AA rechargeable batteries. When they sit down, they can simply be replaced with new ones or charged ones.
You can find a miniature Power Bank with a built-in battery, like this:

Once you have all of these components, you can start building your wireless headphones.
1. Insert the Bluetooth adapter into a charged wireless charger or one with fresh batteries. If all is well, the blue LED in the adapter will flash.
2. Connect the headphone plug to the audio input of the Bluetooth adapter.
3. Open Bluetooth settings on your smartphone and search for Bluetooth devices. There should be a sound adapter among them, connect to it. If he asks for a code, enter "0000".
4. Turn on music and enjoy your favorite songs.
Of course, your headphones will be considered wireless only conditionally - they will have wires, but you no longer need to connect them to the audio output of your smartphone. The same wireless headphones can be built if the 3.5 mm plug has stopped functioning normally in your smartphone, and for some reason you do not want to repair it. Keep in mind that Bluetooth has an extremely limited range, and if you move more than ten meters away from your smartphone, the sound in the headphones will become intermittent or completely disappear.
Headphones are a device that tends to break down completely unexpectedly and out of place. Usually, new headphones are immediately bought, because today it is quite difficult to imagine life without headphones. New headphones last no longer than old ones; Thus, in a few years, you can collect a whole bag of headphones of varying degrees of breakage. Do not throw them away - as a rule, it is quite possible to collect half a bag of fully functional devices from a bag of non-working headphones.
Making headphones from scratch with your own hands is not easy and very pointless. One way or another, you get an assembly of headphones from four constituent elements - a plug, a cable, speakers and a case. Everything except the case will probably have to be bought in a radio store or cut off from old headphones - and the case, probably, too, unless, of course, you have some original idea and especially straight hands. Nobody forbids casting a new plastic case - but is it worth the candle?
Collecting new headphones from a pair of old ones is a matter of no special wisdom. To do this, you only need a sharp stationery knife, a soldering iron and a roll of duct tape.
Exploring the headphone device
Before you start assembling headphones with your own hands, you should figure out what this device consists of and how it works.
Standard headphones, whether in-ear or on-ear, are made up of three main elements:

So, the device of the headphones is very simple, so disassembling the old ones and assembling the new ones will not be an overwhelming task. But before you cut old non-working headphones into pieces, you need to find out why they don't work, what can be used from them, and what cannot.
Diagnostics of spare parts
Broken headphones may not work for many reasons. First, before dissecting the device, make sure that they are not actually working - perhaps the problem is not with them at all, but with the sound source you are using.
If the headphones themselves do not work for sure, find out which part is inoperative and which can be used. The main causes of breakdowns are wires that have come off the plug contacts, a cable break and a speaker breakdown. Thus, you may need three pairs of broken headphones to assemble new working ones - from one you will take the plug, from the other - the cable, from the third - the case with the speakers.
We disassemble old headphones

Get your broken headphones ready for use and find the right tool:
- a sharp knife for stripping and cutting wires;
- soldering iron for connecting wires with contacts and fixing twists;
- insulating tape or heat-shrinkable strip for connecting cable lengths.
In the last step, you found out which parts are suitable for further operation - feel free to shred the headphones and separate these working parts. The plug must be cut off so that at least 3 cm of the old cable extends from it. Likewise, the speakers are cut off.
If a working plug is not found, cut it completely: remove the plastic case and tear off the remaining wires from the contacts, they will no longer be useful.
The old cable does not have to be intact. Let's say it was too short, and you want to build it up in the new headphones, or in all the old headphones it is torn. It doesn't matter - take as many segments as you find - it's not difficult to connect them.
How long should the cable be?
The standard length of the headphone cable is 80–120 cm. In this case, a good operating range is also ensured - the sound source is rarely far from the headphone case, and the effect of the cable on the sound quality is vanishingly small. Making the cable longer can cause signal loss, leading to distortion, noise and squeaking in the headphones. A shorter cable will simply be inconvenient.

Do you need a cable at all? Is it possible to DIY wireless headphones? Well, this, of course, is possible, but it is better to do this if the old headphones were also wireless - in this case, you can use a working transmitter by inserting it into a case with working speakers. It is difficult for an inexperienced user to supplement the previously wired headphones with a wireless interface - you will need to create a control microcircuit and program it.
We collect new headphones with our own hands
So you've got a complete set of parts that work, whether they are sourced from old headphones or purchased from a store. It remains only to assemble them correctly, and you can start listening to music.
Plug
The first step is to deal with the plug. Its attachment can occur in two ways:
- if it worked, then the piece of wire extending from it simply joins the rest of the cable;
- if a non-working plug is taken, it will have to be disassembled and thoroughly connected to a new cable.
Let us examine the second situation in more detail. The design of the plug is simple and does not differ in particular depth - there is, in principle, nothing to break there, so even if it no longer works as part of the headphones, it is quite functional by itself and can be used again.
Under the plastic housing you will find the metal base of the plug, from which two or more metal plates of different lengths extend. In the case of conventional stereo headphones, there will be three plates - two pins for transmitting the left and right channels and a pin for ground. The third contact is the easiest to determine - it is the longest and is usually attached to the sleeve - the longest part of the plug extending from the base.

We take a cable or one of the parts of the future cable and strip one of its ends. Under the braid, you can find 3 or more often 4 wires, which are again stripped of insulation. After that, using a soldering iron, it is worth melting the transparent protective layer so that the current passes as freely as possible. After that, the wiring is connected to their contacts - the channels can be safely confused in places, this will not affect anything. The copper conductors are twisted, attached to the contacts and fixed with a blowtorch. Remember that the wires must be insulated from each other.
The plug body cannot be restored, but you can use anything instead - just wrap the twist with electrical tape or thread the plug into the syringe tip or pen cap.
Cable
If the cable is assembled from several sections, the parts will have to be twisted securely together. For this, the parts to be connected are freed from the braid, and the wires are stripped of insulation. After that, the wires are twisted in a linear or spiral way - detailed instructions are not needed here, this operation is easily performed on a whim. Then the twist is fastened with a soldering iron, the channels are isolated from each other and from the ground. From above, the twist is wrapped with electrical tape or tightened with heat shrink tape. The main thing is to choose the color for the braid so that the cable does not look too artisanal. In extreme cases, over the plastic braid, you can make a homemade winding from thread or lacing.
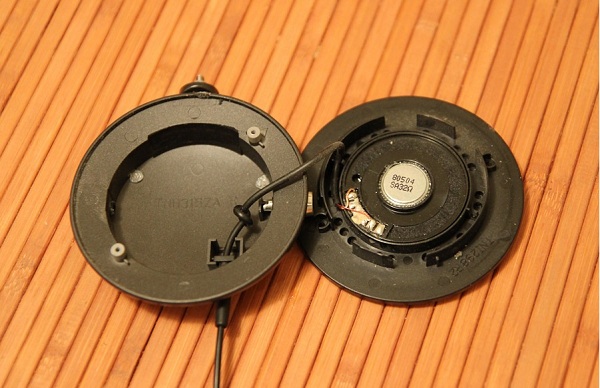
Speaker
All that remains is to attach the speaker. Disassemble the case in any convenient way - it is best if such a possibility is provided and the case parts are fastened with screws that can be unscrewed.
On the body of the emitter itself, you will find the same contacts as on the plug. The corresponding channel is connected to one of them, the ground to the second. We solder, insulate, assemble the case back.

Thus, from several non-working pairs of headphones, it is easy to assemble new headphones with your own hands using the simplest set of tools. There is no point in assembling headphones from scratch - it will be easier (and, as a rule, cheaper) to just buy them at the nearest store.
Quite often, there are cases when students are forced to give money for the session, and even after they answer all the questions posed, teachers express their dissatisfaction, and so on. Therefore, if you want to avoid such difficulties, then you can take care of buying a micro-earpiece before the exam session, which will help you quickly overcome this period.
What are earpieces?
Under earpieces, it is customary to understand capsules of the minimum size, the main purpose of which is associated with the provision of hidden wireless connections.
Currently, in a similar set you can find the following elements:
- wireless small headphones placed in the ear canals;
- hidden micro-headset equipped with an ultra-sensitive microphone;
- special batteries for such headphones, although for different types of devices, similar elements have different markings.
Usually, the headset is attached to the bottom of the clothing, and then it is connected to a mobile device via bluetooth.
The use of earpieces
In general, the micro-earphone operation scheme is not complicated, since for this you need a mobile phone with Bluetooth, to which the headset will be connected in the future, and then it is inserted into the ear. Now you can go to the audience with complete peace of mind.
Of course, for students, such prompters bring a lot of benefits, even when they are in another city. When you have chosen a ticket for yourself, you must very quietly communicate all the questions presented there through the headset. Everything else depends only on the assistant, because it is he who will dictate the correct answers. As a rule, others cannot notice this, because any signals are transmitted through an invisible earpiece located in the auricle. For the examinee, it remains to write down everything that he hears in the earpieces.
Thus, hidden earpieces can be called the most excellent version of cheat sheets. It has been proven many times that the device is highly efficient.
With the help of wireless technologies, the lives of modern people have become not only brighter, but also more comfortable. One such invention made student life easier.
Nowadays, such devices are sold in huge quantities, although the cost of some of them is quite high. Let's consider how to make a magnetic earpiece with your own hands.
How to make earphones with your own hands
If you want to make your own earpieces, then for this you need to prepare:
- radio from a Chinese manufacturer;
- mobile device;
- phone-compatible version of Hundsfree;
- TEM marked 1958;
- a capacitor with a special power;
- resistor;
- 3 bipolar transistors;
- turn coil;
- battery, with a capacity of 337 A;
- heat shrink tubing with a flesh tint;
- plasticine intended for these purposes;
- sealed material;
- automobile coils from the relay, and instead of them, wires with a diameter of not more than 0.1 mm are suitable;
- sheets of gypsum and special fibrous material;
- glue;
- hair dryer for any construction work, lighters or candles;
- surgical instruments;
- cosmetic tweezers;
- some sandpaper or a file;
- a small amount of thick fishing line;
- a device for soldering individual elements;
- nippers;
- gloves from any material.

detailed instructions
This device includes immediately three main parts:
- amplifying, that is, the transmitter;
- inductive loop or external loop antenna;
- micro earphones.
You should start with creating a transmitter, and for this it is recommended to do the following:
- Purchase any radio that is not equipped with speakers, but makes it possible to search for channels in automatic mode. It is worth noting that the circuit in various models practically does not differ from each other, for this reason absolutely any radio will do.
- Disassemble the main body.
- Delete all the small circuits, after which you need to find the contact associated with the headphone plug. The path that goes directly to the plug is carefully cut, and a prepared antenna is installed in its place. To the extreme contact, which is responsible for the volume level, it is worth soldering one wire that replaces the earpiece.
- It is necessary to make a hole in the main body, where the same wire will pass.
- Begin to assemble this body in the reverse order, after which it will have to be tightened well.
- The amplifier is now ready for further use.
 Now it's time to consider Hundsfree wire, which is designed to connect the phone and radio, but it does not require any additional modifications.
- Cut off the headphones.
- An amplifier is installed in its place, and this is done using a soldering iron.
Quite often, a microphone is extremely necessary, so it is recommended:
- Carefully disassemble the Hundsfree button and extract all of its contents.
- The microphone is then output using a separate wire.
For creating inductive loop or an outer contour, you need:
- Make a frame using a gypsum fiber sheet, but the main thing is to take into account the diameter.
- Take out the coil of wire located in the relay.
- Wind up, while making sure that the wires are laid in the correct order.
- Make the strictly required number of turns.
- Secure everything in several places with glue.
- Disassemble the entire mandrel.
- Remove the resulting loop and wind the wire in the direction of the spiral.
- Secure the halter with a soldering iron.
- In order to reinforce the junction, it is necessary to wind these wires with a thick layer.
- Create a shape with a suitable diameter, and a simple plasticine is suitable as a material.
Diagram for assembling a micro-earphone with your own hands
- Using a special computer program, make a diagram showing the installation process.
- Create a basic board.
- Usually, two parts are noted in the printed wiring, this is a transistor and a resistor, as well as a resistor and a capacitor.
The step-by-step process of assembling micro-earphones with your own hands is shown in the video:
Modern experts give a number of valuable tips:
- A special wire is selected strictly for the used mobile device, as this will allow you not to encounter a sound problem.
- Choose the smallest size for your headphones, and not only should you be careful when making a board, but you should be even more careful.
- The soldering process is recommended to be carried out only on a surface made of any metal. Moreover, it will be much better if it can absorb excess heat, because this leads to a breakdown on the board.
- Always use gloves when working with auto-plasticine, as it is rather dirty and extremely difficult to wash.
If you use an earphone and hear a slight hiss in it, then you should not be intimidated, because this effect is an indicator of proper operation.
Pay attention to this kit:
In addition, when a conductor is used to wrap a TEM in a large diameter, then, often, the process of self-excitation of the headphones begins, and therefore a high frequency squeak appears.
Headphones are one of the most popular devices in the modern world. Like any device, they have an unpleasant tendency to breakdown at the most inopportune moment. The frustrated owner immediately goes to the store to buy a new headset to replace the lost one and does not even think about how to make headphones with his own hands. Although this procedure is not as complicated as it seems at first glance.
Making them from scratch is the most difficult and painstaking task, or working with ready-made material. But be that as it may, the procedure will still consist of four steps:
- connection with a plug;
- cable processing;

- assembly of speakers;
- packing of parts into the case.
All elements will have to be bought in a specialized store or separated from broken headsets... The case will also have to be looked for separately or made by yourself. There are several original recipes for casting it from plastic at home. The process is long and painstaking, but if you are used to making something on your own, no one forbids you to experiment.
Assembling new headphones from parts of the previous ones does not require specific knowledge of technology from you, the main thing is to stock up on a tool. To work you will need:
- special nippers, office knife or sharp blade;
- soldering iron, some solder, rosin;
- insulating tape.
Required device components
Before starting the procedure, it will be helpful to understand a little about the design of the headphones. The standard equipment includes such necessary elements.
Plug
This is a part better known as mini— jack, with a diameter of three and a half millimeters, designed to connect the headphones to the main unit. Experts call it the TRS connector because of the three pins that can be easily found on the surface. These pins receive signals from the line-out on a music device or mobile phone. Depending on the manufacturer, they may be;
- two - this number is typical for monaural headphones;
- three - for stereophonic devices;
- four - this configuration is used in the manufacture of headsets.
It is worth paying particular attention to this detail, since the performance of the future product will depend on it.

Cable or main wire
It can be made in the form of a round cord or flat black tape. Manufacturers make double and single cords- it depends on whether they are connected to one speaker or to both. Copper conductors are placed under the layer of insulating material and protective varnish - the left channel, the right channel and the grounding conductor. As a rule, the wires are marked with different colors - this allows them not to get confused during production, or, as in our case, during repairs. 
This is the basic element of any headphone, on which the reproduction and sound quality depend. The sound transducer can belong to any class - broad spectrum, low-frequency or vice versa, focused on high reproduction frequency, dome or simple. However, the most common use in headphones is standard speaker of the simplest type. It cannot boast of high power or sensitivity, but it is reliable and unassuming to conditions.
It is rather difficult to buy a speaker separately, it is even more difficult to assemble without special tools, do not create unnecessary difficulties for yourself and simply cut off the necessary elements from old headphones.
Try to cut the wire straight without splitting the copper strand.

So the headphone setup is pretty simple. Disassembling a failed device and using its parts to assemble a new one will not be a difficult task. But before starting the procedure, you need to find out why the old device failed.
Checking details
Headphone breakage can occur for a variety of reasons. The first thing to do before disassembling for parts is to make sure they are not working. There are often cases when the problem was hidden in the main device, but the owner, without understanding the situation, threw out perfectly serviceable headphones.
If you are sure that the reason is precisely in them, then before collecting new headphones, decide what details can be used. Typical problems with such devices are faulty plug contacts, a broken wire, or faulty sound emitters. How to make headphones in this case? Collect working parts from three different pairs.

Disassembly
It is quite easy to disassemble old headphones with your own hands, the main thing is to choose the right instrument. Feel free to cut old headphones into parts, carefully separating them from each other sharp knife... Do not forget to leave a small tail of the wire for later soldering. Three centimeters of cable will be enough for the plug, the same length will be enough for the speakers.

If you could not find a working plug, you will have to tinker a little. Take any suitable part and completely remove the rubber pads from it. After that, clean the surface from the old contacts. For a new cable, you can use pieces of different lengths, connect them together with a soldering iron - a matter of five minutes.

Assembling new headphones
The first step is to deal with the plug. There are two ways to attach it to the cable:
- a completely serviceable part is simply soldered to the cord;
- the faulty part will have to be completely cleaned and all contacts will have to be re-fastened.
Let's consider the second situation in more detail. The main design of the plug is not susceptible to breakage, there is simply nothing to break there. However, the contacts that carry out the signal transmission can easily fail, and then they have to be replaced.
Depending on the class, the metal base of the part may have a different number of wires... Stereo headphones have three - two transmitting for the left and right speakers and a ground wire. Grounding usually has the longest wire attached to the longest portion of the plug extending from the base.

Strip the main cable and locate the required wires. Connect them with pins, the sequence doesn't matter here. The main thing is to remember that the veins must be isolated from each other.
Extension of the cable
This operation does not require detailed explanation, as it is carried out on a whim. Take the pieces of wire and twist them together. Secure the twist with a soldering iron and the required amount of solder. At the end of the procedure, wrap the wires with heat shrink tape.

Installation of sound emitters
Now let's take care of the most important part of the headphones, namely the speakers. Disassemble the case of the parts you have chosen and look for contacts similar to those already used on the plug. Attach to the first transmitting wire e, connect the ground to the second. After that, apply solder to the contacts and carefully insulate the wiring. Assemble the body in reverse order.

How to make USB headphones
Now a new type of headphones is becoming popular, which, nevertheless, also often becomes unusable. How to make usb headphones with your own hands if their connector is broken? Everything is very simple. First, remove the damaged part with a pair of wire cutters or a sharp knife. Then take serviceable connector and gently solder it to the main cable.

Remember that, as with the plug, you need to pay attention to the contacts and not overdo it with rosin. The rest of the usb headphones are no different from ordinary ones, and the assembly process is not fundamentally different.
How can you make headphones with a microphone? Just solder the microphone contacts to the cable at the final stage, and you will have a full-fledged headset.
 Epson t50 pcb maker printer for pcb maker
 DIY waterproof phone case
 Stand for a smartphone on a car torpedo with your own hands or how to make a car holder for a phone in a car Homemade phone mount in a car