How to unlock touchpad on hp laptop. How to enable touchpad on Lenovo laptop
Almost all laptop models are equipped with a special touch panel, also called a touchpad. It is intended mainly for controlling the mouse cursor, as well as calling context menus in various programs and the Windows 7/10 interface. Laptop manufacturers are trying to make touchpads as convenient as possible, but none of them has yet been able to replace the most ordinary computer mouse in terms of convenience.
Moreover, in some cases it becomes a hindrance. When typing text, the user accidentally touches it with his fingers or palm, which causes the cursor to move on the screen, elements that are not needed at the moment are highlighted, and the like. Therefore, some users are looking for ways to disable the touchpad so that the latter does not interfere with work. There are several ways to do this, and now we will consider them in turn.
Using hardware keys
You can turn off the touchpad on a laptop by pressing a special combination of hot keys, but this is provided that the appropriate drivers are installed in the laptop system. In addition, for different laptop models, the keyboard combinations for disabling the touchpad may differ. First of all, look at the topmost row of the laptop keyboard - one of the keys should have a crossed-out touchpad icon. This button is responsible for turning it off.
In general, in laptops, the following combinations are used to temporarily turn off the touchpad:
- Aser - F7 and Fn + F7;
- Asus - F9, Fn + F9 and Fn + F7;
- Dell - F5 or Fn + F5;
- Lenovo - Fn + F5 / F8;
- Toshiba-F5;
- Samsung - F5 or F6.
In HP laptops, the touchpad is disabled by double-clicking the area in its upper right corner or holding your finger at this point for a few seconds. If the described method fails to disable the touchpad, most likely the PC does not have the necessary drivers. In this case, either download and install them from the official website of the manufacturer, or go to other options.
Through the control panel in the properties of the mouse
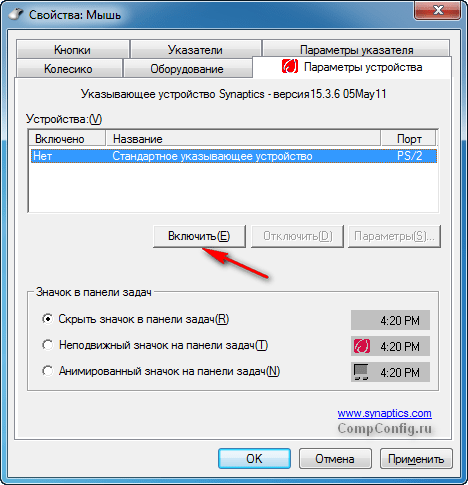
Many modern laptops are equipped with touch panels manufactured by Synaptics. If so, you will most likely have a special driver installed in your system, and in the mouse properties window there will be a special tab “Device Settings”, marked with a characteristic red icon. Through the Settings app or the classic Control Panel, open Mouse Properties.

Switch to the tab (if available) "Device Settings", select the device you do not need, in this case the touchpad, and disable it with the appropriate button.

Yes, you can also select the middle option by checking the checkbox "Disable internal pointing device when connecting an external pointing device to the USB port." This action enables the touchpad to automatically turn off when a mouse is connected to the laptop. Again, all this assumes that the PC has the right drivers. Now let's see how to disable the touchpad on a laptop if they are not there.
Disabling the touchpad through Device Manager
You can disable the touchpad through the Windows Device Manager. Open the snap with the command devmgmt.msc and expand the Mice and other pointing devices branch. If you see a PS / 2 mouse in the list, then this is most likely a touchpad.

Right-click on the device and select "Disable" from the menu. The touchpad can also be located in the “HID Devices” branch and be called either a USB mouse, or TouchPad, or something else, here you will already have to experiment by turning devices off and on in sequence.
What if there is no "Disable" option in the context menu? In this case, the device can be removed, and in order to prevent it from being installed again when the system is rebooted, use the command gpedit.msc open local group policy editor, navigate to location Computer Configuration - Administrative Templates - System - Device Installation - Device Installation Restrictions.

In the right column, open the "Prohibit installation of devices not described by other policy settings" policy, set the radio button to "Enabled" and reboot.

After that, the remote device will not be installed again.
Note: disks shipped with laptops often have "native" programs for controlling the touchpad, for example, smart gesture at Asus. If such a program is installed on your PC, the touchpad in Device Manager will not be called "Microsoft PS / 2 mouse", but something else.

In this case, to disable the touchpad, it is better to use the program, for sure it has a corresponding function.

Disable touchpad in BIOS
If you are looking for how to disable the touchpad on a laptop without using system settings and programs, do it at the hardware level - through the BIOS. On most laptop models, entering the BIOS is done by pressing and holding the F2 or Del keys. The BIOS interface of different laptop models may differ, but as a rule, the option responsible for disabling / enabling the touchpad is called “Internal Pointing Device” and is located in the “Advanced” section.

The "Disabled" key disables the touchpad, the "Enabled" key re-enables it. The new BIOS settings are saved by pressing F10.
Using Third Party Programs
And finally, one more way to disable the touchpad. For these purposes, there are special utilities. There are not many of them and some of them may not work on older versions of Windows. The most popular of them is. After installation, this little free program settles in the system tray, automatically blocking accidental clicks on the touchpad.

In the Touchpad Blocker settings, you can enable autoload, set the touchpad blocking time and set the necessary hot keys for this.
- A utility for blocking the touchpad, used even before the advent of Windows XP. It is highly unlikely that it will work on Windows 7/10, but you can try it as an option. The utility is completely devoid of any settings, it starts working immediately after installation. You can close it from the system tray.

A program similar in functionality to TouchFreeze, it only disables the touchpad at the time of entering text. Deprived of settings, controlled from the notification area.

If the above tools do not suit you, try installing the driver Synaptics TouchPad Driver. In theory, after installing it in the properties of the mouse, you should have an additional tab "Device Settings", and in it - touchpad control tools. By and large, the TouchPad Driver serves the same purpose as the Microsoft Windows touchpad driver, but it also offers a number of additional features, supporting disabling the touchpad, using three fingers for control, rotation, and several other functions.
The touchpad is an age-old feature that has long since replaced alternative mouse controls. With it, we can fully control our device, be it a laptop or a hybrid tablet. Many laptops (Acer, Asus, HP, Lenovo, Dell) have problems with the touchpad. What to do if the touchpad does not work on a laptop in Windows 10? Let's look at 5 ways to fix this problem.
1. Re-enabling the touchpad with the Fn key
One story happened to me when I turned on WiFi on a laptop and accidentally disabled the touchpad touchpad. For a long time I was looking for the reason, not immediately realizing what happened. Everything turned out to be simple, in laptops there is a button for additional functions called Fn from the bottom left of the keyboard. To enable a function on a laptop, hold down the combination of the Fn and F1 ... F12 buttons. On the same buttons F1-F12, pictures or symbols are drawn to apply the parameter. For example, to enable the touchpad, you need to press Fn + F7, on the F7 button itself there will be an image like a touchpad. You can press all the buttons in order Fn + F1 ... F12, but remember that there is a function to turn off the display, press again those buttons on which the screen went out.
On some HP brand laptops, the touchpad is turned on and off by double tapping the edge of the touchpad itself. Asus and acer brands may have a separate button next to the touchpad. If the touchpad still does not work, then move on.

2. Uninstall Other Mouse Drivers
There are times when you had a whole bunch of drivers connected from different mouse devices in the past and you never deleted them. Some drivers from mouse manufacturers automatically disable the Touchpad themselves. Go to device Manager, pressing a combination of buttons Win+R and type in the line devmgmt.msc.

Find the line that points to mice and other pointing devices, click on the tab to expand the category and remove all mouse drivers in order until the touchpad works on your laptop. If it does not work, try rebooting the system after removing all drivers. Touchpad not working? We move on to the next point.

3. Update or roll back the touchpad driver
Try updating or rolling back the touchpad driver. Go to the same device manager as described above. Locate the Touchpad device, usually named after the brand of the laptop (Dell TouchPad, Lenovo TouchPad, Synaptics, HP TouchPad, Acer TouchPad, Asus TouchPad.) Right click on your driver and select properties. Next, click Update to see if there are any useful updates for your touchpad.
Many people have reported on the Microsoft forums that the touchpad stopped working exactly after the Windows 10 update, for this you need to select roll back driver. If you do not have the Roll Back button highlighted, then you do not have a previous version of the driver.

In many cases, Device Manager does not work in order to enable the Touchpad on a laptop. If your Touchpad still does not work on a laptop in windows 10, then go to the properties of the mouse.
- Dial mouse in the windows search bar and go to Mouse Settings.
- Click Additional mouse options in the window that opens, go device settings, tab Touchpad or as in the picture.
- Find your Touchpad and click "enable".

5. Disable Touch Screen Input Service for Hybrid Laptops
If your laptop is a hybrid (laptop and tablet in one with a touchscreen.) There's a chance that the touchscreen input service, which controls stylus functionality, is interfering with your touchpad.
To disable the service, press win+R, then type services.msc and in the list of services find TabletInputService or Tablet PC Input Service. Right click on it, then disable it. A very inconvenient solution for those who use the touch screen and touchpads, but you can be smarter and try to remove the drivers, roll back, update and then restart the service.

The touchpad of the laptop helps to control the cursor. If it bothers you, you can block it at any time and then unblock it. We will tell you how to disable and enable the touchpad on a laptop - specific actions depend on the brand of the device and the OS installed on it.
On laptops, a dedicated button or combination of the two is usually used to disable and enable the touchpad. You can find the one you need by the picture - a rectangle with two fields on top. On a number of laptops there is a separate hardware button to turn off the sensor - it is located on the top or side of the main panel.
ASUS
How to disable or enable the touchpad on an ASUS laptop: try the combinations Fn + F7 and Fn + F9. One of these combinations will help both block the panel and activate it back.

Acer
On models from Acer, the touchpad is disabled in the same way as on an ASUS laptop - with the Fn + F7 combination. The picture on the desired function button here usually depicts a finger raised to the panel.
HP
How to disable or enable the touchpad on an HP laptop: double-click on the upper left corner, in which a white dot is drawn or there is a small indentation.

Another way for HP is to put your finger in the left corner of the panel on top and hold it for 5 seconds.
Sony
On Sony models, try the Fn + F1 combination. If the laptop has the proprietary Vaio Control Center utility, control the touchpad through it: in the Mice and Keyboards subsection, you can not only deactivate the panel, but also set gestures to call individual functions.
Samsung
On Samsung devices, touchpad control is tied to the Fn + F5 keys.
Lenovo
How to enable or disable the touchpad on a Lenovo laptop: check the combinations Fn + F5 and Fn + F7. Synaptics-type panels are installed on devices of this brand, so they can be controlled through a special utility.
Toshiba
At Toshiba, panel control is usually wired into the popular Fn + F5 combination.
Windows Tools
How to enable or disable the touchpad on a Windows 10 laptop: Open System Settings from Start. Go to the "Devices" section and select "Touchpad". At the top, you'll see a switch that enables and disables the touchpad.

Also in this section there is a useful option - whether to turn off the panel when connecting a regular mouse.
A number of manufacturers add their functions to the "Mobility Center" - it opens from the tray, by clicking on the battery icon. If your model has a sensor control unit there, use it to activate the touchpad.
For Synaptics panels
Many popular laptops have Synaptics sensors, which the manufacturer equips with a proprietary utility. You can find it using Windows tools:
- run system settings from "Start";
- go to "Devices" and select the "Mouse" sub-item;
- open "Advanced options";
- if the window has an additional tab with a red icon, use it to control the sensor.

To enable or disable the panel, select it in the list of devices and click on "Activate" or "Stop" respectively. The item "Disable when connecting a USB mouse" will automatically disable the touchpad when you plug the mouse into the USB port.
In the dispatcher
Another available option on how to enable the touchpad on a laptop is through the Device Manager functions. To run it in Windows 10, hold down Win + X and select the menu item of the same name. In lower versions of the OS, the utility is available through the properties of "My Computer". In the list of devices, look for the sensor - it should be in the category "Mice" or "HID Devices".

The name of the panel does not necessarily include the word "TouchPad", it can be listed as "USB device" or some other similar name. To disable, right-click on the found line and select "Disable" in the submenu, when the panel is disabled, the "Enable" option will be available. If you cannot accurately identify the touchpad in the list, successively turn off all entries similar to it - you cannot damage the equipment in this way, in case of an error, simply turn the device back on.
Third Party Programs
A little more functionality can be found in additional applications. Touchpad Blocker introduces more flexible settings, but the interface is only in English. The user is presented with the following options:
- Block accidental taps and clicks - blocks accidental clicks by turning off the bar while typing. Nearby, the number of seconds for which the sensor is deactivated after pressing any button on the keyboard is set.
- Also block move and wheel event - disables page scrolling.

Additionally, you can set hot keys to launch functions, sound alerts.
in bios
Changing the BIOS settings should be a last resort when other items have not helped, and it is very important for you to completely disable the touchpad for a long time. It is also worth checking the BIOS if the sensor does not respond to pressing, although it is enabled in the Windows settings. What we do:
- restart the PC, at the beginning of the boot, press Del to start the bios;
- go to the Integrated Peripherals tab;
- opposite the Pointing Device, change the value to Disabled;
- save settings and reboot.
Conclusion
We figured out how you can control the touchpad on different laptops. The fastest way is to use special keyboard shortcuts, if they do not work on your model, use the tools built into Windows. Save changing BIOS settings as a last resort, when you definitely don't plan to use the touch pointer anymore.
In contact with
TouchPad (touchpad) can sometimes be disabled on laptops for some reason. In some cases, users themselves disable the touchpad, because. it can interfere with active work with the laptop keyboard.
There are several options for enabling the touchpad. But when using them, you need to consider what brand of laptop you have. The fact is that different models use different ways to activate the touchpad.
Let's look at how you can enable the touchpad on a laptop using several methods.
Reboot laptop
Regardless of the model and brand of laptop, the first tip to solve the problem is to reboot. It doesn’t matter which system you have is Windows 7, Windows 8, Ubuntu or another, perhaps there was just a one-time error and everything will fall into place after a reboot.
Using keyboard shortcuts
Most laptops have a special key combination to enable/disable the touchpad. Only for different brands it will be slightly different.
When using this method, you need to simultaneously press two keys on the laptop keyboard: the Fn key and one of the function keys in the top row (F1-F12).
For different brands and models of laptops, this combination is slightly different. For example, for Asus laptops, you need to use the following combination: Fn + F9.

Enabling the touchpad on an Asus laptop
Here is a list of keyboard shortcuts to enable the touchpad for common brands of laptops:
- Asus - Fn + F9 or Fn + F7
- Acer - Fn + F7
- Lenovo - Fn + F8 and Fn + F5
- Dell - Fn + F5
- Sony - Fn + F1
- Toshiba - Fn + F5
- Samsung - Fn + F5
There is no HP brand in this list, because on Hewlett-Packard laptops, the touchpad is enabled using a separate key dedicated to this function. If there is no such key, then most likely, to perform this task, you need to double-tap (or long press) in the upper left corner of the touchpad (watch the video below).
Enabling touchpad in BIOS
If the touchpad does not work for you and the previous tips do not help, it may simply be disabled in the BIOS settings.
 Go into the BIOS and find the item "Internal Pointing Device". The value of this parameter must be "Enable", i.e. included.
Installing/reinstalling drivers
Also, the reason for the inoperability of the touchpad may be the lack or incorrect operation of the device drivers. This situation may well be if Windows was reinstalled or some kind of failure occurred.
In this case, you need to try installing the touchpad drivers from the disk (if available) or download from the manufacturer's official website.
Synaptics TouchPad
Synaptics touchpads are now very commonly used on modern laptops. You may also have a touchpad from this manufacturer installed on your laptop. In this case (if the drivers are installed), the touchpad can be disabled using the control panel.
To do this, go to the Windows control panel and select the "Mouse" item.
On the Device Settings tab, use the corresponding buttons to enable or disable the touchpad.
Also, for some driver versions, this tab may contain a setting that allows you to disable the touchpad when a USB mouse is connected to the laptop.
TouchPad is defective
If all of the above recommendations did not help you, the cause may be a physical damage to the touchpad or the contacts are simply disconnected. In this case, there is only one way out - to disassemble the laptop and check all connections. In extreme cases, you may even need to replace the touchpad. If you are an inexperienced user, then it is better to entrust this work to professionals.
A laptop is a mobile device that can be used equally effectively both at a full-fledged workplace and in field conditions, for example, in transport. The touchpad is one of those devices that provide mobility. Therefore, it is very important for users to know how to enable the touchpad on a laptop.

After that, a window with mouse properties will open in front of you. Here you need to go to the "Device Settings" tab (sometimes this tab may have a different name, for example "ELAN"). On the Device Options tab, there should be an Enable button. Click on this button and save the settings by clicking on the "OK" button, which is located at the bottom of the window.

It should be noted that on the "Device Options" tab, the "Disconnect when connecting an external mouse" function may be available. If it is enabled, the touchpad will not work when a regular computer mouse is connected to the computer. If you want to use the touchpad and mouse at the same time, then this feature must be disabled.
If you have tried all of the above methods to enable the touchpad and nothing has helped, then your touchpad may have been disabled in the BIOS. In this case, in order to enable the touchpad, you need to enable a feature called "Internal Pointing Device". As a rule, it is located in the "Advanced" section of the settings.

If everything is also enabled in the BIOS, then there are only two options left: uninstalled drivers or a broken touchpad.
 Step-by-step PC troubleshooting
 How to create your first mobile app