How to copy an EDS certificate to your desktop. How to copy certificates in the cryptopro program
If a flash drive or a floppy disk is used for work, copying can be performed using Windows tools (this method is suitable for CryptoPro CSP versions not lower than 3.0). The folder with the private key (and the certificate file, if any) must be placed in the root of the flash drive (floppy disk). It is recommended not to change the folder name when copying.
The private key folder must contain 6 files with the extension .key. Below is an example of the contents of such a folder.
Copying of the container can also be performed using the CryptoPro CSP encryption provider. To do this, follow these steps:
1. Select Start / Control Panel / CryptoPro CSP.
2. Go to the Service tab and click on the Copy button. (see fig. 1).

Rice. 1. Window "Properties of CryptoPro CSP"
3. In the window Copying the private key container push the button Overview(see fig. 2).

Rice. 2. Copying the private key container
4. Select a container from the list, click on the button OK, then Further.

Rice. 3. The name of the key container
6. In the "Insert and select the storage medium for the private key container" window, you must select the medium on which the new container will be placed (see Figure 4).

Rice. 4. Choosing a clean key carrier
7. The new container will be prompted to set a password. Setting a password is optional, you can leave the field empty and click on the button OK(see fig. 5).

Rice. 5. Setting a password for the container
When copying to media Rutoken, the message will sound differently (see fig. 6)

Rice. 6. Pin code for the container
Please note: if you lose your password / pin-code, the use of the container will become impossible.
8. After copying is complete, the system will return to the Service in the window CryptoPro CSP... Copying completed. If you plan to use a new key container to work in the Kontur-Extern system, you must install a personal certificate (see How to install a personal certificate?).
For bulk copying, download and run the Certfix utility.

This article was created for EDS users who experience difficulties in transferring keys from a 3.5A floppy disk to other more reliable media.
The article also describes the process of installing new certificates. This operation should be started in the following order: Items 1-3 (instead of " Copy" select " Install«) And then continue from point 15.
- This can lead to the use of two certificates.
- Once copied, the files can also be encrypted on the floppy disk.
So that there are no difficulties in determining in the program CryptoProCSP USB media, there is a free utility to keep the funds CryptoPRO and Rutoken up to date. This check can be launched from the site: http://help.kontur.ru (you need to enter using Internet Explorer browser). On this page, you will need to perform preliminary preparation (download and install a small program) and then click " Start diagnostics«.
This write protection is set as follows. To make changes to the registry, you must open the registry editor. After confirming the login, the registration editor opens. In the left half of the window, click on the following path. It should look like the following screenshot. However, creating this entry is not enough, you still need to assign the value 1.
Command line tools
The value can be easily changed by double clicking on the entry. Changes took effect after restart. Lower security: On an insecure computer, credentials and keys can be copied. With the help of a cryptographic card, they could not be copied, although they were used illegally. Possibility of duplication: you lose the security and uniqueness of the identity document. Capacity: Hundreds or thousands of certificates and passwords can be stored on the smallest device. Duplication: Doubling can be an advantage so you don't have to carry it over.
Password Authentication
Credential authentication without a password. Authentication for device ownership. Certificates for citizens in Catalonia.- Advantages.
- If it is not, ask for the user and password as before.
- If it is not a secure website, it also uses a challenge.
All components will be checked:
Select " Fix identified issues»And in the next window select those programs that need updating.
Transferring the certificate and EDS keys from Disk 3.5A toUSB-flash (This operation works for EDMS keys, Continet AP, Contour-tax reporting, Purchases)
What does a certificate export and what is it for?
Exporting a certificate consists of creating a copy of the certificate. As a result, we will have a file that can help us. It is advisable to keep it in a safe place, with some support outside of our computer. To transfer our certificate to another browser, we have an Import Certificate operation, which we will explain in another post. For your safety, get a copy of our certificate. ... Attention: it is important that our copy is under our control and not without the need to copy our certificate.
In a few minutes, your new set of keys will be ready. Save yourself by creating a password to access your cryptographic keys. This is an extremely important step that you shouldn't skip: the revocation certificate is a simple file. Once you have the key pair and the revocation certificate, it's time to inform the public that you can receive and send encrypted emails. The best way to do this is to upload your public key to a dedicated server where other users can find it - the server in question is for people with higher security requirements.
Next, you need to step by step follow the proposed instructions, but it is worth remembering that a copy can only be made through the cryptographic protection of information (cryptographic information protection tool), otherwise, for example, if you copy through Explorer, you will not be able to run the key on another computer.
Instructions for copying a certificate through CryptoPro CSP
1. Click on the CryptoPro CSP 3.0 shortcut or open it via Start - Control Panel.
Uploading your public key to a key server is a good way to reveal that you are working with encrypted mail. There is nothing wrong with this, because this resource is not a key server, but rather a database containing information from many such servers. If you still want to change your destination, you can do so by clicking on the drop-down menu and choosing something else from the list.
Installation of an electronic signature in the registry
You can also post your public key to your personal website or blog. To reproduce it, go back to the key management window, make sure the "Show all keys by default" option is checked, and then highlight your email when it appears. Then right-click it and select the "Copy public keys to clipboard" option.
2. In the system window, go to the "Hardware" tab and configure the readers by selecting from the list of installed readers, then - "Add". Use "All Removable Drives" and "Registry" in case they were not in the list.
4. In the next window that opens, run the "Browse" command in order to enter a name in an empty field. When choosing a name, first confirm the operation, then click on the "Next" button. In some cases, when working with a rootken, you may need to enter a password (pin code) - enter the sequence 12345678.
5. Create a name for the container where the data is copied to. The keyboard layout can be both Russian and Latin. Spaces are also allowed in the name. After defining with a name, click Finish.
6. Then the system will ask you to insert a blank key carrier to which the container will be copied. Do this and click "OK".
7. You can set a password for the created copy - this is an optional step, so you can simply click "OK", leaving the field blank. If the copy is made to a rutoken, then you need to enter the standard security combination again - 12345678.
The copying process will be completed when the system returns to the screen the "Service" tab.
Often people who use electronic digital signatures for their needs need to copy the CryptoPro certificate to a USB flash drive. In this lesson, we will look at various options for performing this procedure.
By and large, the procedure for copying a certificate to a USB drive can be organized in two groups of ways: using the internal tools of the operating system and using the functions of the CryptoPro CSP program. Next, we'll take a closer look at both options.
Method 1: CryptoPro CSP
First of all, we will consider a copy method using the CryptoPro CSP application itself. All actions will be described using the example of the Windows 7 operating system, but in general the presented algorithm can be used for other operating systems of the Windows family.
The main condition for copying a container with a key is the need for it to be marked as exported when created on the CryptoPro website. Otherwise, the transfer will fail.

- Before starting the manipulations, connect the USB flash drive to the computer and go to "Control Panel" systems.
- Open the section "System and safety".
- In the specified directory, find the item "CryptoPro CSP" and click on it.
- A small window will open where you want to move to the section "Service".
- Then press the button "Copy ...".
- The window for copying the container will be displayed, where you need to click on the button "Overview…".
- The container selection window will open. Highlight the name of the one from the list, the certificate from which you want to copy to the USB-drive, and press "OK".
- Then the authentication window will be displayed, where in the field "Enter password" it is required to enter a key expression with which the selected container is password protected. After filling in the specified field, click "OK".
- After that, there is a return to the main window for copying the container of the private key. Note that in the key container name field, the expression will be automatically added to the original name "- Copy"... But if you wish, you can change the name to any other, although this is not necessary. Then click on the button "Ready".
- Next, a window for selecting a new key medium will open. In the list provided, select the drive with the letter corresponding to the desired flash drive. After that press "OK".
- In the displayed authentication window, you will need to enter the same arbitrary password for the container twice. It can either match the key expression of the source, or be completely new. There are no restrictions on this. After entering press "OK".
- After that, an information window will be displayed with a message that the container with the key has been successfully copied to the selected medium, that is, in this case, to the USB flash drive.


Method 2: Windows Tools
You can also transfer the CryptoPro certificate to a USB flash drive exclusively using the Windows operating system by simply copying it through "Conductor"... This method is only suitable when the header.key file contains a public certificate. Moreover, as a rule, its weight is at least 1 Kb.

As in the previous method, descriptions will be given using the example of actions in the Windows 7 operating system, but in general they will be suitable for other OSs of this line.


At first glance, transferring a CryptoPro certificate to a USB flash drive through the operating system tools is much easier and more intuitive than actions through CryptoPro CSP. But it should be noted that this method is only suitable when copying a public certificate. Otherwise, you will have to use the program for this purpose.
My new post will be devoted to the Crypto Pro program, it seems nothing complicated, but all the time there are troubles with this software, either because you have to deal with it once or twice a year, or such software, but in general I decided to make a memo for myself and for you.
Task: Provide access to the Kontur Extern program on two machines, well, OK, let's get started.
What we have: One already working key on the SD card.
What you need: We need any SD card, a USB flash drive can also be uploaded to the registry, or you can use the so-called RUtoken. I will install on RUtoken, and you can use any of the options.
Yes, one more little remark, if you have a domain computer, then it is better to do all this under an administrator account.
And so let's get started
We find the program in the start menu or control panel,
We launch the program.
Go to the tab Service and click on the button Copy.


You will need to enter a password of any 8 characters. We enter the password and press Further.

In the next window, we need to set the name of the container, (I always use the 2 organizations convenient for me and I use the labeling name-01 and 02, you can also use the TIN of the organization for separation.) And then press the button The finish.
Here you will again need to enter the password for the new container, do the same and click OK.

In the next dialog box, you need to select the medium where to copy our container, I choose RUtoken and you need to select the medium where you are going to install the container.
After you have selected, press the button Further... Then The finish.
In general, that's almost all, the key is copied. It remains only to install it for a specific user.

There are two options here:
Option 1.
Go to CryptoPro again, open the service tab and click on the button View certificates in the container.

In the dialog box that opens, open the container we need and press the button OK. then press the button Further.

In the next window, press the button У become, if it is not there, then press the button C properties.

In the window that opens, press the button У get a certificate... The certificate import wizard will open where you need to click Further.

In the window that opens, you need to leave everything as it is and click Further.
If the certificate is installed successfully you should see the following dialog box.

Option 2.
Installation through the menu to install a personal certificate.
To install the certificate, we need the certificate file itself, (file with the .cer extension) it is located on the media where we copied it, in my case it is rutokin.
And so, open CryptoPro again, go to the tab Service and press the button Install personal certificate.

In the window that opens, we find this certificate by clicking on the button Overview.
In the next dialog box, check the box next to Find container automatically, after which the program will automatically find the container you need. Then press the button Further.

Then a window may appear with a choice of the storage location for the certificate, you need to select Personal and click the button OK.
Then a dialog box may appear where you need to click the button Yes.

Then wait for the message about successful installation.
After that, you need to remove your device to which the container with keys refers and insert it back, after the device is found, you can try.
If you have any questions, because there may be different changes in different versions of CryptoPro, then ask to leave your comments, I will always be happy to help you.
Now in almost every organization on the accountant's computer is installed CIPF- a system of cryptographic information protection. As such, we use it. In our case, CryptoPro is necessary for the operation of the Client-Bank and the SBIS ++ program (through this program, the accounting department prepares and submits reports to the tax, pension fund, Rosstat).
The main functions of the cryptographic information protection tool of CryptoPro are:
- verification of the payer's secret keys when sending electronic documents via communication channels;
- encryption of payer's documents when sending reports;
- transcript of received responses from inspections.
When working with both the Client-Bank and VLSI ++, key carriers are used, on which secret keys and certificates are stored. Such media can be a floppy disk, a USB flash drive, a protected flash drive (Rutoken, eToken), as well as a registry.
So, once our accountant got tired of inserting a floppy disk into the computer every time you send reports. In addition, this medium is rather unreliable and has failed a couple of times (we had to). So the decision was made copy keys from floppy disk to registry.
Keeping keys in the registry is, of course, convenient. But keep in mind this moment: when you reinstall the operating system on your computer, the information about your keys will be irretrievably lost. So after copying the keys to the registry, be sure to save the media with the original of these keys.
So, how do you copy keys from a floppy disk to the registry in CryptoPro CSP 3.6?
1. Go to "Start" - "Control Panel" - "CryptoPro CSP".
2. In the window that opens, go to the "Service" tab.
3. Insert the key diskette into the floppy drive of your computer and click the “Copy container” button.  4. Then click “Browse” and in the window that appears, select the container that you want to copy (click on it once with the mouse and click “OK”).
 The name of the selected container will appear in the “Key container name” field. Click Next.
 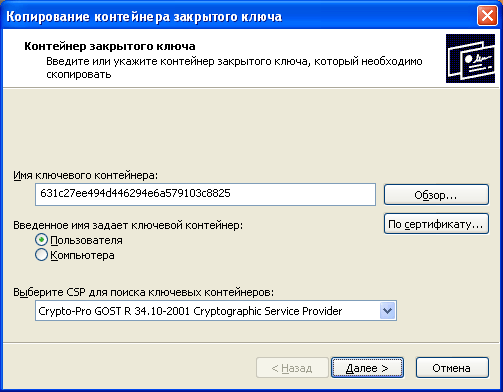 5. In the next window, write any name - this will be the name of the copy. Click Finish.
  6. Next, select the "Registry" medium and click "OK".
 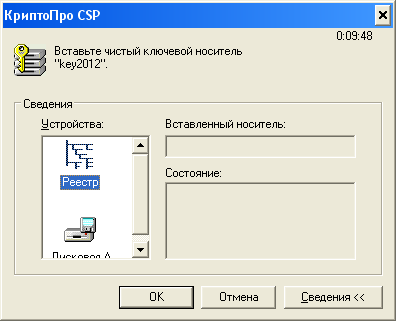 A window will appear prompting you to set a password. If you do not need it - do not enter anything, but just click “OK” here.
  That's all - we are copied the key to the registry... To check this - in the same place in the "Service" tab, click the "View certificates in the container" - "Browse" button - here, in the list of key containers, the registry and the name of the container that you specified will be displayed.
 Checking secure connections in Mozilla Firefox
 How to copy a certificate from a rootken to a computer, from a cryptopro to a USB flash drive - Kontur
 An authentication error has occurred