Twrp does not see zip files. Self-flashing Android devices via TWRP Recovery
In previous articles, we talked about CWM Recovery. In this article, you will find out in detail what items are and what the menu in TWRP recovery is responsible for.
Download TWRP
You can download custom recovery TWRP to your Android device from the official TeamWIN page - https://twrp.me/Devices/
You can install TWRP according to this instruction - Installing custom Recovery
Management in TWRP
The TWRP menu is controlled from the touch screen. Confirmation of actions with a swipe at the bottom of the screen.

Briefly about all TWRP Recovery menus
The main TWRP interface looks something like this:

Let's take a look at each submenu
- Install- Installation of various patches and firmware format ZIP archive
- Wipe- erasing (formatting) Android partitions and memory cards (details about WIPE or data reset)
- Backup- creating backups of the system and user data
- Restore- Android recovery from system backups and user data
- Mount- connecting or disconnecting sections of Android
- Settings- setting up TWRP Recovery
- Advanced- additional or advanced TWRP features
- Reboot- reboot Android into various modes
Details about TWRP
Now let's take a closer look at the capabilities of each submenu.
Install menu (install update.zip)
As mentioned above, the Install menu allows you to install patches or firmware. By pressing the button Install you get into the file manager on a memory card or internal memory with your folders and files:

In order to install the ZIP update, you must click on it and a new menu will appear to confirm your intentions to install the archived update

In order to install the update, you need to make a swipe from left to right
You can also notice that there are buttons in this menu:
Add more zips- install any additional archive ZIP update
Clear zip queue- undo previously selected ZIP updates
WIPE menu
This menu can perform various resets, different sections of Android. By default, wipe will reset the partition / data and / cache

To activate additional features, click the button Advanced Wipe

How to do wipe correctly, read the article - wipe Android.
Backup menu
In this menu, you can make backups (slices) of the current state of Android. You can configure which partitions to back up, as well as activate the ability to compress backups - enable compression and also add validation - skip MD5 generation during backup , which will allow, if a backup copy is created "broken" in the future, not to restore from such a copy.

Backups are stored along the SdCard / TWRP / BACKUPS path, they can be copied to a computer and, if a problem occurs, reanimate Android from the Restore menu.
Restore menu
Allows you to recover from previously created backups (created in the Backup TWRP Recovery menu):

Mount Menu
Allows you to connect or disconnect Android partitions - this is necessary to apply various patches (which indicate or not indicate whether the partition should be mounted). Also in this section you can connect the ability to connect the device as a flash drive - Mount USB Storage

Settings menu
This menu brings together all the settings in various menus.
- Verifying the signature of the ZIP updates
- Formatting partitions
- Skipping Verefkation
- Verifying the verification of backups
- Screen brightness, time zone selection and others
- Interface language (from version 3 TWRP)

Every novice user of an Android tablet or phone, sooner or later, thinks about the need to get root rights on his device or about installing alternative firmware, boot animation and other things on it.
Reading instructions on how to do all this, he often comes across the concept of modified or alternative recovery, such as ClockworkMod Recovery or TWRP Recovery... What is modrecovery, as well as instructions on ClockworkMod Recovery, you can read in this article, and today I want to acquaint you with another popular modified recovery - TWRP Recovery from the Teamwin development team.
Before you start reading the TWRP Recovery instructions, I want to note that most of the users prefer to use this particular recovery due to the fact that, compared to ClockworkMod, it has the following advantages:
More user-friendly touch interface
Function for setting some options.
A transparent way to choose what we want to include in the backup
Support for batch installation of zip files
Lock the screen by pressing the power button
S Pen support on Galaxy Note tablets and phones
Instructions for working with TWRP Recovery:
Introduction to alternative recovery TWRP
TWRP Recovery is a much more powerful system recovery utility (menu) than the factory one, which allows you to make full backups of the entire device system, install software, firmware, kernels and much more on it, which usually does not allow factory recovery ... TWRP, is installed in a special system partition of the internal memory of a tablet or phone, in place of the factory recovery.
TWRP Recovery can help you out in some seemingly desperate situations. Even if your tablet or phone stopped booting, in many cases, using TWRP, you can restore the system from a backup, with all its settings and applications.
Here's a rough list of what you can do with TWRP Recovery:
Install custom firmware and unofficial kernels
Install factory system updates, add-ons and fixes
Connect to a computer via USB, in removable storage mode
Create a full backup of the current firmware and its individual parts (system, settings, applications)
Recover a device from a previously created backup
Reset to factory settings (Wipe - data / factory reset), clear cache (wipe cache), clear dalvik-cache (wipe Dalvik-cache), clear battery statistics (wipe battery stats)
Create partitions on the memory card and format them
Execute terminal commands
Work with files on your device
Installing TWRP Recovery
For many smartphones and tablets, installing TWRP Recovery is a fairly simple procedure, you just need to install a program such as GooManager from the Market and select “Install OpenRecovery Script” from its menu:

For many devices, such as Nexus tablets and smartphones, there are separate utilities, like the Google Nexus 7 Toolkit. Also, TWRP Recovery can be installed using the adb program.
Launching TWRP Recovery
There are several ways to load your tablet or phone into TWRP Recovery.
1. Using a special program, such as GooManager, by selecting the item " Reboot Recovery"-" Load Recovery Mode ".
2. By pressing a certain key combination when turning on the device. This combination depends on the device model. On many devices, you can get into recovery by pressing the volume down and power on buttons at the same time when they are turned on.
3. Using the ADB program. If you configured a connection to a computer using the ADB program, you can load your tablet into recovery using the command:
adb reboot recovery
Purpose of TWRP Recovery menu items
After booting your tablet or phone into TWRP Recovery, you will first of all see its main menu:


Screenshots were taken in one of the latest (at the time of this writing) versions of TWRP recovery 2.3.2. Newer TWRP versions, as well as versions for different devices, may have a slightly different menu, but its main functions will remain unchanged.
In addition, the appearance of TWRP recovery on your device may be different - it may change depending on the theme.
Thanks to the touch interface of the recovery, it is very easy to navigate through its items and select the options you need - just click on a certain element with your finger.
In all submenus, you can return to the previous menu by pressing the return button located at the bottom (smartphone) or upper right (tablet) part of the screen.
At the top of the screen, you see the battery percentage and the current time.
The purpose of the main menu items:
1. Install - installing firmware and add-ons

This is one of the most frequently used TWRP Recovery items.
With its help, you can install both official and unofficial (custom) firmware, install kernels, themes and other software, which must be in a zip file located on the built-in memory of your device.
After selecting a file, you will be taken to the next menu, where you can choose to add the next file to the firmware queue (button Add more zips) or start flashing the selected file using the slider located at the bottom of the screen.

With the option Zip Signature verifications the mode of verifying the signature of the zip file is turned on.
With the option Force MD5 check on all Zips you can enable MD5 checksum checking for all zip files installed on the device.
2. Wipe - clear and reset to factory settings

With this option you can clear partitions such as cache ( Cache), Dalvilк Cache, System and also do a factory reset - Factory reset, after which your phone or tablet will return to the state in which it was sold in the store.
You can also clear the external memory card - External storage and internal memory - Internal Storage, clear the system folder android_secure and do clearing the battery usage statistics - Wipe Battery Stats.
As in the rest of the menu items, you will have to confirm the start of a particular operation using the slider that appears at the bottom of the screen. You can cancel the operation using the Back button.
3. Backup - creating a backup copy of the system.

Another of the most important points of TWRP. With it, you can make a complete copy of the entire tablet system, along with the data and applications available in its internal memory - the so-called Nandroid Backup.
Here you can:
Find out the amount of free space on the media: Free space
Enable backup compression: Enable Compression
Disable the creation of files with backup checksums:
Select a memory card for storing backups: Use external SD
Select the device's internal memory for storing backups: Use internal storage
Set backup file name - button Set Backup name
As usual, confirm your selection with the slider and TWRP will begin the backup process:

After that, you can restart your tablet or phone - the button Reboot System, and also go back or to the main TWRP menu using the corresponding buttons.
4. Restore - restoring the system from a previously made backup.

Here you can:
Select a memory card to search for backups: Use external SD
Select the internal memory of the device to search for backups: Use internal storage
The names of the backups consist of the date and time of their creation. You can sort files by:
Ascending Sort Ascending»Name, date and size
Descending Sort Descending»Name, date and size
After choosing a backup, you will have the opportunity to:

Select the partitions (System, Data, Boot, Recovery, Cache, Uboot, NVram) that you want to recover,
Rename backup " Rename Backup»
Delete backup " Delete Backup»
Enable MD5 checksum checking of backup files
You can start recovery by confirming your choice with the slider.
5. M ount - mount individual partitions, format them and mount the device as a USB drive when connected to a computer

Mounting makes partitions or folders available for use.
Items in this menu mean the following:
Mount / Unmount System - mount or unmount the system partition
Mount / Unmount Data - mount or unmount a partition with data
Mount / Unmount Cache - mount or unmount a partition with a cache
Mount / Unmoun Sdcard - mount or unmount a memory card
Mount / Unmoun Internal - mounting or unmounting internal memory
Button " Mount USB storage"- connecting a tablet or phone to a computer in removable storage mode
In this case, you can choose to mount:
Memory card: Use external SD
Internal memory: Use internal storage
6. Settings - TWRP settings

Here you can set the default options that TWRP Recovery will use by default when creating and restoring backups, as well as when installing zip files:
Zip file signature verification: verifying the signature of the zip file
Force MD5 check for all zips: checksum checks for all zip files
Use rm –rf instead of formatting: deleting files instead of formatting when cleaning partitions
Skip MD5 generation during backup: disable the creation of checksums when backing up
Ignore image size errors during backup: ignore file size errors when backing up
Button " Time zone"Serves to select your time zone
Button " Restore defaults"Is intended to reset the settings to the default settings
7. Advanced - additional functions of TWRP

This menu consists of the following items:
Copy Log to SD- copying the operation log to a file on a memory card.
Fix Permissions- fix access rights to files and sections. This item is used to return to the factory state the permissions to system files and folders, which can be changed by the incorrect operation of some root applications, which can lead to freezes and malfunctions of the tablet or phone.
Partition SD Card- creating partitions on the memory card. This item is used to create / sd-ext and / swap partitions on the memory card. The / sd-ext partition can be used by some firmware when there is not enough internal device memory, for example, to expand the / data partition. The / swap section is usually used to speed up the operation of an Android device.
File manager- file manager. Here you can select a file and perform the following operations on it:
Copy- copy file
Move- move file
Chmod 755- set access rights 755 (like all system files)
Chmod- set any other access rights
Delete- delete a file
Rename File- rename the file
Terminal Command- execute a terminal command in the selected directory in the style of adb commands
Also, in the Advanced section, other buttons can be placed that the developer can add when building the recovery from the source codes for a specific device.

Here you can choose the following:
System- completely restart your tablet or phone
Recovery- restart recovery
Power Off- turn off the device.
Installing firmware, updates, kernels and more, on an Android device using TWRP
All alternative firmware, custom kernels, crackers, add-ons, decorations, application packages that can be installed on a tablet or phone using TWRP recovery are packed as zip files.
Before installing anything on your device, do not forget to make a full backup of the current firmware, so that later you can painlessly return your tablet or phone to its original state.
Make sure your device's battery is at least 60 percent charged, preferably fully charged, and disconnect it from your computer and charger.
Copy the file that you want to flash to the device memory or to a memory card, best of all to its root, WITHOUT UNPACKING IT. Make sure that the file name consists only of Latin letters and numbers and does not contain spaces or special characters.
If you are installing a new firmware, be sure to do a complete cleaning using the "Wipe" item
Getting started with the firmware:
1. Reboot the device to TWRP recovery
2. We select the item "Install"
3. We choose:
Memory card: Use external SD
Internal memory: Use internal storage
4. Selecting the zip file
5. With option Force MD5 check on all Zips enable MD5 checksum checking if you have an md5 file bundled with your zip file.
6. We start the firmware by confirming the selection using the slider
You can also select up to 10 zip files to be installed at one time using the Add More Zips button, or clear the list of previously selected files using the Clear Zip Queue
Related materials:
With the help of the popular Team Win Recovery Project program, users of mobile devices on the Android platform have the opportunity to carry out a large number of operations related to the optimization of the structure of the program interfaces of the device. How can these actions be carried out? What are the main features of the respective program?
What is the Team Win Recovery Project or TWRP solution?
The Team Win Recovery Project mobile application, the installation and use instructions of which will be studied by us today, is a system recovery tool for a multimedia device that allows you to back up files, install various types of software and firmware.
The considered solution is installed in a special section of the built-in memory of the device and thus replaces the branded interface for does not turn on at all.
The Team Win Recovery Project interface - the instructions for it must be read carefully, it allows you to restore, among other things, those files in which the system and application settings are registered.

TWRP advantages
It is worth noting that the solution in question is not the only one that is capable of mobile devices. Competitive products are also available for download on the web. However, the Team Win Recovery Project (the instructions for it, we will draw your attention to this again, should be carefully studied before work) has a number of significant advantages. These include:
- an interface adapted to touch control;
- the ability to fine-tune key options related to the management of system files;
- availability of interfaces for the formation of an optimal data package placed in the system backup;
- ZIP file support.
These options are of great importance from the point of view of the ease of use of the program, as well as the use of its main functions. Actually, it will be useful to consider a list of those.

Main functions of TWRP
The main functions of the Team Win Recovery Project (the instructions for using them describe the process in detail) are as follows:
- installation of custom firmware and kernels;
- installing branded updates to system files;
- ensuring the operation of the device in flash drive mode;
- the ability to create both a full backup copy of the firmware of a mobile device, and a partial one, for example, represented mainly by system files;
- restoring the system from a backup while preserving the functionality of the interface;
- real-time reset of settings to those installed in the branded version of the system;
- creating partitions for storing data on a memory card, as well as formatting them;
- launching various commands through the terminal;
- gaining access to files located on the device.

Features of the installation of the program
Let's take a look at the points that describe how the solution in question can be installed on a mobile device. For this purpose, common interfaces such as, for example, GooManager can be used. You need to download this program in a trusted application store, run it, and then select the Install Open Recovery option.
If the user owns a smartphone from Nexus, then he can use another popular utility - Google Toolkit. In principle, there are quite a few programs that allow you to solve the problem in question. But the marked 2 solutions are among the most convenient.
Let's take a closer look at how programs for installing TWRP can be used in practice.

Using TWRP: Launching System Restore Tool
There is usually no difficulty in installing Team Win Recovery Project. However, there are nuances that directly characterize the launch of the program - in fact, the inclusion of a mobile device in the appropriate mode. If the GooManager program is used, then you need to launch the corresponding application, then select the Reboot Recovery option, then select the item that allows you to load the recovery mode.
In principle, you can launch the program in question by using a special combination of keys to control your mobile device. But in this case, it is quite difficult to find a universal combination of them: it is determined by a specific device manufacturer. Also, in order to launch the solution in question, you can use the popular ADB application. It involves connecting a mobile device to a computer. Using the specified application, you can boot your smartphone or tablet in recovery mode using special commands entered through the ADB interfaces.
Let us now study in more detail how to use the program in question in one version or another, for example, Team Win Recovery Project in modifications 2.8, 2.8.7.0, 2.8.7.3 or Team Win Recovery Project 3.0.2. The instructions for each of these versions of the solution will generally be similar. The same can be said about earlier modifications of the corresponding application, for example TWRP 2.6.3.0.
TWRP interface: features of use
As soon as the smartphone or tablet boots into recovery mode, the main menu of the Team Win Recovery Project - 2.8 application will appear on the screen or in any other of the marked versions, which are generally similar both in terms of the location of the controls for various options and in terms of in terms of the management functionality of the recovery interface.
If the smartphone or tablet is touch-sensitive (it is likely that this will be the case), then the interface of the application in question can be controlled by swiping your finger across the screen. But it is important to do this not in a random order, but in accordance with what is prescribed by the instruction used as a guiding document in using the Team Win Recovery Project solution. How can I exit the interface that was selected from the main menu by mistake, so as not to accidentally activate any inappropriate procedures? It's very simple: to do this, you can use the back button that the mobile device is equipped with. It is often located just below the screen if it is a smartphone, or in the upper right corner if it is a tablet.
Let's take a closer look at the main menu options of Team Win Recovery Project 2.8.7.0 or another version of the solution close to it, in particular from those mentioned above. The interface of the application in question is generally English. We will focus on it. Thus, the main options that will be available to the TWRP user are:
- Install.
- Wipe.
- Backup.
- Restore.
- Mount.
Let's study in more detail the specifics of the application of each of them.

Install option
The considered option Team Win Recovery Project 2.8.7.3 (the instructions for it will generally be the same in structure as in the case of other modifications of the corresponding solution) allows you to install various firmware on the phone, first of all. Moreover, they can be both custom and branded. Also, through the option in question, you can install software kernels, various themes and other types of software that the user needs.
An important nuance: the installation files of the programs that need to be installed on a mobile device must be packed into a ZIP archive. It is advisable to place it on the memory card of your smartphone or tablet. Using the TWRP interfaces, you must select the appropriate archive, then add it to the firmware queue. You can, using various options, check the signature of the archive file, as well as those files that are installed on the mobile device.
Let's move on to exploring other useful options of the Team Win Recovery Project program. We know how to install the firmware, now we will consider the specifics of using the Wipe interface.
Wipe option
This option allows you to reset the software settings of the mobile device to the factory settings, as well as to clear a number of OS system partitions, such as, for example, the cache. In addition, the considered interface allows you to clean the plug-in memory card, as well as the internal flash memory of the mobile device. If necessary, you can also clean up the system folder called android_secure.
Another noteworthy option available when using the Wipe interface is clearing the smartphone or tablet from statistical files reflecting battery usage. If the user is not sure that he is choosing the correct option within the Wipe interface, it is better to deselect it so as not to provoke any problem in the operation of the phone or the Team Win Recovery Project program itself. The instructions on how to exit the selected interface to the main menu are discussed above: all you need to do is press the return button on your smartphone or tablet.
Backup option
The option under consideration allows you to create a backup copy of the system files of a mobile device. Actually, many users install the corresponding solution mainly in order to use this Team Win Recovery Project 2.6.3.0 interface (the instructions for it, as we already know, will be similar in structure to any other that characterizes the above program modifications).
Through the Backup menu, the user can use the following functions of the application:
- selection of specific system partitions that you want to save as a backup;
- determination of free space on a flash drive;
- activation of the option to compress a copy of a system package;
- disabling the option to check checksums for backups;
- selection of a specific memory card as a resource for placing a backup copy of system files;
- specifying a name for a file of a copy of system data;
- recalculation of the size of partitions on the disk.
After the files for creating a copy of the system data are selected and copied in accordance with the algorithm defined by the user, you can reboot the mobile device by clicking on the Reboot button.
Restore option
The Restore interface complements the above option of the program. It allows, in fact, to restore the OS from a backup. This procedure may require the user of Team Win Recovery Project 2.8.7.0 (instructions for other versions of the program assume the implementation of similar actions):
- choosing a specific memory card to access the backup files;
- selection of a specific backup file (for example, if there are several of them, then you can sort in ascending or descending order of name, date or value);
- selection of a specific section of the operating system of the mobile device that you want to restore;
- renaming, deleting a backup copy of a system package;
- activation of checksum verification for backups.
Mount Option
Another useful option for the application in question is Mount. It allows you to mount various partitions on the disk, format them, and also configure the mode of using the device as a USB drive. This procedure may include mounting:
- system partition;
- the disk partition where the user files are located;
- the section where the cached data is located;
- external memory card;
- internal memory module.

Other options
So, now we know how the Team Win Recovery Project can install the firmware on the phone, replace it with a branded one, and save it as a backup copy. It will also be useful to study a number of additional settings of the program in question in order to detail our small instructions.
So, you can pay attention to the Settings option in the TWRP interface. It allows, first of all, to set the default settings of the program in question when creating and restoring certain backups of system data, in addition, when installing files located in ZIP archives.
Another notable menu item of the TWRP program is Advanced. It allows the user to carry out a large number of operations. Namely:
- copy transaction data to a memory card;
- adjust the access rights to various data;
- form partitions on the disk;
- use a file manager, through which it will be possible to copy or move them, set access rights, delete, rename;
- activate commands entered through the terminal.
In addition, other options may be added to the Advanced menu by the API designer. Another significant interface of the Team Win Recovery Project 2.8 application or its analogue is Reboot. This option allows you to reboot the device completely, restart only the recovery program, or turn off the mobile device.
These are the main features of the popular Team Win Recovery Project program. With its help, you can carry out a wide range of operations with the device in order to optimize its performance, including through the installation of updated firmware. The program is easy to use, functional, versatile enough.
It is important when carrying out certain operations with the device, especially those related to firmware changes, to first consult with specialists about whether it is worth changing the structure of the software interfaces of a mobile device in one way or another, and also how effective the corresponding changes can be.
In some cases, Xiaomi devices start to malfunction, fail, or even some of the main functions fail, which makes their normal operation impossible. To eliminate any problems in a cardinal, but at the same time effective way, you can always reflash the device. The article will talk about how the firmware is performed through TWRP and how this method is better than the alternatives to it (with detailed instructions for implementation).
Initially, you should understand what TWRP is, and then talk about how to install the desired firmware using it. In fact, everything is quite simple if you read the transcript of this abbreviation: TeamWin recovery. In fact, this is an unofficial recovery that can replace the standard software of any smartphone running on the Android platform. TWRP is also called custom, and most users who dealt with it and with standard recovery believe that TWRP is more efficient, functional and easy to use, in addition, it allows you to install, in addition to custom firmware, kernels, modems and other system components of the firmware ...
Further, a more detailed instruction for TWRP recovery will be presented, with which it will be possible to install the firmware on any device from Xiaomi (the instruction has a general form, since the system files for different models often differ).
It should be said right away that to install custom firmware, it is recommended to delete all data from the phone, which means you need to do it for subsequent recovery on a device with a clean system. Also important is the smartphone (bootloader). As we have already mentioned in one of the articles, and therefore we will immediately move on to information on how to reflash a device using TWRP with our own hands.

Algorithm for working with TWRP for Xiaomi devices
So, when TWRP is already installed on the Xiaomi device, and, of course, the bootloader is also unlocked, you can proceed with the procedure. At the same time, it is also important to have a firmware file in .zip format, which is downloaded for each specific device on the official website of the manufacturer or on thematic forums, if the user is more attracted to the unofficial assembly.
The firmware is being installed via TWRP recovery as follows:
- The smartphone reboots with the entrance to TWRP recovery mode. To do this, you need to turn it off, and then start it by clamping the volume rocker in the up position and the smartphone's power button. The result of clamping this combination will be the inscription "recovery" on the screen and, as a result, enter the desired menu.

- Now you need to reset all data except SD and OTG. To do this, go to the sections Wipe - Advanced Wipe and mark the following items: Dalvik Cache, System, Data, Internal Storage, Cache. The device will be completely cleaned!

Data reset
- Then we press back, select Reboot recovery and confirm the action (usually you need to drag the switch across the screen to the right).
- The firmware file must be placed on the device beforehand.
It is recommended to place the .zip file on an SD | OTG memory card, since in this case the system information on the device will take up much less space, but not less than 200 megabytes. Similarly, it is worth placing backups created through TWRP. .
- If the necessary files are loaded and all the previous steps are completed correctly, then you can press "Install" and confirm the action (also by the standard swipe to the right). The firmware procedure may not be displayed in any way on the screen: you just need to wait a long time.

- When the firmware via TWRP is complete, you need to select the Wipe cache / dalvik partition, and then Reboot System.

- Successful execution of the procedure will lead to the fact that during the first reboot, the three dots under the manufacturer's (Xiaomi) logo will “blink” for about 10 minutes, and then the device will start.
Decryption and elimination of TWRP errors
Often, when working with TWRP, users have various errors. All of them are summarized in the table below, and a solution is proposed for each error.
| Error code | Causes of occurrence | Elimination |
| Error 6 | The updater-script file in the firmware archive is not in the correct format. | It is necessary to open the specified file through standard "Notepad" or "NotePad ++", change its format to Unix and resave. |
| Error 7 | The firmware was selected incorrectly and does not correspond to the device on which the installation should be performed. | 1. Download the correct firmware file from the official website. At the same time, it is important to check the version of the device, since, for example, Xiaomi Redmi Note 3 has a Pro modification, which makes the firmware from the first device incompatible with the second. 2. If the firmware is exactly correct, then you need to open the updater-script file in edit mode and delete the first lines in it with the list of devices for which this firmware is intended. |
| Error 0 | One of the files is missing from the firmware archive. | You need to reload the archive or add the necessary files. |
| Error 255 | The updater-binary file is not valid. | By analogy with the previous point: you need to replace the specified file. |
Outcome
After completing the firmware procedure, you can start changing the settings of the smartphone. It is worth being more careful with the device settings, since most of the problems that lead to the need for firmware arise precisely because of the incorrect operation of the phone.
After configuring the firmware and installing only the most necessary programs, we advise you to make a full backup of the firmware, so you can always restore your smartphone.
Users who do not like the standard Android menu recovery have a great alternative in the form of TWRP Recovery, but a question arises related to how to install TWRP Recovery.
This recovery option differs, first of all, in that all functions are completely sensory.
That is, you will not need to use the volume buttons and phone menu to select certain items in Recovery.
Often, all this is extremely uncomfortable and only causes unpleasant emotions. Therefore, many people decide to install TWRP Recovery.
Besides sensory selection, it has many other benefits. But we will not consider them now, but instead we will talk about installing this custom recovery.
Content:Option number 1. GooManager
This application has now been renamed TWRP Manager. It is one of the simplest, and therefore convenient for setting the menu we need.
All actions are performed in the same window. In general, the developers have tried their best.
The installation process is as follows:
- First you need to download the manager to. There is a corresponding link for this.
- Then the application is installed and launched. After that, you should go to the application menu. This is done by swaping to the left.
- In this menu, it remains to select the "Install TWRP" item.
- In the next window, you just need to click "Install Recovery".
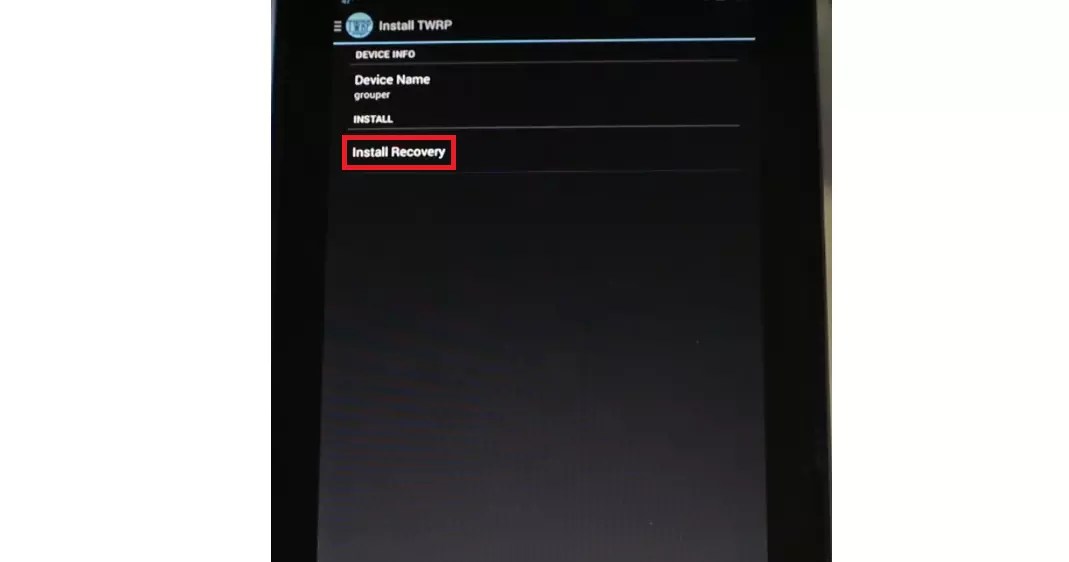
Rice. 2. "Install Recovery" in the manager
- The installation file is searched for. Its name should include the name of your device. For example, if you have a Samsung Galaxy S3, then the downloaded file will be called "openrecovery-twrp-1.1.1.1-i9300.img", and "i9300" here actually means S3 (this is the code of this phone).
- So, if the name of the downloaded file does not contain the name of your device, you should not install it. Better to use the other methods described below. And if there is, you just have to click "Yes" in the message that appears after downloading.

That's all, the process is over, and you can safely use the new menu.
But not everything is so simple.
Attention! To use this program you need root rights.
One of the easiest ways to give your device so called is to use the Root Checker app.
All that needs to be done after downloading and installing it is just go to the "Verify root" tab and click on the same inscription a little below.

Rice. 4. Using Root Checker to assign root rights
In principle, this is true for almost all methods described in this review. Therefore, before performing each of them, assign root rights to your device.
By the way, this is useful in many other cases when you need to add some unusual functions to your phone or tablet.
Now let's get back to installing the recovery.
Option number 2. Official TWRP App
Of course, the creators of this beautiful and convenient menu have made their own application for installing the recovery.
But the problem is that quite often the operating system itself blocks its bootloader.
Therefore, you have to use the aforementioned manager or other programs, which we will talk about later.
At the same time, you should not try to understand why this is happening. You won't succeed. Also, do not be afraid of unofficial applications for installing TWRP.
They are all completely safe, at least the ones described in this article.
So, to use the Official App, do this:
- It all starts, of course, with a download. Here is the download link on Google Play.
- After installation, open the program. In the first window, click on the "TWRP FLASH" button at the bottom.

Rice. 5. Button "TWRP FLASH" in the first window of the Official App
- In the next window, select your device. To do this, click on the drop-down menu, which initially says "Select Device".
- Then click on the "Download TWRP" button to download the installation file. Here the principle is the same as in the first option - if the name does not contain the name of your device, then something is wrong. And it's very easy to check. You need to go to the "Download" folder or the place where all downloaded files go, and check the file related to the recovery there. When this step is completed, the program may decide on its own what to install. If this is not the case, then the text "Select a file to flash" will still be present in the field under the device. Then click on it and select the downloaded installation file.
- In the end, you just need to use the FLASH TO RECOVERY button.

Rice. 6. The main menu for installing TWRP through the Official App
As you can see, in this case, everything is also quite simple. We recommend that you try to use the Official App first. But this does not always work out.
Then you need to take one of the managers indicated in this article.
And if neither the Official App nor the GooManager want to cope with the task we are considering, then there is also the ROM Manager.
Hint: Also, in cases where something will not work for you, write about it in the comments. We will definitely help you solve the problem and install TWRP.
Contact us!
Option number 3. ROM Manager
The use of this manager is even easier than the previous two. This process is as follows:
- From the very beginning, the program is downloaded from Google Play. Here's a link . Then it is installed on the smartphone / tablet. This happens in the same way as with any other application.
- After launch, a welcome window will appear with a description of the functions of the ROM Manager. Click "OK" to continue.
- Then click on the three vertical dots in the upper right corner and select the previously downloaded recovery file. It will be installed exactly.
- Then, in the "Recovery Mode" section, select the "Recovery Setup" item.
- In the next window, you will need to click on the item responsible for TWRM (it will be located next to "ClockworkMod Recovery" in the section Install or Update Recovery).
- Finally, in the last window, you must click on "Install", wait until the download of the desired file and its installation is completed. The user can only observe this process, but not participate in it.

Rice. 7. Using ROM Manager
As it was already possible to understand, in this case it is necessary to manually download the .img file in advance, that is, the one that is needed to install the recovery.
And you can do this on the official website of this custom extension twrp.me. The download process is as follows:
- First you need to go to the me / Devices page and use the search bar to find your device there.
- Among the proposed options that will appear under the search, select the one you need. There may be several .img for one device - they differ depending on the processor model or other features.

Rice. 8. Selecting the installation file on twrp.me
- Then scroll down the page to the "Download Links" section. If you are in America, click on the link "Primary (Americas)", and if in other countries, then your option is "Primary (Europe)".
 "Choose a file" and indicate where the previously downloaded file is located.

Rice. 10. Using Flashify to Install TWRP Recovery
Actually, this is where the installation ends. You can safely use the new Recovery.
Option number 5. Rashr
This is truly the easiest option in our roundup today.
All you need to do is download the program on Google Play, click on "TWRP Recovery" in the main menu
 Checking secure connections in Mozilla Firefox
 How to copy a certificate from a rootken to a computer, from a cryptopro to a USB flash drive - Kontur
 An authentication error has occurred