How to enter BIOS on a msi laptop or at least uefi? How to put the system boot from a USB flash drive into BIOS "Delete" is your pass to the system settings.
In the last article we talked about. And now I will tell you how to configure the BIOS of a computer to install Windows from a disk or flash drive.
1. What is BIOS and UEFI
Each motherboard has a special program to boot the computer and configure the parameters of various devices. This program is stitched (programmed) into a special microcircuit on the motherboard and is therefore called firmware.
Previously, all motherboards had a firmware called BIOS, which had a simple graphical interface with white letters on a blue background and was limited in functionality. For example, in the BIOS it was impossible to use a mouse, choose a language, and there were no graphic elements (pictures) due to the limited size of the BIOS memory chip. Also, motherboards with BIOS did not support drives larger than 2TB due to limitations of the old disk partitioning system (MBR).
Now many motherboards have a new type of firmware called UEFI, which features an improved graphical interface with a beautiful background, hand-drawn buttons, the ability to select a language (including Russian) and some improvements. For example, support for a new type of disk partitions (GPT), which allows using hard drives larger than 2 TB.
You can find out what type of firmware your motherboard has in the manual for it, on the website of the manufacturer of the motherboard or laptop, and also visually when entering the Setup program. The Setup program is also programmed into the motherboard and is used to change BIOS or UEFI settings.
2. How to enter BIOS Setup
To enter the Setup program, immediately after turning on the computer, hold down the "Delete" button on the keyboard. On some motherboards and laptops, this is done using the F2, F10, or Esc keys. Which button to press can be read in the messages that appear immediately after turning on the computer.
In text form

Graphically

If you do not have time to read, then press the "Pause" button on the keyboard to pause the download. You can continue downloading by pressing any key. If you press the key intended to enter Setup, you will immediately be taken to the motherboard setup program.
Classic BIOS

UEFI interface

3. Basic Setup
3.1. Control Keys
The Setup program is a collection of different parameters, grouped on separate tabs, depending on the purpose. On the right or below there will be a description of the keys with which all actions are performed.

To navigate between tabs, the arrows "right" and "left" on the keyboard are usually used. To navigate between lines within one tab, use the arrows "down", "up".

To change the values, use the arrows to move to the required field, press the "Enter" key, and then use the arrows to select a new value from the drop-down menu. For this, the keys "+", "-" or "Page Up", "Page Down" can also be used.
Press the Esc key to return one level up or to the previous page. The "Esc" key on one of the main tabs will mean exiting the BIOS without saving the settings, which will need to be confirmed or canceled.
In the UEFI Setup program, you can do everything with the mouse.
3.2. Saving settings
This is a very important point. After completing all the necessary settings, go to the "Exit" tab, select "Exit and Save Changes" with the arrows, press "Enter" and confirm the saving of the settings by selecting "OK" or "Yes" and again "Enter".
You can save the settings much easier and faster by pressing the "F10" key on the keyboard and confirming your decision. This key works in many versions of BIOS, UEFI, and is often indicated in tooltips (bottom or right).
3.3. Cancel settings
If you have changed something by accident or are not sure if the settings you made are correct, go to the Exit tab and select Exit and Discard Changes, or press Esc until you see the message to exit without change the settings and confirm the action ("OK" or "Yes").
3.4. Restore settings
To restore all settings to their optimal default values, go to the Exit tab and select Load Setup Default. After that, you can immediately change other settings or simply exit the BIOS with saving the parameters ("Exit and Save Changes" or "F10").
4. Boot options
Insert a bootable disk or USB flash drive into the computer on which you plan to install Windows. Now, in order to start installing Windows, you need to configure the BIOS (or UEFI) using the Setup program to boot from a disk or flash drive. You can also use the special boot menu of the motherboard for this (Boot Menu). The latter option is simpler and more convenient, but we will consider both methods.
5. BIOS setup
5.1. Change boot priority
Go to the Boot or Boot tab.

Install your DVD drive or USB stick first in the order of boot devices.

If you are going to install Windows from a disk, then the first item is to select a device such as "ATAPI CD-ROM", a name indicating the manufacturer or model of the drive. For example, "CDROM: PM-HL-DT-STDVD-RAM GH22NP" (this is an "LG" DVD drive).
If you plan to install Windows from a USB flash drive, be the first to choose something like "Removable Dev." or the name of the flash drive with the manufacturer. For example, "USB: Patriot Memory" (this is a "PATRIOT" flash drive).
Transcend JetFlash 790 8Gb
The second should be the hard disk, which is designated as "Hard Drive", "HDD" or the interface to which it is connected, the manufacturer and model of the disk. For example, "SATA: 3M-SAMSUNG HD502HJ" (this is a 500 GB Samsung hard drive with a SATA interface).
Please note that in the "Boot" section there may be other items responsible for boot priority, such as "Hard Disk Drives" or "Removable Device Priority".

They also need to check that the DVD drive or flash drive comes first.

If you have two hard drives, then the one on which you are installing the system should be higher. But in this case, I recommend disconnecting one of the disks to avoid confusion and possible errors in the installation of the system. It can be connected after installation.
In the UEFI Setup program, everything is done in the same way. Look for the "Boot" or "Download" section, find your DVD drive or USB flash drive there and raise them to the very top of the boot priority. Plus, you can use the mouse for this, which is easier and more convenient.

5.2. SATA controller operating mode
In principle, this is not so important, but many are interested in this question, so I decided to clarify it a little. SATA drives can work in compatibility mode with older IDE drives and in the more modern AHCI mode. AHCI gives a small increase in hard disk performance when multiple concurrent access to it. This mode of disk operation occurs mainly on servers and is practically useless for an ordinary home computer.
When setting up the BIOS, it is possible to select the operating mode of the SATA controller.

These settings can be in different places and differ slightly in names, but the principle is the same everywhere. You are offered IDE compatibility mode or the new AHCI mode.

In general, it is recommended to use the IDE compatibility mode for Windows XP, since initially it does not have SATA drivers and simply will not see the hard drive, which will prevent Windows from installing. Drivers can be built into the Windows installation distribution, but this does not make sense, since it will not affect the speed of work, but it can add problems.
There is an easier and more convenient way to boot from a DVD or USB flash drive for both BIOS and UEFI - booting using the "Boot Menu".
The keys "F8", "F10", "F11", "F12" or "Esc" can be used to call the boot menu. They can often be seen in prompts on the computer's startup screen. You can also find out this information from the instructions, on the website of the manufacturer of the motherboard or laptop, by searching the Internet or by typing.

Immediately after turning on the computer, press and hold the "Boot Menu" call key until the boot device selection menu appears.

Use the “down” and “up” arrows to navigate to the DVD drive or USB flash drive and press “Enter”.
Sandisk cruzer
The advantages of this method are obvious - you do not need to dig into the BIOS, then you do not need to return the BIOS settings back (although this is not always necessary), and it is enough to call this menu just once, since after the start of the Windows installation, this is no longer required. Also, using the Boot Menu does not change the BIOS or UEFI settings.
7. Problems with loading
Friends, due to the fact that many had problems with booting when installing Windows and some wrote about this in the comments, I decided to make a separate section where I collected the ways I know how to solve these problems.
- If the computer stops booting at the very beginning and asks to press F1, after which it enters the BIOS, then you most likely either have a low battery on the motherboard (time may get lost), problems with the processor cooler (out of order, it was not connected there) or a hard drive (errors in SMART).
- If the message "Reboot and Select proper Boot device or Insert Boot Media in selected Boot device and press a key" appears when you turn on the PC, this means that the boot area on the disk or flash drive was not found or is damaged. Try booting from the installation disc or USB flash drive using the Boot Menu (section 6 of the article), if it doesn't help, re-create the bootable media using the Windows USB / DVD Download Tool.
- If, after restarting the computer, the Windows installation starts from the beginning, then remove the boot disk or USB flash drive and restart the computer, the installation should continue from the hard disk.
- Disconnect all unnecessary USB devices from the computer (USB flash drive, 3G modem, smartphone, printer). You only need to leave the mouse, keyboard, DVD-disk or USB flash drive from which you are installing Windows.
- If you have several hard drives, then disconnect all drives from the motherboard, except for the one on which Windows will be installed.
- Reset BIOS to default settings (described in this article).
- If the installer does not see the disk or at the end the error 0x0000007B appears, change the SATA controller mode in the BIOS from AHCI to IDE or vice versa.
- If at each boot the computer or laptop enters the BIOS or opens the boot menu, then set the Boot Pop Menu option in the BIOS to Disable (if any).
- Disable Fast Boot in the Advanced section of the BIOS, and in the Boot section, set the Launch CSM option to Enable (if any).
- In the Boot section of the BIOS, change the Boot Mode from EFI (UEFI) to Legacy (if available).
- Set the BIOS to the Secure Boot option to Disable (if any).
- Select the version of Windows you are installing in the BIOS (if any).
- If you have a laptop, one version of Windows is installed, and the other is not, and advice on setting up the BIOS did not help you, then contact the support or the manufacturer's forum. Updating the BIOS can also help, after which additional options may appear in it (clauses 8-12).
- If possible, from a DVD, since there are many different problems with flash drives.
- Make of.
- Insert the USB flash drive into the USB 2.0 connector on the back of your computer (motherboard) or the USB 2.0 connector on your laptop. Booting from USB 3.0 does not always work.
- Try using the Boot Menu as described in section 6 of this article. This method is simpler, more reliable than setting the boot priority in the BIOS, and you can determine whether the computer sees your USB flash drive.
- An underscore on a black screen indicates that the computer freezes when accessing a USB flash drive or hard drive. If the download goes on without a flash drive, then the point is definitely in it.
- If the computer does not see the USB flash drive or does not want to boot from it, use a DVD or other USB flash drive for installation.
- If this is not possible, then change the type of flash drive from "removable media" to "hard disk" using the "BootIt Next Generation" utility, format it with the "HP USB Disk Storage Format Tool" utility and make it bootable again using "Windows USB / DVD Download Tool ". All these utilities you can download below in the "Links" section.
- If the problem occurs after selecting the Windows installation partition, then use the BIOS setup tips (p. 7-12). Remove old partitions from the disk during installation, or do it using the Acronis Disk Director bootable disk.
- If the installer reports that it cannot install Windows to the disk, then try to execute or vice versa.
Let me remind you that the F10 key is used to exit the BIOS while saving the settings.
8. Links
In the following articles, we will look at how to install, and.
Sandisk cruzer
Transcend JetFlash 790 8Gb
Sandisk cruzer
Most manufacturers have their own way of locating and configuring individual BIOS options.
BIOS setup in most cases causes difficulties for users due to the lack of a description in their native language. For our guide, we used the Gigabyte GA-P55A-UD6 motherboard, which has a well-designed BIOS with many features and a wide range of settings. Of course, all these tips can be easily used in BIOSes of other manufacturers, there may be only minor differences in naming, location and parameter ranges.
Entering BIOS - How to enter BIOS
First of all, you need to find a way to enter BIOS. When turned on, the computer displays a welcome image. This can be information about system testing (as in Figure 1) or the logo of the motherboard manufacturer. If you press the Pause key during boot, you can familiarize yourself with the list of messages in more detail. What we need will be visible on the loading screen at the bottom. In the case of this motherboard, you will enter the BIOS after pressing the (: BIOS Setup) key. This is typical for the vast majority of motherboards, although there are exceptions. In some models, the keys, or, are responsible for entering the BIOS.

Time setting and diagnostics of drives
BIOS settings are usually divided into logical groups depending on their purpose (Fig. 2). Emphasis on the word "as a rule", because the BIOS has not yet been translated in which there is a blatant mess and lack of logic. In the case of a Gigabyte motherboard, the order is exemplary.

Time, date and channel availability for drives are set on the Standard CMOS Features tab (Fig. 3). For each channel (IDE Channel) you have three options (select them from the drop-down menu on the right, between the square brackets): Auto, Manual, None. By default, the Auto parameter is set everywhere. After turning on the computer, the connected drives are recognized automatically. If you want to speed up the computer boot, then set the value None for unused channels. During boot, the computer will only deal with the connected drives, and will not waste time detecting subsequent ones.

At the very bottom, you will see the option Drive A, floppy drive. Most likely it is not on your computer (the floppies have been replaced by USB devices), in this case set it to None.
Configuring boot options, i.e. starting the computer
Boot, that is, the main start of the computer (even before the operating system is loaded), is controlled by the functions on the Advanced BIOS Features tab (Fig. 4).

If two or more hard disks are installed in the computer, then using the Hard Disk Boot Priority option, you specify on which of them to boot the operating system.
The Quick Boot option disables detailed hardware tests when the computer starts up. If you don't have any problems with your computer, this option should be enabled.
Three more functions - First Boot Device, Second Boot Device and Third Boot Device - allow you to determine from which type of drive an attempt will be made to boot the operating system in the first place. If the system is installed on a hard disk, set the Hard Disk value in the first one (Fig. 5).

If you need to boot from an optical drive (for example, to install Windows from a disc), choose the CDROM option. The F12 key has the same function, but when it is turned on, pressing it causes only a one-time boot from the optical drive, while the boot method set in the BIOS will be permanent (until changed).
Other important setting options on this tab:
- HDD S.M.A.R.T. Capability - enables testing of the hard drive (if there are no problems, set it to Disabled).
- Limit CPUID Max. to 3 - allows you to identify the processor through the system. This option should be disabled in operating systems newer than Windows 2000, in almost all new computers.
- No-Execute Memory Protect - protects against attempts to overflow the memory buffer.
- Delay for HDD (Secs) - draws the attention of the BIOS to the timely detection of an old, slow-working hard drive. In the case of all new drives, you must set it to 0.
- Backup BIOS Image to HDD - creates a copy of the BIOS on your hard drive, which you can use if the motherboard BIOS fails.
- Full Screen LOGO Show - enable the appearance of the colored logo-splash of the motherboard manufacturer when the computer boots (if not happy, set it to Disabled).
- Init Display First - the function indicates exactly where the computer should first of all look for the video card (external or integrated). Correct settings - this is another acceleration of the computer boot.
System board components
Integrated Peripherals (fig. 6, fig. 7) on this tab are, first of all, settings of the operating modes of devices and computer ports. Here you can also enable or disable unused controllers.
Few people today use Serial Port devices, so Onboard Serial Port 1 should be set to Disabled.


PCH SATA Control Mode (Fig. 8) is used to determine the way controllers work: IDE (by default for most disks), RAID (creating disk arrays - systems of at least two hard disks working in the described way), AHCI (improving performance hard drives with SATA interface, is performed using the mechanisms designed for this, for example, a queue for reading data).

The option that is visible at the top of the eXtreme Hard Drive (XHD) is relevant only for Gigabyte's motherboards - it allows you to increase the performance of system drives by simply and quickly adding an additional hard drive.
Other useful BIOS settings from this tab:
- Green LAN - the system recognizes the connection of the network cable, if not connected, the network controller will be automatically turned off.
- SMART LAN1 (2) - controls the operation of the network connection cable. After diagnostics, a report on possible problems will be presented.
- Azalia Codec - enables / disables the built-in audio codec.
- USB Controllers - enables / disables USB controllers.
- USB Storage Function - Recognizes USB storage devices.
- USB Legacy Function - On older systems such as DOS or Windows NT, enables support for USB devices such as a keyboard or mouse.
BIOS Power Saving Methods
The Power Management Setup tab (Figure 9) groups functions that set energy savings. In principle, the default settings should be sufficient.

ACPI Suspend Type - indicates how to turn off the computer in power saving mode: S1 turns off the display, stops the processor clock and power to the hard drive, and S3 turns off all components except the keyboard and RAM.
Resume by Alarm - setting the computer to wake up automatically at a specified time.
Soft-Off by PWR-BTTN - determines the action of the Power button in MS-DOS mode: the Instant-Off function turns off the computer immediately, and Delay 4 sec - after pressing the button for less than 4 seconds, the computer goes into sleep mode.
PME Event Wake Up - Allows the system to wake up from sleep mode by signal from a PCIe or PCI device.
Power On by Ring - wakes up the system with a signal from a modem that supports this function.
AC Back Function - sets the way the computer works after a power loss: Soft-Off - the computer remains off, Full-On - turns on automatically, Memory - restores the system to the state of the last sleep mode.
Fan speed, temperature and limits
The functions are collected on the PC Health Status tab (Fig. 10) - they are responsible for monitoring the voltage and temperature of important components, and also allow you to control the fans (coolers) connected to the motherboard. With their help, the temperature limit values are set, as well as the way the fans operate. Here you can also see the readings of the sensors built into the board. Particularly important is the processor temperature sensor, which informs the experienced user that the system is operating in a safe environment.

CPU Warning Temperature - sets a value, after exceeding which a warning about a high processor temperature will appear (Fig. 11).

- CPU FAN Fail Warning - Enabled displays a warning if the processor fan is not working.
- SYSTEM FAN2 Fail Warning - as above if you connect a second fan.
- POWER FAN Fail Warning - As above, but applies to the power supply fan.
- SYSTEM FAN1 Fail Warning - As above, but for the additional fan.
- CPU Smart FAN Control - enables automatic adjustment of the processor fan speed.
Preserving and protecting access
Functions related to saving and restoring settings, as well as protecting access to a computer, are located to the right of the main BIOS menu (Fig. 12). Selecting them results in immediate execution (do not open menu tabs).
The Load Optimized Defaults option resets the BIOS to the factory default settings. You can use this function if you are not sure that the BIOS is configured correctly, if the computer is unstable.

With the Set Supervisor Password and Set User Password parameter, you can set the password for accessing the BIOS, as well as the one required to boot the operating system. If you select Save and Exit Setup, the current settings will be saved and the computer will be restarted.
The Exit Without Saving function restarts the computer, but without saving the changes you made.
BIOS Setup - Overlocker Shrine
Gigabyte stores all the functions of the extended menu for configuring the parameters of the operation of the main components or the motherboard, loading the processor and memory on the MB Intelligent Tweaker (M.I.T.) tab.
Here you will find additional tabs with very important information: the values of the base frequency of the processor, memory, the amount of installed memory, the operating temperature of the processor and chipset, as well as the current voltage of the processor and memory (Fig. 13).

In the M.I.T. Current Status for more detailed information about the parameters of the entire processor and memory. You cannot make any changes here.

Advanced Frequency Settings - (Fig. 15) this tab contains the most interesting functions used during overclocking.

The most important is BCLK Frequency (MHz) (Fig. 16) - the base values used to generate all the operating frequencies of the components through the appropriate coefficients. For newer Intel processors, the nominal value is 133 MHz.

Above you can see the CPU Clock Ratio option, it sets the processor multiplier. This figure is multiplied by the base value, sets the operating frequency of the system. In the example in the figure, the multiplier is x22, which at BCLK 133 MHz (actual value 133.3 MHz) gives a frequency of 2933 MHz.
The QPI Clock Ratio option sets the frequency multiplier of the QPI bus (components used in case the internal communication between two systems is located in the same processor case).
System Memory Multiplier (SPD) is another memory multiplier - setting it to x10 gives the memory frequency 1333 MHz - nominal for Intel Core i7 800 chips.
In most processors, all multipliers are set to maximum values. This means that overclocking more than the ceiling set by the manufacturer is not possible. The limitation can be circumvented by increasing the base frequency.
There are also options for changing the PCI Express bus clock frequency (PCI Express Frequency (MHz)). The default value in this case is 100 MHz.
Additional tab Advanced CPU Core Features (Fig. 17) provides access to additional processor parameters - allows you to enable or disable various ways to save energy or turbo mode.

Also here you can specify the number of active cores (Fig. 18). The photo shows the optimal parameters, for the system to work properly, with one exception - the turbo mode must be enabled (Enabled).

RAM memory operation parameters are set on the Advanced Memory Settings tab (Fig. 19).

At the top, you will see the System Memory Multiplier option, which is a multiplier of the operating memory frequency (Figure 20).

Performance Enhance - defines the way the memory works, from moderate to aggressive. DRAM Timing Selectable - allows you to set the access time selection method - from automatic to manual (Auto, Quick, Expert).
Selecting this function gives access to manual setting of all timings (Channel A / B Timing Settings tab) (Fig. 21), requires more experience and knowledge of the real capabilities of the used RAM modules.

You set the component voltage on the Advanced Voltage Settings tab (Fig. 22).

If you do not have much experience in this area, it is better to leave all the default settings, that is, Auto or Normal - too high a voltage can damage the entire computer. However, during overclocking, raising these values is necessary to obtain good results and stable system operation.
The principle "the more the better" does not apply here, it requires lengthy testing of the computer with the specified voltage and a combination of these values. In short, this lesson is for the most experienced users who are well versed in computer work, have vast experience and devote a lot of time to experiments. Manufacturers offer various ways to change the voltage: to a selected value (for example, from 1.2 to 1.35 V), or from a selected value (for example: 1.2 + 0.15 V).
Specific Settings Functions for AMD Processors
The BIOS settings described above include universal options, but are suitable for mat. boards with an LGA 1156 socket, that is, for Intel processors. The overclocking functions of motherboards for AMD processors have fundamental differences, therefore, they require a separate description.
We used the MSI 870A-G54 motherboard as an example. You will find functions for managing the parameters of the operation of nodes and overclocking MSI on the Cell Menu tab (Fig. 23).

In this case, instead of BCLK, we have the Adjust CPU FSB Frequency (MHz) item (Fig. 24). Its name is misleading - AMD abandoned FSB on motherboards for processors many years ago. Thus, we are dealing here with an output frequency (HTT) of 200 MHz.

On the Adjust CPU Ratio tab, you will find the processor core multiplier, which was not locked in the Phenom II X3 720 BE we are using, which greatly facilitates the overclocking process.
The Adjust CPU-NB Ratio parameter (Fig. 25) is the setting of the multiplier of the processor north bridge - its constituent parts, but regardless of the processor cores.

AMD Cool'n'Quiet is a great power saving option. During stable operation of the computer, it should always be turned on.
Unlock CPU Core - unlock unused processor cores. A description of the full capabilities of this option requires a separate article.
You can also configure in the voltage parameters: the voltage of the processor core (CPU Voltage) and its north bridge (CPU-NB Voltage), the HT bus (HT Link Voltage) and separately the north (NB Voltage), and the south (SB Voltage) bridge of the motherboard ( fig. 26).
Hardware Monitor II
Hardware monitoring allows you to control the system fans using Total Fan Control, as well as monitor the main system parameters using an easy-to-use graphical interface. You can set the temperature threshold for the processor at four points, thereby setting the fan algorithm.Board Explorer
This function graphically displays all board connectors, connected devices and their current state. With the BOARD EXPLORER, you can easily determine which of the devices is not connected or connected incorrectly.OC profile preview II
Tired of manually adjusting settings every time? Thanks to the saved OC profiles, you can easily switch between 8 saved settings on HDD or USB. In no time, you will see the difference between the current system settings and the settings loaded from the profile.Memory presets
Save time. Load stable memory settings for overclocking. With our new saved memory configurations, you can always quickly select the desired memory profile with the highest performance for your board.Memory-Z allows you to easily monitor memory settings by displaying information about the timings stored in the SPD module. Helps optimize memory settings for better overclocking stability.
M-Flash allows you to update the BIOS, as well as save a copy of it on your hard drive or USB drive. With M-FLASH, you can test a new BIOS version without actually flashing it onto the board. Explore new features and BIOS changes with M-FLASH as a portable BIOS chip.
Clickable OC Genie
Few people want to open the case every time to turn the OC Genie on or off. With just one click, you can overclock your system in one second and take full advantage of OC Genie through BIOS.MyOC Genie
The new OC Genie also supports MyOC Genie. With MyOC Genie, you can customize your own OC Genie profile and, at the push of a button, overclock your system even further.Memory try it
Tired of tinkering with memory settings? Our engineers, with the assistance of the world's best overclockers, have created the largest database of overclocking memory profiles for the most popular chips. Just set the CAS latency and memory frequency, and we'll do the rest. Overclocking memory has never been easier.Draggable boot order
Want to boot from another device? Thanks to Click BIOS 4, you can see not only the established boot order from devices, but also change it with the mouse, by dragging and dropping the names of boot devices in the list. Conveniently controlled by icons at the top of the BIOS screen.GO2BIOS button
Didn't have time to press DEL to enter BIOS settings? Just press the GO2BIOS button before you turn on or reboot the system and the next time you start, you will automatically enter the BIOS settings.Multi-BIOS II
Did something go wrong while updating the BIOS? Do not worry! With Multi BIOS II technology, you have a second BIOS chip that you can use to restore the contents of the main BIOS chip.Ceasefire lite
Don't waste time opening the case and removing unused graphics cards. Use Ceasefire Lite via Click BIOS 4. This menu allows you to disable unused PCIe slots.Slow Mode
Solve the cold start problem with Slow Mode. Slow Mode lowers the CPU multiplier to 8x. When using the CPU vCore Adaptive Mode, the Slow Mode function will significantly lower the vCore voltage to 0.8 ~ 0.9V. This function will help to avoid the problem of "cold start" in extreme freezing temperatures during overclocking.My Favorites
Want to have quick access to the most important settings? The My favorite section allows you to organize easy access to your favorite, most frequently used settings. You can organize the required settings into five groups.
Advanced memory settings
Adjust memory parameters such as CAS latency and TRAS. In this section, you can change the memory settings of the second and even the third level.View complete information about the processor, such as stepping, current frequency, voltage and number of threads. CPU-INFO is a handy tool for checking processor parameters and settings during overclocking. Make sure the processor is running with the correct parameters before you run the benchmark or game.
Last known best setting
Failed to boot after overclocking? Do not worry! Thanks to the Last Known Best Setting feature, the system will revert to the previous BIOS settings before you had time to change them. This will save you tons of time.Change Settings Info
When exiting the BIOS, check which settings you changed. Clicking BIOS 4 has a Change Settings Info function, which shows which of the settings were changed before exiting the BIOS. Thus, you can always check what changes in the settings were actually made before rebooting the system.Quick XMP Button
Don't want to tweak the memory timings yourself? With easy one-button access to XMP in Click BIOS 4, you can be sure that the correct memory timings are set for optimal performance and stability.Quick nav
Quickly switch between different sections of BIOS settings using the keyboard Up / Down / Left / Right keys. A simple navigation bar will always help you determine which BIOS section you are in.Simple / advanced mode
Want to see only important Click BIOS 4 settings? Use the simple mode of the settings display to view the most important settings without unnecessary detail. Use advanced mode and access all overclocking settings.Quick preview system status
Using the tab on the right side of the BIOS settings, you can monitor in real time the most important voltages, such as the voltage of the CPU Core.If you were looking for BIOS settings in pictures, then you have come to the right address.
The changes made will be protected by a lithium battery built into the motherboard and maintaining the required parameters in the event of a voltage loss.
Thanks to the program, it is possible to establish a stable interaction of the operating system (OS) with PC devices.
Attention! The present section of the Boot network configuration allows you to adjust the parameters related to the system boot speed, keyboard and mouse settings.
After completing work or familiarizing yourself with the Bios Setup Utility menu, press the burning Exit button, which automatically saves the changes made.
Main section - Main menu
Let's start with the MAIN section, which is used to modify the settings and adjust the timing.
Here you can independently configure the time and date of your computer, as well as configure the connected hard drives and other drives.

To reformat the operating mode of the hard disk, you need to select the hard disk (for example: "SATA 1", as shown in the figure).
- Type - this item indicates the type of connected hard disk;
- LBA Large Mode- is responsible for supporting drives with a volume of more than 504 MB. So the recommended value here is AUTO.
- Block (Multi-Sector Transfer) - For faster operation, we recommend choosing the AUTO mode here;
- PIO Mode - enables the hard disk to work in legacy data exchange mode. It is also best to choose AUTO here;
- DMA Mode - gives direct memory access. Select AUTO to get a faster read or write speed;
- Smart monitoring - this technology, based on the analysis of the drive's operation, is able to warn of a possible disk failure in the near future;
- 32 bit Data Transfer - the option determines whether the 32-bit data exchange mode will be used by the standard IDE / SATA controller of the chipset.

Everywhere using the "ENTER" key and arrows, the Auto mode is set. The exception is subsection 32 Bit Transfer, which needs to be fixed with the Enabled setting.
Important! It is required to refrain from changing the "Storage Configuration" option, which is located in the "System information" section and not to allow correction "SATADetectTimeout ".

Advanced section - Additional settings
Now let's proceed to the settings of the basic PC nodes in the ADVANCED section, which consists of several sub-items.
Initially, you will need to set the necessary processor and memory parameters in the Jumper Free Configuration menu of the system configuration.

Choosing Jumper Free Configuration, you will go to the Configure System Frequency / Voltage subsection, here you can perform the following operations:
- automatic or manual overclocking of the hard drive - AI Overclocking;
- changing the clock frequency of memory modules -;
- Memory Voltage;
- manual mode for setting the chipset voltage - NB Voltage
- change of port addresses (COM, LPT) - Serial and Parallel Port;
- setting controller settings - Onboard Devices configuration.

Power section - PC power
The POWER item is responsible for powering the PC and contains several subsections that need the following settings:
- Suspend Mode- set the automatic mode;
- ACPI APIC- install Enabled;
- ACPI 2.0- fix the Disabled mode.

BOOT Section - Boot Management
Here it is allowed to determine the priority drive, choosing between a flash card, floppy drive or hard drive.

If there are several hard drives, then the priority hard drive is selected in the Hard Disk sub-item.
The PC boot configuration is set in the Boot Setting subsection, which contains a menu consisting of several items:

Choosing a hard drive
The boot configuration of the PC is set in the Boot Setting subsection,

- Quick Boot- acceleration of OS loading;
- Logo full screen- disabling the splash screen and activating an information window containing information about the download process;
- Add On ROM- setting the order on the information screen of the modules connected to the motherboard (MT) by means of slots;
- Wait For ‘F1 ′ If Error- activation of the function of forced pressing "F1" at the moment of error identification by the system.
The main task of the Boot section is to determine boot devices and set the required priorities.
- ASUS EZ Flash- using this option, you have the ability to update the BIOS from such drives as: floppy disk, Flash-disk or CD.
- AI NET- using this option, you can get information about the cable connected to the network controller.

Exit Section - Exit and Save
Special attention should be paid to the EXIT item, which has 4 operating modes:
- Save Changes- we save the changes made;
- Discard Changes + EXIT- we leave the factory settings in action;
- Setup Defaults- enter the default parameters;
- Discard Changes- we cancel all our actions.

These step-by-step instructions explain in detail the purpose of the main BIOS sections and how to make changes to improve the performance of your PC.
Bios setup
Bios settings - Detailed instructions in pictures
Today I will tell you how to enable booting from a USB flash drive in the BIOS of various manufacturers. It doesn't matter what version you have, the order of body movements will be as follows:
1. We insert our bootable USB flash drive into the usb connector of our computer. I recommend plugging it into the port located directly on the motherboard, i.e. from the back of the system unit.
2. Turn on the computer and press the key Delete(or F2) to get into the BIOS. Depending on the manufacturer and BIOS version, other keys (Esc, F1, Tab) can also be used, so you need to carefully read the prompts on the screen.
In BIOS, we can move through the tabs only using the keyboard.
Below I will describe this process in detail using the example of the most used BIOS versions.
Attention! Remember that if you install the operating system from a USB flash drive or CD and select the boot device in the BIOS, and not in the boot menu, then after the first automatic restart of Windows, you must enter the BIOS again and return to boot from the hard disk. If this is not done, autoload from a USB flash drive or CD will work again, and Windows will start the first stage of the procedure again. installation.
Setting up Award Bios to boot from a USB flash drive
Award Bios:
First, let's check if the USB controller is turned on. Go to “Integrated Peripherals”. We go down with the arrow on the keyboard to the point “USB Controller”. Press the “Enter” key and select “Enable” in the window that appears (also using “Enter”). Opposite “USB Controller 2.0” should also be “Enable”.
 We leave this tab by pressing "Esc".
Then we go to “Advanced BIOS Features” - “Hard Disk Boot Priority”.Now, in my example, the hard drive is in the first place, and the flash drive should be.
 We stand on the line with the name of our flash drive (Patriot Memory) and raise it to the very top using the “+” key on the keyboard.
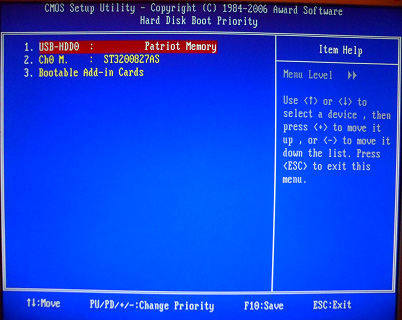 We leave from here by pressing "Esc".
Configuring AMI Bios to boot from a USB flash drive
If, upon entering Bios, you see such a screen, then you have AMI Bios:
 First, let's check if the USB controller is turned on. Go to the “Advanced” - “USB Configuration” tab.
 Opposite the items “USB Function” and “USB 2.0 Controller” should be “Enabled”.
 If this is not the case, we stand on this line and press the “Enter” key. From the list that appears, select “Enabled” (also using “Enter”).
Then we exit this tab by pressing “Esc”.
Go to the tab “Boot” - “Hard Disk Drives”.
 Now my hard drive is in the first place, but I need to put a USB flash drive here. We stand on the first line, press “Enter” and in the window that appears, select our Patriot Memory flash drive.
 It should be like this:
 We leave from here through "Esc".
Choose “Boot Device Priority”. Here, the first boot device must be a USB flash drive.
 Press Esc.
Then we exit Bios, saving all the settings made. To do this, go to “Exit” - “Exit & Save Changes” - “OK”.

Configuring Phoenix-Award Bios to Boot from a USB Flash Drive
If, upon entering Bios, you see such a screen, then you have Phoenix-Award BIOS :
 First, let's check if the USB controller is turned on. We go to the “Peripherals” tab - opposite the “USB Controller” and “USB 2.0 Controller” items there should be “Enabled”.
 Then go to the “Advanced” tab and set “USB-HDD” opposite the “First Boot Device”.
 After that, we exit Bios, saving the changes. To do this, go to “Exit” - “Save & Exit Setup” - press the key “Y” - “Enter”
 This is practically everything you need to know in order to boot from a USB flash drive. In my article, I described the process of configuring BIOS for the most popular versions: Award and AMI... The third example presents Phoenix-Award Bios, which is much less common.
This procedure may differ slightly in different BIOS versions. But the main thing is that you understand the very principle of setting.
By the way, I would also like to add: in order to choose which device your computer will boot from, it is not necessary to change the settings in the BIOS. You can immediately call up a special menu after turning on the computer to select boot devices (this can be done with the F8, F10, F11, F12 or Esc key). In order not to guess with the keys, we look closely at the monitor immediately after switching on. We need to have time to see an inscription like this: “Press Esc to selest boot device”. In my case, it was necessary to press "Esc".
 Assembler School: Operating System Development
 The Rust language and why you should eat it Rust where to start programming
 ISCSI Theory and Practice Securing an iSCSI SAN