Setting up printed forms in 1s 7.7. Publications
It is carried out in accordance with the standard layout of the printed form built into the application by the developers (this is called the “delivered” layout).
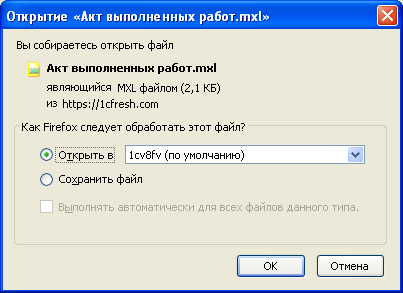
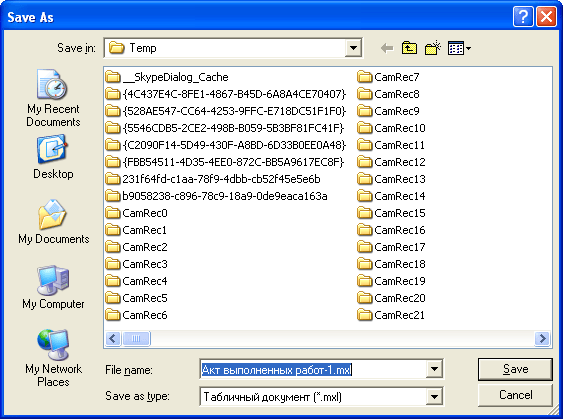
If necessary, you can change the standard layout and, in the future, print a document based on your personal (“custom”) layout. To edit the layout of the printed form, a mechanism is provided for uploading to a local computer. Editing the layout is carried out in the local version of the 1C:Enterprise system application (in particular, you can use the free 1C:Enterprise - Working with Files application).

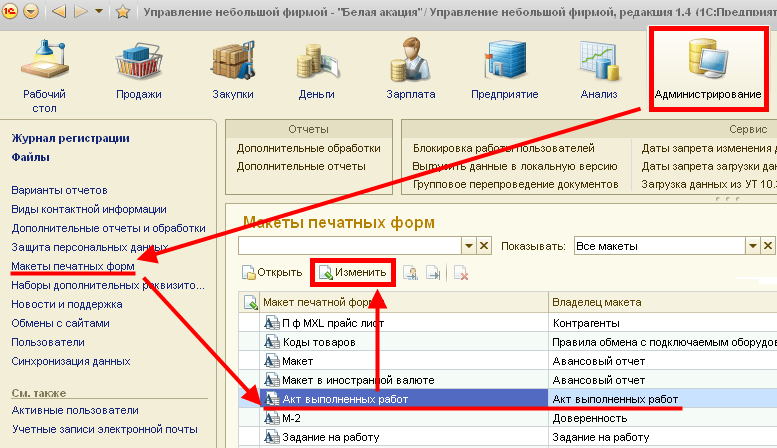
To change the printable layout:
Editing the layout of the printed form is completed; when printing the document, the layout to which the changes have been made will be used.

If you want to return to the previous printable layout, click the button Use standard layout. In this case, the edited layout will still be present on the server, and it can be turned on again by pressing the button Change.
We wish you pleasant work!
How to insert a company logo into a printed form layout?
Here is a specific example of editing a printed form layout Invoices for payment, namely, we will consider how to insert an image into it, for example, a company logo (this image must first be prepared and saved as a graphic file, for example, in png or jpg format).

Thus, now the invoices that you prepare for transfer to your counterparties will contain your company logo. In order to add a logo to other documents, you will need to repeat the described steps for the corresponding printed forms of these documents.
We wish you pleasant work!
In documents for which printing of any printed forms is provided, to the left of the button Seal There is a list button.
After clicking on this button, the user is presented with a list of printable forms to choose from. The first form in the list is standard, the remaining forms are registered as external.
Treatment Registering external printing forms designed for connecting new external printing forms. Connected forms are offered in the list of document printable forms.

The processing dialog box contains a table with a list of external printables. For each type of document, list or directory element, any number of external printed forms can be assigned.
In Group External printing forms for a document or directory for which a printed form is connected is specified. The group includes three switches:
- Documenta- the printable form will appear in the print list of the dialog box of the document selected below;
- Directory list- the printed form will appear in the print list of the directory selected below;
- Directory element- the printable form will appear in the print list of the dialog box of the element of the reference book selected below.
All external printables are stored in a subdirectory PrnForms catalog EXTFORMS. When processing starts, the program reads external forms stored in this directory. Each row of the table contains the text name of the external file, the file name and the name of the button that will be assigned in the document (directory) to call the print form.
Below the list there are buttons for working with external files.
Button Open opens the selected external file. This opens processing Seal, which requires you to specify a specific document (or reference book) that needs to be printed using an external form.
Pressing a button Update refills the list of external printing forms. The button must be used after recording new external printables in the subdirectory PrnForms.
Button Change used to work with a list of external files. When the button is pressed Change A menu of four items opens next to it:
- Change the name;
- Change button;
- Add to list;
- Remove from list.
When selecting an item Change name the text name of the external file will be displayed for editing in a separate dialog box.
After editing, the new name of the external file will appear in the list instead of the previous one.
When selecting an item Edit button the text name of the button will be displayed for editing in the same dialog box. After editing, the new button name will also appear in the list.
Paragraph Add to list allows you to add a new external form to the list. When you select this item, a list of external form files located in the subdirectory will open PrnForms catalog EXTFORMS. Information about the file name and button name is stored in a text file with the extension efd. These names are automatically included in the list. They can be changed if necessary.
Paragraph Remove from list after an additional request, removes the line describing the external file from the list. In this case, the file itself is not deleted, so it can later be added to the list again.
As a rule, a user of the 1C: Enterprise 7.7 program can independently update his working configuration. The following provides recommendations for updating a typical unmodified configuration. If your configuration has been changed, modifications have been made to documents, reports, or printed forms, then it is not recommended to update the configuration yourself. We recommend calling a qualified technician to carry out the update work.How to independently connect external reports and external printed forms to the configuration in the 1C:Enterprise 7.7 program
Copying an external report to the infobase directory.
The external report file has the extension "ert". This is a direct external report. Typically, an external report file is accompanied by a description file with the extension "efd". This file is necessary so that the program immediately “finds” the report and does not need to connect it manually. For example, the external report file is called “Application Log.ert”, then the description file will be called “Application Log.efd”. These two files (or one if there is no file with the efd extension) must be copied to the working database directory. To do this, you first need to find the working database directory. After this, you need to find the "ExtForms" directory in the working database directory.
If you are copying an external printed form, you need to find the “PrnForms” directory in the “ExtForms” directory. You need to copy both files to the found directory (ExtForms for external reports and PrnForms for external printed forms).
Connecting to an external report program using special processing.
To connect to an external report database, you must open the “Advanced Features” report by going to the “Tools” - “Advanced Features” menu.
If you copied the external report and the file with the efd extension correctly, your external report will appear in the list of external reports.
If the efd configuration file is not copied, then you need to do the following:
Click the "Change" button and select "Add to list" from the menu.

From the drop-down list, select the desired external report file (which was copied to the ExtForms directory). If the required file is not in the list, this may be for two reasons: 1) The file was copied to the wrong folder, i.e. you need to carefully check again that the copying was correct in the chapter “Copying an external report to the infobase directory.” 2) The file was copied correctly and is already in the list of external reports. In this case, you need to carefully review the list of external reports and find the newly added report.
After selecting the file, a window will open in which you need to specify the name of the external report. Enter a custom name. Click the "OK" button.

After this, your external file will appear in the list of external files.
Connecting an external (additional) printing form to the program.
To connect an external printing form, you must select from the menu "Tools" - "Registration of external printing forms".

Next, select for which document, or for which element or list of the directory you need to connect an external printed form. For example, let's connect an external printed form for the document "Shipment of goods, products". To do this, you need to select the “Document” item in the “External printed forms for” group. Next, select “Shipment of goods, products” from the menu.

The connected external printed forms should appear in the table. If the table contains the form you need, then it was connected automatically.
If the required form is not in the table, you must do the following: Click on the “Change…” button and select “Add to list” in the drop-down menu.

In the list that opens, you must select the form that you copied to the PrnForms directory.

If the form is not in the list, it means you copied the form incorrectly to the directory, carefully read the chapter “Copying an external report to the infobase directory” again.

To check the functionality of a new external printing form, you need to open the document, list or directory element to which you connected the form and click on the button with a small triangle located next to the “Print” button.
You must select a new printing form from the drop-down list.
 Making a Smart TV if you don't have one
 How to scan in Photoshop cs5
 Cropping an image in AutoCAD if there is nowhere to go and there are no other tools