Disable active users 1s 8.3. Kicking users out of the server infobase
Hello Dmitry! Please teach me how to expel users forcibly from the database in order to update the configuration. Thanks in advance.
From user: Svetlana Nikolaevna
Hello, Svetlana Nikolaevna!
In order to expel users from the database, you need to have administrator rights.
We go to the section Administration, Support and maintenance:
Choose Blocking user work:

You can view the list of active users from the form by clicking the button.
We fill in the message that users will see on their screens, set the blocking interval (if you do not know the end time, leave the field blank). Install also unlock code, because blocking will also affect your active session, for example, set 1234 .
Click Set lock. A warning message will appear:

We agree. Now the form says in red that the blocking will begin soon.

For active users at this time, the following window appears:

Closer to the beginning of the blocking, it starts to appear every minute:

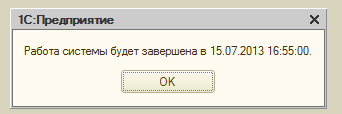
The user needs to complete his work in the program and exit. If it does not exit on its own, the program will close automatically. When trying to login to the database, the user will receive the following warning:

The user who set the block also receives a message:

Let's get out of the base.
Because blocking applies to all sessions of all users, we will need to set the launch parameter (this is where we need Unlock code):


On the second tab, we write the database launch parameter (where 1234 is our code):

We click ready. Now we can enter both the configurator and the user mode.
To unlock the base, you need to return to the lock form and click Remove lock.

If a blocking end date has been set, then the blocking will end automatically when it occurs.
To carry out routine maintenance in the 1C:Enterprise 8 information base, it is often necessary to obtain exclusive access to the database. For example, to perform a database backup or perform routine maintenance on the DBMS server (reindexing, etc.), you must disable all active sessions.
Consider a simple way to disable users from information base using the standard functionality of the 1C:Enterprise server.
Standard functionality
I’ll make a reservation right away that we will be talking about the client-server version of 1C: Enterprise 8. To disable sessions, go to the server administration console. There we will find the necessary infobase in the list:

Going into the IB properties, set the option "Locking the start of sessions is enabled." In this case, it may be necessary to enter the login/password of the infobase administrator account.

Don't forget to set the session blocking period. You should also ensure that all background jobs must be stopped while sessions are blocked. This is done with the option "Lock routine tasks enabled".
If necessary, you can set the message text for users who will be notified 5 minutes before the sessions are blocked, as well as the permission code for entering the infobase during the session blocking period.
The permission code can be used to enter the infobase to perform routine maintenance while other sessions are not active. You need to enter the permission code when connecting to the database using the parameters. For example, this is what the parameter passed to the server would look like if the permission code is "123456".

By entering the database in this way, we will get exclusive access to the infobase. Other sessions will not be able to join us.
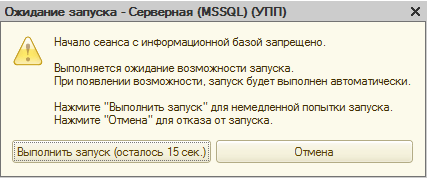
The notification to the user that sessions are locked looks like this (depending on the message entered by the administrator). It appears every minute 5 minutes before the blocking period.
At the beginning of the session blocking period, a notification first appears:
After the session ends.
Active sessions can also be disabled by removing them from the list of active sessions. Such an action is sometimes necessary to end hung sessions.

In practice, disconnecting users is best communicated in advance to reduce the risk of losing data entered by users but not yet saved.
Administration and control of 1C 8.3 users is an integral part of the implementation and support of any 1C software product. Actually this simple task, and I'm sure anyone can handle it without any problems. Consider the process of administering 1C users in more detail.
User management in 1C is a fairly simple and intuitive process, but it still needs a description.
Conditionally administration and control includes:
- user creation;
- setting user rights;
- view active users;
- analysis of user actions.
Let's consider each of these points in more detail:
Creation and installation of user rights 1C 8.2
Depending on the configuration, users are entered either in the configurator or in user mode. Almost all modern configurations support user input in 1C: Enterprise 8 mode. Also in 1C: Enterprise mode, as a rule, they enter Extra options users.
However, regardless of the configuration, the first user with administrative rights is always entered in configurator mode. Therefore, we will consider both modes of user input.
Entering users in the Configurator
To enter the 1C Configurator mode, select the Configurator option in the database selection list:
After logging in, select Administration - Users from the menu. A list of users will open, if you start the first user, it will be empty. Let's add a new user "Administrator":

On this page you must specify the user settings:
- Name and Full name — username.
- If the flag is set Authentication 1C: Enterprises, then the items will become available Password(password that is used to enter 1C), The user is not allowed to change the password(makes affordable opportunity password change by user in user mode), Show in selection list(makes available the selection of a user in the list, otherwise the username must be entered manually).
- Authentication operating system — flag responsible for the possibility of authorization using the username of the operating system. User- Username information system(for example, \\dom\kirill, where dom is the network domain and kirill is the OS username). 1C at startup first checks authorization through the OS, and then authorization 1C 8.2.
- Open ID authentication- enabling authorization using OpenID technology . Open ID is an open decentralized system that allows the user to use a single account for authentication on a variety of unrelated sites, portals, blogs and forums.
Get 267 1C video lessons for free:

On the tab Other you need to specify the appropriate roles for the user (). In our case, we will specify for the administrator Full rights. For other users, the required roles can be flagged here. User rights are summarized from the available objects of different roles. Those. if the user has two roles selected, one has access to the "Nomenclature" directory, and the second role does not, access will be. For any user without "Full rights" the user role must be set(if present).
Also on this tab you can specify Main interface(only works for normal forms). Default language— if the configuration is developed in several languages. Start mode- managed or regular application.
Creating a user in 1C Accounting 2.0
After a user with full rights is registered in the system, users can be entered in 1C: Enterprise mode. For example, let's create a user in the most common configuration - Enterprise Accounting 8.2.
To do this, select the menu item Service - User and Access Management. The "Users" directory will open. Create a new user:

Enter information about the user and its main ones, click the "OK" button: the system will offer to automatically create a database user:

You must agree, the form of the new database user will be displayed:

That's all! The creation of the user and the assignment of rights to him is completed.
Viewing active users in the 1C database
To view users working in the database in 1C: Enterprise mode, select the item Service - Active Users. A list of users working in the database will open:

How to disable users in 1C 8.3 and 8.2
There are two ways to disable an active user in the 1C database:
- in the program interface (for configurations 1C Accounting 3.0, Trade Management 11, etc.);
- via the server cluster console (only available in client-server mode).
From the interface
In user mode, you can kick out a hung user by going to the "Administration" - "Support and maintenance" menu, then selecting the "Active users" item:

Choose from the list desired user and click the "Finish" button.
From the cluster console
If you have access to the administrative panel of the 1C server, you can end the session using it. We go to the console, find the hung user in the "Sessions" menu, call context menu and click "Delete":

User control 1C 8.3
To view the user's work history, go to the menu item Service - :

 Black screen after BIOS splash screen
 What to do if the BIOS sees the HDD, but Windows does not
 Solving the problem of an unhandled exception in a Microsoft application