Installing android on an old computer. How to install Android - Step by step instructions
Thanks to the rapid development of software for the Android OS, many desktop PC users are turning their eyes to this particular platform.
In this connection, they ask a logical question: "How to install an android on a computer"?
Android was not originally designed for use on x86 PCs, and versions of the OS prior to 3.0 were intended exclusively for phones.
Despite this, a group of enthusiasts have created and regularly create updated Android distributions for installation on a personal computer.
How to install this "mobile" operating system on your PC will be discussed in this publication.
Steps to install Android OS on PC
All work on installing the Android OS on a PC can be divided into several stages:
- Downloading the distribution kit to the computer.
- Create bootable media.
- Preparing HDD for Android installation.
- Installing a new operating system and configuring it.
Now about each stage in more detail.
In order to make your computer a full-fledged android device, you should select and download the OS distribution kit.
It is better to do this from the developers website by going to: http://www.android-x86.org/download.
At the time of this writing, the Android x86 OS distribution kit version 5.1 is available to everyone, but you can use another, more “run-in” version of the program.
Screenshot of the page with the distribution kit Android-x86-5.1-rc1.iso
This ISO image must be downloaded to a PC and bootable media created.
Create bootable media
You can install Android OS on your computer using optical media or a bootable USB flash drive.
Since most portable PCs are not equipped with a DVD drive, we will use a regular 2 GB USB flash drive as a boot disk.
In order to write the distribution image to a USB flash drive, you must use third-party software. The developers recommend the UNetbootin or UltraISO utilities.
Consider the process of writing a distribution kit to a flesh card using the UNetbootin program:
- Insert a formatted USB flash drive into the PC.
- Download and run the UNetbootin program.
- In the utility window, click "Disk Image", click on the button with ellipsis and select the downloaded distribution kit, by clicking the "Media" button, select your flesh-card, then boldly click "OK".
- After the bootable media creation procedure is completed, click "Exit"
The bootable media has been created.
If only the Android OS is supposed to be on the PC, then it is enough to make your USB flash drive a priority at startup in the BIOS and you can begin the installation process.
If Android is the second operating system on the computer, then an additional partition on the HDD should be prepared for its installation.
Creating a hard drive partition for Android OS
You can create a partition on the HDD using Windows 7. To do this:
- Press win+R.
- In the dialog box, enter diskmgmt.msc and then press "Enter".
- In the utility window, find the unallocated space, select "Create a simple volume" from the drop-down list.
- In the Partition Wizard, click Next.
- Enter the partition size. To install Android on a computer, you must allocate at least 10 GB of your HDD for this section. Click next.
- Enter a letter for the new disk partition and click Next.
- In the formatting options window, you can leave everything by default. "Further".
- In the window for completing the partition creation procedure, click "Finish".
BIOS setup
In order to install a "mobile" OS, you need the PC to start from a bootable USB Flash card.
To do this, immediately before turning on the computer, you must install a USB flesh card into the PC connector and enter the BIOS by pressing the F12 or DEL key immediately after starting the PC.
In some laptop models, you need to press the F2 or Esc key to enter the BIOS.
Important! The BIOS entry key may vary depending on the manufacturer of the motherboard and theBIOS. You can find out exactly the login button from the documentation for your computer.
After entering the BIOS, enter the Boot section where use the arrows to set the boot priority from the USB device, then confirm the settings by pressing F10, and exit the BIOS by pressing Esc.
Installing Android OS on PC
After starting the computer from a bootable USB flash drive, a window will open where you will need to select the last line from the entire list.
To install Android on your computer, you must select the desired HDD partition for installing the distribution.
In the next window, the available partitions are defined as sda1, sda2, sda3. Select the one you want and click OK.
Android setup
Almost any user can handle setting up OC Android. The first thing that appears on the PC screen after installing the system is the language setting screen.
Choose the one that interests you.
This completes the initial system setup process. In the window that opens, click OK.
Advice! If you don’t know how the “mobile system” will behave on your PC, then after starting the computer from a USB flash drive, in the window that opens, select the first menu item Live CD - Run Android without installation. The system will not be installed on the computer, but will start from the media. In this mode, you can always test the selected version of Android before its final installation.
There are several popular ways to install Android OS on smartphones and tablets, namely: using CWM Recovery, through TWRP Recovery, through the ROM Manager program, and using. In these ways, you can install not only official, but also custom firmware from third-party developers. After that you need.
Installing Android via CWM Recovery
CWM Recovery is a multifunctional menu, one of the features of which is the installation of new firmware. The menu only works with ZIP archives, so be sure to check the extension of the downloaded file.
Installing a new firmware takes place in several stages:
- Because CWM Recovery is custom, you must first download and install it on your device.
- Log in to the Recovery Menu using the method described below.
- In the menu itself, navigation is carried out using the volume up / down buttons, and the selection is done with the power key. Installing a new system implies the previous OS. Find the "Wipe Data/Factory Reset" section and select it.
- Confirm your choice by clicking "Yes - Wipe all user data".

- Next, return to the main Recovery menu and select the "Install ZIP" section.

- In the list that opens, select the option "Choose ZIP from / sdcard".

- Specify the directory where you previously downloaded the new firmware.

- Confirm your choice. Click "Yes - Install".

- The Android OS will start downloading to your phone. At the end of the process, the notification "Install from sdcard complete" will appear.
To activate the Recovery menu, turn off your phone and press the button combination that matches your phone model. Below are the most popular combinations:
- Volume up + off button;
- Volume down + off button;
- Volume up / down + power button + "Home";
- Volume up + volume down + off button.
If you didn’t get into the Recovery Menu, then use the search to find the desired key combination.
Installation on this is considered complete. Return to the main menu and reboot the system. The first launch of a new version can be unusually long. This should be taken into account and not succumb to unnecessary panic.

Installing Android OS via TWRP Recovery
TWRP is another custom recovery that works with installation files in ZIP format. The flashing process starts by installing this menu on your phone. Then follow the algorithm:
- Download the desired version of Android, and then download it to an arbitrary directory on your smartphone or tablet PC in ZIP format.
- Go to TWRP Recovery. The way to enter is no different from getting into other Recovery Menus, so study the key combinations at the beginning of the article or find combinations for your phone model on Google.
- Perform a factory reset. Click "Wipe" in the main menu of the program.

- If you just want to restore the factory ("native") settings, then move the highlighted slider to the right side.

- If you want to completely clear the memory for further installation of a new system, then click "Advanced Wipe". At the end of the cleaning process, simply click on the "Back" button.

- Now you need to install a new operating system. In the main menu, click on the "Install" section.

- Select the path where the program will find the firmware you saved.

- Confirm the start of flashing by moving the slider to the right. The process usually does not take more than 2-3 minutes.

- At the end of all manipulations, the program will issue a notification about the successful completion of the installation. Select "Reboot System" to reboot and run the new version.

Installation on this is considered complete.
Flashing via ROM Manager
How to install Android on a phone using specialized software? Prior to this, the methods were described exclusively in the Recovery Menu, but if you prefer utilities with a convenient interface, then the program of choice is ROM Manager.
Before starting work, the following conditions must be met:
- To work with the application, you must get Root rights (this can be done through Unlock Root, Vroot and other programs);
- You must install any custom Recovery. The program performs all operations with its help, but saves you from a primitive interface and inconvenient navigation;
- The smartphone must have saved the version of the OS you want to install in ZIP format.
When all these points are completed, launch the ROM Manager and follow the step-by-step algorithm:


The program also allows you to download ready-made firmware for your smartphone or tablet PC model. Select the operating system in the "Download firmware" section.

This instruction is about how to run Android on a computer or laptop, as well as install it as an operating system (main or additional), if the need arises. What could it be useful for? Just for experimentation, or, for example, on an old netbook, Android may well work relatively quickly, despite the weakness of the hardware.
On January 14, 2016, a promising Remix OS for PC operating system was released (still in alpha version), based on Android x86, but offering significant improvements in the user interface specifically for using Android on a computer.

Among these improvements:
- A complete multi-window interface for multitasking (with the ability to minimize the window, maximize it to full screen, etc.).
- Similar to the taskbar and start menu, as well as a notification area similar to that present in Windows
- Desktop with shortcuts, interface settings for use on a regular PC.
Just like Android x86, Remix OS can be run in LiveCD (Guest Mode) or installed on a hard drive.

You can download Remix OS for Legacy and UEFI systems from the official website (the download package contains its own utility for creating a bootable USB flash drive with the OS): http://www.jide.com/remixos-for-pc.
By the way, you can run the first and second options in a virtual machine on your computer - the steps will be similar (although not everything may work, for example, I could not run Remix OS in Hyper-V).
Two more similar versions of Android adapted for use on computers and laptops - and.
Everyone knows that the Android operating system is developed by Google for smartphones and tablets. At the moment, this is the most popular platform for these devices. The official version of Android can only run on supported ARM devices. But since Android is an open source project, a port of Android for x86 computers has been created by the community that will run on almost any modern computer.
The official version of Android 6.0 from Google came out a long time ago, but only a few days ago, the developers released a stable version of the Android x86 port for version 6.0. In this article, we will consider installing Android x86 6.0 on a computer or laptop. Perhaps the platform is not yet stable enough, but it can already be used and you will see for yourself.
System requirements Android x86 6.0
Android x86 is quite demanding on hardware. Ideally, it should work on any computer with an x86 processor. But in fact, not everything is so simple. The developers tested the system on several devices, for example, laptops from ASUS, EeePC and Dell, you can find a complete list of supported devices and their level of support on the official website.
With regard to equipment and characteristics, the following parameters are recommended:
- CPU: Intel;
- RAM: 2048 MB;
- Free disk space: 10 GB;
- USB flash drive- to record the installer.
Preparing for installation
As with other operating systems, we first need to download the installation media. You can download the latest version of the system from the repository on SourceFoge or the official website. Images are available for both 32 and 64 bit architecture:
The image takes a little, only more than 400 megabytes, so it loads quickly.
Step 2. Write to media
To install Android, you need to use either a flash drive or a rewritable disk. But it's still better than a flash drive. I do not recommend using various utilities to burn the image, do it with the following command:
dd if=~/android-x86-6.0.iso of=/dev/sdc bs=5M
Here ~/android-x86-6.0.iso is the image you just downloaded and /dev/sdc is your stick.
Step 3Setting up the BIOS
Everything is standard here. Restart your computer and during the BIOS splash screen, press F2, F8, Shift+F2 or Del to enter the BIOS setup, then go to the Boot tab and select in 1st boot device your flash drive.

It remains to go to the tab exit and press Exit & Save Changes.
Installing Android 6.0
Step 1: Begin installation
Immediately after restarting the computer, you will see such a bootloader window. Here you can either boot into the Live system or proceed to install it. We will be interested in the last point, the installation:

The installer will run very quickly:

Step 3. Selecting a drive
In the first step, you have to choose the disk on which you will install:

Step 4Partition Table
Further, if this disk has not yet been marked, you must select the partition table. It is possible to use GPT, but I do not recommend doing this, as it is more likely that the installation will simply hang. Therefore, at this step, choose No. In this case, the MBR will be used:

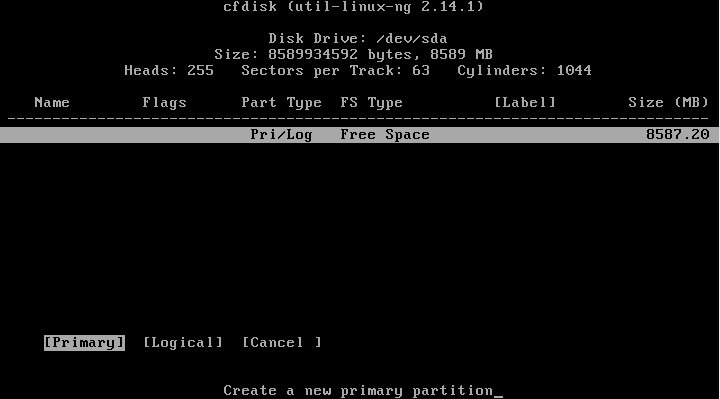
Step 5Creating a Partition
Installing Android x86 6.0 is only done on one partition. And at this step we have to create it. The cfdisk utility will be used for this. First click New to create a new partition. You can navigate through the buttons with the left / right arrows, and press Enter with:

Select type primary, primary:

Find the Bootable button and press Enter to make this partition bootable:

Find and click the Write button to write the changes to disk. Type yes to confirm:
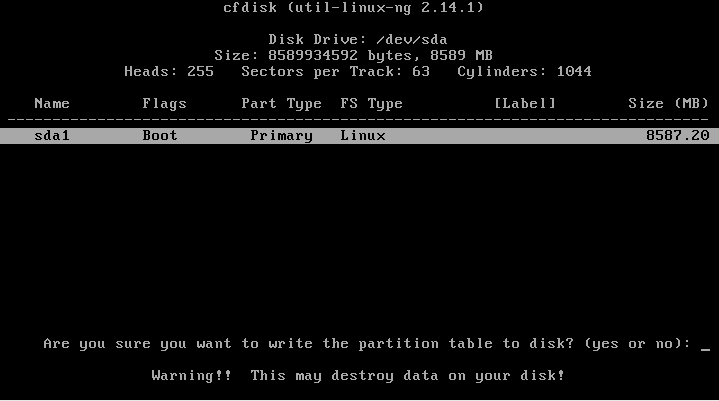
It remains to press the quit button to exit the program:

Step 6. Selecting a partition
After the markup is complete, you need to select the section you just created:

Step 7. File system
Select a file system, e.g. ext4

Step 8 Formatting
Since we need a clean partition, we agree that it will be formatted:

Step 9. Loader
We will need a bootloader, so select Yes:

Step 10. EFI Bootloader
But we do not need an EFI bootloader, given that we used the MBR. Select Skip:

Step 11 Access Mode
In this window, you need to choose whether you want to mount the system partition / system in read-write mode. This will be useful for installing new programs, so select Yes:

Step 12: Finishing the installation
Wait until all files are unpacked:

When the installation of Android on the computer is completed, select Reboot to restart the computer and enter the new system:

Step 14 Loader
Select the first bootloader item:

Step 15. Starting the system
Wait for the system to finish loading.
Step 16 Done
That's it, the installation of Android x86 on the computer is complete. Now you can use Android directly on your computer. You can install and run Android applications, play games:

conclusions
As you have seen, installing android x86 on a PC is not so different from other operating systems. If you are lucky and the system will fully support your hardware, then you can very easily get a full Android system on your computer. If you have any questions, write in the comments!
To complete the video with the Android installation process from an American video blogger:
Android works not only on tablets and phones, but also on computers and laptops. There are several installation options: as a second operating system, in a virtual machine, as an emulator. The choice of answer to the question of how to install Android on a computer depends on what goals the user is pursuing.
To create an installation media, you will need a USB flash drive with a capacity of at least 1 GB, the Unetbootin utility and the Android ISO image, which you download from the developers website: http://www.android-x86.org/download. When downloading the distribution, pay attention to the bit depth - 32 or 64-bit system. You can download both pure Android of the latest version, and Remix OS - a special build for your computer. At the same time, you can install the Android OS on a laptop according to the same scheme, only the system interface will differ.
To create installation media:

It takes about 10 minutes to create the installation media. After Unetbootin is finished, you can restart your computer to start from the media. Instead of Unetbootin, another utility, such as Rufus, can be used to burn the installation media.
To start the installation media, you must change the boot priority on the "Boot" tab in the BIOS or select boot from a flash drive in the Boot Menu, called by the F11 key. After booting from the installation media, a menu appears in which it is possible to start Android without prior installation. To take advantage of this offer, select the first option.  A short boot will take you to the preconfiguration screen. The mouse, keyboard and touchpad on a laptop should already work here. You can not configure anything, anyway, after restarting the computer, the settings will fail. After pre-configuring (or skipping this procedure), you will be taken to the Android home screen.
Simply put, it is not necessary to know how to install Android on a computer. It is enough to create installation media to run the system on a PC and see the main features. The only drawback is that no changes made by the user are saved. The rest of the system works without errors, there is even Internet access, provided that the computer is connected to a network or Wi-Fi.
If you are going to install Android as a 2 system next to Windows, then it is better to create a separate partition in advance.
- Press Win+R, execute "diskmgmt.msc".

- Right-click on the volume from which you can take the place for installing Android. A lot of free space is not needed - 5 GB is enough, you can even less. Select Shrink Volume.
- In the "Size of compressible space" line, set the desired number of megabytes and click "Compress".

- Unallocated space will appear. Right click on it and select "Create Simple Volume".

You do not need to change any settings when creating a volume. As a result, you will have a personal clean section for Android.
System installation
You can install Android on any laptop, the technical requirements of the system are such that even the capabilities of an old machine are enough. An excellent option would be to install Android on a netbook - the system takes up little space, consumes a minimum amount of resources.
- Boot from the installation media, select the last item in the menu - "Install to hard disk".
- Highlight a section created specifically for Android. The main thing is not to make a mistake, because if you burn Android over Windows, then all data from the system from Microsoft, like herself, will be deleted.

- In the format selection window, select FAT32 or NTFS. A warning will appear stating that all data will be deleted. Click Yes.

- Agree to install the GRUB bootloader and the GRUB2 EFU subkey. Without these options, you will not be able to choose which system to boot - Android or Windows.

- Allow overwriting data and working with files in Android by clicking "Yes".

The system installation will start. Upon completion, the installer will offer to create a custom partition inside Android. By default, 512 MB is allocated for it, but it is better to increase the volume by 4 times, up to 2000 MB. This completes the installation. To start, click "Run Android".  When installing Android on a laptop, an external USB keyboard may be required. The rest of the difficulties should not arise.
If you have figured out how to download Android and whether it is possible to install it on a PC, then there will be no problems with pre-configuration, especially since it is carried out in the same way as on a phone or tablet after purchase. The first point is the choice of language.  Next, the system will prompt you to select a network for accessing the Internet, set up geolocation, add a Google account, set the time and date. After this small tweak, you can put Android games on your computer and generally use all the features of the OS from Google. The installed tools will be enough to perform any tasks implemented on a regular Android device.
If you do not want to put Android on a PC as a second system next to Windows, worrying about the state of the bootloader or saving data on the hard drive, and the option to run without installation does not suit you due to the lack of the ability to apply changes, then use a virtual machine. Let's see how to install Android on a virtual machine using Oracle VM VirtualBox as an example.
- Launch VirtualBox, click "Create".
- Write the name of the new machine (any name is possible, for example, Android). Set the type to "Linux", the version to "Other Linux". Be sure to correctly specify the bitness of the system, 32 or 64-bit.

- Allocate RAM. The recommended amount is 256 MB, but it is better to take more.

- Select "Create a new disk" and click "Create".

- Set the disk type to "VirtualBox Disk Image".

- Check the "Dynamic Disk" box.

- Write any name for the disk. Specify the size - at least 1 GB, it is better to take more.

An isolated environment has been created, you can install Android in it. Highlight "Android" in the menu on the left and click "Launch". In the machine window, specify the path to the downloaded ISO file with the Android distribution.  Next, you need to install Android on your PC using the instructions above. The only difference is that we install Android not next to Windows, but inside an isolated environment created using a virtual machine.
If Android on a PC is needed only to play applications from Google Play, then you can get by with an emulator. Rich choice:
- bluestacks;
- Leapdroid;
- Koplayer;
- Genymotion;
- YouWave for Android.
The listed emulators have different purposes. If BlueStacks and Koplayer are more focused on running games and other applications, then Genymotion is more of a developer tool, although Android games on PC can also be opened with it.  If you want to get a full-fledged Android on your computer without downloading the distribution kit and installing the system, then use the Nox App Player emulator. It is compatible with all latest versions of Windows.
  The program does not have a Russian-language interface, but inside Android you can set the Russian language, as you do on your phone. The sound and camera work without any additional configuration, as well as the computer keyboard inside the emulator.
  By default, Nox App Player starts in tablet resolution, but if necessary, you can change it in the settings that are called by clicking on the gear. Also, low performance is set by default, which allows the emulator to work without brakes even on weak hardware. You can also change the performance level in the settings.
 "Notification Center": what is it, how to disable the service How to disable system notifications in windows 10
 Android, Windows Phone or iOS - which OS is better for a smartphone What are the platforms other than android
 Installing a Driver from an INF File