Network between two computers windows 10. How to create and configure a local network between two computers
Hello.
Even 10-15 years ago, having a computer was almost a luxury, but now even having two (or more) computers in the house surprises no one ... Naturally, all the advantages of a PC appear when it is connected to a local network and the Internet, for example: network games, disk space sharing, fast file transfer from one PC to another, etc.
Not so long ago, I was “lucky” to create a home local network between two computers + “share” the Internet from one computer to another. I will tell you how to do this (according to fresh memory) in this post.
1. How to connect computers to each other
The first thing to do when creating a local network is to decide how it will be built. A home local network usually consists of a small number of computers / laptops (2-3 pcs.). Therefore, 2 options are most often used: either computers are connected directly using a special cable; or use a special device - a router. Consider the features of each option.
Direct connection of computers

This option is the simplest and cheapest (in terms of equipment costs). You can connect 2-3 computers (laptops) with each other in this way. At the same time, if at least one PC is connected to the Internet, you can allow access to all other PCs in such a network.
What is needed to create such a connection?
1. Cable (it is also called twisted pair), a little more than the distance between the connected PCs. Even better, if you immediately buy a crimped cable in the store - i.e. already with connectors for connecting to a computer network card (if you crimp it yourself, I recommend that you familiarize yourself :).
By the way, you need to pay attention to the fact that the cable is needed specifically for connecting a computer to a computer (cross connection). If you take a cable to connect a computer to a router - and use it by connecting 2 PCs - such a network will not work!
2. Each computer must have a network card (all modern PCs / laptops have it).
3. Actually, that's all. The costs are minimal, for example, a cable in a store for connecting 2 PCs can be bought for 200-300 rubles; network cards are in every PC.
It remains only to connect the 2 system units with a cable and turn on both computers for further settings. By the way, if one of the PCs is connected to the Internet via a network card, then you will need a second network card - to be used to connect the PC to the local network.
Pros of this option:
Quick creation;
Easy setup;
The reliability of such a network;
High speed when exchanging files.
Minuses:
Extra wires around the apartment;
In order to have access to the Internet, the main PC that is connected to the Internet must always be turned on;
Inability to access the network for mobile devices*.
Creating a home local network using a router
A router is a small box that greatly simplifies the creation of a local network and Internet connection for all devices in the house.
It is enough to configure the router once - and all devices will be able to immediately access the local network and access the Internet. Now in stores you can find a huge number of routers, I recommend that you read the article:
Stationary computers are connected to the router via a cable (usually 1 cable is always included with the router), laptops and mobile devices are connected to the router via Wi-Fi. You can see how to connect a PC to a router (using the D-Link router as an example).
The organization of such a network is described in more detail in this article:

Pros:
Once set up a router, and access to the Internet will be on all devices;
No extra wires;
Flexible Internet access settings for different devices.
Minuses:
Additional costs for the purchase of a router;
Not all routers (especially from a low price category) can provide high speed on a local network;
It is not always so easy for inexperienced users to set up such a device.
2. Setting up a local network in Windows 7 (8)
After the computers are connected to each other by any of the options (whether they are connected to a router or directly to each other), you need to configure Windows for the full operation of the local network. Let's show on the example of Windows 7 (the most popular OS today, in Windows 8 the setting is similar + you can familiarize yourself with).
2.1 When connecting through a router
When connected through a router, the local network, in most cases, is configured automatically. The main task is to configure the router itself. Popular models have already been analyzed on the blog pages earlier, I will give a few links below.
After setting up the router, you can start setting up the OS. So…
1. Setting the workgroup and PC name
The first thing to do is to set a unique name for each computer on the local network and set the same workgroup name.
For instance:
1) Computer #1
Working group: WORKGROUP
Name: Comp1
2) Computer #2
Working group: WORKGROUP
Name: Comp2
To change the PC name and workgroup, go to the control panel at the following address: Control Panel\System and Security\System.


Windows 7 System Properties
2. Sharing files and printers
If you do not take this step, then no matter what folders and files you provide for public access, no one will be able to access them.
To enable the option to share printers and folders, go to the control panel and open the " Network and Internet«.


Now click in the column on the left on the item " change advanced sharing options«.

Several profiles 2-3 will appear in front of you (in the screenshot below 2 profiles: “ Home or work" and "General"). In both profiles, you need to enable file and printer sharing + disable password protection. See below.

Sharing settings.

More sharing options
After making the settings, click " save changes" and restart your computer.
3. Sharing folders for public access
Now, in order to use the files of another computer, you need the user to share folders on it (share them).
It is very easy to do this - in 2-3 mouse clicks. Open File Explorer and right-click on the folder you want to open. In the context menu, select " Sharing - HomeGroup (Read)«.

Then it remains to wait about 10-15 seconds and the folder will appear in the public domain. By the way, to see all the computers on your home network - click on the button " Network"In the left column of the explorer (OS Windows 7, 8).

2.2 When connecting directly + sharing Internet access on a second PC
In principle, most of the steps for setting up a local network will be very similar to the previous option (when connected via a router). In order not to repeat, the steps that are repeated, I will mark in brackets.
1. Setting the computer name and workgroup (similarly, see above).
2. Setting up file and printer sharing (similarly, see above).
3. Setting up IP addresses and gateways
The setup will need to be done on two computers.
Microsoft Corporation, starting with Windows Vista, greatly changed the security policy of their systems regarding the local network. The operating system seemed new, somehow too complicated, and therefore many could not figure out how to open access to files on a computer. Today we will analyze how this is done using Windows 8.1 as an example, but Vista and 7 have a similar system, and the difference is not fundamental. The local area network can also be used to later create , which will unite all multimedia devices of the house or apartment, or to share files with your phone or tablet.
In my opinion, this is very convenient when, without additional movements, you can play a movie from a computer, laptop or even phone on a large TV screen or listen to your favorite music from your phone, on the speaker system without connecting additional wires, although it is already necessary here. . But let's move on to setting up a local network.
Video instruction available at link.
Step-by-step instruction
- For the normal functioning of the local network, all computers on this network must be in the same workgroup; for the home network, let's take MSHOME. To install it, we need to follow the following path: open "Control Panel" - "System and Security" - "System" (you can also right-click on the "Computer" shortcut on the desktop and select "Properties" or the key combination " " ). In the window that opens, select "Advanced system settings" in the left column.

- In the window that opens, go to the "Computer Name" tab and click the "Change" button. A dialog box opens in which we need to record a new working group. We prescribe MSHOME (all caps) and click OK. Close the system settings by clicking the OK button and restart the computer.

- Next, it is desirable to configure a permanent IP for both computers. To do this, go to "Control Panel" - "Network and Internet" - "Network and Sharing Center" - on the left side of the "Change adapter settings" window - select the network card, right-click and click "Properties".

- Before completing this item, read the notes under the screenshot. Select "Internet Protocol version 4" and click "Properties", fill in as shown in the picture.

P.S. If your local network is organized through a router with a DHCP server enabled - IP address, Default Gateway and DNS Servers can be left in automatic mode. This action must be done if you have two computers connected directly or if DHCP is disabled on the router.
P.P.S. The value of the IP address must be different on computers within the same local network. That is, we specify IP 192.168.0.7 for this computer, and 192.168.0.8 for the next one.
- At this point, we begin to work with folders that we will share on the network. I will use the example of one folder, but you can open access to the entire local disk in a similar scenario.
First we need to share the folder. It should be borne in mind that if the network is not limited to two computers (for example, some providers (Beeline) provide Internet to apartments based on one large local network), it makes sense not to give the right to change the contents of the folder; if you are sure about the computers included in the local network, feel free to give "Full access". So, open the properties of the folder we need, for this we right-click on the folder and select "Properties", open the "Access" tab and click the "Advanced settings ..." button.
- In the window that opens, check the box "Share this folder", click the "Permissions" button and give the necessary rights to the folder; since this is an example, I give full access to the folder, but you put it at your discretion. That's what I did:

- Click OK to accept the changes, just click OK in the "Advanced sharing settings" window, then in the folder properties go to the "Security" section and click the "Change" button.

- Click the "Add" button, in the window that opens, write "All" (without quotes) and click OK.

- We select our new group in the window and give it full access at the bottom of the window.

- We press OK, in the properties of the folder is also OK and for reliability we restart the computer again.
Next, we need to configure the visibility of the computer within the local network. To do this, go to "Control Panel" - "Network and Internet" - "Network and Sharing Center" - in the left part of the window, select "Change advanced sharing settings" and we will see the sharing settings profiles. Here your task is that in all profiles you must enable “network discovery”, and “file and printer sharing”, and “sharing so that network users can read and write files in shared folders”, as well as "Turn off password protected sharing." We press to save changes.


Visit our partner store OGO.ru, where you will find a lot of electronics from computer components to refrigerators and washing machines at delicious prices.
That's all. I hope you found this article useful, click one of the buttons below to share it with your friends. Also subscribe to site updates by entering your e-mail in the field on the right or by subscribing to a group in Vkontakte.
Thank you for your attention!
Good day!
Eh, if in the 90s of the last century a computer was a luxury, now many people have not one, but several computers / laptops at home. If you connect computers to a local network (in which there will even be only 2 devices), you can get undeniable advantages:
- the ability to open files located on another PC, work with them, etc. Now you do not need to run back and forth with a flash drive or disk;
- the ability to make a network printer (scanner, CD / DVD drive, etc.), and use it from all PCs in the local network;
- the ability to play network games (this is a separate and most interesting opportunity, which can be talked about for a long time).
In this article, I wanted to consider the issue of building a home local network (and setting it up), which will be useful to all novice users. I will follow the path of step-by-step analysis, I will start with the question of connecting one PC to another, then I will consider setting up Windows, and how, in fact, to share (make available to the local network) folders, printers, etc. So...
When creating a home local network, most often, two options are used:
- connect two computers (PC to laptop, PC to PC, etc.) using a cable (it is often called twisted pair);
- get a special "box" called a Wi-Fi router. A PC is connected to the router using a network cable, and laptops, phones, tablets, etc. devices get Internet access via Wi-Fi (the most popular option today).
Option number 1 - connecting 2 PCs using twisted pair
Pros: simplicity and cheapness (you need 2 things: a network card, and a network cable); providing a sufficiently high speed that not every router is able to issue, a smaller number of radio waves in the room.
Cons: extra wires create confusion, get in the way; after reinstalling Windows OS - network setup is required again; for Internet access to be on the second PC (2), the first PC (1) must be enabled.
What is needed: that each PC has a network card, a network cable. If you plan to connect more than 2 PCs to a local network (or if one PC is connected to the Internet and is on the local network at the same time), one of the PCs must have 2-3 or more network cards.
In general, if both PCs have network cards, and you have a network cable (also called an Ethernet cable), then connecting them with it is not difficult. I don't think there is much to consider here.
Note: Please note that network cards usually start to turn green (yellow) LED when you connect a cable to it.

Another important point!
Network cables for sale are different: and not only in color and length. The fact is that there are cables for connecting a computer to a computer, and there are those that are used to connect a PC to a router.
For our task needed crossed network cable (or cable pressed in a cross way- here who calls it).
In a crossover cable - on the end connectors, the yellow and green pairs are reversed; in the standard (for connecting a PC to a router) - the colors of the contacts are the same.

In general, if two PCs are turned on, working, you connected them with a cable (the LEDs on the network cards blinked), the network icon next to the clock stopped displaying a red cross, which means the PC has found the network and is waiting for it to be configured. This is what we will do in the second section of this article.
Option number 2 - connecting 2-3 or more PCs using a router
Pros: most devices: phones, tablets, laptops, etc. will have access to a Wi-Fi network; fewer wires "underfoot", after reinstalling Windows - the Internet will work.
Cons: purchase of a router (after all, some models are far from cheap); "complicated" device setup; router radio waves ., lower ping and freezes (if the router can not cope with the load).
What you need: a router (it usually comes with a network cable to connect one PC to it).
With the connection of the router, as a rule, there are also no big problems: the cable coming from the Internet provider is connected to the special. router connector (it is often called "Internet"), and local PCs are connected to other connectors ("Lan-ports"). Those. the router becomes an intermediary (an example diagram is shown in the screenshot below. By the way, in this diagram there may not be a modem on the right, it all depends on your Internet connection) .
By the way, pay attention to the LEDs on the router case: when you connect the Internet cable from the provider, from the local PC, they should light up and blink. In general, setting up a Wi-Fi router is a separate big topic, besides, for each router, the instructions will be slightly different. Therefore, it is hardly possible to give universal recommendations in one single article ...
By the way, when connecting through a router, the local network is usually configured automatically (that is, all computers connected via a network cable should already be on the local network, there will be a couple of small touches (about them below)). The main task after that is to set up a Wi-Fi connection and access to the Internet. But since this article is about the local network, I do not focus on this ...
LAN setup (Windows 7, 8, 10)
In this subsection of the article, I will give universal instructions, regardless of how your local network is organized: connected via a network cable, or using a router. Where the settings will relate to a specific option - there will be notes.
Note: all settings are relevant for Windows 7, 8, 8.1, 10.
Computer name and workgroup
Allegory: each person has his own name, surname, patronymic, date of birth, city, etc. - No two people are the same. It is the same in the network - there should not be computers with the same name ...
The first thing to do when setting up a local network is to check and configure workgroup name and computer name. Moreover, you need to do this on each computer in the local network!
To find out the computer name, open the Windows Control Panel at: Control Panel\System and Security\System (screen below). Next, make sure the following:
- PC name and slave. the group must be in Latin;
- each PC / laptop in the local network should have its own unique name(for example: PC1, PC2, PC3);
- Every PC/Laptop should have same working group (for example: WORKGROUP).
To change the name and working group - click the "Change settings" button.


Change workgroup and PC name
In general, when you bring all the names in accordance with the requirements above, you can proceed to the next step of the setup.
Turn on printer and folder sharing
Relevant for connecting through a router, and directly ...
This innovation appeared in Windows 7, supposedly provides more security for the OS (in my opinion, it only creates the need for additional local network settings). The bottom line is that, by default, Windows blocks and does not allow access to open and share folders, a printer, etc., until the security policy is "softened".
To remove this lock and enable sharing, you need to:

Setting up IP addresses, DNS, masks, gateways
For a network organized using a router
In general, for PCs connected to a local network using a router, usually nothing needs to be configured (everything works by default). If something is wrong, just in case, I recommend that you go in and check the connection properties.
To do this, you first need to open "network connections" . This is done simply:
- first open the window "Run"- combination of buttons Win+R;
- then enter the command ncpa.cpl and press Enter(works in all versions of Windows 7, 8, 10).

How to open network connections // ncpa.cpl

Local Area Connection Properties

To connect PC to PC via network cable
PC 1
By PC 1, I mean a computer that has two network cards: one of them is connected to the ISP's Internet cable, and the second is a local network cable that goes to PC 2.
Note: although, the Internet cable from the provider does not have to be. If it is not there, choose PC 1 and PC 2 - arbitrarily ...
And so, we open network LAN connection properties(how this is done - see a little higher in the article).
- IP address: 192.168.0.1;
- subnet mask: 255.255.255.0 (see screenshot below);
- save your settings.

V properties of IP version 4 (TCP/IPv4) second PC, you need to set the following parameters:
- IP address: 192.168.0.2,
- subnet mask: 255.255.255.0;
- default gateway: 192.168.0.1;
- preferred DNS server: 192.168.0.1 (see screenshot below);
- save your settings.

Actually, the local network setup itself is finished. Now you can proceed to the most interesting part - sharing and using the shared resources of the local network. Exactly what we were going for...
Sharing Internet access on a second PC
Relevant for PCs connected directly by LAN cable...
You need to configure PC 1 (i.e. the one to which we have the provider's Internet cable connected).
First we open network connections : press combination Win+R, enter ncpa.cpl, Further Enter .
How to open network connections //ncpa.cpl

Next, open the tab "Access", and check the box next to "Allow other network users to use this computer's Internet connection" . Save your settings.

Allow other users to access the internet
If everything is done correctly, the Internet will be on both computers.
Note: of course, for the Internet to be on PC 2 - PC 1 must be turned on! This, by the way, is one of the inconveniences of such a local network, when connected through a router - the Internet will be regardless of which PC is on / off.
Sharing folders/files for public access


3) Set the resolution: read or read and write.
Note:
- allowed to read: users can only copy your files to themselves (neither delete nor change - they can't!);
- read and write allowed: LAN users will have full control over files in folders: they can delete all files, change any of them, etc. In general, I would not recommend giving such access to important and large folders (to transfer files, it is better to have a separate folder, to which you give full access).

5) After a few seconds, Windows will report that the folder has been shared. So everything went well.
6) To access the folder:
- open the explorer;
- then open the "Network" tab (on the left, at the bottom of the window);
- open computer name, on which the folder was shared. As you can see in the screenshot below, it is shared, you can go into it and start copying (reading) any files.

Printer sharing (shared network printer)
1) The first thing to do is open the control panel: control panel/hardware and sound/devices and printers.
3) Then open the tab "Access" and check the box "Sharing this printer" . Save the settings (see screenshot below). Actually, now the printer is shared and it can be used by other PCs / laptops / tablets and other devices on the local network.

How to share a printer
4) To connect a network printer, open conductor, select computer name , on which the printer is shared. Next you should see it: click on it right mouse button and select the option from the menu connections .

How to connect a network printer
5) Then you can open any document, press Ctrl+P (File/Print), and try to print a friend page.
Note: By default, Windows typically lists a different printer (not the one you have connected over the network). Do not forget when printing - change it.
Regarding the local network printer - I recommend that you read my detailed article on this topic. It covers some of the points in more detail. Link below.
"Creating" a network printer -
I am finishing the article on this. Good luck and fast setup.
Update! Since the homegroup was removed in Windows 10 starting with version 1803, this article is no longer relevant. I have prepared a new instruction for setting up a local network and managing shared folders and files in Windows 10:.
In a previous article, I wrote about setting up a local network on Windows 7. But, since the number of Windows 10 users is growing every day, I decided to prepare instructions for setting up a local network in Windows 10. Following this instruction, you can combine everything into a home local network computers that you have connected to the same Wi-Fi router. I will show using the example of setting up a network between a computer on Windows 10 and Windows 7. But, computers on Windows 8, or several computers on Windows 10, can also participate in this network. The instruction is universal, and if you have several ordinary desktop computers and laptops connected to the same router, then you can easily combine them into a local network. And at the same time, it does not matter at all what version of Windows they work on (except for Windows XP).
After creating a local network, you will be able to:
- Share files between computers on your home network.
- Use printer sharing. For example: you connected a printer to one computer in the local network, and documents can be printed from other computers.
- Play games on local network.
And all this can be done over the air. If your computers and laptops are connected to the router via a Wi-Fi network. This is how you get it. You can connect some computers via cable, and laptops, for example, via Wi-Fi. Everything will work.
I set up a local network between two computers (stationary PC and laptop). One works on Windows 10, and the second on Windows 7. I set it up through the home group. I think this is the most correct and safe way. You can also configure it by disabling password-protected sharing, as I did in the instructions for .
How does LAN work, through homegroup setup? A very important point, since the settings there are a little confusing, the main thing is to understand how everything works, and it will be easier to set it up. So, we create a home group on one of the computers and get a password (I created on Windows 7, it doesn't matter). And all other computers that we want to network, we simply join the homegroup using the password received. That's all. It is this scheme that we will now consider in more detail.
I made a small diagram for clarity (you may have more or fewer computers and you don't have to connect a printer):
Before proceeding with the setup, you must check time and date. Check that the time and date on all computers that will participate in the network are the same.
Creating a Homegroup in Windows 7
If, for example, you have all computers on Windows 10, then we create a home group on one of the computers with "ten", everything is exactly the same there. Or in Windows 8, for example.
Click the internet connection icon on the notification bar with your mouse. Then, select .

There will be our connection to the router (via cable, or Wi-Fi). It is important that it be with the Home network status. If you have a Public Network like mine in the screenshot, then click on this link and select home network.

Close the window with the network location selection. Now, our connection with the status "Home network". Go to section home group.

Click on the button Create a homegroup.
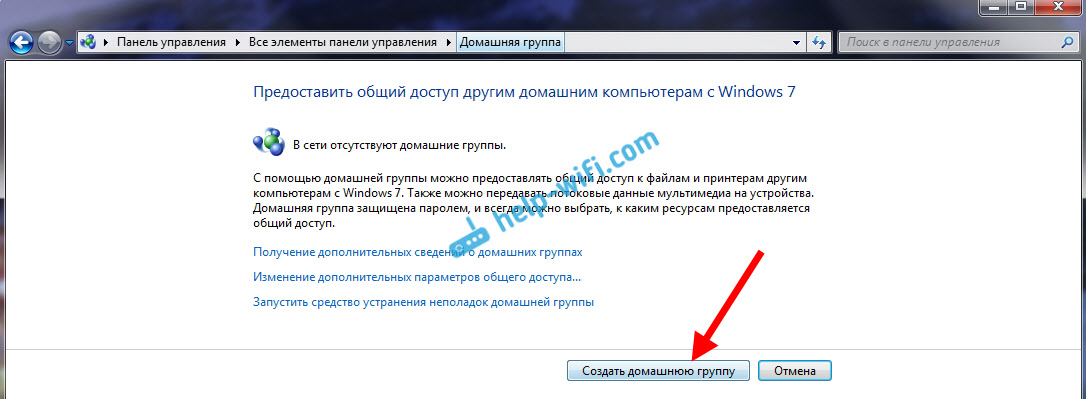
Select the checkboxes for the items you want to share (shared folders), and click Further.

Write down or take a photo of the password you get. With this password, we will join other computers to our network.

On this, the creation of the home group is completed. If you go back to Network and Sharing Center - home group, you can remember the password, change it, leave the group, change sharing settings, etc.

That's it, the group has been created. We have a password. Now we connect the necessary computers in our network to the home group.
Setting up a local network in Windows 10: connecting to a homegroup
Let's move on to another computer. Now I will show, using the example of a Windows 10 computer, how to connect to a homegroup to create a home LAN. You can use this scheme to connect not only computers with Windows 10 installed, but also with Windows 7 and Windows 8.
Already according to the standard scheme, right-click on the Internet icon, and select Network and Sharing Center. Go to home group.

If you have a message "HomeGroup is not available because you are not connected to your home network.", then click on , and click on the button Yes.

We wait a bit, and we see a message that we can join the home group. Click on the button Join.

A password request will appear. Specify the password that we received when creating the homegroup on another computer. Click Ok.

A message will appear indicating that you have joined a homegroup. Click Ready.

If you open the Network and Sharing Center - Homegroup, you can set up sharing, leave the group, see the password, etc.

Everything, the local network between computers is already working. Open Explorer (This computer), go to the network tab on the left, and see computers on the local network. We can open them and view the folders that are shared. A computer with Windows 10 sees a computer with Windows 7 installed on the network without problems.

In the same way, a Windows 7 computer sees and enters a Windows 10 computer. In this way, you can connect other computers. One condition is that they are connected to your router.
What to do next? How to use the local network?
It all depends on the purpose for which you combined computers into one network.
- If you want to play online, then everything should already work. Sometimes, antiviruses block such connections. Therefore, if there are problems when computers do not see each other, then just try for a while disable antivirus.
- To share files, you can use shared folders. Just copy the files for example to the "My Pictures" folder (assuming we shared this folder during setup), and they will be available from all computers on the network. If you want to share your folder on a local drive, then follow. See after the heading "Setting up file and folder sharing".
- And on setting up printer sharing, I will prepare a separate article.
Here are some tips. I hope the article was useful to you.
This article describes how to set up sharing, to files and folders, without a password on Windows 10.
This instruction will consider the simplest case of setting up Windows 10 folder sharing. When you need to provide access to Windows 10 shares without a password. This is the most common situation in home networks and small office networks. This setting assumes that access over the network will be without a password, without restrictions.
Note. If you have Windows 10 2017 or 2018 and are experiencing a problem " Windows 10 does not see other computers on the local network", then, read another article -. It describes the solution to the problem with connecting Windows 10 to older versions of Windows. This article may also be relevant for connecting Windows 10 to older versions of Linux.
But at the beginning of a silent theory.
Local and global networks
There is only one global computer network today, and that is the Internet. Local computer networks differ from global ones in the following factors:
- The number of computers connected in this network.
- The quantity and quality of shared (available) resources in this network.
Hundreds of millions (possibly more than a billion) computers are connected in the global Internet network. These computers provide a large number of different types of resources. The most common of which is textual and graphical information. In addition to the information itself on the Internet, processing of this information is also possible - there are services for working with images and documents. Also, services not related to computer topics are available on the Internet, for example, the sale of goods and services (for example, the sale of tickets for various transport).
A local computer network most often combines from two to several computers. Much less often, the number of computers in a local network can be several tens or hundreds (in large commercial or government organizations). As a rule, only a few resources are distributed in local networks - files, printers, scanners and access to the Internet.
Physically, computers are networked either using a cable or via a radio signal (WiFi). But in any case, setting up a local network is the same.
So, what, and in what sequence, needs to be done in order to configure the Windows 10 network?
Sharing Windows 10 without password
This guide will describe how to set up a Windows 10 network so that folders (files) and printers can be shared without asking for a password. This is a variant of a trusted network. This organization of a local computer network is the most convenient to use (no need to remember passwords for each computer). And besides, such a network is easier to create and maintain.
It is best to start setting up a local network by checking the prerequisites.
Checking the LAN connection
First, you need to check if your computer has a LAN connection. To do this, open the Available Network Adapters and Network Connections applet. The easiest way to open this applet is through the " Run Windows+R ncpa.cpl and click " OK":
Note: there is a longer way - open "" and there click on the link " Change adapter settings".
This is what the network connections applet looks like:

This example shows that there is a physical network adapter on the computer and there is also a network connection to the local network. This example uses a cabled LAN (Ethernet) connection. If connected via WiFi, the adapter will be called "Wireless 802-11".
Possible errors that can be found in the Network Connections applet:
- This applet may not have adapters at all - in this case, you need to check the list of equipment (Device Manager). Perhaps the network adapter is disabled or drivers are not installed.
- The adapter can be crossed out with a red cross. This means that there is no physical connection to the local network. You need to check the cables. In the case of WiFi, this means that the computer is not connected to a WiFi access point (router).
- The adapter may be labeled " Unidentified network". This means that there is a physical connection to the local network, but the computer could not get the settings for this network. Most often this happens if there is no router on the local network and you need to manually specify the local network settings.
By default, Windows is configured to automatically obtain network settings from a network router. If there is a router in the local network, then you just need to plug in a network cable or connect to a WiFi access point. If the local network does not have a router, which sometimes happens when using small cable networks, then you will need to manually specify the network settings in the properties of the network adapter. More information about manually configuring local network settings is written in the article "Setting up a network between Linux and Windows". The setup for Windows XP is described there, but for Windows 10 it will be exactly the same.
The next step is to check the computer name and workgroup. To do this, open the applet " System properties". The easiest way to open this applet is through the " Run". It is available through the Start menu or by pressing the keys Windows+R on keyboard. In this window write sysdm.cpl and click " OK":

This is what the applet looks like System properties" (need to open tab " Computer name"):

Here you need to check:
- Full name- it should not be written in Cyrillic and should not have spaces.
- Working group- it should not be written in Cyrillic and should not have spaces. In addition, the workgroup name must match the same name on other computers on the local network. That is, the workgroup name must be the same on all computers on the local network.
If you need to change the computer or workgroup name, click the Change button. After this change, you will need to restart Windows.
Now you can move on to configuring your Windows 10 network.
Windows 10 network setup
open "Windows Explorer" and in it find and open the item " Net". By default, on Windows 10, sharing is disabled and when you open the "Network", there will be a warning at the top:

You need to click on this inscription and then select the item " Turn on network discovery and file sharing":

Note: another way to enable network discovery and file sharing via " Network and Sharing Center"and then click on the link" More sharing options" and then open the desired profile.
Thereafter "Windows Explorer" will prompt you to select the type of network, there you need to select the first option:

Note: if you later need to change the network type - instructions in the article "Change network type Windows 10".
Thereafter "Windows Explorer" will show a list of computers on the local network:

Now you can enter the folders on these computers that are shared.
Login via local network to a computer named "Home":

The next step is to set up Windows 10 folder sharing.
How to share a folder in Windows 10
V "Windows Explorer" find the folder you want to share. Right-click on this folder and select " Properties" (in this illustration, the folder is called lan):

Note: The folder name must be in Latin characters and without spaces.
In the folder properties window, you need to open the tab " Access"and press the button there" General access":

In the next window, you need to open the list of local users (accounts on this computer) and select "All" in this list:

After that, click the "Add" button:

After that, for the "Everyone" group, you need to specify read and write access rights:


After that, you need to click the "Finish" button:

After that, the window will open again " Folder properties". In it, you can check the tab " Safety", there must be full access for the group " Everything" (Windows automatically changes the permissions of the NTFS file system):

Everything, this completes the configuration of access to a specific folder. If you want to share another folder, these steps must be repeated for each.
Note: You don't need to share individual files. All files that are in the shared folder will be available over the network. Will also be available online and all nested folders.
The last action remains..
Need to open" Network and Sharing Center" and on the left side click on " Change advanced sharing options":

In the next window you need to open the profile " All networks":

And there disable the option " password protected sharing and of course click the "Save Changes" button:

This completes setting up network access without a password for Windows 10. Now it will be possible to access this computer via the local network and Windows will not require you to enter a password.
To check, let's go to a Windows 10 computer from a Windows XP computer:

The shared folder "lan" opens and you can edit and create files through the local network.
But if, nevertheless, Windows requires a network password
Despite the fact that the settings described above are made, when logging into this computer, another computer may request a network password. This is possible in two cases.
Local users with the same name (login)
Both computers have local users with the same name but different passwords.
Example. There are Comp1 and Comp2. Each of them has a user named User. But on Comp1, the user has a password of 123, and on Comp2, he has a password of 456. When trying to network login, the system will ask for a password.
Solution. Or remove matching usernames. Or for users with the same login, specify the same password. An empty password is also considered the same.
There are no local users on Windows 10
On Windows 10, you can sign in and work with a Microsoft account if you have the Internet. At the same time, such a situation is possible when a local user was not created at all during the installation of Windows 10 (login was through a Microsoft account). In this case, Windows will also require a password when logging in over the local network.
Solution. Create a local user on a Windows 10 computer.
If there are old computers on your local network
If you have computers running older versions of Windows or Linux on your local network, then you may encounter a problem where Windows 10 "does not see" such computers.
The reason may be that in the latest versions of Windows 10 they disabled support for the SMB version 1 protocol. How to enable support for SMB version 1 is written in the article LAN between Windows 10 and Windows XP.
Unshare Folder Windows 10
On Windows 10, unsharing is not at all obvious (unlike on Windows XP). On the tab " Access" (folder options) there is no option, as it was in Windows XP. It is useless to press the "Share" button, you cannot cancel sharing there.
Now, to cancel sharing, you need on the tab " Access"press button" Advanced setup":

And there disable access (remove the bird on the option "Share this folder"):

As the saying goes "guess three times".
Sharing a Windows 10 Folder Through Command Prompt
Everything can be done much faster if you use the command line (console, cmd.exe). There are only two commands:
net share lan=c:\lan
net share lan /delete
The first command shares the folder c:\lan and sets a network name for it lan.
The second command deletes the network (public) folder lan. real folder c:\lan of course stays in place.
Sharing Windows 10 files through the Shared Folders snap-in
The Windows 10 Management Toolkit has a special program (snap) for managing shares on your computer. It is called "Shared Folders" and you can run it with the command fsmgmt.msc(in console or via Win+R):

Otherwise, this snap-in can be opened through the Start menu: "Control Panel - Administrative Tools - Computer Management - Shared Folders".
Sharing printers Windows 10
Sharing printers is configured in the same way as for a folder. You need to open the "Devices and Printers" applet, find the desired printer there, open its properties and on the "Access" tab define the network access settings.
Setting up a local network for other OS
If you live in Krasnodar and you need to set up a local network in Windows
Ivan Sukhov, 2017, 2019 .
If you found this article useful or just liked it, then don't be shy - support the author financially. This is easy to do by throwing money on Yandex Wallet № 410011416229354. Or on the phone +7 918-16-26-331 .
Even a small amount can help writing new articles :)
 "Notification Center": what is it, how to disable the service How to disable system notifications in windows 10
 Android, Windows Phone or iOS - which OS is better for a smartphone What are the platforms other than android
 Installing a Driver from an INF File