Reinstalling Windows 7 on a laptop from a flash drive. Installing Windows from a USB flash drive via BIOS
We remind you that attempts to repeat the author’s actions may lead to loss of warranty on the equipment and even to its failure. The material is provided for informational purposes only. If you are going to reproduce the steps described below, we strongly advise you to carefully read the article to the end at least once. The editors of 3DNews do not bear any responsibility for any possible consequences.

During operation, the utility deploys the OS image (in fact, it stupidly unpacks the archive) directly to a removable drive. This will turn out much faster, but upon first boot you will have to carry out the standard system setup procedure: select language settings, time zone, create users, and so on. And this is a very small price to pay for speed.
When you launch PWBoot (with administrator rights, of course), you will be prompted to either install a clean OS on a USB drive, or patch an already installed system if you are somehow going to transfer it to an external drive. You will also have to “roll” the patch after installing service packs and, possibly, some Windows updates. Working with the program is incredibly simple, so there’s almost nothing to tell. Nevertheless, there are still a couple of nuances.

Firstly, PWBoot stubbornly refuses to work with Cyrillic. If your Windows 7 installation image supports the installation of several OS editions at once, then you need to select the one you need. How to do it? Using the ImageX utility (see above), launched with the info parameter and specifying the path to the wim file.
imagex /info x:\path\to\install.wim
In the command output, look for the Image Index item and the version description that follows it. In PWBoot, the versions appear in the selection list in the same order as they appear in the command output.

Secondly, there are two installation options to choose from - directly to an external drive (with its mandatory formatting) or to a virtual disk in VHD format. The second option is much more interesting, but, unlike the first, it definitely requires Windows 7 Ultimate or Enterprise. More precisely, these editions support booting from VHD. In fact, there will be only one file on the disk in which all your work will take place. At the same time, in the OS loaded from the VHD, the physical disk will also be visible. Interestingly, the speed of the system inside the VHD is almost the same as when working directly from the drive.

In general, using VHD provides a lot of advantages. Firstly, any self-respecting virtual machine can work with this format, and its support is built right into Windows 7. You can create, edit, mount VHD disks and work with difference images (in fact, diff for an entire disk) using standard tools. This gives rise to such opportunities as the presence of several Windows installations on one logical volume, easy rollback of changes in the system, convenience and speed of OS deployment on many PCs at once, and so on.


Let's return to PWBoot. At the next stage, you need to specify the location and name of the future VHD container. Naturally, it must be on an external USB drive. Please note that the disk must have an NTFS file system (FAT32 is not suitable due to file size restrictions) and sufficient free space. The program itself will offer to make a minimum disk size, but it is better to allocate as much as you need for software, documents and everything else. A VHD disk can be made dynamic (expandable) by checking the appropriate box. That is, physically it will occupy exactly as much information as it contains. In general, to save space, you can enable this option, but at the same time lose a little in performance.

All that remains is to select the disk where the bootloader will be installed (that is, an external USB drive), check the Update bootcode and Add boot entry to BCD checkboxes, change the description of the boot menu item if desired, and click Install. That's it, the program will perform further installation steps itself. This usually takes no more than ten minutes, but a lot depends on the speed of the USB drive itself.

After installation, it is advisable to lighten the system a little - remove unnecessary components, disable non-critical services, turn off hard drive indexing, and generally try to avoid any operations associated with a heavy load on the drive. It is also useful to defragment the external drive by connecting it to another system. The problem with the swap file also remains unresolved - you can use the DiskMod driver to create it on a USB drive, you can abandon it altogether, but it is better to manually set its location on the normal HDD of the machine on which our portable Windows 7 is running.

Volume C: is an HD container that is physically located on volume E:
Finally, it is worth mentioning an interesting development called VBoot. It is a bootloader based on GRUB, but with support for direct booting from VHDs. And it doesn’t have to be Windows. The site, for example, has ready-made Ubuntu builds. In general, it’s a ready-made and convenient solution, but, of course, it’s paid - from $79 per license. By the way, Windows 8 will have a built-in ability to transfer your entire work environment to a USB drive and boot directly from it. In the meantime, you will have to be content with the above method. Good luck with your installation!

Installing Windows 7 from a flash drive is a very simple process that only requires careful reading of this article and strict adherence to simple step-by-step instructions.
Conventionally, the entire process can be divided into several steps.
- Save all important data.
- Creating bootable media.
- Installing Windows 7.
- User settings.
- Installing drivers.
Preparatory stages
We will analyze all the stages in detail and will not get to the most interesting parts right away.
If you are reinstalling Windows, we need to keep all your important files and documents, photos and videos.
There are several ways to do this.
1 Transfer everything to the cloud.
This is a cloud storage in which all data will be saved.
There are many similar services: Yandex.Disk, OneDrive, Dropbox, Mail.Ru Cloud, Google Drive, iCloud and many others.
Here we will not describe how to do this, otherwise the article will turn out to be disproportionately large.
2 Write everything to removable media: a CD or flash drive, or to a removable USB hard drive.
3 Transfer all data to other logical media if we format the system drive (usually drive C:).
Creating a bootable USB flash drive in UltraISO
Windows 7 is still popular. It almost immediately won the minds and hearts of the majority of users, who called it the best operating system.
At one time, Windows 7 was installed on more than 70% of the world's computers.
Almost every second user probably has a disk with an image; it can be written to a flash drive and then installed on a computer.
Firstly, modern computers and laptops have been sold for a long time without optical drives.
Secondly, on those devices that still have drives, due to long periods of inactivity (disks are almost never used anymore), they can fail: the installation process may fail due to dust in the drive or an invisible scratch on the disk - it’s better install from a flash drive.
To record we need the UltraISO program.
This is not the only program for creating bootable media, there are a lot of them, but in most cases these are either paid products, or difficult to manage, or in English.
At least, no restrictions were noticed during the trial period for the average user.
1 Downloaded the program. Installed. Double-click to launch the shortcut on the desktop.
2 In the program window, click on the “File” button. In the drop-down context menu, select “Open”.


Hard disk recording
And select the item in the context menu list “Burn hard disk image”.

2 Select our flash drive in the list Disk Drive.

3 Recording method USB HDD+. Check the box "Check". We don’t touch other settings anymore - click “Record”.

The process, on average, lasts about 10 minutes.
The flash drive must be formatted, so you also need to transfer files from it somewhere to reliable storage.
At the end of recording, we see a corresponding message in the program window. The program can be closed.

Before starting the installation, you can check whether everything was done correctly.

Nothing bad will happen! If the Windows 7 installation window starts, great, restart the computer and proceed with the installation.
Preparing to install Windows 7
Now let's get to the fun part.
The flash drive with the image must already be installed in the USB connector.
Reboot the computer or turn it on.
We need to boot from a flash drive: there are two ways - set the boot priority in the BIOS and through .
Let's look at each of them.
Boot priority in BIOS
When rebooting, you need to press a key or key combination:
- Delete
- F1, F2, F3, F10, F11, F12
- Ctrl +Shift +S
- Ctrl +Alt +S
- Ctrl +Alt +Esc
- Ctrl +Alt +Del
Depending on the motherboard manufacturer, the key may differ.
More details can be found on the website of the manufacturer of the motherboard of a specific model, or at the time of the POST check, when the message appears on the screen with the motherboard logo for a few seconds - "Press Del to run Setup".
A window like this will load. The BIOS interface may also differ significantly from the example.
In more modern computer models (only now it is UEFI), it has a graphical interface and the ability to switch the menu to Russian.
Here we switch to the section Boot or Advanced BIOS Features.
You can only navigate here using the arrow keys on the keyboard (with the exception of modern BIOS firmware, where you can use the mouse).
We need a section Hard Disk Boot Priority- switch it to position Press Enter. The next step is to select a flash drive in the section First Boot Device.

Save the changes with the F10 key and exit the menu - Esc.
You can boot from a flash drive without changing the BIOS settings. And setting download priority.
This can be done through.
When rebooting, you need to use the keys F9, F12, Esc, F8, F11 (depending on the BIOS version).
When a window like this appears (it may differ slightly), use the arrows on the keyboard to select our flash drive from the list of bootable media and click Enter.

If everything is done correctly, as described in the previous paragraphs, then when the message appears, click on any key and wait until the installation of Windows 7 begins.


1 In the first window, select the language and keyboard layout (the default is Russian). Click "Further".
2 Press the button "Install".

There is a button below "Recovery" with its help you can restore a damaged boot sector (for more experienced users).
And help - by clicking on the button "What you need to know before installation", you can read detailed tips and instructions for installation .
3 We agree to the terms of the license agreement and click "Further". It would be useful to read the agreement itself.

We agree to the terms of the license agreement and click “Next”
4 Now the most important thing, in the next window we switch to the item "Custom installation for advanced users".

Don’t be afraid of the inscription about experienced users, this is just a clean installation option with full formatting of the system partition or the entire hard drive before installation.
But we have already saved all the documents and can safely format the system disk.
First option "Update" represents the installation of a system over the old one, when the old system is packed into a folder Windows.old, it will take up a lot of space and it will be difficult for an inexperienced user to remove it without reinstalling it.
1 When the system is installed on a new computer, you need to create a logical partition, one or more (if necessary). Click on the button "Disk Setup".


Click “Create”
3 Write the size of the future system disk and select “Apply”.


Additional partitions will be created automatically, in addition to the main one, these are system-reserved partitions for recovery.
When reinstalling the system, you only need to select the partition with the system and format it.
Other partitions, logical drives and reserved partitions cannot be touched. Otherwise, it will not be possible to save information on logical drives.
To completely format the entire disk, delete all partitions, format the entire disk, and create the partitions again.

Now we need to be patient, the process can last 20 minutes or more.
True, on modern SSD drives the installation is much faster - about 5 minutes.
Once the installation is complete, the computer will reboot several times.
It is advisable to remove the flash drive during the first restart so that the installation does not start again if the boot priority in the BIOS was initially changed.

3 The following window will appear to enter the product license key (it can be found on the box with the license disc).

Uncheck the box “Automatically activate Windows when connected to the Internet.”
Important: if you do not remove this checkbox, you will not be able to log in to the system without the key.
Selecting security options.

The second point is to install only important updates.
Third point "Postpone the decision"- no updates will be downloaded, but you can then install them yourself.
The next step is to set the time zone, time and date.

Select the network type. If the Internet is available, the corresponding parameters for the selected network type will be applied.

Possible problems
Sometimes users encounter driver problems. After installation, you may, for example, discover that there is no sound.
Or there is no network access - this means that the network driver is not installed.
To protect yourself from such unexpected troubles, you can prepare in advance a collection of all the necessary drivers and utilities, after installing which your computer will work without problems.
Such a tool is the program DriverPack Offline Full.
It needs to be loaded onto a separate flash drive and run on a system that does not have the necessary drivers.
The program itself will detect missing drivers and utilities and install them.
There is only one drawback - the program is quite voluminous. At the time of writing this article, the driver pack weighed more than 16 GB.
But you should be careful - it will install various additional programs and applications without permission.
It is easy for an inexperienced user to miss this point, and then they will have to clean the system of unnecessary antivirus programs and other unnecessary software.
conclusions
Windows 7 can already be called an outdated system. Without a doubt, even after 9 years it is still considered the best, although the “top ten” are catching up with it by leaps and bounds.
Extended support, according to Microsoft developers, for the “seven” will be completely discontinued in 2020.
After the complete end of support for security updates, you can no longer wait.
Therefore, consider purchasing a new version of Windows.
Installing Windows 7 from a USB flash driveit doesn’t work, help, I looked up everything I could on the Internet, I don’t have a DVD drive, I live in the area, I have no one to ask for advice and I need to prepare for exams, I wrote to everyone, no one answered me.That’s it, no more, no less, let’s try to help, and the most impatient can read at the end of the article the advice that helped our girl install the operating system.
Installing Windows 7 from a USB flash drive
Let's start at the very beginning of why you and I might fail.
- Firstly, it is difficult to understand the girl, she does not have a DVD drive, it may not be in the netbook, almost all netbooks support booting from a USB device and she simply cannot change the boot priority from the hard drive to the flash drive, then read our articles and another one. Or she has a simple computer without a disk drive and the motherboard installed in it does not support booting from a USB device, but let’s hope that it’s not so tragic.
- I once observed how a user without proper experience... installed Windows 7 from a flash drive to your netbook. He suffered failure after failure, as it later turned out due to an incorrectly prepared Windows 7 distribution kit on his flash drive, read how, which details how to prepare a distribution kit with Windows 7 on a flash drive in nine simple and free ways.
- Use only original builds of Windows 7 from Microsoft, and you will get rid of many problems, it could also be the flash drive itself, if it is many, many years old, try replacing it. The process itself installing Windows 7 from a USB flash drive, no different from usual, let’s take a look at our article.
- Try also changing the USB port into which you insert the flash drive; it is advisable to use one located directly on the motherboard, read
- The flash drive must have a capacity of at least 4 GB; all your files from it must first be copied to a safe place, because it will be formatted.
You should also prepare your netbook for installing Windows 7 from a flash drive, from the partition on which you will install the operating system, you also need to copy all the data to a secluded place, it will be formatted like the flash drive. - Friends, if you have a new computer, laptop, netbook with USB 2.0, as well as USB 3.0 ports and you decide to install Windows 7 on it from a bootable USB flash drive, then you need to know that you need to insert the flash drive into a USB 2.0 port, since Windows 7 does not support USB 3.0 (ports are usually colored blue). If you insert a bootable USB flash drive into a USB 3.0 port, the installation of Windows 7 will end with this error.
"The required driver for the optical drive was not found. If you have a floppy disk, CD, DVD, or USB flash drive with this driver, insert this media" - You may also be interested in our other interesting articles: and.
And lastly, a method for creating a bootable USB flash drive with Windows 7 in just four steps from Microsoft, the Windows 7 USB/DVD Download Tool, this method is not in the article on our website “How to Make a bootable USB flash drive for Windows 7”.
Download the utility from the direct link Windows 7 USB/DVD Download Tool; by the way, it can also create an installation DVD.
Requires Microsoft .NET Framework 2.0 (download)
Launch the program, then click Browse and specify the Windows 7 ISO image file
Step-by-step installation of Windows 7 from a flash drive!
Are you planning to install Windows 7, but your DVD drive refuses to work? Or do you not have one at all, since you use a netbook? Indeed, the situation is not pleasant, but there is no need to despair. A great way to get out of this situation is installing Windows 7 from a USB flash drive.
Please note that for the installation process you will need:
- Flash drive, the volume of which must be more than 4GB.
- ISO image with Windows 7.
- Windows 7 USB/DVD Download Tool 1.0.
For simplicity, we will conditionally divide the entire process of installing Windows 7 into several stages:
- Creating a bootable USB flash drive.
- Installation of the operating system.
Go to the “Start” menu, select “Control Panel”, then click on the “User Accounts and Family Safety” item, and lastly, select “User Accounts”. Here we click “Change User Account Control settings”.

Move the slider to the very bottom, then click OK.
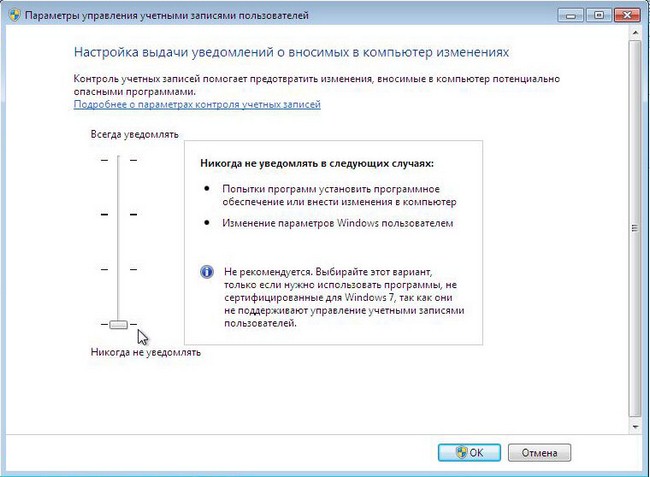
We confirm our decision by clicking Yes.

Congratulations, you have completed the first stage - disabling User Account Control.
2. Creating a bootable USB flash drive
There are several ways to install the Windows 7 operating system. Installation from a flash drive using the Windows 7 USB/DVD Download Tool 1.0 is the easiest and fastest. Connect the flash drive to the computer, having first copied all important information from it. Next, launch the USB/DVD Download Tool and click Browse.

Select the operating system ISO image and click Open.

After you have specified the ISO image on your computer, click Next.

Click USB device.

In this window, select the connected flash drive and click Begin copying, which will start the copying process.

Click Erase USB Device to format the flash drive.
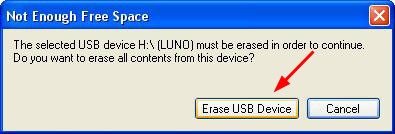
Click Yes to confirm your decision.
The process of writing the image to the flash drive has begun.
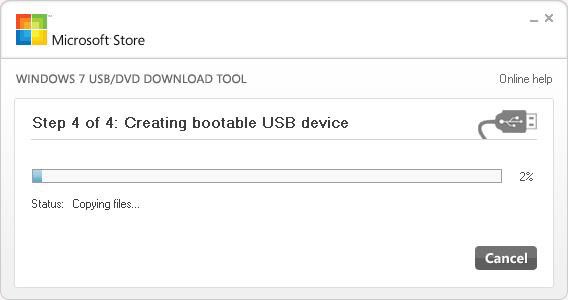
Once recording is complete, Backup completed will appear. You can safely close the program.

That's all. You created a bootable USB flash drive yourself. As you can see, installing Windows 7 from a flash drive is not at all difficult if you follow these steps.
Before you start installing Windows 7, you need to set the flash drive to first place in the boot priority in the BIOS. To get to the BIOS menu, you need to start a specific key when you boot your computer. This could be Del or F2. When loading, you may see this prompt at the bottom of the screen:

In Bios, look for the Boot tab. Here, in the boot order, you need to put the bootable USB flash drive first. To do this, use the arrow keys, as well as F5 and F6. Use the arrow keys to select the flash drive, and use the F6 key to bring it to the first position. Next, save your changes and exit this menu by pressing F10.

A window will appear where you need to click Yes, confirming your intentions to put the flash drive first in the boot order. If you did everything as described here, then after restarting the computer, the installation of Windows 7 from the USB flash drive will begin.

Select the basic installation options and click Next.

Click Install.

We agree to the license agreement by checking the appropriate box. Click Next.

At this point, you will be offered several installation types. We recommend choosing the full installation.

Here you need to specify the partition (disk) on which Windows 7 will be installed. Please note! Do not install the operating system on hidden partitions, if there are any.

After selecting the partition where you plan to install the OS, click Disk Setup.

Click Format. Note! Formatting will permanently delete all data on this drive.

If there is no important information in this section, feel free to click ok.


The installation of Windows 7 from the USB flash drive will begin.

If all files are copied, the computer will reboot for the first time. If you don't want to wait for the 10 seconds to pass and the computer to restart itself, click “Restart now.” During the reboot, be sure to return the hard drive to first place in boot priority, otherwise you will start installing the OS again.


Here you need to enter your Username and Computername. Let's move on.

If you wish, you can set a password for your account.

Enter the license key in the field. Please note that you can enter the key after installing the system. Click Next.

Here we specify the security settings.

Enter the Date and Time.

Specify network settings.

If you followed these steps, then you will see this image, which indicates that the installation of Windows 7 is complete, for which we congratulate you!

Video tutorial on installing Windows 7 from a flash drive
Write in the comments below if something doesn’t work out for you or if you have any difficulties - we’ll figure it out together!
Installing Windows on a laptop from a flash drive or disk via BIOS, problems installing Windows 7 are the most common problems when installing Windows 7, we will look at them all here. These recommendations and installation instructions also work not only for a laptop, but also for a computer and for installing any version of Windows. Since a laptop is essentially no different from a computer, the installation of all versions of Windows works according to a similar scheme.
I myself don’t like to read a lot, much less write a lot. That’s why everything here is written in the most understandable language, without fluff and verbiage for SEO search engines. Even an autistic person will understand it.
- So, download the image itself from Windows 7 to your laptop or computer, the image format is ISO, the most stable build of Windows 7 or the original image of Windows 7 can be found on our website and downloaded via a torrent client. To make sure that the file is downloaded entirely and without errors, we check the checksums; if you don’t know what it is, then we don’t bother and don’t check it; most often the image is downloaded without problems.
Now we need to create a bootable USB flash drive or a bootable DVD disc. To do this, you need to use the UltraISO program or the Rufus program.
We insert our boot disk into the disk drive of a laptop or computer, or the created bootable flash drive into a USB connector. On relatively new PCs there are two types of USB. USB2.0 and USB3.0. So you need to insert it into USB2.0. If you don’t know where which ones are, try inserting them into different connectors and see what works.
Now we need the laptop or computer to boot from our boot DVD or flash drive. Besides how to do this through the BIOS, there is a much simpler and faster option. Just call the BOOT menu and there we select the media from which we want to boot.
The keys that call up the boot menu are different for each laptop, look at the picture with the table below and determine which button calls up the boot menu on your computer or laptop.

If you still want to configure the BIOS for installing Windows 7, then keep in mind two things: after the first installation stage, at the time of reboot, do not forget to remove the USB flash drive or remove the disk from the DVD drive, otherwise the first installation stage will be repeated endlessly. And that after installation you will have to change the priority back in the BIOS from the flash drive to your hard drive.
The BIOS window is called up by the button indicated in the same table above, slightly different for each manufacturer. Either the DEL or F2 button. Next, select the Boot tab and there we see the line Boot device Priority. We go there and put our storage media, either a flash drive or a DVD drive, in the top place, and don’t forget to go to the Exit tab and select the Exit & Save Changes line there so that all changes are saved.
That's it, our BIOS is configured for installing Windows 7. Now we boot from our flash drive or disk and install Windows 7 in semi-automatic mode, choosing our parameters.
Upon completion of the win7 installation, do not forget to activate windows 7, then install the windows drivers and update the system from the Internet or from the standalone windows 7 SP1 update package.
 Fitness bracelets Xiaomi Watch mi band 2
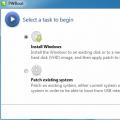 Installing Windows from a USB flash drive via BIOS
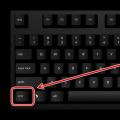 How to see another computer on the network When I go to the network, not all computers are visible