We connect original gamepads to the PC. Correctly connecting a gamepad to a computer Connecting a joystick to a Windows 7 computer
Control of your computer and most of its applications is designed for use with a keyboard and mouse. However, some games use a gamepad, so it is recommended to use it exclusively in them, but you won’t be able to simply connect the joystick to your computer (PC).
DirectInput or Xinput
Dinput and Xinput are APIs that send commands to the computer, entered on the gamepad. There is a very major difference between them: it lies in the key settings. Xinput (Xbox) was originally created for controllersXbox, since they are developed by Microsoft along with Windows, and therefore all kinds of its configurations are present in the system by default. Dinput (Direct), in turn, cannot boast of this, because the configuration must be carried out by the owner. But some devices (like Logitech joysticks) can support both modes.
Connecting to a computer
To connect any joystick to a PC or laptop, just insert a USB cable or BlueTooth adapter (depending on the device itself) into the USB connector of the computer. However, after this it is unlikely to work, since most likely the necessary drivers will be missing.
For non-branded and Chinese controllers, they are almost always included on a separate disk, or a link to download them is provided in the instructions (otherwise you need to find them on the Internet), it all depends on the manufacturer. After installing the drivers and connecting, the computer should recognize the joystick as a controller and add it to the device manager - it will start working.
Calibration and Setup
After connecting the gamepad to the computer, you need to configure and calibrate:
The joystick settings for Windows 7, 8, 10 are completely identical.
Connecting a PlayStation joystick
XBOX Wireless Controller
The process of connecting a wireless Xbox controller is very different from connecting a conventional wireless joystick (described above), and all thanks to it unique opportunities: vibration and glow. To implement it you need to follow these steps:

Connecting a joystick on MacOS
Since Mac OS is quite different from Windows, connecting the joystick is different: most of these systems doesn't see them at all, which requires installing special drivers or programs. One of these is Joystick Mapper ($4.99 or 349 rubles in the Mac App Store) after connecting the gamepad you can immediately configure it and works with all controllers in all applications - it works by simulating keyboard keys. There is also a free analogue of the mapper – Enjoyable, which works on a similar principle.
But there are also those that Mac will see without additional settings: on Windows these support Dinput (or it and Xinput at the same time), for example? Logitech joysticks can be noted.
How to check the functionality of the joystick
A distinctive feature of a working joystick is, oddly enough, cursor control on the desktop. In addition, on XBOX gamepads during operation ring flashing around the logo, and on “regular” light bulb on adapter and the power button. The response of individual keys can be checked in the already mentioned calibration menu or the driver menu.
Connecting multiple joysticks
To share one computer, you just need to connect twoUSB-cable(or adapter) into 2 different connectors, then you can enjoy a cooperative game (only if all of the above methods for connecting one device are done correctly).
The game does not recognize the gamepad
There are several solutions to this problem:
- If usedSteam, then you need to switch to the mode Big Pucture using the option in the upper right corner, enable “ settings" and go to " gamepad settings».
- If we are talking about an unlicensed version of the game that does not support a gamepad, then you need find a quality emulator.
- Some games or not at all don't support gamepad, or only supports Xinput, i.e. from Xbox. In this case, you need to find an emulating program: for example x360ce, configure the device in it and (in the current situation) copy the settings data to the game folder. Xpadder can also help, copying your keyboard keystrokes, so the gamepad will definitely work in all games - and absolutely free.
A gamepad (joystick in common parlance) is an extremely convenient tool for games. Most modern PC projects in the gaming industry are designed to work specifically with the Xbox 360 or Xbox One controller. There are small exceptions when the game is also able to distinguish a Sony gamepad, but this is very rare.
However, what if you don’t have expensive accessories like a Microsoft or Sony gamepad? Let's say that you purchased a completely ordinary gamepad from a not very popular company, for example, DeTech, which modern games simply refuse to detect. How to set up a joystick on a PC for games of this type?
To play games on a PC, you don’t need to have a gamepad from a popular company: you can configure any gamepad to work properly. It is in this article that we will look at various ways to configure conventional joysticks.
How to set up a joystick on a PC for games?
So, you have at your disposal an inexpensive but good gamepad that is not registered in any way by any modern toy. Why is this happening? The thing is that most inexpensive gamepads are made using the DirectInput input standard, which will allow you to reassign buttons on the device.
Most games are designed to work with devices using the XInput standard, which ensures full compatibility with the Xbox 360 gamepad. Simply put, a gamepad with XInput input will be detected in almost every game (yes, there are exceptions) as an Xbox 360 gamepad. DirectInput gamepad. accordingly, it won’t. Yes, in some games it will be able to be identified as a control device, but setting up the joystick control in this case will be incredibly problematic, and sometimes even impossible.
Don’t throw your DirectInput joystick in the trash and run out and buy a branded device, right? Right! Using a program called x360ce, you can make all games think that you have an Xbox 360 gamepad connected.
First, you need to go to the official website of the developer of this emulator (that’s exactly what it is) and download it to your computer. First of all, you need to decide what bit size your game is. All modern games are 64-bit applications, while most older games are 32-bit. After downloading the desired version of the x360ce emulator, place its executable file (x360ce_x64.exe or x360ce.exe) in the folder with the game executable file.
Ok, we did it. Okay, now you need to configure the emulator itself to work in the game with your gamepad. Connect the gamepad to your computer and run the x360ce emulator executive file, located in the folder with your game. The following x360ce emulator window should open in front of you:


The emulator will tell you that the xiput1_3.dll file is required for it to work correctly and will prompt you to create it. Click on the “Create” button to have the emulator create this file in your game folder. Next, you should see something like the following picture:

Check the box next to “Search for settings automatically,” as well as the box next to the “Search the Internet” option. Then click on the “Next” button, after which the following window should appear in front of you if everything went as it should:

Now you should see a window with settings for the layout of the gamepad buttons. Take the connected gamepad in your hands and try to press a few buttons on it, if everything went well, you will see button press signals. If not, then in the “Controller” tab you will see a red square and no click signals.

If this situation occurs to you, then of course you can start trying to set different profiles for the controller in the layout settings, but we recommend that you simply collect the layout and then configure it yourself. To do this, click on the “Clear” button, after which you will get a clean screen like this:

Now all you have to do is assign each button to your gamepad individually. To do this, click on the button's drop-down menu, select "Record" (with a red circle), and then press the button on the gamepad to assign it to the selected location. You should get something like this (depending on the gamepad):

Assign the keys to your controller to match those on your Xbox 360 controller. Once you're done, click on the "Save" button and close the x360ce emulator window. Then launch the game you need and make sure that the emulator settings have been made correctly.
That's all. Using the x360ce emulator, you can make many video games think that a regular gamepad connected to your computer is an Xbox 360 gamepad. Finally, I would like to point out one more small aspect of this whole problem: some gamepads are able to switch between DirectInput and XInput modes, for example, some Device models from Logitech are capable of this.
If you have such a gamepad at your disposal, then you do not need to use the x360ce emulator or other software - just switch it to XInput mode and all games will think that an Xbox 360 gamepad is connected to your PC.
Found a typo? Select the text and press Ctrl + Enter
This is a type of game controller, which is controlled by pressing special control buttons with your fingers.
This device gained immense popularity with the advent of game consoles such as Sega and Sony PlayStation.
Today we will look at how to connect a gamepad to a computer in order to be able to fully enjoy a particular game.
Universal connection to Windows
Read also: TOP 15 Best Games on PC | Review of the coolest new products released in 2019
Connecting the game controller to a personal computer running the Windows operating system is carried out as follows:
- First of all, find it on the Internet, download it and install it on your computer special application ScpToolkit. This program is a large set of drivers for Windows for all kinds of game controllers;
- connect your existing gamepad to the computer using a USB cable and launch the ScpToolkit application, a shortcut for which will appear on the desktop.
In the program window, check the boxes next to the groups of drivers that you want to use and proceed to install them.
If you are deciding how to connect a wireless gamepad to a computer, activate the item "Install Bluetooth driver" and select the same one from the drop-down list - the device that you connected to the computer.

After this you need to click on the button "Install" and wait for the installation of the required driver to complete.
Connecting using MotionJoy Gamepad Tool
Read also: TOP 10 Best portable game consoles: always take your favorite games with you | 2019
Game joysticks can also be connected to a PC running the Windows operating system using the program MotionJoy Gamepad Tool. DOWNLOAD
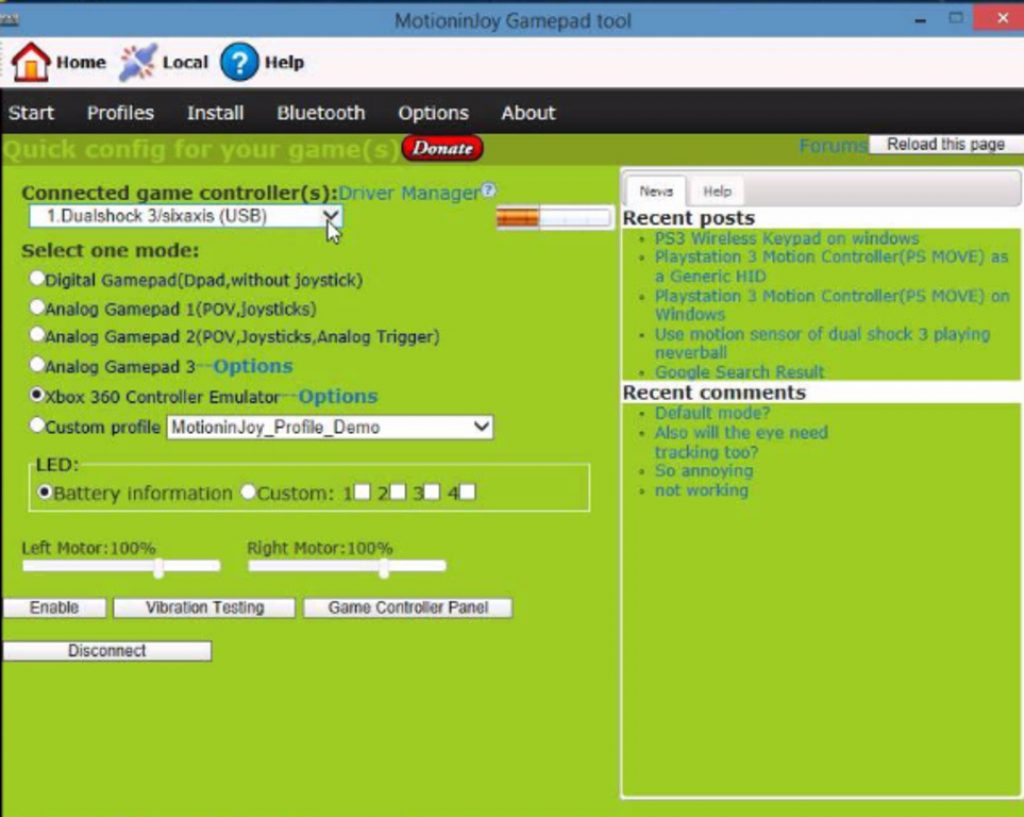
In addition to the connection itself, this program allows you to configure all the buttons of the connected manipulator, as well as the vibration power during the game.
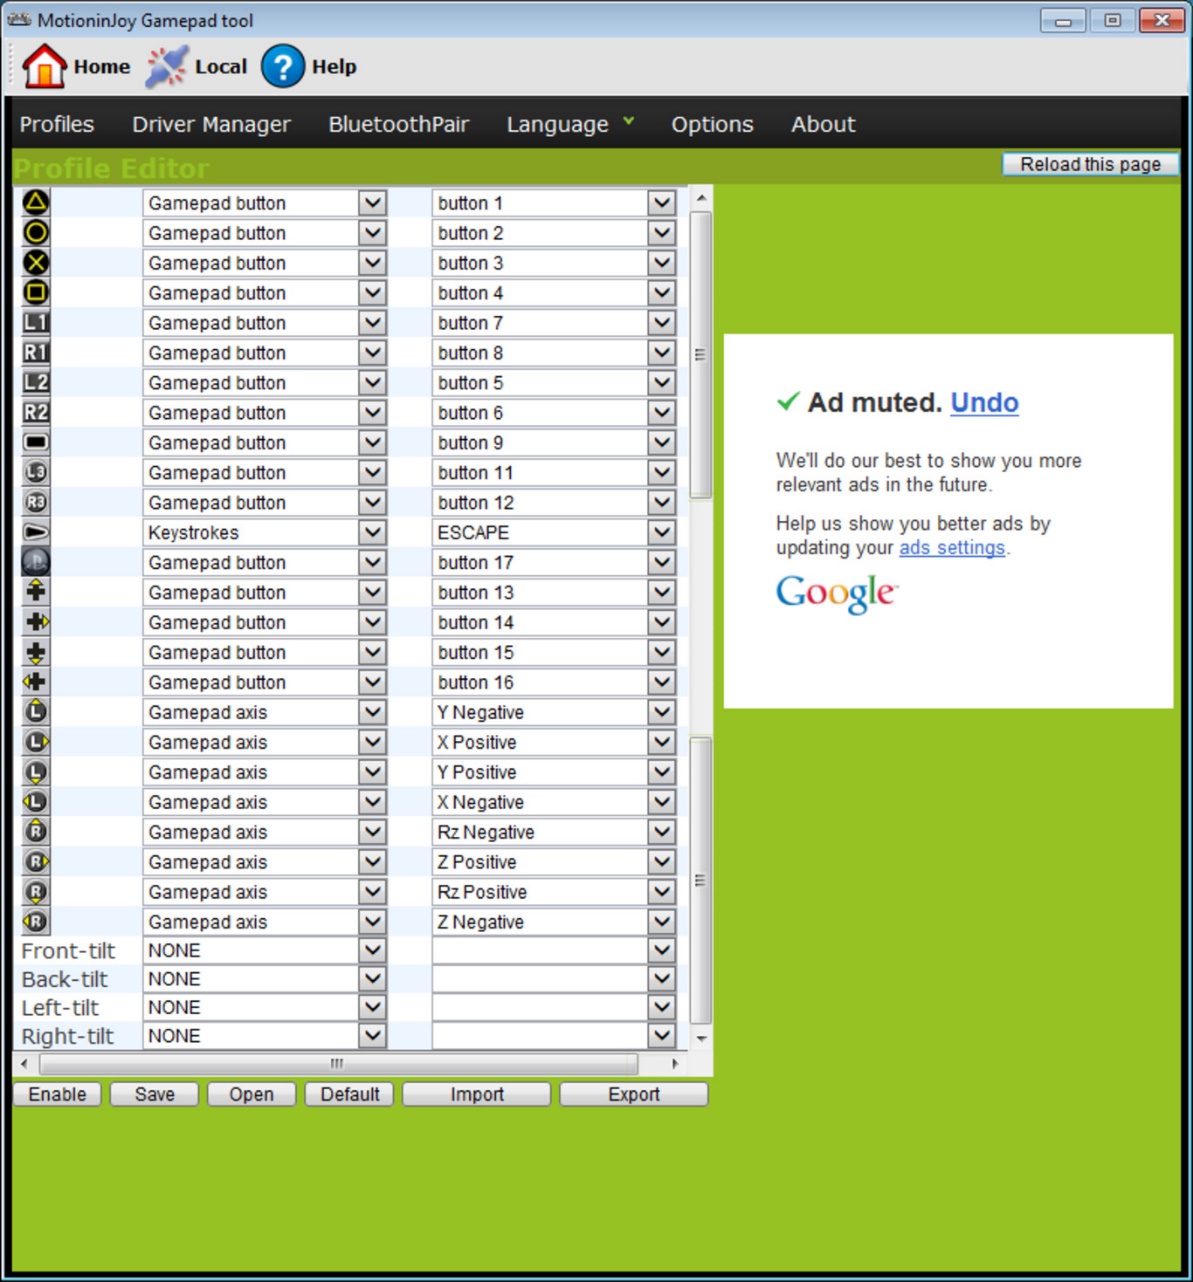
Connecting a joystick using this program is a fairly simple process, during which you only have to follow the instructions available on the official website.
Connecting using JoyToKey
Read also:TOP 12 Best gamepads for your PC | Review of current models in 2019
When a user buys a regular joystick that has a USB cable attached to it, he can connect the device by simply connecting the gaming device to the computer.
Typically, Windows OS will automatically recognize the connected joystick and install the appropriate driver for it.
In this case, a set of drivers is included with the universal joystick. So you don’t have to be afraid that the system won’t cope with this task of how to connect a gamepad to a computer on its own.
Owners of Xbox One game consoles, as well as a wired controller, can connect these devices to the computer themselves.
Such a set-top box is made by Microsoft, which means there will be no problems with automatically searching for a driver.
Having connected the gadget to a personal computer, press the central button and wait until the segment lights up.
If the user has an original PlayStation joystick (third version), it would not be superfluous to install and also purchase a mini USB cable.
Be sure to select the appropriate OS version (if you are using a Windows version earlier than version 8).
The user will also need to download the Microsoft.net and Visual C packages.
Download DownloadYou can't do without the SCP Driver program.
DownloadAfter completing these steps, proceed to connecting the joystick. Run the application from the unpacked archives and wait for the installation to complete.
Connection process
Read also:TOP 12 Best Gaming Monitors from 100 to 144 Hz | Rating of current models in 2019
Connecting a gamepad from the PS3 game console to your computer is much more difficult than the popular Xbox gamepad.
The reason for this is the fact that special drivers are required to be loaded - this is necessary for the Windows OS to see the inserted gamepad and work successfully with it.
But the specialists managed to develop an easy way to connect:
- download the driver file from the official website;
- don't forget to connect the gamepad;
- Open "Device Manager" and find your gamepad - it will be marked with a question mark. By going to the context menu, open the device properties. Once in the driver, click "update" or "installing drivers" . In this case, you will have to specify the path to the folder of downloaded drivers;
- install the ForceFeedbackDriver driver, which will be located in the downloaded devices folder. The specified driver controls the vibration of gamepads during the game;
- don't forget to install the SDDriverSetting driver, whose main task is assigning keys and setting up Bluetooth.

As a result, the gamepad will work correctly with the Windows operating system.
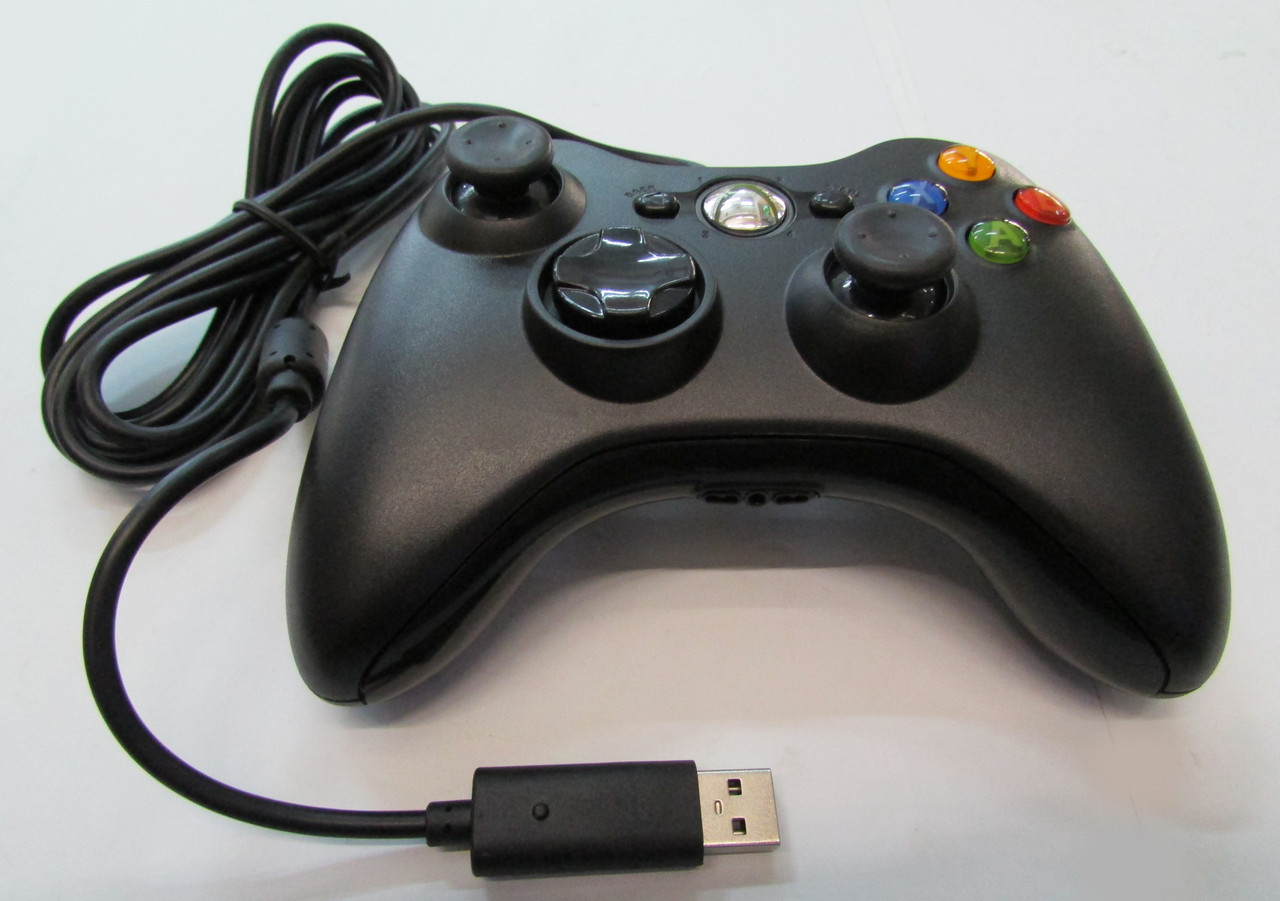
Connecting a wired Xbox 360 joystick
Read also: TOP 10 Best gaming computers for good gaming | Review of current models in 2019
This section will help you understand how to connect an Xbox 360 gamepad to a computer, even for a person ignorant of this.
For these purposes, you need to connect the Xbox 360 controller to any unoccupied USB port.
The operating system itself must detect the drivers for the joystick and install them.
If this process is missing, you need to install all the latest updates on your operating system.
After installing the updates, restart your computer and connect the joystick again.
If you have completed all the necessary steps, the operating system will detect the new device and install the appropriate drivers for it. After that, all you have to do is launch the game and enjoy the gameplay.
Please note that in some cases the Xbox 360 controller may not work when connected to a USB 3.0 port.
To solve this problem, you just need to move the cable from the joystick to another free input on the computer.
Xbox 360 Wireless Gamepad
The only thing that is required for these purposes is the purchase of a special adapter that allows you to connect the Xbox gamepad to your computer.
This device is sold complete with a CD containing all the necessary drivers. But they can be downloaded for free from the Internet.
All you need to do is install them and enjoy your favorite ones.

53 102 042 0
Entertainment is one of the functions of modern computers, which has long become a priority for many users. Those who do not want to buy an Xbox or PS for these purposes try to make their devices as powerful as possible - top-end video cards, fast processors and a huge amount of RAM on board - this is not a complete “spec list” of gaming computers. But even the most powerful configuration will not give you the full experience of your favorite game if you do not have a good control module.
This is why all kinds of joysticks and controllers are in such great demand - with their help you can fully enjoy your favorite game without resorting to buying expensive consoles. But, unfortunately, many users do not know how to connect the device to a computer, even after purchasing such a device.
Today we will try to correct this misunderstanding by telling you in detail how to set up a joystick on a PC or laptop.
You will need:
Connection
We take the device out of the box and unwind the wire. Connecting this device is simple - insert the joystick plug into the USB port on the computer.

The automatic process of searching and installing drivers will begin. If the joypad came with a software disc, be sure to install it. It may contain the necessary drivers or software for the device to function correctly.
Installation
After making sure that the software is installed and the system recognizes the joystick, you can proceed to setting it up. To do this, open the “Start” menu and select the “Control Panel” section.

We are interested in the joypad - click on its icon twice. A menu will appear in front of us in which we will need to assign operating buttons and axes of the device.
Settings
Click opposite the name of a specific key on the game controller and manually on the keyboard perform the action that the joypad should perform in the game.

When finished, save the changes. It is possible to create multiple sets of key values.
For example, you purchased a joystick for FIFA 2012 and Mortal Combat. In order not to reassign buttons manually each time, you can simply change the ready set by confirming the changes.
When Sony first announced that the DualShock 4 would be compatible with Windows, gamers all over the Internet cheered the news. Unfortunately, you won't always be able to simply connect it to your computer and start playing. Although the PS4 controller is recognized by Windows, existing games may glitch or not work automatically with it.
Windows supports the use of the PS4 gamepad for PC, but since Microsoft has its own console, they officially only support their controllers, and dual shockers will have to dance a little with a tambourine.
What do you need to connect?
- Actually the controller itself.
- Standard USB cable.
After connecting the gamepad, it will be recognized by the system and you may even be able to use it in some applications and games (for example Steam and some toys).
If you simply connect the device to your computer, then some of the joystick’s functions will not work, such as:
- touchpad (but works like a button),
- gyroscope,
- vibration,
- built-in microphone and speaker,
- headset jack.
How to make the gamepad work correctly?
Here you have only one option - to use special software, namely:
- drivers;
- joystick emulator (Xpadder).
It is worth understanding that when connecting a PS4 joystick to a PC, you only need to use one of two options; which one is up to you. Let's talk about everything in order.
1) Dualshock 4 drivers for computer
In most cases, using a modern operating system such as Windows 10, no drivers will be required and the joystick will be recognized automatically.
However, this may not always be so smooth, and for such cases when the gamepad will not be recognized or will be recognized with errors, there are at least two drivers:
Moreover, the second grew out of the first, when it was still at the testing stage. You can download the drivers using the links above, or by visiting the official support threads: one, two.
In addition to the drivers themselves, you need to check if the following components are installed on your system and install (or update) them if necessary:
- Latest version of DirectX;
- Latest official version of Microsoft Xbox 360 Controller Driver;
- Administrator rights.
Before installing all components, you should close all applications and games that may be using the controller. Also, if you previously installed a driver for Dualshock 3, you should remove it. If you want to use the gamepad via Bluetooth, you need to install the appropriate drivers for it too.
Installation procedure for DS4Tool:
- In the archive there is a Virtual Bus Driver folder, in which we install the ScpDriver.exe file (this is the driver itself).
- After installing the driver, run the ScpServer.exe file (located in the root of the archive).
Once the installation is complete, connect your DualShock 4 to your computer via USB or Bluetooth. Keep in mind, USB is a much more reliable choice as some Bluetooth chipsets are not supported by this software. The controller is recognized in the application (ScpServer), and in most cases functions identically to the Xbox 360 device. However, some games have compatibility issues, so you may need to check the "Hide DS4 Controller" checkbox.
By clicking on the “Settings” button, you can open a window with several sliders. Here you can change the color and intensity of the DS4's light bar, switch it to a battery indicator, set vibration, and enable the touchpad to control the mouse pointer.
You can watch this video to make it clearer:
At the time of creating the video, earlier versions of drivers were available, which is why there is such a discrepancy in size - the author talks about ~700kb, when the current version is already more than one megabyte. Please remember that the application is a work in progress. Currently, you need to manually launch the program every time you want to launch the game. This may be fixed in future updates.
2) Using the joystick using the Xpadder program
First, let's figure out what kind of software this is. Xpadder is a joystick emulator program for your computer. Currently it supports several hundred controllers from different manufacturers, which makes it absolutely universal in terms of use. And of course it’s suitable for our dual shock from PS4.
This method has two undeniable advantages:
- no drivers needed;
- You can customize each joystick button to suit your needs.
But there are also disadvantages:
- it will take a lot of time to understand the essence of the application and configure everything as it should;
- The program is officially paid (but you can very easily find a free version).
Setting up Xpadder for Dualshock 4
The video below shows the setup for an Xbox joystick, but since the program is universal, the steps described are also suitable for your DS4.
 How to access the Network and Sharing Center
 How to test a radar detector at home
 The processor clock speed is one of the most important components of a computer.