Timer to turn off the fan in the bathroom. What are bathroom timers, and how to make a fan with a do-it-yourself timer? DIY timers
When visiting the toilet or bathroom, often at the same time as turning on the lighting, they turn on the hood to eliminate excessive moisture and odors. The fan is simply parallel with the lighting lamp. Thus, after turning off the lighting, the hood fan also turns off, which, in my opinion, is not optimal.
The scheme I propose ensures the operation of the exhaust fan for some time (configurable, default 2 minutes) after the light is turned off. The unit is controlled contactlessly, a sensor - a photoresistor is used. There is no microcontroller in the circuit.
Diagram of the exhaust fan control module
The diagram of the device and the list of used elements are shown in the figure.
The diagram contains three main nodes.
1. Triac load control unit(in this case it is an asynchronous motor). Made practically according to the recommendations given in the datasheets for the DD3 MOC3023M optocoupler triac and the VS1 BT143-600 power triac.
2. Node of the logical part. We have a half-bridge from the resistor R1 of the photoresistive sensor R10, the output signal from which, depending on whether the photoresistor is illuminated (has low resistance) or not (has high resistance), takes the level of logical "0" or "1". This signal is fed to the input of the logic element DD1 - the so-called "single-cell" logic with an output of the "open drain" type. Chips are available and cheap.
When the photoresistor is illuminated, the DD1 microcircuit discharges the capacitor C2 through the limiting resistor R3. The low-level signal from the output of DD1 is fed to the input of DD2 and generates a low-level signal at its output.
In the input circuit of the optocoupler triac DD3 MOC3023M, a current begins to flow, the level of which is determined by the resistance of the resistor R6. In this case, the conditions for switching on the power triac are provided.
After the lighting is turned off, the resistance of the photoresistor increases, which leads to the appearance of a voltage at the DD1 input corresponding to the logic level "1", the output of the DD1 microcircuit is disconnected from the discharge circuit. Through the resistor R2, the charge of the capacitor C2 begins.
After a time T = 3*R2*C2 (shutdown delay time), the voltage at the DD2 input will reach the trigger level, a “1” will appear at the DD2 output, the DD3 optocoupler thyristor will turn off and the power triac will turn off the fan motor from the network.
3. Power node is made using a capacitor as a ballast resistance and provides a load current of up to 25 mA. This is enough to reliably turn on the optocoupler DD3.
The circuit contains high voltage, dangerous to life.
Observe the safety regulations!
--
Thanks for attention!
Igor Kotov, editor-in-chief of Datagor magazine
Datasheets for interesting chips 74LVC1G07DBV, 74LVC1G17DBV:
▼
🕗 15/08/16 ⚖️ 1.26 Mb ⇣ 44
The timer for bathrooms is designed to automatically turn on and off the exhaust ventilation of the bathroom. The timer turns on the fan after a specified time after the lighting is turned on and turns off the fan after a specified time after the light is turned off.
The timer detects when the light is turned on by a built-in photocell, so it is only suitable for use in bathrooms with artificial lighting.
Light sensitivity, time from light on to fan on and time from light off to fan off are adjustable.
Adjustment of delays of inclusion and switching off.
The timer goes on sale with the following settings:
Turn-on delay - 0 s
Turn-off delay no more than - 5 s
Illumination threshold - 1–10 lux.
If you set the timer again, then for the convenience of adjusting the illumination threshold, it is recommended to set the minimum delays by turning the "Time before" and "Time after" controls to the extreme position counterclockwise, and the "Sens." to the middle position.
Attention!
To turn the knobs, use a screwdriver with a thin flat blade. Excessive torque may damage the regulator.
Set the “Time before” and “Time after” controls to the time convenient for you from turning on the light to starting the fan, and from turning off the light to turning off the fan, respectively. The middle positions of the adjustments correspond to 1 minute from turning on the light to turning on the fan and 5 minutes from turning off the light to turning off the fan.
It is not possible to turn the fan on or off by adjusting the delays. The new times will be used the next time the light is turned on. Therefore, after changing the position of the time regulators, it is necessary to turn off the light, wait for the fan to stop, and only then check the settings. The time scale of the regulators is shown in the figure.
Attention!
Connect the Timer for bathrooms with the mains off. The power of the fan connected to the Timer must not exceed 300 W.
The timer is connected with two pairs of wires, as shown in the diagram:
A pair of dark wires connects to the fan.
A pair of light wires is connected to a 220 V AC mains.
The timer should be placed and fixed so that its front side (with inscriptions and regulators) faces the light source in the bathroom, or at least is well lit by it.
I recently did a major renovation of the bathroom and the question arose, how to control the extractor fan? Just putting the switch is somehow too easy and inconvenient. I did not like ready-made solutions from manufacturers of such devices, as well as options from the Web. Particularly outraged was the option of the fan from the light switch.
I decided to make an easy-to-manage timer with a wide range of settings for the automatic work cycle and pause. And I mounted it in the form of a separate block in a standard hidden socket on the wall.

In the photo: a socket for a washing machine, a timer, a floor heating controller.
Height from the floor 1.2 meters
My bathroom is small, 3 sq. meters, but still decided to make an electric floor heating. For economic reasons, the regulator bought the cheapest one, without temperature indication. On the panel, he only has a dial on the scale. Therefore, I also introduced a temperature measurement mode into the block of my timer, since the controller allows it. Now my device measures the temperature in the bathroom at a level of about 1.2 meters from the floor.
A micro toggle switch on the side to completely de-energize the device, for example, if you need to leave for a month. In everyday life "work-home-cottage" it makes no sense to de-energize the device.
You can view the temperature at any time, including when the indicators are counting down.
I have a temperature display in my bathroom. And if, for example, I smoke, I can press the “Mode Change” button, turning on the fan for a previously set time, and leave. The timer will automatically turn off the fan and pause.
In my opinion, the timer turned out to be as functional as possible. The user can change the desired mode at any time by pressing just one button. I hope someone finds this solution useful. Necessary condition- laying wiring from the fan to the timer and the presence of 220 V voltage at the timer installation site.
Main modes:
1. Operating mode (fan on).
2. Pause mode (fan off).
3. Input mode (setting the time values for work and pause).
4. Temperature display mode (the timer cycle is not interrupted).
--
Thanks for attention!
Igor Kotov, editor-in-chief of Datagor magazine
Firmware: ▼ 🕗 21/05/14 ⚖️ 1.87 Kb ⇣ 72 Hello reader! My name is Igor, I'm 45, I'm a Siberian and an avid amateur electronics engineer. I came up with, created and maintain this wonderful site since 2006.
For more than 10 years, our magazine exists only at my expense.
Good! The freebie is over. If you want files and useful articles - help me!
Very high humidity and the presence of a large amount of condensate on all surfaces of the bathroom are a big problem for many. An exhaust fan will help to cope with this task.
Why ventilate the bathroom
The bathroom often has a small area, so without constant air circulation, the level of humidity will be very high. This will promote the appearance of fungus, mold and other microorganisms. In addition, the service life of many building materials used in the arrangement of the premises can be significantly reduced. Since the bathroom does not have windows, the only way to maintain normal humidity is to use installed ventilation systems. They are usually designed so that air circulation is maintained without additional devices. Check if this is enough by placing a piece of thin paper over the hole and releasing it. It must be held by the pressure difference between inside and outside and not give. If this does not happen, you need a fan that will provide forced air circulation and lower the humidity level.
Fan characteristics
It is impossible to make the right choice of a device without knowing its technical parameters and characteristics. The fan with timer has the following features:
- power. In order to determine the required performance, you need to measure the volume of the bathroom and multiply the result by 8 (the air exchange rate recommended by sanitary standards). The received power is the minimum required;
- noise level. Both fans with silencers and without them are produced. The exact value of the noise produced can be found in the device data sheet. If it exceeds 30-35 dB, the installation of such a fan in the bathroom is not desirable;
- control type. The fan timer can be set in various ways. By pressing buttons on the device, turning a mechanical relay or a signal from the control panel. You need to choose the most convenient way, although it will not have to be adjusted too often;
- humidity sensor. Using this sensor, it is possible to automatically turn on when a critical level of humidity is reached and turn off when it drops to the required level or turn on after a person enters, and turn off after a decrease in humidity or by a timer signal. This helps to reduce electricity consumption.
- start work after turning on the switch, finish after 15-45 minutes;
- do not turn on if the light was on for less than 90 seconds, otherwise, after turning off the light, work for 15-45 minutes.
- axial;
- diametric;
- radial;
- wall;
- channel.
- phase - contact L;
- zero - contact N;
- ground - ground contact;
- phase - switch - luminaire input - luminaire output - timer contact (LT).
electrical safety
Compliance with safety rules in rooms with high humidity is very important. There must be a mark on the body of the device indicating the possibility of its use in such a place. It is acceptable to use a timer fan with IPX3 rating or higher.
Devices rated higher than IPX5 do not need to be used.
What is a timer for?
When connected via a switch, the device with a timer can operate in 2 modes:
The operating time is adjusted by a trimmer switch on the device case using a screwdriver.
Differences in operating principles
Different types differ in price and technical characteristics: noise level, power. Fans for domestic use can be divided into 3 types:
The use of cross-flow exhaust fans in this case is usually not required. It is enough to choose between radial and axial.
Axial
The most budget option, moreover, as a rule, with greater performance. However, the noise level can be significantly higher than that of radial ones. It is recommended to stay on it if the bathroom has a large area.
The device consists of an electric motor and an impeller with blades attached to it. The principle of operation is as follows: the engine rotates the wheel, the air is captured by the blades and sent to the ventilation channel. If the device is equipped with a check valve, the flow of air from the ventilation into the bathroom becomes impossible, which allows you to protect yourself from dust, harmful microorganisms and insects.
Radial

It consists of a wheel in a spiral casing. Through the holes between the blades, the air enters the device, then it is compressed and passes into the spiral casing, and then into the heating hole. The performance of budget devices is quite small.
Installation of equipment
Household fans can be divided into 2 categories:
The wall unit is placed directly in front of the vent outlet. If it is necessary to move the device away from the opening (for example, when installing in a bathroom with a suspended ceiling), an air duct can be installed to connect the fan and shaft. The design of the air duct can be carried out in the gap above the suspended ceiling.
The second type of fans can only be mounted inside the ventilation duct. Usually they are used during work together with a false ceiling and are installed inside the air duct. Their body can be round or rectangular. You need to choose one that will match the shape of the installed duct. A diffuser is installed at the outlet. It can be used to regulate the air flow.
The height for mounting the device must be chosen as high as possible. The top edge should be 50mm below the ceiling. If the vent is located significantly lower, it is recommended to relocate it. Fastening is carried out using self-tapping screws or liquid nails. The choice depends on the weight of the device and the material of the walls.
Electrical connection

Usually the fan is connected to the lighting fixture. In this case, it starts working at the same time as a person enters the bathroom, and ends after a certain time set by the timer after the light is turned off.
The cables are connected in the following way:
It is also possible to use an additional switch without connecting the device to the bathroom lighting. In this case, it is enough to remove the luminaire input - luminaire output fragment from the proposed scheme. This method is less convenient, since a person has to take more steps to start the device, but it saves energy by not turning on the device in some cases (for example, when using a washing machine). It is most convenient if both switches are located in the same place.
If the installation is carried out at the time of repair, the cables can be routed under the finishing materials on the walls and ceiling. If the repair has already been completed, cable channels can be used. It is necessary to ensure that a large amount of water splashes do not reach the places of their installation. In order not to spoil the design of the bathroom, the cable channel can be held close to the ceiling. If the ceiling is made of plastic panels, you can carefully remove them, hide the wiring under them and put them back together.
Wall Unit Installation Procedure
First, wiring is laid to the installation site. Do not forget about safety precautions. When connecting the cables, the electricity must be turned off.
- Remove the top panel from the device.
- The cable is connected to the fan terminals via a terminal block. The wire connected through the lamp is connected to the first contact of the lamp socket, and the second contact is connected to the LT contact of the device.
- The device is securely fixed to the wall.
- The top decorative panel returns to its place. If there is an insect screen, it is placed between the device and the panel.
The timer for bathrooms is designed to automatically turn on and off the exhaust ventilation of the bathroom. The timer turns on the fan after a specified time after the lighting is turned on and turns off the fan after a specified time after the light is turned off.
The timer detects when the light is turned on by a built-in photocell, so it is only suitable for use in bathrooms with artificial lighting.
Light sensitivity, time from light on to fan on and time from light off to fan off are adjustable.
Adjustment of delays of inclusion and switching off.
The timer goes on sale with the following settings:
Turn-on delay - 0 s
Turn-off delay no more than - 5 s
Illumination threshold - 1–10 lux.
If you set the timer again, then for the convenience of adjusting the illumination threshold, it is recommended to set the minimum delays by turning the "Time before" and "Time after" controls to the extreme position counterclockwise, and the "Sens." to the middle position.
Attention!
To turn the knobs, use a screwdriver with a thin flat blade. Excessive torque may damage the regulator.
Set the “Time before” and “Time after” controls to the time convenient for you from turning on the light to starting the fan, and from turning off the light to turning off the fan, respectively. The middle positions of the adjustments correspond to 1 minute from turning on the light to turning on the fan and 5 minutes from turning off the light to turning off the fan.
It is not possible to turn the fan on or off by adjusting the delays. The new times will be used the next time the light is turned on. Therefore, after changing the position of the time regulators, it is necessary to turn off the light, wait for the fan to stop, and only then check the settings. The time scale of the regulators is shown in the figure.
Attention!
Connect the Timer for bathrooms with the mains off. The power of the fan connected to the Timer must not exceed 300 W.
The timer is connected with two pairs of wires, as shown in the diagram:
A pair of dark wires connects to the fan.
A pair of light wires is connected to a 220 V AC mains.
The timer should be placed and fixed so that its front side (with inscriptions and regulators) faces the light source in the bathroom, or at least is well lit by it.
 How to test a variable resistor with a multimeter?
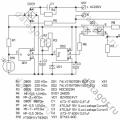 What are bathroom timers, and how to make a fan with a do-it-yourself timer?
 Voltage relay test