Why the Internet does not work on the phone: the main reasons + solution problem
On devices running under the android platform is a very common problem.
In any case, it would be helpful to deal with what causes and ways to solve this phenomenon.
Banal reasons
Let's start, perhaps, from a number of the most banal reasons why mobile Internet may not work.
The list is as follows:
- Negative balance on the phone. To exclude this option, you should check how much money you have. Depending on the operator, the method may differ.
To find out how to check the account status on your phone, you should contact the operator. Most often, there is a balance number on the SIM card, and the operator number.
- The subscriber is out of the network area. Another very simple and common cause. To eliminate this option, you should look at the network indicator in your. An example of this can be seen in Figure 2.
To eliminate such a problem, there is a single output - go there, where the device can normally catch the signal. By the way, a weak network can cause the Internet just to work very slowly.
![]()
Prompt: If this indicator always has a low value, even if you approach the device close to the telephone tower, it means that the problem is not online, but in the device itself. Then it should be simply attributed to the repair.
- The "Data Transfer" option is not connected in the settings. In all modern smartphones there is such an option. In the settings it can be easily disabled.
True, depending on the specific smartphone model, the location of this item will be completely different. For example, in phones with a platform it can be found in this way:- go in settings;
- choose the item "More ..." (Figure No. 3.A);
- go to the "Mobile Network" menu (Figure No. 3.B);
- put a tick opposite the Mobile Data Transfer (Figure No. 3.B).

As mentioned above, in different operating systems this item will be in different places, but his name will always be about the same.
- There was no automatic registration on the network after it was not for some time. Such a phenomenon may occur after the subscriber leaves the subway or simply returns from the places where the Internet did not work.
This is especially true for networks. In this case, there is also a single way to fix everything and is to restart your device, that is, turn it off and turn it on again.
Depending on this process, it occurs differently, see the instructions.
Set up settings
To exclude this option, you should go to the Internet configuration on your phone and find there points related to APN, that is, access point.
Depending on the model, the location of this item may also differ, but APN will remain APN anyway.
To correct this problem, there are two ways:
- Request the settings from the operator.
- Manually perform the network connection setting.
More mild, of course, is the first option. To find out how to request such settings, you should contact the operator or go to the site of your mobile operator.
Information on the most common one can be seen in Table 1.
Table 1. Request numbers for Internet settings for the most popular Mobile operators in Russia
As for the rest of the operators, it will be necessary to call the operator and recognize from him how to get automatic Internet settings.
In most cases, the settings will be installed automatically and the user will not even notice.
Only in the end it will come a message about such a content: "Congratulations! Internet settings on your phone are installed successfully. "
It happens that SMS comes, when reading the "Install" button appears.
Accordingly, it must be pressed and the settings will be installed.
Manual network setting
With manual adjustment, everything is somewhat more complicated. An example of finding the access point settings on the phones with Android can be seen below.
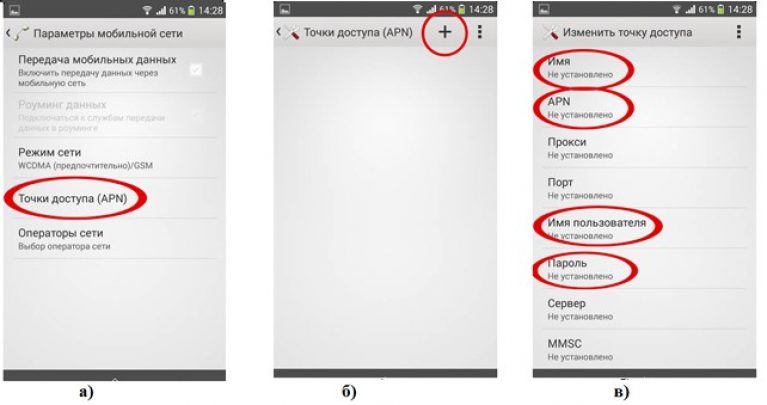
Step 1. Go to the settings, then select the item "More ...", which is shown in Figure No. 3.And, then choose the "Mobile Network" (Figure No. 3.B).
Step 2. In the menu that opens, open the point "Access point (APN)", as shown in Figure No. 4.A.
Step 3. Press the button to add a new access point. It usually consists of a simple sign "+", as shown in Figure No. 4.B.
Step 4. Fill out the name "Name", "APN", "username", "password", which are highlighted in Figure No. 4..
As for the values \u200b\u200bof these fields, they should also be recognized from the operator, for each network they are completely different.
For the most popular operators, the values \u200b\u200bof these fields can be seen in Table 2.
Table 2. Internet settings values \u200b\u200bfor the most popular operators in Russia
These menu items can be absolutely different depending on the phone. There are other reasons because of which the Internet works poorly or does not work at all.
 Service "Prohibition of Calls" from MegaFon
 Tele Support Service2: Free Phone
 How to connect bluetooth headphones to a computer?