How to connect a mixing console. Connecting the mixer to a laptop Effects of phantom power on other audio equipment
A mixer is an electronic sound processing device that enhances the quality and format of an audio file through the presence of audio processing functionality. The mixing console allows you to mix channels, receive signals from various sources and provide the ability to listen to the final results of file processing in various ways. The need to use such devices in the process of recording studios or in dj installations is obvious. As for the use of a mixer at home for personal rather than professional purposes, very few can boast of the presence of serious audio systems with a mixing console in their apartments. If the purposes of using the device are determined for you, it remains only to figure out the process of connecting the equipment.
Connecting a mixing console to a laptop or any other stationary computer is a rather painstaking procedure that requires taking into account many different factors and consists of several stages.
First of all, you need to study the plug of the device through which the network connection. Modern devices, as a rule, are equipped with European standard plugs, therefore, you will need an adapter to work.
Choosing cables and wires for connection is perhaps the most time-consuming and crucial moment in the entire procedure.
Unfortunately, via a usb connection, which is so convenient and versatile, the system cannot be configured.
You have to use more complex connection options. To connect to a computer, you will need a cable with two "jack" connectors and one "mini-jack" connector for connecting a sound card. Make no mistake about the length of the cord: it is better to buy a spare cord than to come up with options for extending it later or continue to use the sound system in an inconvenient location.

Cable - adapter from jack to mini-jack
The next step will be microphone connection. To connect it, you need to use a special connector located on the side wall (sometimes on the back) of the laptop and an XLR cable. Sometimes it happens that the system does not see the device. In this case, we do the following:
- go to the "Control Panel" Windows;
- select the item "Hardware and sound";
- click on "Realtek Manager";
- in the driver settings, set the standard device;
- We check the performance of the microphone and mixing console.

XLR microphone cable
Connect speakers and amplifier
Connecting the system to the speakers and amplifier, which are most often included in the equipment, is quite easy, but accuracy and care are needed in this case too.
The procedure is as follows.
- On the motherboard of the computer, you need to find a linear exit marked green– a place for connecting the connector of the stereo cable, direct the second connector to the IN-jack of the mixer.
- Connect "Out" on the remote to "In" on the amplifier.
- Next, add columns to the system. As a rule, they are connected to the remote control through the "Out R" and "Out L" connectors.
Pay attention to resistance! This indicator should be identical for the speakers and the amplifier - the discrepancy will immediately affect the volume and sound quality.
Connecting a sound card
The right choice of a sound card will ensure the full use of the functionality of mixing systems, this is especially true in cases where it is necessary to solve professional problems. If the card built into the device has a high degree of audio playback quality, then it is quite reasonable to continue using it in combination with a mixer, but if the quality is not enough, you will need to take care of purchasing an external usb sound card.
Any external sound card has several inputs and outputs for manipulation between the mixer and the computer.

You can connect all elements of the system as follows:
- we connect the card and the laptop with wires (“mini-jack” to the “out-put” socket on the card);
- download and install drivers for the card;
- then you need to connect a microphone, headphones and other auxiliary devices through the connection with mixer;
- we complete the system by combining the mixer and laptop.
The option of optimal combination of all elements of the system in each specific case may be different - it depends both on the tasks set and on the specifics of the selected devices.
Setting up sound card drivers
You will not be able to record sound without installing and configuring drivers. Most often, all the necessary software is installed at the time of the initial boot of Windows, but if the card was replaced later, you need to download the drivers again.

Connecting a mixer to a laptop and combining all devices into a single system that provides maximum opportunities for processing, listening and playing audio is a task that is quite possible to solve on your own. On the Internet resources you can find instructions and manuals for almost all options for the equipment used. If the decision to use a mixer for recording and processing sound files in your particular case has already been made, do not put off the process indefinitely, start setting it up now!
There is only one type of microphone connection known as phantom power. Phantom power specification is given in DIN45596. It was originally standardized to supply 48 volts (P48) through 6.8 kΩ resistors. The value of the denominations is not as critical as their consistency. It should be within 0.4% for good signal quality. Phantom power is now standardized at 24 (P24) and 12 (P12) volts, but is much less common than 48 volts. Systems using lower supply voltages use lower value resistors. Most condenser microphones can handle a wide range of phantom power voltages. Power supply 48 volts (+10%...-20%) is supported by default by all manufacturers of mixing consoles. There is equipment that uses lower voltage phantom power. Most often, this voltage is 15 volts through a 680 ohm resistor (similar, for example, is used in portable sound systems). Some wireless systems may use even lower supply voltages, 5 to 9 volts.
Phantom power is currently the most common method of powering microphones due to its safety when connecting a dynamic or ribbon microphone to an input with phantom power enabled. The only danger is that if the microphone cable is short-circuited, or if an older design (grounded) microphone is used, current will flow through the coil and damage the capsule. This is a good reason to regularly check cables for short circuits, and microphones for the presence of a ground terminal (so as not to accidentally plug it into a live input).
The name "phantom power" comes from the field of telecommunications, where a phantom line is the transmission of a telegraph signal using ground, while speech is transmitted over a balanced pair.
6.1 P48, P24 and P12 phantom power
There is often confusion about the different but actually similar types of phantom power. DIN 45596 specifies that phantom power can be achieved with one of three standard voltages: 12, 24 and 48 volts. Most often, the way the microphone is powered can change depending on the voltage supplied. There is usually no indication that the microphone is receiving power, but 48 volts will work for sure.
Creating a clean and stable voltage of 48 volts is a difficult and expensive task, especially when only 9 volt krona batteries are available. Partly because of this, most modern microphones are capable of handling voltages ranging from 9-54 volts.
6.2 Phantom power for electret microphones
The diagram below (Fig. 19) is the easiest way to connect an electret microphone capsule to the balanced input of a mixing console with 48 volt phantom power.
Please note that this is just the simplest way to "spandor" an electret microphone to the console. This scheme works, but has its drawbacks, such as high sensitivity to phantom power noise, unbalanced connection (prone to noise), and high output impedance (cannot use long cables). This circuit can be used to test an electret microphone capsule when connected to a mixing console with a short cable. Also, when using this circuit, transient noise (for example, when phantom power is turned on or off, when connected to a mixing console, as well as disconnected from it) are very high. Another disadvantage of this circuit is that it does not load the phantom power supply circuit symmetrically. This may affect the performance of some mixing consoles, especially older models (in some mixing consoles, the input transformer may short-circuit and burn out, in which case pins 1 and 3 are closed through a 47Ω resistor).
In practice, this circuit works when used with modern mixing consoles, but it is not recommended for real recording or any other application. It is much better to use a balanced circuit, it is much more complicated, but much better.
6.3 Symmetrical electret microphone connection
The output of this circuit (Fig. 20) is balanced and has an output impedance of 2 kΩ, which makes it possible to use it with a microphone cable up to several meters long.The 10uF capacitances that are connected to the output of the Hot and Cold pins should be high quality film capacitors. Their value can be reduced to 2.2uF if the input impedance of the preamplifier is 10kΩ or more. If for some reason you use electrolytes instead of film capacitors, then you should select capacitors designed for a voltage of more than 50V. In addition, they need to include 100nF film capacitors in parallel. Capacitors connected in parallel with the zener diode should be tantalum, but if desired, 10nF film capacitors can be used with them.
The cable to be connected must be two-core shielded. The screen is soldered to the zener diode and not soldered to the primer. The pinout is standard for an XLR connector.
6.4 Improved connection of an electret microphone to phantom power
This circuit (Fig. 21) provides a lower output impedance than the circuit discussed above (Fig. 20):BC479 can be used as bipolar PNP transistors. Ideally, they should be matched as closely as possible to minimize noise and gain consistency. Keep in mind that the voltage between collector and emitter can be as high as 36V. The 1uF capacitances should be high quality film capacitors. The circuit can be improved by adding 22pF capacitors in parallel with the 100kΩ resistors. To minimize self-noise, the 2.2 kΩ resistors must be carefully selected.
Source: PZM Modifications web page by Christopher Hicks.
6.5 External phantom power supply
This is the diagram (Fig. 22) of an external phantom power supply used with mixing consoles that do not have phantom power:
The +48V power supply is grounded to signal ground (pin 1). +48V voltage can be obtained using a transformer and rectifier, using batteries (5 pieces of 9V, 45V in total, which should be enough), or using a battery-powered DC/DC converter.
There should be two 12V zener diodes between the signal wires and ground, connected back to back, to prevent a 48V pulse through the capacitors to the input of the mixing console. Resistors with a nominal value of 6.8 kOhm should be used high-precision (1%) to reduce noise.
6.6 Getting voltage +48B for phantom power
In mixing consoles, phantom power is usually supplied using a separate transformer or DC/DC converter. An example circuit using a DC/DC converter can be found at http://www.epanorama.net/counter.php?url=http://www.paia.com/phantsch.gif (single mic preamp circuit from PAiA Electronics).If you are using a battery, you may find it helpful to know that many microphones that require phantom power work just fine with voltages below 48V. Try 9V and then increase it until the microphone starts working. It's much easier than using a DC/DC converter. However, it must be remembered that the sound of a microphone powered by a lower voltage can be very different, and this should be taken into account. Five 9V batteries will provide 45V power, which should be enough for any microphone.
If you are using batteries, short them out with a capacitor to limit the sound path from their noise. To do this, you can use 10uF and 0.1uF capacitors in parallel with the batteries. Also, batteries can be used with a 100 ohm resistor and a 100uF 63V capacitor.
6.7 Effect of phantom power on a plug-in dynamic microphone
Connecting a dynamic microphone with a two-wire shielded cable to the input of a mixing console with phantom power on will not cause any physical damage. So the most popular mics shouldn't be a problem (if they're properly wired). Modern dynamic microphones with balanced connections are designed so that their moving parts are not sensitive to the positive potential received from phantom power, and they work perfectly.Many older dynamic microphones have a center tap that is grounded to the microphone body and cable shield. This could short the phantom power to ground and burn the winding. It's easy to check if this is the case in your microphone. Using an ohmmeter, check the contact between the signal pins (2 and 3) and ground (pin 1, or the microphone housing). If the circuit is not open, then do not use this microphone with phantom power.
Do not attempt to connect a microphone with an unbalanced output to the input of a phantom powered mixing console. This may result in equipment damage.
6.8 Effects of phantom power on other audio equipment
The 48V phantom power is quite high compared to what conventional audio equipment normally handles. You must be very careful not to turn on phantom power on inputs that are connected to equipment that is not designed for this. Otherwise, it may damage the equipment. This is especially true for consumer-grade equipment connected to the console through a special adapter / converter. For a safe connection, transformer isolation is used between the signal source and the console input.6.9 Connecting professional microphones to computers
Typical computer audio interfaces provide only 5V power. Often this power is called phantom power, but it should be understood that it has nothing to do with professional audio equipment. Professional microphones typically require 48V power, many will work with 12 to 15 volts, but a consumer sound card won't be able to provide that either.Depending on your budget and tech savvy, you can either switch to using household microphones or make your own external phantom power supply. You can use both an external voltage source and a power supply built into the computer. As a rule, every computer power supply has a +12V output, so it remains only to connect it in the right way.
7. T-powering and A-B powering
T-powering is a new name for what was previously called A-B powering. T-powering (short for Tonaderspeisung, also covered in DIN45595) was developed for use in portable devices, and is still widely used in cinema sound equipment. T-powering is mainly used by sound engineers in fixed systems where long microphone cables are required.T-powering typically has 12V applied to the balanced pair through 180 ohm resistors. Due to the potential difference on the microphone capsule, when a dynamic microphone is connected, current will begin to flow through its coil, which will negatively affect the sound, and after some time will damage the microphone. Thus, microphones specially designed for T-powering technology can be connected to this circuit. Dynamic and ribbon mics will be damaged when plugged in, and condenser mics will most likely not work properly.
Microphones using T-powering are, in terms of circuitry, a capacitor, and therefore prevent the flow of direct current. The advantage of T-powering technology is that the shield of the microphone cable does not need to be connected at both ends. This feature avoids the appearance of a ground loop.
The diagram for connecting a microphone powered by T-powering technology from an external source to a mixing console with a balanced input is shown in the figure below (Fig. 23):
 |
| Fig.23 - Scheme of external power supply T-powering |
8. Other useful information
Microphones with a balanced output can be used when connected to an unbalanced input by making the appropriate wiring (this is a common practice). Microphones with an unbalanced output, respectively, can be included in the balanced input, but this does not give any advantages. An unbalanced signal can be converted to a balanced signal using a special device - Di-Box.When mixing, you may get the feeling that the results you achieve are somehow different from professional ones. Professionally mixed audio can be perceived as more powerful and expressive. One of the reasons for such differences is the means of compression used by professionals in the course of sound production. Compressors can act as limiters to keep signals from getting too loud, but they can also shape the volume of certain sounds themselves. The result of this can be increased sound pressure and, as a result, a feeling of excessive sound aggressiveness. In this regard, when working with a compressor, it is necessary to adjust a whole set of parameters (in particular, compression depth and attack speed), and if the operator is not aware of this, the sound may be perceived as “crumpled”, not creating the effect of presence.
The MGP32X mixing console is equipped with a single-knob compressor designed so that even an inexperienced user can activate automatic adjustment of parameters to suitable levels by simply turning a knob. Practice applying the compressor to your pedal and snare drums. Applying a compressor to a bass or electric guitar can also improve the sound of the instruments.
Turning the single knob compressor clockwise increases the volume level. Note that applying too much compression can cause acoustic feedback. To compensate for it, if necessary, lower the channel fader a little.
HELLO TO ALL SINGERS!
Today I will answer the question: "How to properly set up a microphone!?"
GO!!!
In fact, this is not very difficult, but there are a number of some subtleties, knowing which you can always quickly and correctly turn on the entire sound reinforcement system and sound as good as possible.
The first step is to turn on the mixing console. Before turning on, pay attention that the master volume faders on the remote control are lowered (usually they are located in the lower right corner). On some models of remotes, there is also a phantom power button near the power button (especially Behringer brand remotes sin with this). Do not turn phantom power on unless you plan to use condenser microphones!
When using a regular dynamic microphone and phantom power is on, there is a chance to burn the microphone input and, as a result, get cradles from the rehearsal point administrator) I would also like to note that the wires for connecting dynamic and condenser microphones may have different wiring.
The time has come: turn on the whole system! If the speakers are passive, turn on the amplifier, if active, then just press ON on each monitor (if active monitors are turned on, make sure that the volume level on both speakers is the same and not at the maximum position. In my opinion, the position 15 hours will be the most.)
We return to our remote control.
Mixer
First, we connect our microphone with the remote control - on the one hand it is impossible to shove the non-pushable on the other, I know the musicians very well, so it would not be superfluous to say that the microphone is connected to the remote control using an XLR wire (mother-father) In the picture with the remote control, the required hole is marked with number No. 1
Step 1 We bring the overall volume to 0 on some remotes, this mark looks like U
Step 2 Let's take a look at the settings for the channel you've plugged the microphone into.
Knob 4 (Gain) – turn the channel preamp to the left until it stops.
Button 5 (low-pass filter) - if we use a microphone, then this button must be pressed (if, for example, we start a phonogram, then it is pressed) This button makes a frequency cut - less than 100 hertz.
Knobs 6 Parameter Knobs - If you're using a good microphone, a good remote, and good speakers, put all the knobs in the middle position.
Knobs 7 (Aux) are responsible for the sends. (They are used, for example, to send a signal to stage monitors) For the purposes of this article, you will not need them, you can leave them as they are or turn left for beauty.
Knob 8 (Fx) is responsible for the amount of effect going to the channel - it often happens that on the consoles there is also a knob or fader that is responsible for the overall level of effects. (so if the overall level is 0 then even when you turn the knob on the channel to the far right you will not hear the result). At the setup stage, it is worth removing all processing by turning the knob to the left.
Knob number 9 (Pan) is responsible for panning the signal - in other words, if you turn left, the sound will go from the left speaker, to the right from the right. In our particular case, we leave this handle in the middle.
The button marked in the figure with number 10 is called Mute, and in translation it means “mute” - as you might guess, with this button we can quickly turn the channel on and off. Oh, such a button for every musician - somewhere in a prominent and easily accessible place))
Button number 11 is called PFL - prefaidlisten (listening to the channel before the fader) - a very useful button with which we can look at the level of the incoming signal and set it as accurately as possible. Let's press it!
Now we raise the volume fader on our channel to 0 and try to sing, with a high degree of probability the signal that you will hear will be quite weak, since initially we turned the preamp knob to 0 (Gain knob No. 4). Now, with the PFL button pressed, we slowly begin to raise the preamplification level at the same time as we sing (feel free to sing a pogrom, since we are primarily interested in the loudest sounds that you are going to make) - you need to monitor the signal indication - the level should not exceed the border of 0 decibels, since the signal that a higher level may experience unwanted distortion and also have a negative effect on the equipment.
If the indication shows that the input signal level is already at zero, and the volume is still not enough, you can pull the kakala fader up a little more - although, as a rule, this can either indicate that the speakers you are using are not powerful enough or your oral the hole makes too quiet sounds. The second is more likely
By setting the desired level, you can get some effects to your liking - with knob number 8, do not get carried away with too many effects, it gives a strong blurring of the voice in the overall soundtrack.
A couple more good tips
If the nature of the sound you hear is not to your liking, there is a chance to tweak the picture with parametric equalizer settings. Try to use parametrics for subtraction, not addition. Be careful when adjusting. Please note that the 2 knobs that are in the middle are responsible for different parameters. One is the choice of a frequency that is in the middle range, and the second is the level to which we will amplify or vice versa, fail this frequency.
That's all!
Good luck!
To connect a mixer to a laptop, you need a mixer, a cable, and a laptop.
It would seem that everything is simple, but during the connection there were several obstacles:
1. it was necessary to choose a cable - an adapter from two mixer outputs to one laptop input;
2. after connecting, it turned out that the headset (microphone with headphones) does not work and a condenser microphone is needed;
3. The condenser microphone also did not work right away and I had to delve into the settings.
Next, I will try to describe the whole process step by step and with photos.
Selection of cables and adapters
1. When I bought the mixer, I was surprised because I saw that the power plug was unusual, although it was written on it that the device was powered by 220V. It turned out that the power supply of the mixer needs a UK-Euro adapter. The store didn't have it, so I ordered a pair and both fit, so I don't see the point in worrying too much about it. Just if you are going to buy a mixer, then pay attention to whether an adapter is needed.

(Picture 1)
2. Choosing a cable to connect the mixer to a laptop. There are 2 mixer outputs, so I chose a cable with two Jack connectors (6.35mm - ? inch) that go to mini - jack (3.5mm - 1/8 inch).

Cable - adapter from jack to mini-jack
(Picture 2)
In online stores there were only two varieties - one 25 meters long, and the second about a meter. I chose a shorter one, although now I think that 3 meters would be just right.
3. To connect the microphone to the mixer, an XLR cable was also purchased (connectors - mom / dad), but longer (6 meters). I didn’t often come across microphones and therefore I was afraid to buy such a cable - it might not work, but my fears turned out to be in vain. Although I wanted something more familiar USB type.

XLR (female - male) microphone cable
(Figure 3)
Connecting to a laptop
4. On the side panel of the laptop there is a microphone input, where we connect the mixer with a cable.
|
|

(Figure 4)
5. In windows, for some reason, there were no messages that a microphone was connected. Just got a driver message.

(Figure 5)
6. There were also no new devices in the sound settings and the microphone connected through the mixer did not work.

(Figure 6)
7. In the driver settings, it turned out to be necessary to make small manipulations so that you can hear the sound.
7.1. To get started, open the driver settings by going to "Control Panel / Hardware and Sound" and selecting "Realteck HD Manager".

(Figure 7)
7.2. In the driver settings, go to the “Microphone” tab and press the button on which the text “Set standard device” is shown in the figure.
The button is not active at the moment, since I already pressed it and there was a different text, which means that the main thing is to press this button.

(Figure 8)
7.3. The microphone worked, which means the mixer also works.
Mixer setup
A video that tells you how to set up the mixing console and is as clear as possible.
findings
The mixer is of course connected, the noise has become less, the sound is louder, but a bunch of new wires.

(Figure 9)
Mixer test
The microphone was recorded on a laptop using the Camtasia program.
He spoke quietly, a computer was working nearby, but the sound is audible and there is no noise as before.

(Figure 10)
In my opinion, the sound is slightly worse due to the sound card or laptop speakers, but there is no noise.
Mixer in comparison:
- headset with microphone - ;
- Audio-Technica AT2020 USB microphone with very poor sound quality - .
 Solving the most common problems
 Solving the most common problems
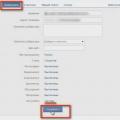 How to delete a group in VK (Vkontakte)?