How to remove problematic Windows updates. How to remove problematic Windows updates Remove win 10 updates
Every user of this operating system is familiar with periodic updates to Windows 10. Their main feature is surprise. Their downloading can begin at any moment without any warning. This usually manifests itself in active work.
Over time, the space on the system drive C is becoming less and less, and many users do not understand where it goes because they do not upload anything there.
Update files are one of the biggest eaters of free space on the system disk. Often their volume exceeds several gigabytes.
In this article we will talk about another one on the C drive in Windows 10, which involves deleting update files.
Features of storing update files in Windows 10
So that you understand what kind of files these are, we will briefly describe the update process to you. First, a special service responsible for checking for updates sends a request to the server. If they are available, then these files are downloaded to your computer. And not somewhere, namely to drive C.
After downloading them, they will be installed. It usually occurs when the computer is turned off.
After the updates are installed, Windows for some reason does not delete the downloaded files with the update sources and they eat up more and more space on drive C. These are what we will delete.
How to delete?
Many people try to find these files manually somewhere in the system folders. But fortunately, Microsoft has provided a special tool to free up space on drive C. It includes the option to safely delete Windows update files. That's what we'll use.
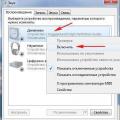
To do this, open the notification area through the icon in the lower right corner of the screen and in the menu that opens, click “All settings”.

Go to system settings
Now on the right click on “Free up space now”.

System Settings -> Free up space
This will start scanning the occupied space for files that can be safely deleted. As a result, a window similar to this will be displayed.
Windows 10 automatically installs updates in the background. Most of the time this is good, but sometimes you get an update that breaks everything. In this case, you need to uninstall that particular update.
Windows 10 is more aggressive about updating than previous versions. For the most part, this is a good thing, since too many people never bother installing updates—even critical security updates. However, there are many PCs and configurations that stop working correctly after an update. There are several ways to delay installing bad updates. You can prevent certain types of updates from downloading automatically. And, starting with the Spring 2017 update, you can easily pause or defer non-critical updates for a month or more.
Unfortunately, none of these strategies help if you've already downloaded and installed an update that broke something. This gets even more complicated if the update is a major new build of Windows, such as the Fall Creators Update released in September 2017. The good news is that Windows provides a way to remove major build updates and smaller, more typical Windows updates.
Removing major build updates
Windows 10 has two different types of updates. In addition to traditional patches, Microsoft sometimes releases larger "builds" of Windows 10. The first major update for Windows 10 was the November Update in November 2015, which made it version 1511. The Fall Creators Update, released in September 2017, was version 1709.
After installing a new build, Windows saves the files necessary to uninstall the new build and revert to the previous one. The catch is that these files are only kept for about a month. After 10 days, Windows will automatically delete the files, and you will no longer be able to return to the previous version without reinstalling.
Note: Rolling back a build also works if you're part of the Windows Insider program and you're helping test new, pre-unstable builds of Windows 10. If the build you're installing is too unstable, you can roll back to the one you were previously using.
To cancel the build, press Windows + I to open the Settings app and then click Update & Security.

On the Update & Security screen, go to the Recovery tab, and then click the Get Started button under the Go back to a previous version of Windows 10 section.

If you don't see the "Go back to a previous version of Windows 10" section, it's been more than 10 days since you upgraded to the current build and Windows has cleared those files. It is also possible that you ran the Disk Cleanup tool and selected "Previous Windows Installations" files to remove. The build is handled much the same as new versions of Windows, so you uninstall the build the same way you uninstall Windows 10 and go back to Windows 8.1 or 7. You will have to reinstall Windows 10 or restore your computer from a system backup to go back to the previous build after these 10 days have passed.
Also, note that rolling back a build is not a way to permanently discard future new builds. Windows 10 will automatically download and install the next major build released. If you are using a stable version of Windows 10, this may take several months. If you are using the Insider Preview build, you will likely receive the new build much sooner.
Uninstalling common Windows updates
You can also uninstall the regular, smaller updates that Microsoft rolls out consistently - just like in previous versions of Windows.
To do this, press the Windows + I button to open the Settings app and then click Update & Security.
On the Update & Security screen, go to the Windows Update tab, and then click the View update history link.

On the View Update History screen, click the Uninstall updates link.

You'll see the familiar interface for uninstalling programs, showing a history of recent updates sorted by installation date. You can use the search box in the upper right corner of the window to search for a specific update by its KB number if you know the exact update number you want to remove. Select the update you want to remove and click the "Delete" button.

Please note that this list allows you to remove updates installed by Windows since the previous "build" was installed. Each build is a new list with new minor updates applied to it. Additionally, there is no way to avoid a particular update forever, as it will eventually be pushed into the next major build of Windows 10.
To prevent a small update from being reinstalled again, you may need to download Microsoft's "Show or hide updates" troubleshooter and "block" the update from automatically downloading in the future. This isn't necessary, but we're not entirely sure that Windows 10 will end up trying to re-download and install updates that you manually removed. Even the “Show or hide updates” troubleshooter can only “temporarily prevent,” according to Microsoft.
Windows 10 updates will hopefully be more stable than ever thanks to the new Insider program, which allows people to test updates before they're rolled out to everyone, but you may find that at some point it becomes necessary to uninstall the problematic update and wait corrections.
Sometimes Windows 10 can be very persistent when it comes to updating. For some, updating becomes a frustrating problem due to compatibility of old programs and other situations. While most Windows updates work great and are designed to improve system and usability, there are times when an update can do more harm than good and mistakenly break some of your computer's functions. Windows 7 was more lenient with updates and gave you more control over which ones you could install or ignore. However, this results in critical maintenance and security updates being ignored and the security of systems at risk. Therefore, now in Windows 10, for better or worse, these updates are installed automatically. If a recent update is causing you problems, we'll show you how to remove the update to return your system to the latest stable version.
Windows 10 updates come in two different types: patches And assemblies. Patches, as a rule, are small in size and quickly installed; you may not even notice this process. Assemblies in turn, they are large in size and are installed like reinstalling windows with a system reboot. When installing the main build, Windows will save the files necessary to revert the system to the previous build. The catch here is that these files will only remain on your computer for 10 days, after this period of time they will be automatically deleted. If you are within this 10 day period, you can follow the instructions below to rollback your installation, which should resolve your issue.
How to remove an update build for Windows 10 and roll back
If you encounter errors after updating Large Assemblies, then rolling back the system to its original state will help you.
Step 1. Open " Options" > "Update and Security" > "Recovery" > and click on the " button Begin" in the column "Restore the computer to its original state". If you do not see the section " Return to previous build", then you do not have the necessary files to go back to the previous version. You will need to reinstall Windows 10 from a full system backup.

How to remove a specific Windows 10 Update Patch
If errors occur after installation patcha, then it can be deleted.
Step 1. Open " Options" > "Update and Security" > "Windows Update" > on the right select " View your activity log".

Step 2. Press " Uninstall updates" and in a new window you will be presented with a list of the latest updates, sorted by installation date. Remove update patches that cause errors or that you consider necessary.

When activated in the Update Center, it constantly installs more and more new update packages as they are released by Microsoft. Unfortunately, not all of them ensure stability and correct operation of the system, causing quite serious failures (even the appearance of emergency situations with a blue screen). In such a situation, you will need to remove unnecessary Windows 10 updates. But this must be done in such a way that they are not installed at all in the future. Next, we offer several basic techniques for consideration that allow you to get rid of any packages that the user does not need, as well as clean the system of files from previous builds of Windows 10.
How to uninstall a Windows 10 update through the options menu?
Since update packages constantly accumulate in the system and are not automatically replaced (or deleted) when new updates are installed, this leads to a reduction in free space on the hard drive (in the system partition). You need to get rid of all this.
Let's start with the method that is considered the most preferable in the tenth version of Windows. Uninstalling old Windows 10 updates or any other ones is done through the update and security section, called up from the settings menu (the gear button in the Start menu). Here, select “Update Center” on the left and use a hyperlink to the update log in the right window.

In the new log window, click the uninstall link, and select the package to be uninstalled from the list, after which you click the delete button at the top. Next you need to confirm the uninstallation. At the end of the process, you must reboot.

If you look carefully at the section for selecting packages to remove, it is not difficult to guess that this is a list that in the classic version can be called up through the corresponding menu of programs and components of the standard “Control Panel”.
Uninstalling updates via the Control Panel
Thus, you can remove the Windows 10 update in the classic way using the regular “Control Panel”. But not all users know how to get to it. This can be done through search (RMB on the “Start” button) or through the “Run” console (Win + R) and entering the control command.

In the panel, the already familiar section of programs and components is selected, and in it - the item for viewing installed updates. Further steps are exactly the same as those described for the previous method.
To prevent packages from being installed again, you need to manually search for available updates in the Update Center, and hide the updates among those found, after remembering the numbers of those that were deleted.
As an additional measure, we can recommend changing the update installation parameters so that the system does not automatically integrate them, but only finds and gives the user the right to choose. But it is not recommended to completely disable system updates under any circumstances.
Uninstalling updates via the command console
You can also remove the Windows 10 update using a more complex method using the command line (cmd in the Run menu). This method allows you to remove even those critical updates that cannot be uninstalled using the methods described above.

First, a line is written in the console to display the complete list of installed packages wmic qfe list brief /format:table (their names always begin with the letters “KB”, followed by the package number). Now you need to remember the number of the package that is supposed to be uninstalled and enter the command wusa /uninstall /kb:package_number. The number is indicated without the initial letters, since they are initially present in the deletion line itself. The Windows Update client then fires, displaying a message indicating confirmation of the action. We agree, wait for the process to complete and reboot (a message requesting a restart will appear automatically).
Note: In some cases, the offline installer may not prompt you to confirm that you want to uninstall the selected packages.
Uninstalling an old version of Windows 10 after upgrading using the classic method
But that's not all. The fact is that updates are released not only for the main components of the system, but also for the system itself. These are the so-called assemblies. Among the most recent, it is worth noting the Anniversary Update, Creators Update and the already officially announced Fall Creators Update, which will be available for installation from October 17, 2017.
When installing new assemblies, files of old versions are saved in a special directory Windpws.old on the system disk. Therefore, do not be surprised that there is noticeably less free space (about 10 GB or more can be used). Such files are needed only in one case, if you plan to return to the previous build and completely disable the installation of new ones. However, it seems that most users will not deal with such things, so you can get rid of old files.
The simplest method is to call the disk properties through the RMB menu from Explorer, where the disk cleanup button is used on the general tab. In the list that appears, you must select the item for deleting temporary installation files and the line for deleting the previous version of the system.
Please note that old OS build files are only retained for thirty days, so after this period, rollback will no longer be possible.
Removing the Windows.old folder through the options section
Similar actions can be performed in the system partition, called through the options menu, where the storage item is used.

Here you need to activate the automatic memory control line, click on the link to change the cleaning method, and in the new window, check the box on the line to delete the previous version and click the immediate cleaning button. But deleting the Windows.old directory directly from Explorer is not recommended under any circumstances.
Disabling updates using a special utility
Finally, Microsoft, seeing user dissatisfaction with some update packages, has released its own specialized utility that allows you to completely disable the installation of unnecessary or unwanted updates. It's called Show or Hide Updates, and you can download it directly from the official website. Such a program for removing Windows 10 updates is not literally an uninstaller, but rather works as a blocker for updates that the user, for his own reasons, does not want to install.

After launching the application and running diagnostics, the program will offer a choice of two actions: hiding updates or showing them. Select the first item, indicate the updates that you want to hide, and wait for the process to complete. After this, updates will no longer be installed for the selected applications and services.
Hiding the notification icon
To make working with the system more comfortable, you can make sure that the icon with the annoying reminder that an update is required no longer appears.
To do this, you just need to find the package with the number KV3035583 in the log of installed updates, delete it and remove it from the list of packages required for installation, as described above.
Instead of a total
As you can see, uninstalling a Windows 10 update is not that difficult. In principle, the first three methods for removing individual packages duplicate each other, as do the methods for removing outdated assemblies. But in general, despite some differences, they are all equivalent to each other. So there is no particular difference in which particular technique will be used.
As you know, many users of Windows 7 and 8.1 have recently received a message about the availability of an update to version 10.
Despite the fact that you can use this service if you wish, the update icon after such a message is installed on the computer of everyone with a licensed OS and periodically appears, interfering and annoying during work. But this is only half the trouble, since along with this icon there also appeared new folder, having Name$WINDOWS.~BT, which serves for an easier transition to a new version and the data contained in it are not deleted. This phenomenon is not very pleasant for those users who do not want to use the innovation, especially when the system disk is almost full of the necessary data, because the weight of the folder is quite large, even 3 GB.
In addition, all this can cause problematic situations in the functioning of a PC or laptop, which is also not very good. Therefore, the best option would be to produce removing unnecessary update, and there are several ways to do this.
It is worth noting that these methods work for rollback any system update.
Uninstall via Update Center
The first method, which is the simplest, is to destroy the component using Parameters And Control panels. To perform this you will need the following operations:

After all the activities, a list of all versions that were installed on the computer will be opened. Among them are selected unnecessary updates and press “ Delete" Next, this action is confirmed and its completion is waited for.


You can also get to the list of updates using Control Panel, in which using the section “ Programs and components", a side menu opens where you select " View installed updates».
Using the command line
The second way to get rid of updates is to use the command line. To carry out the process, the following actions will be required:


 Could not play test sound - Solution: Check BIOS settings
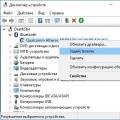 How to enable Bluetooth on a laptop
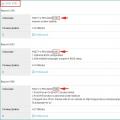 How to find out the BIOS version of a computer or laptop