How to install d link and enable surveillance. Connecting an IP camera to a computer and setting it up
Setting up a Wi-Fi IP camera.
To pre-configure the D-Link DCS-2121 Wi-Fi IP camera, you need to connect it to a computer using the Ethernet cable that comes with the device.
This requires a PC with the following minimum requirements: CPU 1.3 GHz or higher, RAM at least 128 MB, 10/100 Fast Ethernet, MS Windows XP or higher, IE 6 browser or higher.
Keep in mind that if you need to use several Wi-Fi cameras at once, the minimum computer system requirements for working with them will be slightly higher (CPU from 2.4 GHz, RAM from 512 MB).
Also, for the cameras to work, you will need a Wi-Fi wireless network, namely, a wireless access point (router) that is compatible with the 802.11g protocol.
Connection
- If you have all of the above components, you can start connecting and configuring the Wi-Fi IP video camera "D-Link DCS-2121". To do this, we will assemble all the components of the camera: we screw in the antenna, assemble the tripod, and install the device on it.
- Next, we connect the network cable to the corresponding RJ-45 port of the video camera at one end, and at the other end to a similar input on a wireless router or directly to a PC. After that, we connect the camera to the mains using a standard power supply. When connected, a red LED should light up on the front side of the antenna, which indicates the operation of the device.
- On a computer that is also connected to the router, install the software from the disk that comes with the device. After inserting the CD into the drive, the installation window should appear on the screen. If this does not happen, you must manually start the program. To do this, go to the "Start> Run" menu, where we enter: "E: DCCD-Link.exe", instead of "E" we put the letter that is assigned to your drive.
- In the menu that appears, select the installation language (Language) and press the "Start" button.

- Further, the manufacturer warns us that it is necessary to remember the MAC address of the camcorder, which is written on the rear panel of the case, and that it is necessary to connect the camcorder to a computer / router using a UTP cable. We click on the “Next” button and proceed to the next step, where we are informed that it is necessary to connect the Wi-Fi IP camera to the mains through the power adapter. We press "Next".

- In the next window, the utility will search for and identify connected IP cameras. This will display the MAC address that you were asked to remember in advance. If several cameras are already connected, select the MAC ID of the required device from the list and click "Next".

- The next menu determines the network connection and Internet access settings. If your network supports DHCP, the LAN settings will be assigned to the camcorder automatically. If automatic address assignment is not set, you will need to manually assign an IP address to the camera, specify the network mask. If you need to directly connect the Wi-Fi IP camera to a DSL modem for Internet access, you need to configure the device according to the connection type. There are two connection options available for installing the D-Link DCS-2121:
Allocation of a static network address (Fixed IP Address). A dedicated IP address is a service that Provided by the provider.
Connection via PPOE connection (will require you to enter the login and password assigned by the provider for Internet access).

- After selecting the required option, click "Next", in the menu that appears, make the settings corresponding to the selected type of connection.

- After correctly filling in all the fields and clicking on the "Next" button, we get to the final window with congratulations on a successful connection. Also in this window the assigned URL will be indicated. By clicking on this link through an Internet browser, we get to the D-Link DCS-2121 web interface, where you can make advanced settings, view the received video signal, and so on.

- To exit the configuration menu, click on the "Exit" button, to go to the URL - the "Advanced Options" button.
Head of the technical support group Benedict Maksimenko.
We drive in the Internet Explorer browser, the IP address of the D-Link DCS-942L camera (the RJ45 camera itself must be connected to the router with a cable) and press Enter. A window will appear: Windows Security, which informs you that you need a username and password to log in to the DCS-942LB1 server at 192.168.1.101. Enter them and click on the button: OK.
The D-Link DCS-942L wireless camera settings interface will load, Live Video tab, Camera section. The video didn't load because the browser cut the plugin's ActiveX element.

To aid security, Internet Explorer has stopped the installation of ActiveX controls on the computer. Click here to select options... Right-click and select: Install this add-on for all users on this computer...
Internet Explorer - Security Warning. This program has been blocked because the publisher cannot be verified. Name: camclictrl.cab. To help protect your computer, Windows will block software if it can't verify the publisher. Click on the button: OK.

Go to Start\Control Panel\System and Security\Windows Firewall and click on: Change notification settings. We mark the items: Turn off Windows Firewall (not recommended) and click on the button: OK.

Click on: Advanced Options. Then in the window: Windows Firewall with Advanced Security, click on: Windows Firewall Properties. And there, in the Domain Profile tab, select the firewall status: Disabled. Click on the button: Apply and OK.

Let's look at the result:
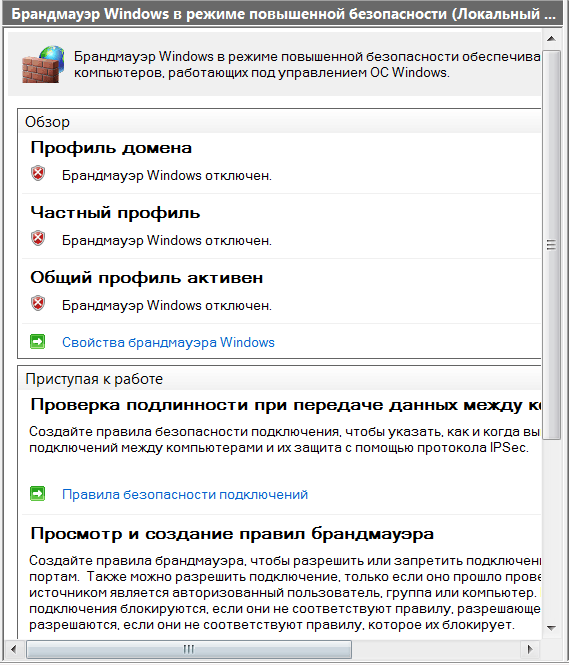
In the Windows tray, an inscription will pop up: Turn on Windows Firewall. Windows Firewall is disabled. Click this line to enable it.

In User Account Control Settings, disable User Account Control. OK.

Launch the Internet Explorer browser and select: Tools > Internet Options.

Switch to the tab: Security. Go to the section - Security level for this zone. Click on the button: Other.

In the window: Security settings - Internet zone, we find the parameter: ActiveX controls and plug-ins > Download unsigned ActiveX controls (unsafe) and check the box in front of the item: Enable (unsafe). Click on the button: OK.

Attention! Are you sure you want to change the setting for this zone? The current security setting puts this computer at increased risk. Click on the button: Yes.

In the window: Internet Options - Security Threat, we see that the security level for this zone has received the status: Special. Click on the buttons: Apply and OK.

And in the Live Video window, we are greeted with information: This section shows your camera "s live video. You can control your settings using the buttons below. Current resolution is 640 x 480. And a window with a resolution of 640x480.

At the bottom of the window, control buttons. Four profiles (we'll talk about them later). The first one has a default resolution: 640x480.
Profile 2 has a default resolution of 320x240.

Next button: Full Screen - enable full screen mode. To exit this mode, press the button: Esc.

Currently, cloud-based IP video cameras are widely used in the consumer market, designed to organize a simple video surveillance system. To ensure the operation of such cameras, special services have been created that provide real-time viewing of events from anywhere in the world where you can connect to the Internet. They are very popular both among ordinary citizens and in public and private companies. In order to properly set up a cloud camera, you need to have an understanding of how it works.
Characteristics of the D-Link DCS-930L camcorder
The D-Link DCS-930L cloud IP camera is designed to organize video surveillance in apartments, private households, small businesses and offices.
The D-Link DCS-930L IP camera has a compact rectangular body and can be mounted on a wall, table, bookshelf and any other flat surface
The device is supplied as follows:

The cameras of this model can be used in two versions.

It is advisable to use an Ethernet cable to connect cameras to a network if the length of the section from each camera to a network switch or server does not exceed one hundred meters.
Video: D-Link DCS-930L Cloud Camera Features and Package Contents
General characteristics
DCS-930L is produced by one of the world leaders in the production of products for telecommunications and network equipment - the Taiwanese company D-Link. The camera runs on an operating system with a Linux kernel, which makes it possible to independently change the firmware of microcircuits to install new software.
The IP camera supports the Mydlink video service, which provides secure remote access to image viewing through stationary and mobile devices connected to the global network. The video broadcast is in real time. This requires registration at http://www.mydlink.com. After that, no hardware settings need to be made..
In the absence of an Internet connection, viewing and recording can be organized on a local network or on one computer using an Ethernet cable connection.
Please note that the creation of a local network using an Ethernet cable will require additional financial costs for its purchase. In addition, the laying of cables is inevitably associated with additional work on their installation in the box. Therefore, before creating a network, you need to decide on the method of transmitting images from IP cameras.
The DCS-930L IP camera has an Ethernet port, can support all standard Wi-Fi networks, but by default it works in 802.11/n network, which has a wider range. All common encryption protocols for data transfer are supported. With the Site Survey option, the camera can quickly search and configure available Wi-Fi networks within the range of the DCS-930L. The presence of the WPS button on the camera body makes it possible to automatically configure a secure wireless connection. Using the IP camera, you can support the remote control option, send photo images by e-mail and to the server when the motion sensor is triggered. When the provider allocates an external dynamic IP address using the DDNS service, you can organize remote access to a given domain name specified by the user.
The DCS-930L IP camera can connect to a local network via a wired port or Wi-Fi
Please note that all settings of the IP camera are carried out only through the LAN connector. You may experience problems when setting up over a wireless network. Even if the camera registers successfully through the in-house Wi-Fi, when you connect to it from a smartphone somewhere in another city, you can see a message that the IP camera is not active.
Keep in mind that when connecting the camera directly through a router, you must install the ActiveX add-on if you are using Internet Explorer or a Java client application to receive an image. Otherwise, the image from the camera will not appear on the monitor display.
Video recording type
The video image from the camera can be recorded to a cloud service or to a computer on the local network. It does not support writing to:
- mydlink web service;
- network storage (SMB);
- memory card;
- USB media.
Image quality
The image quality of the video camera is quite acceptable for home video surveillance and control of premises in offices:

You can rotate and mirror the image, as well as overlay timestamps and text.
Sound
Of the audio devices, there is only a built-in microphone. Options such as:
- connecting an external microphone;
- bidirectional audio channel;
- built-in speaker.
Built-in interfaces
Of all the connectors for connecting to the camera, there is only an Ethernet jack. All other useful interfaces are missing:
- no audio input and audio output;
- there is no slot for a memory card;
- there are no DI/DO connectors that provide a physical interface for sending and receiving digital signals from various external devices.
Network interface - wired and wireless.
Size and weight
The camera is quite compact and lightweight. It has the following dimensions (W X D X H):

Camera weight 76.9 g (excluding bracket and stand).
Connection and setup
There are two ways to connect and configure the D-Link DCS-930L IP camera for image transmission:
- with pre-installation of D-ViewCam software from the supplied DVD;
- with a direct connection via the Internet to the mydlink service without installing D-ViewCam.
Connecting and configuring DCS-930L with D-ViewCam installation
Connecting and configuring the D-Link DCS-930L IP camera is carried out in several stages. It is necessary to follow a fairly simple algorithm, according to which most software installations for the Windows operating system are performed.

Connecting and configuring the DCS-930L directly via the mydlink service
Connection through the mydlink video service is used if video surveillance does not plan to use a local network, and most of the control over the situation is carried out using mobile devices. To do this, the following algorithm is performed.
- Select the DCS-930L camera model on the start page.
Select the DCS-930L model and click in the "Setup Wizard" block on the line Setup Wizard for Windows
- Download and install the latest install wizard for the DCS-930L from http://www.mydlink.com/support .
- Launch the installation wizard.
- Select the interface language and click the "Start" button.
Select the Russian language and click on the "Start" button
- Agree to the terms and conditions of the program by checking the box to accept the terms and clicking the "Next" button.
Check the box to accept the terms and click the "Next" button
- Connect an Ethernet cable to the LAN port on the back of the IP camera and click the "Next" button.
Connect an Ethernet cable to the LAN port of the IP camera
- Connect the other end of the Ethernet cable to the router's LAN port and click the "Next" button.
Connect the Ethernet cable connector to the LAN port of the router
- Connect the power adapter to the camera and power outlet and click the "Next" button.
Connect the power adapter to the camera connector
- When the camera is ready for use, its indicator will turn green.
The readiness of the IP camera for operation is signaled by a green indicator on its front panel
- When prompted on the screen, confirm that the indicator is solid green.
Click the "Yes" button to confirm the request
- Select an IP camera from the list of discovered devices and click the "Next" button.
Select the IP camera model to connect to the service
- Select the wired or wireless method to connect the IP camera to the router and click the "Next" button.
- If you select a wired connection, click the "Next" button and follow the instructions on the screen. If you select wireless connection, disconnect the Ethernet cable from the LAN port on the IP camera.
Select the type of connection depending on your network configuration
- Start searching for a wireless network. If the network asks for a password, then enter the password for the Wi-Fi network and click the "Next" button.
Start searching for a wireless network and enter its password if necessary
- To use the camera's cloud features, register with mydlink. To do this, enter your email address, password, as well as your first and last name in the empty fields. Click the "Next" button.
Enter your data in the empty fields and confirm your agreement with the terms of use of the software and the privacy policy
- In the last window, add a shortcut to the mydlink internet connection to the desktop and click the "Finish" button.
Add a shortcut to mydlink to your desktop and click the "Finish" button
- Log in with a user account to the service website and view the image from the IP camera.
View the image transmitted from the IP camera through the mydlink service
Video: viewing Dlink IP cameras via the Internet - Mydlink cloud service
Configuring access to the web interface
After connecting and configuring the IP camera, you need to configure the web interface according to the following algorithm.

Changing the IP address
When an IP camera is shipped from the factory, it is assigned an IP address. It is indicated in the product passport or in the instruction manual. The most commonly assigned address is 192.168.0.20. After installing and configuring the camera, you can change it. To do this, you must perform a certain sequence of actions.

Change video settings
To change the video settings, follow the steps below.

Configuring access to video streams
To configure access to video streams on the DCS-930L IP camera, you also need to perform a number of simple operations.

The D-Link DCS-930L IP camera can simultaneously generate two video streams via one link like http://x.x.x.x/video.cgi.

Camera firmware update
Since the DCS-930L IP camera runs under the Linux operating system, the user has the right to update the software firmware by himself. In addition, the system itself can detect outdated firmware after installing and configuring the camera and offer to install the update automatically.
If it is necessary to install the updated software firmware, the following algorithm is performed.
- Connect the DCS-930L to the router using an Ethernet cable. A computer must be connected to it, on which work with the camera will be performed. You cannot perform the update process using a wireless connection or using a remote connection.
Connect the computer and IP camera to the router using an Ethernet cable
- Go to the mydlink service website.
- Select the IP camera model and download the latest firmware version. Unzip the file and save it to your desktop.
Download the latest firmware for your camera model and save it to your computer
- Launch the camera software installation wizard and write down its IP address.
After starting the installation wizard will show the IP address of the video camera - write it down or remember it
- Enter the IP address in the browser to access the web interface of the camera.
- In the IP camera connection console that appears, enter the username admin and password (usually it is not set by default).
Enter the username and password to connect to the IP camera
To activate the update download process, click the Upload button
- When the upgrade process is completed, go to the Firmware Upgrade block to return to the firmware upgrade page.
After the firmware update is completed, go to the Firmware Upgrade section
It is important to remember that an attempt to update the firmware via a wireless network will inevitably lead to errors in the operation of the IP camera and the video broadcast of the image from the Internet.
Different people come to the issue of organizing a video surveillance system for various reasons. Some see the need to create an enterprise system that will use a huge number of IP cameras and powerful video servers. For some, it is enough to install a couple of devices for domestic or personal purposes. But in any situation, regardless of the purpose of the system, the owner needs to properly organize the setup process.
First of all, you need to start setting up the entire tracking system from the video camera, because this device is its main component. Cameras that are branded D-Link have the function of automatically assigning an IP address. The DHCP protocol is used for this purpose. In the event that such a protocol is not available on the local network, the device receives a permanent IP address. It defaults to 192.168.0.20.
Connecting a D-Link IP Camera
 The initial connection of a D-Link brand video camera is carried out in several stages, but first you will need to prepare all the components of the system. To do this, you need to connect the IP camera to a laptop or PC, for which an Ethernet cable is used. All D-Link cameras have this cable included.
The computer has the following requirements:
- RAM: at least 128 megabytes;
- CPU frequency: from 1.3 GHz;
- FE: 10/100;
- internet browser: from Internet Explorer 6;
- operating system: Microsoft Windows XP.

In the case when many devices are connected to the system, the minimum RAM will need four times the specified value, and it is better to choose a processor from 2.4 GHz. Wi-Fi devices will need a wireless network in the form of a router that supports the 802.11g protocol.
The connection is made in several stages:
- screwing in the antenna;
- tripod collection;
- installing a video camera on a tripod;
- connecting to a network cable on one side of a computer or wireless router, and on the other side - a video camera;
- connecting the IP camera to electricity using the power supply included in the kit.
In the event that all steps are performed correctly, the red LED on the front of the antenna will light up. This means that the device is working successfully, and you can proceed with further configuration.
Setting up D-Link
The process of setting up a D-Link brand camera is carried out through a computer that is connected to a video surveillance system, including a router. The IP video camera will be able to function correctly when the latest version of Java is loaded. If this is not true, you will need to install and configure Java before you begin.
In addition, the camcorder's firmware must also be the latest version, which will need to be downloaded to a working PC.
To set up the device, follow these steps in sequence:

- subnet mask address: 255.255.255.0
- IP address: 192.168.1.21

- DNS 1: 213.184.225.37
- Gateway (router address): 192.168.1.1,
 then save the settings, and wait until the device reboots. It is very important to know that each application of new settings by pressing the "Save" button will reboot the camcorder. Therefore, before the countdown is over, it is not recommended to perform any other actions with the system, otherwise the settings will not be able to be saved.
- The router is disconnected from the PC and the camcorder. Then you need to return to the original settings of the network card. By default, network settings are obtained automatically.
- In the window of any convenient browser, you need to specify the address of the video camera, and then press "Enter".
- Installing the NCS plugin will allow you to view video information through the device settings. To install this utility, you need to go to the "Live Video" menu, and then click on the link that appears in the settings window. This will start the plugin installation.
- The NCS module must be enabled in order to be able to view data in the camera settings. To do this, you need to find the item "Manage plug-ins" in the Internet browser settings. If we talk about the Google Chrome browser, then it will be located in the upper right corner.
- In order for the module to work properly without interruptions and failures, you need to allow its use for the device IP address. This can be done through the appropriate item in the "Plugin Management" menu, and then click "Finish".
- Setting the date and time is done through the "Time & Date" section. Here you will need:


- encryption type: "AES"
- wireless mode: "Infrastucture"
- security mode: "WPA2-PSK"
At this point, the D-Link camera settings come to an end, and you can start working through the appropriate communication service.
How to find out the IP address of a D-Link camera
Quite often, situations arise when the owner of a video surveillance system needs to find out what IP address a particular video camera has. D-Link brand devices of various models (for example, 2102 or 2121) can connect to the network not only stationary, via an Ethernet wire, but also via a Wi-Fi connection. The device has a button called WPS. Its sequential pressing on the video camera and router allows you to get the IP address first.
After the address is assigned, the connection and configuration is carried out, but before that it is necessary to understand the parameters of the IP address. To do this, you need to enter the settings of the router, where the necessary data will be indicated.
An easy way to find out the ip-address of d-link is to look at the instructions. Usually the default is 192.168.1.0. If the address has been changed, then install the official D-Link D-ViewCam software.

Click on the icon (look at the screenshot), the program will automatically determine the ip-address of d-link.
At some point in life, most people are faced with the need to use a video surveillance system. Some "face" with corporate video surveillance systems, which use dozens, hundreds of cameras and high-performance information processing servers. Others are content with a system with one or two cameras. Regardless of the size of the video surveillance system, the user is faced with the task of setting up the elements of the system.
One of the main elements of the video surveillance system is a video camera. I'll start with her.
All modern D-Link IP cameras can obtain an IP address automatically using the DHCP protocol. If the local network where the camera is connected does not have a DHCP server, the camera uses the static IP address 192.168.0.20. The next step is to launch Internet Explorer 7 or higher on the computer, in the address bar we type http://IP address cameras. If you did everything correctly, a window for entering a login and password will appear (admin is empty by default).
Subsequent items can be interchanged. I will submit them in the order that, in my opinion, is most convenient.
1) After entering the WEB interface of the camera, I set the time. To do this, you need to find the "Time and Date" item in the camera settings. Depending on the model, this item can be found by pressing the buttons:
Setup ->Time and date
Setup -> System ->Time and date.


I advise you to enable time synchronization with an NTP server so as not to re-adjust the time after a power failure. For this you need:
Set the time zone;
If necessary, enable summer/winter time;
Activate the "Synchronize with NTP Server" option;
In the "NTP Server" field, specify the server with which you want to synchronize;
Press the "Save Settings" button.
2) Setting video stream and audio parameters:

Setup -> Audio and Video
Setup->Audio and Video->Video Settings
In this menu, you can configure the following video stream parameters:
Image aspect ratio (Aspect ratio);
Select codec for processing video stream MPEG4, MJPEG and H.264;
Frame size (Frame size or Region of Interest);
The size of the window in which the video is displayed (View window area or Output frame size);
Limit the maximum frame rate (Maximum frame rate);
In the "Video Quality" menu, set the video quality using one of the Constant bit rate or Fixed quality modes;
After changing the necessary parameters, click the "Save Settings" button.

Let me briefly explain the meaning of the above parameters:
frame size or Region of interest- the size of the image transmitted from the matrix (sensor) to the camera.
view window area or output frame size– size of the image transmitted by the camera.
video quality- video quality. "Quality" is set by one of the algorithms Constant bit rate or fixed quality.
When we set the video quality "Constant bit rate", the drop-down menu with the bitrate value becomes active. The higher the bitrate value, the better the video quality and the "wider" the bandwidth required for video transmission. By selecting one of the values, you will limit the traffic transmitted by the camera. Depending on the selected video codec and the activity of changing the frame (image) in front of the camera, the video quality may change, but the traffic transmitted by the camera does not exceed the specified value.
Set video quality "Fixed quality", the drop-down menu with the conditional value of the video quality becomes active. In most cameras, a choice of three values is available: Exellent, Good, Standard. The "Fixed quality" algorithm processes video by "holding" the quality of the image while the bitrate can change.
Why degrade video quality?
If the camera is used only in your local network, you can leave the maximum settings. As a result, you will be able to watch real video and archive with good quality. But often the user wants to view the video remotely, and the Internet does not have time to pass the traffic transmitted by the camera. In this case, you can set up one profile with good video quality for recording. The second, with the worst video quality, and at the same time with a small bitrate, for remote viewing.
3) Adjust image parameters:

Setup -> ImageSetup
Setup->Audio and Video->Video Settings

In different models of cameras, the "filling" of the menu may differ. Let me explain the parameters that you need to pay attention to:
power line or power line frequency– This parameter sets the mains frequency to 50 or 60 Hz. Since in our country the power supply frequency is 50 Hz, we set this value in the settings. If you leave 60 Hz, then horizontal stripes will "run" on the video.
Mirror And Flip- mirror and coup. There are places for mounting cameras, where you can’t put it except “upside down”. In order for the transmitted video from the camera to be correct, the top matches the top, and the bottom matches the bottom, you need to enable Mirror and Flip.
Having completed the above three points, we can assume that the video stream setting has been completed.
4.1) preparation of the SAMBA server.
A directory must be allocated on the server in which the camera will record files. It is desirable that the directory be located in the root directory of the server. On the server, create an account for the camera.
4.2) preparing a memory card.
We insert a card into the camera. In the web interface of the camera, you need to format the memory card. Depending on the camera model, go through the menu:
Setup -> SDcard press FormatSDcard.

Setup -> Advanced Setup -> Recording->Local Storage press Format

When the memory card is formatted, the camera's WEB interface displays the card options.
In cameras with a blue-gray WEB interface (DCS-3010, 6112, 6113, etc.), in the same section, if necessary, overwriting data on the memory card is set.
5) Add a recording server in the camera
Setup -> Event Setup -> Server->Add.

After pressing the button Add
In the dialog box, select the server you want to add. For a memory card, just put a dot in front of SDcard. For SAMBA Network Storage and fill in the appropriate fields. To save the settings, click Save Settings.

In cameras with a blue-gray WEB interface (DCS-3010, 6112, 6113, etc.), the server SDcard added automatically after formatting the memory card.
For adding SAMBA-server go through the menu:
Setup -> Advanced Setup -> Event Management -> Event Settings press Add

After pressing the button Add a dialog box for adding a server will appear.
In the dialog box, select the server you want to add. For SAMBA-servers put a dot in front of the field Network Storage and fill in the appropriate fields.

To complete the settings, press the button Save. Also, it will not be superfluous to press the button test, to check the status of the server.
6) The server has been added, turn on the recording.
Setup -> eventSetup -> Recording-> Add.

After pressing the button Add

In the record settings, fill in the required fields and set the required values:
Recording entry name– information field "Name" of the record.
Enable this recording– enable/disable recording. Don't forget to check this box to enable recording. If you have installed a new card in the camera or want to format a previously installed card, this mark must be temporarily unchecked.
priority– setting the priority for this event. The event with the higher priority will be executed first.
Source– stream source, you can set one of the video profiles configured earlier in the second step.
Recordingschedule– recording schedule. Here we mark the days and the time range when you need to "write".
Destination- appointment. In the drop-down menu, you need to select where we will write to the installed card (SD) or SAMBA server (SAMBA).
Totalcyclingrecordingsize– the amount of space allocated for video recording. With this parameter you set how much space the camera can take up in the recording directory. When the set volume is reached, the camera will begin to erase old recordings. If you set the volume to more than available in the recording directory, the camera will stop recording after the directory is full. Be careful during setup, the volume is indicated in megabytes. A memory card with a capacity of 32 gigabytes is not equal to a volume of 32,000 megabytes.
sizeofeachfileforrecording– limiting the file size according to the selected volume.
Timeofeachfileforrecording– limiting the duration of recording to a file according to the selected time.
FileNamePrefix– adding a prefix at the beginning of the file name.
For cameras with a blue-gray WEB interface (DCS-3010, 6112, 6113, etc.), perform the same steps as described above:
Setup -> Advanced Setup -> Recording -> Recording Settings press Add

After pressing the button Add a dialog box for recording settings will appear.

A little about the parameters other than the "orange WEB interfaces":
Destination- appointment. In the drop-down menu, you need to select where we will record - to the installed card (SD) or SAMBA server (Network Storage).
If SD is selected, this window does not display options for overwriting on the memory card. They are available on the menu. Setup -> Advanced Setup -> Recording->Local Storage-> SD card control.
When you select Network Storage, this window displays the options for writing to the SAMBA server.
Capacity- you can choose to occupy all free space on the server (Entire free space) or limit the amount occupied (Reserved space).
Enable cyclic recording– enable loop recording. After reaching the maximum volume, the camera will erase old files, writing new ones in their place.
IP video surveillance is becoming more and more dense every day. I hope this text will help you understand the basic settings of D-Link IP video cameras. More information about the settings is available in the user manual and on our websites.
 RTSP video surveillance
 Broadcasting a video stream from an IP camera using WebRTC
 Why doesn't more always mean better?