How to make a booklet in an open office. Practical work on the topic "Creating a booklet in the Libre Office Write text editor" outline of a lesson in computer science and ICT on the topic
This short article will explain some of the points in creating and printing a brochure in OpenOffice.org. The article will consider the layout of an A5 brochure. Actually, the whole article is the procedure that is provided in the editor Writer for similar operations and some printer skills. So let's get started.
Sheet preparation
The first key step to take is to prepare the page, page margins, and print margins.
Opening the menu "Format", then item "Page..."
On the tab "Page" set the paper format to A5. Orientation remains "Portrait".
Now for the fields...
Be aware that printers may set their own minimum margins when printing sheets. For example, when printing on HP Deskjet 3550 printers and, apparently, on all budget models, the minimum top print margin will be approximately 3 mm, and the minimum bottom margin will be approximately 9 mm. 
The figure illustrates the position of the print margins and page margins on a sheet of paper for the HP Deskjet 3550 printer. The sheet of paper is highlighted in green, the printer's print margin in blue, and the page margins in red when they are formatted and printed.
You need to know this, because we will set the page margins at 1 cm from all sides.

And when printing on printers with “incorrect” print margins, text and any inserts, headers, and images may be cropped.
Indents for pagination
If you plan to insert page numbers, we recommend that you leave a sufficient indent from the edge of the sheet at the top or bottom, respectively.
Main points of layout
Before formatting, you must remember that the number of pages in the brochure must be a multiple of 4. If you do not follow this rule, the program will add “extra pages” to the brochure, with incomprehensible numbering (if you enabled it), etc.
Pagination
To enable page numbering, you must first enable the required header (header or footer). By enabling the header and footer, you can edit it like regular text.
With the cursor in the header, select the item in the main menu "Insert" - "Fields", then "Page number". The page number will appear. On each page, it will automatically appear and be set to the desired value.
To move the page number (along with the rest of the header text) to the left corner, center or right corner, place the cursor in the header and switch the paragraph alignment (left, center or right) with the corresponding button on the Writer toolbar.
If you need more complex pagination, use the Pager extension.
Inserting images
When inserting images, you should remember: if the image goes beyond the page margin (not to be confused with the printer's print margin), it will be displayed correctly on the screen, but it will be cut off during layout before printing! Therefore, if you want to insert a non-standard image that will go beyond the text (it will be located close to the edge of the sheet and the fold of the booklet), you need to set smaller print margins, and text indents, respectively, large.
Two more points when working with an image in text:
- Resize images in proportion: click on the image that you have inserted into the text. 8 green dots will appear around the perimeter. Holding down a key "shift" and "grabbing" one of the points, resize the image to the desired one.
- For the readability of the text that is next to the image, you need to set the indents from the image: using the right mouse button, call the context menu, select the item "Image", on the tab "Wrap Around" In chapter "Indents" set 5 mm each indent.


Brochure printing
Before printing, we remind you once again that the total number of pages in the brochure must be a multiple of 4.
To print a brochure, execute the following commands: open the menu "File", paragraph "Seal", then press the button "Options...", in the opened dialog "Print Options" In chapter "Pages", check the box "brochure" - "OK".
Now we press the button "Properties..." and change the page orientation to landscape.
After these settings, Writer will calculate the brochure and start printing it.
Directly when printing, you need to feed one A4 sheet at a time. If your printer does not support duplex printing, then to print the second side, the sheet printed on one side must be fed to the printer input with the clean side, respectively, and the edge of the sheet that came out of the printer must be fed forward. Follow these two rules, and you will always have correctly oriented sheets.
If a print break occurs...
If a print break occurs, it's easy to fix. First, you need to stop printing. Then continue printing, making the same settings before printing, but specifying the page printing range as 3-6 pages (here you need to remember that the range, if calculated correctly, will start with an odd number and end with an even number).
For example, you want to print an 8-sheet A5 brochure. You will need 2 A4 sheets. If there is a break in printing on the first page (it doesn't matter if it's the first or second side), then we reprint the entire brochure.
If there is a break in printing on the second page (and it doesn’t matter either, the first or second side), then we reprint pages in the range of 3-6 pages.
Finally...
And for the layout of brochures in A4 format, the appropriate page format is set, and when printing, A3 paper is used.
A booklet is a sheet that has several folds and contains textual and graphic information. Booklets are often used for the mass dissemination of information about an event or organization.
In this lesson, we will create a booklet containing information about a technical creativity institution. The archive contains images and a text file odt.
Approximate appearance of the result:

Step 1 Presets
Create a document with the following characteristics:
- Layout - Single Page
- Size - A4
- Orientation - Album
- Margins - 10 pt on all sides
- Number of pages - 2
Now you need to set the guide lines, which will indicate the fold points and help place the material. We will have three vertical lines on both pages (for the fold), and one horizontal line only on the second sheet (for even material).
Execute the command Page → Manage Guides. On the Columns/Rows tab, add two vertical guides and click the Apply to All Pages button. Make the second page active and add one horizontal guide.
The right third of the first page is the front cover of the booklet, the central part is the back cover, the left third will be nested inside when folded. The second page is the inside of the booklet. The first page will contain general information about the organization, and the second - information about associations (circles) functioning on its basis.
Step 2. Information about joins
Let's tackle the second page first. Let us have only four associations: "Radio Engineering", "Karting", "Aircraft Modeling" and "Computer Technologies". One cell is allocated for each union, formed by guides. Leave one third of the second page blank for notes or a schedule. The schedule is usually placed in a table, which is easier to prepare in a text editor than in Scribus. Therefore, you can first print the booklet, and then "run" the sheet through the printer a second time and print the schedule, placing it correctly on the page.
Create a block with the text "Radio Engineering". This will be the union header. Adjust the font size, color and shadow through the properties panel. Copy the block to three other cells and change the text to match the existing joins.
In each cell of the guides, two pictures and two text blocks will be placed. Creating each block separately is not the best solution. So let's use the Table Tool (A).
Stretch the table from the lower left edge of the text block with the name of the union, to the lower right corner of the cell from the guides. In the window that appears, specify 2 columns and 2 rows. Copy the table to three other cells.
After that, each table should be ungrouped, and half of the cells in a checkerboard pattern should be converted to images (in the context menu: Convert to → Image; or in the regular menu: Object → Convert to → Image).
Load images into their respective blocks. Fit images into blocks.
Reduce all the text blocks a little and link them together so that after loading the text in the first one, it will "spread" over the rest of the blocks. When linking blocks, please note that the information in the text document has the following sequence: 1) about the unification of radio engineering design, 2) karting, 3) aircraft modeling, 4) computer technology.
Load the text and edit its style. In order for the text to “spread” correctly over its cells, adjust the size of the text blocks to the amount of text corresponding to them.
Step 3. Making the outside
Design the first page yourself, approximately as shown in the figure above.
Step 4: Publish and print
Export the publication to pdf format. Look at the result.
Please note that when printing brochures, it is important to remove the page scaling in the program from which you print.
Somehow I needed to organize a double-sided printing of a document. It turned out that in OO this is not as intuitively easy to do as in many other applications. Googled it. Here is the result
Duplex printing in OpenOffice
From: Valentin Davydov
From: "Leizer Karabin" A.
0300 It's not even a bummer for me to list the pages I need, separated by commas
EG in the print dialog. The problem is that it is necessary that even sheets of EG
were printed in reverse order, otherwise they will have to be manually
EG shuffle
DTP-shniks have long solved the problem: another or receiving tray (pack in
reverse order or lies), even and odd change the order of printing,
first type even or vice versa.
al in the more OOo new ones has "print in reverse". how to time
al duplex printing is the most it.
It is unlikely that Evgeny has an inkjet or a matrix, but everyone has laser
a drawstring that allows you to take pages face 1,2, .. up or down.
Not everyone. for example, K at ML-2015/2510/2570 (aka Phaser 3117/3122/3125)
Although no. older models already natively know how to postscript.
the third A is not given. And it is hardly more complicated than software tricks.
It is more difficult than software tricks - to make it so that the printer takes exactly from the pack
one Val.
sheet. Dove.
--- ifmail v.2.15dev5.4
* Origin: Demos online (2:5020/400) service
Recently there was a work-related need to print text material typed in LibreOffice Writer in the form of a brochure. In principle, the idea itself was clear to me, but I had no idea how to implement it. I won’t say anything new, but as usual, Google helped me.
So, let's say that we have already created a document. I had a document in A4 format with a portrait (vertical) orientation.

It is advisable to number the pages. For this we go to Format - Page - Footer and check the box next to "On. footer".


Now File - Print - Page Layout. Select item - Brochure.


Click Properties. In the window that opens, select Paper Size - A4 and Page Orientation - landscape, in my case Landscape. In other printers, of course, the settings window will be different, but I think the meaning is clear.

Now you can click OK and the print will start. But it is worth remembering that you need to submit one sheet at a time. The first page has been printed, and the same page must be inserted into the printer again, but with the back, clean side. And so on until all the pages have been printed. Of course, printers can support duplex printing and some models can print all pages first on one side and then on the other side. But these are details. For me, the main thing was to understand the process itself. As a result, the entire document was printed with the correct page layout to create a booklet.
This short article will explain some of the points in creating and printing a brochure in OpenOffice.org. The article will consider the layout of an A5 brochure. Actually, the whole article is the procedure that is provided in the editor Writer for similar operations and some printer skills. So let's get started.
Sheet preparation
The first key step to take is to prepare the page, page margins, and print margins.
Opening the menu "Format", then item "Page…"
On the tab "Page" set the paper format to A5. Orientation remains "Portrait".
Now for the fields...
Be aware that printers may set their own minimum margins when printing sheets. For example, when printing on HP Deskjet 3550 printers and, apparently, on all budget models, the minimum top print margin will be approximately 3 mm, and the minimum bottom margin will be approximately 9 mm. 
The figure illustrates the position of the print margins and page margins on a sheet of paper for the HP Deskjet 3550 printer. The sheet of paper is highlighted in green, the printer's print margin in blue, and the page margins in red when they are formatted and printed.
You need to know this, because we will set the page margins at 1 cm from all sides.
And when printing on printers with “incorrect” print margins, text and any inserts, headers, and images may be cropped.
Indents for pagination
If you plan to insert page numbers, we recommend that you leave a sufficient indent from the edge of the sheet at the top or bottom, respectively.
Main points of layout
Before formatting, you must remember that the number of pages in the brochure must be a multiple of 4. If you do not follow this rule, the program will add “extra pages” to the brochure, with incomprehensible numbering (if you enabled it), etc.
Pagination
To enable page numbering, you must first enable the required header (header or footer). By enabling the header and footer, you can edit it like regular text.
With the cursor in the header, select the item in the main menu "Insert" — "Fields", then "Page number". The page number will appear. On each page, it will automatically appear and be set to the desired value.
To move the page number (along with the rest of the header text) to the left corner, center or right corner, place the cursor in the header and switch the paragraph alignment (left, center or right) with the corresponding button on the Writer toolbar.
If you need more complex pagination, use the Pager extension.
Inserting images
When inserting images, you should remember: if the image goes beyond the page margin (not to be confused with the printer's print margin), it will be displayed correctly on the screen, but it will be cut off during layout before printing! Therefore, if you want to insert a non-standard image that will go beyond the text (it will be located close to the edge of the sheet and the fold of the booklet), you need to set smaller print margins, and text indents, respectively, large.
Two more points when working with an image in text:
- Resize images in proportion: click on the image that you have inserted into the text. 8 green dots will appear around the perimeter. Holding down a key "shift" and "grabbing" one of the points, resize the image to the desired one.
- For the readability of the text that is next to the image, you need to set the indents from the image: using the right mouse button, call the context menu, select the item "Image", on the tab "Wrap Around" In chapter "Indents" set 5 mm each indent.


Brochure printing
Before printing, we remind you once again that the total number of pages in the brochure must be a multiple of 4.
To print a brochure, execute the following commands: open the menu "File", paragraph "Seal", then press the button "Options…", in the opened dialog "Print Options" In chapter "Pages", check the box "brochure" — "OK".
Now we press the button "Properties…" and change the page orientation to landscape.
After these settings, Writer will calculate the brochure and start printing it.
Directly when printing, you need to feed one A4 sheet at a time. If your printer does not support duplex printing, then to print the second side, the sheet printed on one side must be fed to the printer input with the clean side, respectively, and the edge of the sheet that came out of the printer must be fed forward. Follow these two rules, and you will always have correctly oriented sheets.
If a print break occurs...
If a print break occurs, it's easy to fix. First, you need to stop printing. Then continue printing, making the same settings before printing, but specifying the page printing range as 3-6 pages (here you need to remember that the range, if calculated correctly, will start with an odd number and end with an even number).
For example, you want to print an 8-sheet A5 brochure. You will need 2 A4 sheets. If there is a break in printing on the first page (it doesn't matter if it's the first or second side), then we reprint the entire brochure.
If there is a break in printing on the second page (and it doesn’t matter either, the first or second side), then we reprint pages in the range of 3-6 pages.
Finally…
And for the layout of brochures in A4 format, the appropriate page format is set, and when printing, A3 paper is used.
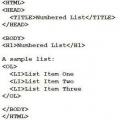 Nested lists in html. Numbered list. List marker in the form of an empty circle
 Description and purpose of the Photoshop toolbar Photoshop toolbar meaning
 Excel for Dummies - Changing Columns, Rows and Cells How to set the desired column width