Save image as JPEG flexibly. How to save an image in Photoshop? How to save in photoshop cs6
Instruction
A beginner should not delve too deeply into theory, but you should definitely know that JPEG is a format with a compression algorithm. A file of this format can have different extensions, for example? .jpeg, .jfif, .jpg, .JPG, or .JPE. It is very convenient because it takes up much less space than a similar image in TIFF or BMP format. Unlike the latter, it has less image information. When viewing the original file on a monitor, this may not be too noticeable, but when the photo is printed in a laboratory or processed, the result may turn out to be of lower quality than the full information formats.
How you save a JPEG depends a lot on your goals. Before you save the picture, decide whether you will process, print on photo paper, or you just need to put the picture on a page on the Internet.
For post-processing or printing in a photo lab, save the image at the highest quality and size. When saving the desired image, open the menu File (File) and select Save as (Save as). Select the directory where the file will be saved. In the first line, enter the name, and in the second, select the JPEG format and click the Save button. If you did manipulations with the file, then a dialog box will pop up in front of you with a choice of the quality of the saved image. You should select the maximum quality with the slider or the corresponding number 12. Confirm your choice by pressing Ok. If you have not manipulated the image, then after saving it, the dialog box with the choice of JPEG quality will not open.
When saving a photo for publication on the Internet, modern resources themselves can change the size and quality of the downloaded JPEG. However, in some cases you have to do it yourself. Before saving the image, resize it by going to the Image menu and selecting Image size. Make sure the Constrain Proportions box is checked. Choose a unit of measurement that is convenient for you: centimeters, pixels, inches or millimeters, enter the required value of one of the sides in numbers and click Ok (in most cases, images from 800 to 1500 pixels on the largest side are used for web pages). Save the result, while choosing a lower quality. With its values from 8 to 10 and a small image size, visual differences from the original size are minimal, but the file size is significantly reduced.
Also in Adobe Photoshop there is a special module for optimizing and saving images for web pages, which may be more convenient. From the File menu, choose Save for Web. In the dialog box that opens, you will be presented with a preview window for the saved image and several options for settings. Select the 4-up or 2-up tab. The program will present you with four or two possible options for the optimized image. To save the right one, just click on the picture and click Save (Save). If the options do not quite suit you, then first use the tools located to the right of the image.
Related videos
The Russian language is rich, but it is not always possible to convey the description of an object or event in its entirety. And it is not in vain that they say that it is better to see once than to hear (read) a hundred times. It's easier to complete your forum post with an image instead of describing it in words. There are many ways to include pictures in your posts.
Instruction
Different resources have different forms. If your case has a form that allows you to add images, use it. Find the "Attach file" field and click on the "Browse" button. In the dialog box that opens, specify the directory where the image is saved on your computer. Having selected the file with the picture with the left mouse button, click on the "Open" button and wait until the file is loaded. Next, format your message as usual. On English sites, use the Additional Options field and the Attach button.
If the message form does not have an option to attach an image, use third-party resources. Upload the desired image to photo hosting and place a link to it in your post. Without closing the message window or tab, open Photo Hosting in a separate tab or window. Click on the "Browse" button in the "Select an image file on your computer" field, specify the path to the file. Next, click on the "Download" button and wait for the download to complete.
Hello, dear readers of the Start-Luck blog! In touch Andrey Zenkov and my practical advice on web design. Today we will talk about the same keys, without which your site will never open the door to the world of browser bookmarks (and it is so important for the user to mark favorite pages with an asterisk).
It will be, as you might have guessed, about images. Picking up a bright photo is only half the battle. After its processing, colorization, text overlay and other manipulations, a new problem is brewing on the horizon: how to save an image in Photoshop?
Let's say you've created a website about pets and are eager to add an extensive photo gallery. Bach - and you can't imagine design without charming menu icons in the form of paw prints. And what about a section with funny animations that will cheer up the guests of the site?
With enthusiasm, you fit all the images to fit, save and ... see that the effort is in vain. Pixels completely kill painstakingly created “paws”, and you can’t look at pictures in motion without tears. Photoshop automatically moves to the list of uninstall programs, and you make a promise to yourself to find a real craftsman. For what? You can do everything yourself, having learned the main secret that I always use.
The algorithm for saving images in optimal quality depends on their format. I do not want to go into details, talking about which are raster and which are vector. Moreover, you can change them in a couple of clicks. I already wrote about this in one of my articles, sharing with readers how to change image formats.
Analyzing the sites that the Internet is rich in, I noticed one interesting detail: all graphic elements are represented by only a few universal formats, while the existence of others is completely forgotten. What are they?
The main groups of images in web design
The graphic content of websites is conditionally divided into three categories.
Collages and photos
They are characterized by the JPG format - by the way, the most common on the web. These images are small in size, which allows you to use them in the design of the site without fear of slow page loading. For example, the same landscape saved in JPG and PNG differs significantly in weight:

Icons, buttons and banners
PNG is preferred for these design elements. It allows you to cut out an object and save the image without a background, using the site's "background" instead. I would also recommend this format for images that do not have a huge palette. For example, create a document in Photoshop and - the name of the site:

We save the image in two formats and compare the result:

Animation
GIF is designed to create animated images consisting of two or more layers. This can be done not only with Photoshop, but also. I would call this format the most capricious, since it is difficult to achieve good quality when saving in it. Luckily, I have a hack that will give you minimally pixelated animations. Intrigued? Read on!
Step-by-step instructions for saving images
Let's start with JPG: it's very easy to get a photo without loss of quality. To do this, click "File" - "Save As". If desired, you can use the key combination Shift + Ctrl + S:

In the window that appears, look for the drop-down list "File type" and select the line JPEG. It usually stands by default:

In the same drop-down list, you can also select the PNG line, thereby simplifying your task. However, I recommend saving images with transparent backgrounds differently.

Examine the window that opens. Your task is to make sure that the PNG-24 item is selected in the drop-down list, and that there are ticks next to the "Transparency" and "Interlaced" lines:

Please note: the last checkmark reduces the time it takes for the image to load on the site, but at the same time increases its weight. If this doesn't bother you, click Save. In the drop-down window, select the file path and press the treasured button again to get the PNG image and put it on the site as soon as possible!
The animation is saved through the same menu item, but now you need to select the GIF option in the drop-down list. A huge number of parameters and incomprehensible words can cause bewilderment or even fear. Not worth it! Just set the options I use:

Summing up
Working with graphics requires constant improvement of skills, without focusing on one or two directions. How to be? At one time, a real find for me was set of five mini-courses from the Photoshop Master project. From them, I learned more than one byte of useful information.

The material is presented in an accessible form and free of charge. This is a great alternative to studying at computer academies and spending many hours searching for the right lessons on the Internet.
That's all. Don't forget to subscribe to VKontakte group and blog updates for a weekly serving of fresh and helpful articles.
Andrei Zenkov was with you. See you soon!
Working with a graphic editor Adobe Photoshop for 5 years now, I was surprised to learn that not everyone knows about the importance and necessity of saving images correctly. Searching the internet, I really didn't find up-to-date and correct information on this topic. For this reason, I figured out the issue and want to tell you how to save images properly.
Who needs to know and why?
Everyone - who works with a graphic editor, not necessarily Adobe Photoshop. Illustrator, artist, graphic designer, web designer, interface designer, photographer, student, schoolboy - by learning how to save images correctly, reducing the file size, you save not only your own, but also other people's time.
What time are we talking about?
First, let's clarify one thing:
By using the internet you are wasting time - a lot of time
Loading pages on the Internet is not instantaneous and takes time, but over the years of being on the Internet, you are used to not noticing this. Let's say average page load speed 3 seconds, where 2 of them are for image uploads. Illustrations, interface elements, photographs, banner ads, a PDF presentation, or even a picture of a cute cat, depending on the file size, will take time for the browser to display the image on the screen.
Don't be fooled by "megabytes per second"
Chances are your ISP is promising you 100 Mbps- this is a brilliant advertising ploy (read as: deception) that has given rise to many misconceptions, including in the topic of site loading speed. I measured the connection speed with a server located in Moscow, the result is:
But the page loading speed from the site is much lower:
How many images per day do you view?
Dozens? Hundreds? As an active Internet user, I view several hundred images a day, most of them in high resolution. If you reduce the weight of these images and increase the download speed accordingly, at least by 1 second, multiplying by 500 images per day, we get about 8 minutes a day and 4 hours per month.
4 hours a month I wait for the picture to load
Everything you need to know about saving images
With rare exceptions, there is no need to save the final result in the same way as PSD, in this case, an additional and extra information from the date of creation and the name of the graphic editor to the weather and camera model.
It's a bad habit to set quality to value 100 , but compared to 80 differs visible quality almost zero, but the difference in weight palpable.

To place an image on a website, send it by mail, save it in the cloud, send it in a messenger, etc. - you must use Save for web.


JPEG or PNG?
JPEG - for images with a lot of colors and complex shapes: illustrations, paintings, photographs.
PNG - for vector images or images containing text, simple geometric shapes with transparency and a small number of colors: logos, screenshots, stickers, icons.
What quality (Quality) to choose?
For most images, the optimal value will be 80 , for some simple images where a clear transition between colors is not important. you can set the value 60 .
Optimization
The function includes an additional color conversion algorithm, it is recommended include always, except when the smallest details are important (for example, Pixel Art).
Convert to sRGB(Convert to sRGB)
Converting image colors to the appropriate sRGB table.
sRGB is the standard for the internet
Resolution(Image Size)
The most common screen resolution is: 1366×768- for computer and 720×1280- for smartphone. Keep this in mind and don't save images longer than 1920 in width.
Metadata
Extra information, which I already mentioned. There is no need to specify additional information about the image, which only increases the size of the file.
When was the last time you looked at the details of a downloaded image?
Using this method, I was able to reduce the weight of the image by half.
Of course, there are rare exceptions where you may need detailed information or increased detail, but in most cases these rules will be relevant and save hundreds of hours.
Thanks Vladislav.
In this lesson, we'll look at file save formats in Photoshop and how they differ from each other.
It is very important for everyone who deals with computer graphics to have a good understanding of the file formats in which graphic information is stored.
Document Format in Photoshop displayed as follows. Let's look at the picture to the right. " No name-2' is the name of the document. After the dot comes document extension, in this case jpg.
Never rush to save your work in Photoshop.
There are currently over 20 graphic file formats, For example, jpg, gif, png, bmp, tif…
The size of the file largely depends on the selected format. Thus, creating any image using a graphic editor photoshop, we have to save it as a file. The main task when saving is to find a middle ground between the quality of the image and the size of the containing file. Although even a poor quality photo can be improved (for an example, see the link below)
Consider the most common graphic formats for saving files in Photoshop
For example, our work contains a number of layers and today there is simply no time to finish this document, i.e. we need to postpone the work until tomorrow and save the intermediate version of our work. So that tomorrow we don’t start creating a new document, but start from where we left off today.

Saving a document in Photoshop in psd format
 We go to tab FILE and choose SAVE AS. In the window that opens, enter the name, select the format psd
and press SAVE.
We go to tab FILE and choose SAVE AS. In the window that opens, enter the name, select the format psd
and press SAVE.
Besides, PSD- this is the native format of the Photoshop graphics editor. If we save our document with this extension, then we can open it in any, even the earliest version of Photoshop.
If we have already finished working with a document in Photoshop, then it is better to save it in another, more common format that will be available to many applications, for example, in the format jpg .
Saving a document in Photoshop as a jpg
Format JPG designed for compact storage of multi-color images with photographic quality. The loss of graphical information when saving is not very significant. Format jpg V photoshop it is best to apply after the final result of image processing.
Saving a document in Photoshop as a gif
 Format gif
designed to save bitmap images in photoshop with the number of colors not more than 256. Let's say this is a screenshot - a screenshot of the tab FILE. The document name is underlined in red in the figure, the extension is in green.
Format gif
designed to save bitmap images in photoshop with the number of colors not more than 256. Let's say this is a screenshot - a screenshot of the tab FILE. The document name is underlined in red in the figure, the extension is in green.
In this screenshot (figure), there are few colors, clear borders and no gradient. GIF format for this image fits perfectly, it allows you to save the transparency of the pixels. Also gif format supports animation.
IN GIF format it is good to preserve contrasting images without smooth transitions or noise, for example, logos, banners, diagrams, drawings, etc.
GIF format often used in web design.
Saving a document in Photoshop in png format
PNG format similar GIF format. The only slight difference is that png capable of displaying more colors. Allows you to save an image with a color depth of 24 and even 48 bit.
PNG format useful in web design to save small multi-color images with small details, such as iridescent picture buttons. The file size will be larger than gif or jpg.
 We go to tab FILE V photoshop. There are several commands for saving an image to a file.
If we need to set a different file format, change its name and location, then it is better to use FILE-SAVE AS, i.e. here we set the name, format, specify the location for saving.
If in the future our file gets on the Internet, it is better to use FILE-SAVE for Web devices.
![]() Having opened this command, we get a dialog box where we see our image. Displayed in the lower left corner the size of this image(in the figure, the image size is shown in the blue box).
Having opened this command, we get a dialog box where we see our image. Displayed in the lower left corner the size of this image(in the figure, the image size is shown in the blue box).
What can we do with our image?! How can we change its parameters?
 To the right of our image, we can set format where we will store it. However, when choosing one or the other format, we can observe all the changes in our image on the screen.
 We can also set the quality of the image when saving in one or another format.
Depending on the choice of quality and format, we will change the size of the image. Keep in mind that when the image quality is set to "medium", the image quality will not change much, but the image size will be smaller. Therefore, it seems to me that this option is very important when saving an image.
After choosing the best option for saving the image, press SAVE and choose a folder to save.
In this lesson, you will learn how to save a document in photoshop. After the photo has been edited, most likely you wondered how to save it? To do this, Photoshop provides three commands: Save (Save), Save As (Save as) and Save for Web & Devices (Save for Web and devices):
Basic information
All three commands can be executed via the File menu:

The Save command allows you to save the document in the format in which it was originally opened. It is recommended to use it when you are editing an image, so that if the program freezes, you will not lose the results. The next command, Save As, will be the most useful for you, it allows you to select the save format, quality and name. The Save for Web & Devices command is useful for saving an image of a web resource or any device, allowing you to highly compress and resize the image. To learn the settings of this command, you will need a separate lesson.
Saving a file in JPEG format
One of the most common formats of our time. Received great popularity for the fact that even with a small size it retains colors well. JPEG is supported by almost all multimedia devices and all web browsers.
To save the image in this format, you need to select File (File) - Save As (Save As), after which a window with save settings will open, which will be described in detail below:

- At the top there is a window for choosing a location to save to your hard drive.
- Changing the file name
- In the field Format (Format) it is possible to select a format for a file. Select JPEG format and click save.
A window with file settings will open in front of you:

In the Image Options section, you can select the quality and compression ratio: Low (Low), Medium (Medium), High (High) and Maximum (Maximum). The easiest way to do this is with the slider. Remember that the more compression, the worse the quality. On the left is the file size. In the Format Options section, you can choose one of three compression methods:
- Baseline Standard (Basic Standard) This compression method is the most common, perfectly understood format for devices and web browsers.
- Baseline Optimizes (Basic optimized) a method that allows you to compress the image, but at the same time maintain clarity and color.
- Progressive (Extended) using this method, the image will not load line by line, but in several passes as it loads. Each of them will display the full image, improving from pass to pass. Some browsers and devices do not work well with it.
Leave Baseline Standard and click OK
Save the file as a PSD
When saving a file in PSD format, all editing processes are saved, including layers, masks, filters, etc. Therefore, if you open this format in Photoshop, you can easily make changes.

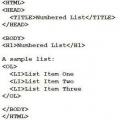 Nested lists in html. Numbered list. List marker in the form of an empty circle
 Description and purpose of the Photoshop toolbar Photoshop toolbar meaning
 Excel for Dummies - Changing Columns, Rows and Cells How to set the desired column width