Fixing errors on a windows 7 hard drive. Checking a hard drive for errors in Windows
Sooner or later, many of us noticed a gradual deterioration in the performance of our computer and a drop in the speed of copying / moving files. This happens for several reasons, the most common of which is a malfunction of the system hard drive. From our new article, you will learn how to independently check the disk for errors, and what this may require.
Unlike today's solid-state SSD drives, HDD drives were developed long before the advent of the first personal computer. An interesting fact is that the basic principles of its work have not changed for 50 years. Only the speed of work, the amount of memory increased, the connection interface changed, and the dimensions decreased.
The main nodes of this data drive are magnetized disks driven by an electric motor. Information from the disk surface is read by a movable head, which transmits it to the device controller for further processing. If everything is clear with damage to moving parts (they are easy to notice by the characteristic noise or even a complete failure of the HDD), then problems with sectors of the magnetized area can be detected only with the help of special programs. An indirect sign of "broken" sectors is a slowdown in data transfer, frequent crashes and errors, the appearance of a BSOD, and partial loss of recorded information.
Themselves with a mustache - run the Chkdsk command
When the first suspicions arise that the disk has begun to “crumble”, it is not necessary to immediately look for the most powerful utility for analyzing the HDD. To get started, the built-in Windows tools will be enough, namely: the Check disk program. If the hard drive fails, it can start automatically when you restart the computer, but this time we use it forcibly.
To check the status of a hard drive:
Put a tick next to "Check and repair bad sectors" and click "Launch".
The duration of the scan depends on the state and performance of the device, as well as on the size of the local disk. At the end of the process, the program will mark bad sectors as unused and correct errors in accessing the contents of the drive.
Note! When executing "chkdsk" for the system partition "C:", a system reboot will be required, after which the search will start automatically.

As stated above, scanning the system partition «
C:" will not start without restarting the PC, so you will see a prompt to start the action the next time you start it. Enter "Y" to confirm. 
In most cases, the regular utility does an excellent job of checking and restoring the hard drive. Its main disadvantages are the minimum information content and the lack of additional functions for a complete analysis of the HDD state. To determine the degree of wear of the device, the temperature regime, the speed of performing individual operations, specialized utilities are needed, which will be discussed below.
Western Digital Data Lifeguard Diagnostic
Our review opens with a miniature healing utility Western Digital Data Lifeguard Diagnostic from the hard drive manufacturer of the same name. The developers did not show "corporate egoism", and optimized their product for devices from all known brands, which makes DLGDIAG a universal, simple and affordable tool for any system.
To check the HDD for "broken" sectors with the Western Digital Data Lifeguard Diagnostic program:

To check the status of the hard drive and get acquainted with the data of the SMART system, click on the icon under the number 1. The utility will provide comprehensive information about the health and technical resource ("health") of the device. If you have all the values marked with green checkmarks - your HDD is in good condition. 

To eliminate possible hidden problems, we recommend using a thorough check, in which each cell of the marked area will be polled. During the search process, DLGDIAG will fix errors, block access to slow sectors, and thus extend the life of the device. However, if the report looks like the screenshot below, then an urgent replacement of the hard drive will be required to avoid losing information on it.

Western Digital Data Lifeguard Diagnostic provides the following benefits:
- Quick installation and low memory footprint;
- Recognizes many models from other manufacturers;
- High verification accuracy;
- Automatically “heals” damaged sectors;
- Does not require a paid license and has no user restrictions;
- Laconic interface.
Also, we could not help but mention the shortcomings:
- The official version is not Russified;
- The "Format" action is incorrectly listed as "Erase", which can lead to accidental data loss beyond recovery. Pay attention to this!
HDD Regenerator
Multifunctional combine HDD Regenerator is one of the most advanced automatic systems for diagnosing hard drives on a PC. The program supports all existing HDD and SSD devices, modern interfaces and file systems. It can perform SMART analysis of devices, check and fix bad clusters, and restore the health of a badly worn hard drive.
The main feature of this software is real-time operation. HDD Regenerator informs the user about the hard drive temperature exceeding, read and write errors, the need for recovery work and other important information.
Important! We will warn you right away that fixing damaged areas is possible only after purchasing a license worth $99.99. Only diagnostics is free.
To check the hard drive with HDD Regenerator:
- We download and install the distribution for free on the developer's website http://www.dposoft.net;


The process of searching and fixing looks like this: 

Advantages of HDD Regenerator:
- A large number of functions;
- Works in real time;
- Outputs SMART data;
- Restores access to information on the drive;
- Efficiently finds and marks bad sectors;
- Runs under Windows and MS-DOS.
Main disadvantages:
- Paid license with not quite adequate price (subjective opinion);
- There is no Russian language in the official version;
- Sometimes SMART evaluates the latest hard drives incorrectly.
Victoria HDD
The last participant in our review is Victoria HDD. A professional-class utility that has long declared itself uses its own algorithms for finding and recovering a hard drive. The software differs from competitors in the abundance of settings and diagnostic parameters, as well as excellent information content. For troubleshooting, Victoria HDD polls only the hard drive controller without interacting with the BIOS, which has a good effect on the compatibility of the utility and the system.
To start using Victoria:
- Download and unpack the archive with files on the developer's website https://victoria4.ru.


The utility found two bad cells.
The advantages of Victoria HDD are:
- A large number of customizable search options;
- Effective correction of the marking area of worn discs;
- Support for outdated and modern hard drives;
- It is possible to work from under MS-DOS;
- The maximum degree of information content among competitors;
- The basic version is free.
Disadvantages of the utility:
- Too complicated interface for an unprepared user;
- There is no Russian language.
Summing up
The situation when a hard drive suddenly starts to “crumble” is very common, since the quality of most modern magnetic drives leaves much to be desired. At risk are devices with many years of experience, in which wear is indecently high. However, you should not immediately go to the store and choose a new hard drive - there is a chance to restore the existing disk to working capacity using one of the methods we have mentioned above.
The standard Windows tools are universal and suitable in all cases. We advise you to always start the check by running Check disk with any of the two options.
If a positive effect has not been achieved, use one of the three utilities from our review. For those who do not want to bother with the settings, Western Digital Data Lifeguard Diagnostic is perfect. Those who want to check their drive to the maximum can use Victoria HDD (free) or HDD Regenerator (if you have extra $100).
Do not be afraid to experiment, and you will definitely learn how to check your computer's disk for errors.
You can check the hard drive for errors and fix them both with the help of third-party programs and through the built-in services that are in Windows by default. Next, we will consider several methods that allow you to automatically check your hard drive and fix problems found on it.
Checking the disk for errors in Windows 7
You can run diagnostics through the command line, disk properties, PowerShell, and the control panel. Each of the proposed options scans the disk for errors of a different type, so it is recommended to use all three instructions and only after that, if the problem is not found, resort to diagnostics through third-party programs.
Checking the hard drive by executing commands
Via disk properties

Video Tutorial: Checking HDD
Via PowerShell

Using the control panel

Using third-party programs to diagnose and check the hard drive for bad sectors
If checking the disk using standard methods did not bring the desired results, then you can use third-party programs that perform disk diagnostics.
You can download the program for free from this site - http://programdownloadfree.com/load/system/test_hdd/victoria/71-1-0-122. Its features and benefits are as follows:

HDAT 2
Similar to the previous application, but supporting more hard drive models and modes of operation. The official website of the program is https://hdat2.com.
CrystalDiskInfo
The program has a beautiful and understandable design, as well as the presence of the Russian language. Official website of the developer -
http://crystalmark.info/?lang=en . In addition to the basic functions common to all the programs described above, CrystalDiskInfo supports diagnostics of external drives, checks the status and temperature of the HDD, and has a wide range of disk settings.
Correction of found problems
In most cases, the found errors will be corrected automatically. But sometimes, the computer may detect an error, but not get rid of it, but only tell you about its presence. In this case, you must fix the error yourself.
With the help of the Victoria program
The Victoria application can both scan the disk for errors and fix the ones found.

So, checking a hard drive or SSD can be done both with the help of third-party and through built-in programs. In most cases, the found errors will be fixed automatically. Before you start working with the disk, it is recommended to restart the computer, the same should be done after you finish working with it.
Windows crashes, computer power shutdown, experiments with software for managing disk space, the consequences of virus penetration - these and other problems can lead to the automatic launch of the regular Windows Chkdsk utility, designed to fix errors in the hard drive file system. Incorrectly completed work of the operating system with files leads to file system errors, and sometimes even to its damage. In emergency cases, the Chkdsk utility itself turns on before Windows starts, scans disk partitions and fixes errors. However, the fact that there are problems with the file system may not make itself felt during normal use of the computer and only be detected when trying to manage disk space. So, for example, when trying to reduce a disk partition using regular Windows tools, we can receive such a notification: “It is possible that the volume selected for compression is damaged. Please use Chkdsk to troubleshoot, and then try shrinking the volume again."
In this case, the disk check does not start automatically. How to run Chkdsk manually in Windows 7, 8.1 and 10? How can I fix disk errors using Chkdsk if this particular problem caused the operating system to be unable to boot?
Inside Windows, the Chkdsk utility can be run in several ways.
1. Run Chkdsk using the Windows GUI
To run Chkdsk, in the system explorer on the C drive, right-click and open "Properties".

In the window that opens the properties of the disk partition, go to the "Service" tab, and in it click the "Check" button (or "Run a check" for Windows 7).

In versions of Windows 8.1 and 10, if everything is in order with the file system of the disk, in the window that appears next we will see a notification that verification is not required. But if you wish, you can start checking the disk with the Chkdsk utility by clicking "Check disk".

If the system suspects file system errors, this window will contain a button to start checking and repairing the disk.

For Chkdsk to work on drive C, you must restart your computer. You can do this immediately or postpone the start of the scan until the next reboot.

After restarting the computer, we will be able to observe the work of Chkdsk.

In Windows 7, running Chkdsk is slightly different: in addition to the pre-installed automatic error correction option, you can add another possible option - checking and repairing bad sectors of the hard disk. When activating this option, it is worth considering that in this case, Chkdsk may take longer to complete.

As in the case of Windows 8.1 and 10, in version 7 the system drive C cannot be checked as part of a running operating system. To start the scan, you need to restart your computer. Click "Schedule disk check".


When checking a non-system disk partition, if it is used by some programs, the situation is simpler than with the system partition. In the window with a notification that the disk is currently in use, you just need to click the "Disable" button to, accordingly, disable this partition for the duration of the scan.
2. Run Chkdsk using the command line
To run Chkdsk using the command line, first, respectively, run the latter.
In the command line, enter the command by type:
In this command, instead of drive C, each time we substitute the letter of the desired partition on which verification is required. If Chkdsk is to check the system partition C, as with the graphical interface, a restart of the computer will be required. After a message appears in the command line about the impossibility of locking the specified drive, you need to enter "Y", then restart the computer.

In addition to the /f option, which is responsible for fixing disk errors, Chkdsk can be run with the /r option, which is designed to search for bad sectors and restore data. As a result of Chkdsk's work with this parameter, hard disk clusters with unreadable sectors will be listed as damaged (bad blocks) with the transfer of their functions to the new cluster. Therefore, it is recommended to run Chkdsk with the /r option only when the usual error correction - running the utility with the /f option - did not bring the desired results. On the example of the same drive C, the command will look like this:
3. Run Chkdsk on unbootable Windows
If Windows freezes at a particular boot stage, one of the possible causes of this problem is file system errors. In this case, you need to run Chkdsk by booting from the rescue media. As such, you can use the usual installation media with versions of Windows 7, 8.1 or 10. With it, we will run the Chkdsk utility inside the command line. At the first stage of starting the system installation process, press the command line launch keys - Shift + F10.

In the command line that opens, before running the Chkdsk command, you need to clarify which letters define the disk partitions. This is easy to do with notepad. I run it with the command:
Click the File menu, then Open.

In the explorer that opens, remember the new disk designations. As a rule, in Windows 8.1 and 10, the C partition (as it is inside the running operating system) is listed as D, since the letter C is given to the first technical partition of the system. And all other sections are offset by one letter of the alphabet.

Having decided on the letters of the disk partitions, close notepad, then, returning to the command line, enter a command of this type:


As with Chkdsk inside Windows, you must first try to fix disk errors by running the utility with the /f option. And only if the problem is not solved, only then we run the command with the / r parameter, as indicated in the previous paragraph of the article.
For cases of Windows inability to boot, you can pre-burn an emergency Live-disk with a selection of various tools to restore the operating system. Among these, for example, AdminPE based on WinPE. Its image for recording to a disk or flash drive can be downloaded from the official website of the project Adminpe.Ru. Using the AdminPE, you can launch a command line and enter the Chkdsk startup commands discussed above. But in this Live disk, the Chkdsk utility has its own interface and is launched using a script. The utility launch shortcut is placed directly on the desktop.

In the drop-down list for checking the disk, select the desired disk partition. Next, activate the checkboxes for recovering bad sectors and forcing the partition (volume) to shut down. I'm running a check.


Among the AdminPE tools are a number of other utilities for working with hard drives, as well as the well-known Hard Disk Sentinel and Victoria programs.
Have a great day!
One day it may turn out that a PC or laptop refused to start the Windows operating system or “frozen” during responsible and urgent work. Hard drive errors while running Windows are not the last cause of computer failure. However, any problem can be corrected if you know what is causing it.
The essence of the problem with the disk
Whether it's a traditional "hard drive" or a newfangled SSD drive, a critical error appears anywhere on it. Disk error - physically or programmatically damaged sectors, infection of the Windows system with viruses, failures in PC components (from parts of the drive itself to components of the computer motherboard). The task of the user is to figure out what caused the errors on the disk.
How to fix hard drive problems detected by Windows
Hard disk problems are unspecified errors on it, not signed by a numerical code (for example, error 11). First of all, the media from which it is proposed to copy valuable data is indicated.
Windows warns you that your data may be seriously affected
Action plan:
- Urgent copying of important files to another drive: flash drives, disks, memory cards, placement of some of these files on the "cloud" Internet services.
- Checking the disk for bad sectors.
- Antivirus scanning.
- Checking the CMOS/BIOS settings on the computer.
- PC maintenance: checking the integrity of cables, external inspection of PC components and their cleaning.
- If malfunctions are found that it was not possible to fix on their own - handing over a PC or laptop for repair.
The last two points will not be considered - this is the task of specialists in computer service centers.
Backing up files in Windows 7
Do the following.
- Click "Start" and in the search bar of the main Windows menu, enter the word "archive". Launch the Backup and Restore application.
 Click on the first suggested option - this is the backup wizard
 - Proceed with configuring the archiving program. Click "Set Up Backup".
 Start setting up your backup
 - Select the disk or its partition where the backups will be created. External drives and flash drives or large memory cards (from a dozen gigabytes) are best suited.
 Choose another, healthy and working disk
 - Click on "Give a choice for Windows". However, if you have clearly defined what you need in the first place, choose an independent option.
 If you give the system a choice, Windows will copy the contents of all user folders by default
 - Select the system folders of user files and/or the contents of the copied disks - except for the disk on which the copy will be created.
 Select everything you want to copy except the destination drive
 - Windows will ask for confirmation and display the categories of files being backed up for storage.
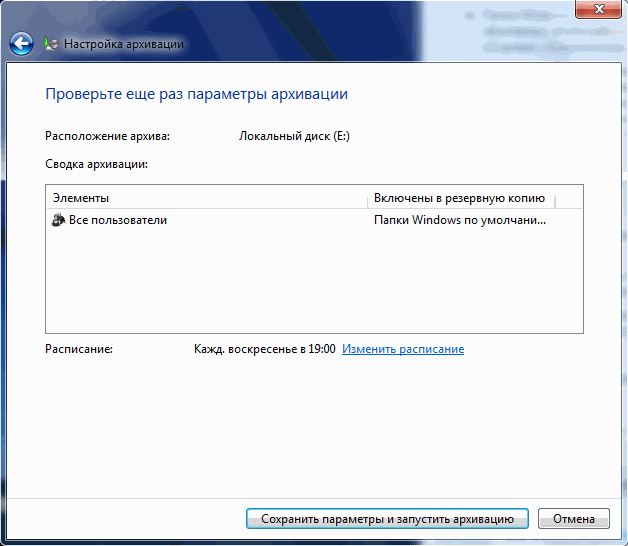 After that, the system will ask you to double-check the parameters and start copying
To restore files from a backup, do the following:

The process will start. After the backup is completed, check if everything has been restored.
 Click the link that appears to view a list of files and folders from the previous copy
 Check disk using Windows 7 command line
Checking the disk identifies logically or physically problematic sectors of the hard drive or SSD drive, which is the main drive in the computer. Do the following:

If you still do not trust the standard disk check tools, use the Victoria program. The version of Victoria for Windows is almost the same as the version for DOS - except for one thing: after downloading it, you can immediately run it to check a disk running a still working Windows system, without resorting to other disks, including removable ones.
Also get a new drive - in case the old one still outlived its usefulness.
Checking PC for viruses
Boot viruses corrupt the boot record and the NTFS(5) file table that Windows 7 works with. Because of this, valuable data that is not easy to recover with special utilities, as well as the system itself, “fly”.
As an example, the Dr. Web CureIt, which allows you to quickly check your hard drive for malicious code.

The application takes up more than 100 MB - due to the extensive anti-virus database of all time. After two days of work, this database is considered outdated - viruses appear almost hourly.
If an error occurs when starting Windows
The computer refuses to boot from the hard drive, reporting an error reading Windows system files.
 To try to resolve the hard disk read error, press Ctrl+Alt+Del to restart
 A professional way to fix such an error is a third-party disk check utility from Windows boot media or another operating system (if there is a version of this utility for it).
Checking the disk with built-in tools hides some details, although its use is not useless.
What does not make sense to do:
- restore the Windows system to an earlier date;
- start automatic recovery;
- start Windows Safe Mode.
BIOS setup to boot a PC from a USB flash drive or external drive
Change the BIOS boot priority of the PC from different disks. Do the following (using the Award BIOS version as an example).
- When you turn on the computer after the manufacturer's logo appears (or immediately below it), a line prompting you to enter the BIOS will appear - press this key.
 Press the key indicated at the end of the list of devices checked when turning on the PC
 - After entering BIOS Setup, select Embedded Peripherals.
 To enter the management of the operation of components, select Integrated Peripherals
 - Check if the USB port controller is active.
 The inscription USB Controller Enabled means that the USB controller is enabled
 - If USB support is enabled, exit this submenu with the Esc key. If it is disabled, enable USB support with the Page Up \ Down keys (the meanings of all BIOS settings control keys are shown below), then exit by pressing Esc.
- From the main BIOS menu, select "Advanced BIOS Settings".
 Go to advanced BIOS settings to manage PC booting from different types of media
 - Enter the hard disk priority menu and turn on the USB flash drive as the first boot disk.
 To configure the system, the boot order from media must be changed
 - Use the "+" or "Page UP/Down" key to make the flash drive the first boot device.
 In the first place in the download priority should be a flash drive
 - Exit this submenu by pressing Esc and set the USB drives as the first startup device.
 Set the First Boot Device section to USB-HDD (First boot from USB drive)
 - Exit all submenus to the BIOS main menu and press F10 to save the settings.
 When a message appears asking the BIOS to save the settings, press Y and Enter
 - Give the command "Y" - "Enter", the computer will restart.
Now, when restarting the PC, it will first of all poll the ports for the presence of a flash drive or a removable hard disk (HDD / SSD) - and only then try to start Windows from the built-in disk.
Checking a hard drive from a flash drive running Victoria
For example, a ready-made flash drive with Victoria under DOS and a laptop with a faulty disk are taken. Do the following.
- Insert the flash drive and restart your PC. The boot menu with Victoria should come out.
 In the window that appears, select Victoria
 - The Victoria app may offer different versions - select the version for laptops.
 In the Victoria for Notebook section, select the second item
 - If you want to get familiar with the functionality of Victoria, read the help on the keys by pressing F1.
 To get started, check how to run different functions of the Victoria program by pressing F1
 - To exit the help, press the X key or any other key that is not in the list.
 To exit help, press X and go to check disk
 - In the main menu, press F2 to show disk information. If this does not happen, press the P key to select the IDE interface channel on which the disk "sits". All modern PCs are equipped with SATA hard drives.
 In the window that appears, select Ext. PCI ATA/SATA and press the Enter key
 - After selecting the channel type, enter its number, for example, 1. If there are no other hard drives, the following numbers will be empty, there is no point in entering them.
 Busy channels in the program are immediately visible - enter the channel number of your disk and press Enter
 - Wait for Victoria to detect the drive on channel 1.
 A message about the successful identification of the channel will be displayed at the bottom
 - If you have an IDE-based drive, go back to the interface selection submenu and select one of the Primary / Secondary Master / Slave options (English “Primary / Secondary Master / Auxiliary Drive”) - check on the drive itself in what position it is switch. IDE is obsolete - modern SATA based drives do not require switching. For example, the Primary Master mode is taken.
 Select the mode with the cursor keys and confirm the selection with the Enter key
 - Information about the disk will come out at the bottom. Press F2 to display details.
 The channel port number is attached to the disk data
 - Initialization (passport data) of the disk shows that its recognition by the Victoria application is completed.
 After the disk is fully initialized, you can start checking it.
 - Press F4 - the disk scan menu will appear. Here LBA is a disk sector (512 bytes). We multiply the number of LBA sectors by 512, divide by 1024 3 - we get the size in gigabytes. The size of the checked disk area in Victoria for DOS must not exceed 1024 GB. If the size is more than 1 TB - calculate the beginning (Start LBA) and end (EndLBA) and scan the disk in several stages.
 Check that the disk size does not exceed 1 TB
 - Press the spacebar and enter an integer number in gigabytes or as a percentage - this will determine the location of the last sector in the scanned area. The start point of the scan is also changeable - calculate the size in gigabytes in the same way. When finished entering, press Enter.
 Enter the last gigabyte, which will end the scanned area of the disk
 - The size of the scanned disk area will be recalculated into the number of LBA sectors. Go to linear reading. Do not change this reading algorithm to another (random and "floating" reads will take longer and wear out the already old disk more).
 Select the linear mode of disk scanning by the program
 - Go to the next step and select "BB (Bad Blocks) Advanced Remap" (eng. "Advanced Transfer of Bad Sectors"). Options are selected using the left/right cursor keys or the spacebar.
 Select the BB Advanced Remap option - it uses sectors from the spare area
 - Do not rush to set the algorithm "Erase 256 sect." (“Erasing 256 neighboring sectors”) - 128 KB of data on the disk will be erased in the place of one problem sector. In this case, the size of the destroyed information will be multiplied by the number of "broken" sectors - depending on the proximity of each of these sectors to each other throughout the scanned area of the disk. Try other sector recovery options first! Press "Enter" to start scanning.
Everything, the process has begun, the Victoria application will inform you about the end with the sound of a “tweeter” in the computer. When bad sectors are found, "remapping" (sector reassignment) will be automatically performed.
 Replacing bad sectors with Victoria is one of the most effective ways to temporarily fix a hard drive
 The forecast of further work of the disk can be estimated according to the SMART monitoring data. Press F9. The status will be shown at the top. If it is “Good”, there is still a reserve for replacing bad sectors. The status has changed - the replacement of the disk with a new one is coming. If it is not possible to replace the disk, try to crop it programmatically, excluding bad sectors with the cropped area (often they are close to each other, many of them are in a row), but this is for those who love difficulties.
 The Good status indicates that the disk is in good condition.
 Other ways to check a disk
There are several options:
- the use of other applications recorded on a USB flash drive in a similar way (DOS bootloader);
- the scandisk.exe utility launched via DOS using the appropriate commands;
- Windows XP command line launched from LiveCD/DVD;
- connecting the problematic drive to another computer via a free loop.
Video: checking and trimming "broken" space
Error 11 when writing or unpacking data
"Error 11" has nothing to do with bad sectors on the disk. 90% is a software problem. It occurs when installing unverified programs that have source codes for installation, which the developers have collected with some omissions. The message is generated by the unarc.dll system library, which is responsible for unpacking content for any installed program and is one of the components of the Windows Installer service.
 Error code 11 can be replaced by any code from 1 to 10
 Some users, not understanding the problem with the source of the program being installed, update or replace this file (it "lies" in the C:\Windows\System32 directory) with any of its versions from the Internet. As a result, Windows may report that some files have been replaced by unknown versions and require you to insert an installation DVD or USB flash drive to restore them.
The solutions to the problem are as follows:
- try not to allow Russian names of files and folders in installed applications. For example, instead of the \Truckers-2 folder, when installing the Truckers-2 game, the \Rig&Roll folder is created. If, nevertheless, the name of the directory is written in Cyrillic, then the game is from a dubious source, download the licensed one (hacking the version does not matter, as long as there is a file structure like the licensed source);
- there is not enough disk space (in any of its partitions) for the program being installed. Clean the disk from unnecessary programs, documents and other content;
- error unpacking archives downloaded from the Internet. Install several archivers (for example, WinRar, WinZip, 7zip and a few others);
- turn off your antivirus and Windows firewall - sometimes they become an obstacle, especially if some application or game requires a crack (activator with key selection).
Other hard drive errors
They may be:
- 3f1 (the error is inherent in HP laptops);
- 300 (no boot entry found);
- 3f0 (no boot disk);
- 301 (SMART disk health diagnostic error), etc.
Video: checking partition C: and flash drives for errors in Windows 7/8/10
Restoring a PC or laptop to disk failure is not a problem if you act wisely and consistently. May you be lucky!
 Computer restarts while playing games or watching videos
 How to restore Windows on a Sony laptop
 Creating a multiboot flash drive with multiple Windows How to write two Windows to a USB flash drive