Multiboot flash drive in WinSetupFromUSB. Creating a multiboot flash drive with multiple Windows How to write two Windows to a USB flash drive
How to create a multiboot flash drive containing two operating systems at once Windows 7 and Windows 8! Hello admin, I can’t wait for your article on this topic, such a flash drive would be very useful to me, but I just don’t know how to create it. In the previous article, you wrote that such a flash drive can be created in the WinSetupFromUSB program, but for some reason it doesn’t work for me, I just can’t find the necessary settings for this in the program. All I can do is create a bootable USB flash drive with one Windows 7 or Windows 8 operating system.
How to create a multiboot flash drive containing two operating systems at once Windows 7 and Windows 8
Very simple, let's not waste time and get straight to the point. You and I will need the WinSetupFromUSB program already familiar to us, but we will need its final version 1.3, so if someone has an old version of the program, do not be lazy, visit the official website of the program and download it.
Note: WinSetupFromUSB creates a UEFI flash drive, that is, using such a bootable USB flash drive, you can install Windows 7 and Windows 8 both on a computer or laptop with a simple BIOS, and on a computer with a UEFI BIOS. Do not forget, if you are installing Windows 7, then insert the USB flash drive into a USB 2.0 port. The USB 3.0 ports (as you know) will not see the blue color "seven" during installation. To create a multiboot flash drive, I used a 16GB flash drive.
Let's return to our article.
Official site of the WinSetupFromUSB program.Select WinSetupFromUSB 1.3.exe (22 MB)

Download and run the program.

If we need create a bootable flash drive Windows 7 64 bit (32 bit) and Windows 8 64 bit, then we run the WinSetupFromUSB_1-3_x64.exe file.

Attention: If you want, then you will have to format the USB flash drive to the FAT32 file system, it follows that your Windows 7 and Windows 8 images must be less than 4 GB, since the FAT32 file system does not work with files larger than 4 GB. Immediately go to the very end of the article, there is detailed information for you.
Most users need normal multiboot flash drivewith Windows 7 and Windows 8, which means that your images of Windows 7 and Windows 8 operating systems may well be more than 4 GB, and in this case, the bootable Windows 7 flash drive we created will be in NTFS format!
How create a multiboot flash drive with Windows 7 and Windows 8
In the main window of the WinSetupFromUSB program, you can see the name of our connected flash drive.
Put a tick on the item Auto format it with FBinst and mark the item NTFS
Check the box

If your flash drive is formatted in the FAT32 file system, then this warning will appear, click OK.

In the explorer that appears, we find the ISO image of Windows 7 64 bit or Windows 7 32 bit, depending on what you need, select it with the left mouse and click "Open"

Click GO

a warning will open, click Yes,

again yes

The process of creating a multiboot flash drive begins.

The flash drive has been created.

Now in the same way we add Windows 8 64 bits to our bootable flash drive
Again we launch our WinSetupFromUSB program, in the USB disk selection field there should be the name of your connected flash drive.
Check mark on Auto format it with FBinst NOT put!
Check the box Vista/7/8/Server 2008/2012 based ISO and click on the button on the right to open the explorer window

In the explorer that appears, find the ISO image of Windows 8 64 bit, select it with the left mouse button and click "Open"

Press the GO button and start the process of creating an already multiboot flash drive.

Multiboot flash drive with Windows 7 and Windows 8 created.

But that's not all friends, the most important thing remains - to install Windows 7 or Windows 8 from this flash drive.
If you install Windows 7 or Windows 8 on a laptop or computer with a simple BIOS, you simply boot your computer or laptop from the created bootable USB flash drive. Perhaps at this stage, our article will be useful to some of the users.
If you selected your USB flash drive in the laptop boot menu,

Or set up in the BIOS the priority of booting the computer from a USB flash drive, the first window will be a menu in which nothing needs to be selected, it will disappear within a few seconds.

Then the GRUB4DOS bootloader window appears. Using the arrows on the keyboard, select the first option 0 Windows NT6 (Vista / 7 and above) Setup, which means installing the operating systems Windows Vista, Windows 7 and higher. Press Enter.

In the next window, select to install the operating system that we need Windows 7 SP 1 x64 or Windows 8 x64.
How create a multiboot UEFI flash drive with Windows 7 and Windows 8
In this case, the process of creating a multiboot flash drive with Windows 7 and Windows 8 differs only in that the flash drive must be formatted to the FAT32 file system at the very beginning.
Run the program WinSetupFromUSB.
In the main window of the program, you can see the name of our connected flash drive.
Put a tick on the item Auto format it with FBinst and tick the item FAT32
Check the box Vista/7/8/Server 2008/2012 based ISO and click on the button on the right to open the explorer window

Click OK on the warning.

In the explorer that opens, we find the ISO image of Windows 7 64 bit, select it with the left mouse and click "Open".
You can also use regular Windows tools, for example, recovery, but this is not always possible, so it is much easier to remove the old system and install a new one.
For recovery, you need a disk or .
Consider the process of creating an image using the example of recording Windows 8, although the "seven" and other operating systems are also written.
Step 1. Getting Started
To perform further actions, you will need to run the program on behalf of the Administrator, otherwise the system simply will not allow you to do anything.
After you have opened the program, you need to click the "Open" menu as shown in the first screenshot and proceed to create a bootable ultraiso flash drive.

The example shows a prepared . The files themselves are easy to find on the Internet, in particular, on torrent trackers. The extension must be ISO, not EXE.

Once you have confirmed the image selection by pressing the "open" button, a list of used files will be displayed in the right window of the program.
Do not delete or rename anything, so that later there will be no errors during installation.
Step 2: Preparing the Image for Burning
A pop-up window will fly out again, once again warning that the data will be deleted. We agree with this and move on.

The most interesting begins - the direct recording of the OS. Ultraiso multiboot flash drive started to be created , which will take some time.

The program itself works quite quickly and efficiently, but the system often slows down the entire creation process. Be patient.
Upon completion of the process, a notification will be displayed in the logs "Record completed"! This means that our flash drive is ready Windows 8 ready to use.

Since we no longer need UltraISO services, the program can be closed.
When the USB flash drive is connected to the PC for the second time, approximately the same inscription should appear, as shown in the screenshot.

Hello site! Tell how to create a multiboot flash drive containing several operating systems and other programs I need. I read your article and created such a flash drive, everything works, thanks, but it would be great to add additional useful software to this flash drive, for example:
Several free anti-virus disks Dr.Web® LiveCD, ESET NOD32 LiveCD, Kaspersky Rescue Disk,
Disk AntiWinLocker (removing the banner blocking the desktop)
Victoria program for fixing errors and bad blocks on the hard drive.
Acronis True Image 2014 - creating a backup of the operating system.
Acronis Disk Director - divide the hard disk into partitions.
Resuscitation disk for Windows XP - ERD Commander 5.0, resuscitation disk for Windows 7 - (MSDaRT) 7.0 and for Windows 8 (MSDaRT) 8.0.
A free Linux operating system, such as Ubuntu (Ubuntu).
So that, on occasion, I can boot a computer or laptop from such a flash drive and not only install Windows XP, Windows 7 and Windows 8, but also install the free Linux operating system, check the computer for viruses, remove the desktop blocker banner on occasion, fix bad your hard drive, repair Windows XP, Windows 7 and Windows 8.
I have a 16 GB flash drive, I think there is enough space for all this stuff! To be honest, I have never seen such multiboot flash drives, but I would very much like to have one. Regards, Mikhail.
How to create a multiboot flash drive containing several operating systems and more programs
You can create such a flash drive friends and it's not at all difficult! We will use the updated WinSetupFromUSB program using the Grub4dos bootloader capable of booting your computer or laptop from a flash drive loaded with several operating systems of various bitness (32 bit and 64 bit) and various software. Such a flash drive is very convenient and will undoubtedly come in handy for a person who is keen on a computer. After creating such a multiboot flash drive and, if necessary, deploy to another flash drive.
For me personally, such a flash drive is important and simply irreplaceable in my computer affairs.

We need a blank flash drive, as a result it will turn into a multiboot one and will contain all of the following:
Note: All operating systems and software used for the example in my article were purchased by me quite legally on the official websites of the developers. Friends, use only licensed software.
Operating systems: Windows XP, Windows 7 and Windows 8.
Dr.Web LiveCD, ESET NOD32 LiveCD, Kaspersky Rescue Disk. You can download them from the links:
Dr.Web LiveCD http://www.freedrweb.com/livecd/ 
ESET NOD32 LiveCD https://www.esetnod32.ru/download/utilities/livecd/

Kaspersky Rescue Disk http://www.kaspersky.ru/virus-scanner 
Acronis True Image 2014 data backup. www.acronis.ru
Acronis Disk Director is a hard disk partition manager.
Resuscitation disks for Windows XP - ERD Commander 5.0, Resuscitation disk for Windows 7 - (MSDaRT) 7.0 and for Windows 8 (MSDaRT) 8.0
Free Linux operating system, such as Ubuntu (Ubuntu).
Download the Victoria program for fixing errors and bad blocks on your hard drive on my cloud storage
https://cloud.mail.ru/public/9Nbd/3W9PU9ED1

Resuscitation disk AntiWinLocker (removal of the banner blocking the desktop).
In the beginning, I suggest that you upload three operating systems to the USB flash drive, you can do this according to our article, if you do not need Windows XP, then according to another article, create a bootable Windows 7 and Windows 8 USB flash drive and only then come back here and continue.
Create a multiboot flash drive
As soon as you create a multiboot flash drive with the number of operating systems you need, then you can add other software to the flash drive.
Note: It really doesn't matter in what order you add something to the flash drive, for example, you can add programs first, and then operating systems, or vice versa. If you need a multi-boot flash drive containing only programs, then you can read directly from this place. If you wish, you can add any operating system to the flash drive at any time using the method shown below.
Select WinSetupFromUSB 1.3.exe (22 MB). Download and run the program.

If we need to create a bootable USB flash drive for Windows 7 64 bit and Windows 8 64 bit, then we run the WinSetupFromUSB_1-3_x64.exe file.

My flash drive already has three operating systems Windows XP, Windows 7 and Windows 8, a 16 GB flash drive is occupied by 7 GB, there is plenty of free space, I add programs.
Attention: if you launched the WinSetupFromUSB program for the first time and you have a clean flash drive, that is, you did not upload operating systems or any programs to it, then before working, the flash drive must be formatted in NTFS and made bootable. The name of our connected flash drive is displayed in the main window of the WinSetupFromUSB program. Put a tick on the item Auto format it with FBinst and mark the item NTFS.
Check the checkbox!
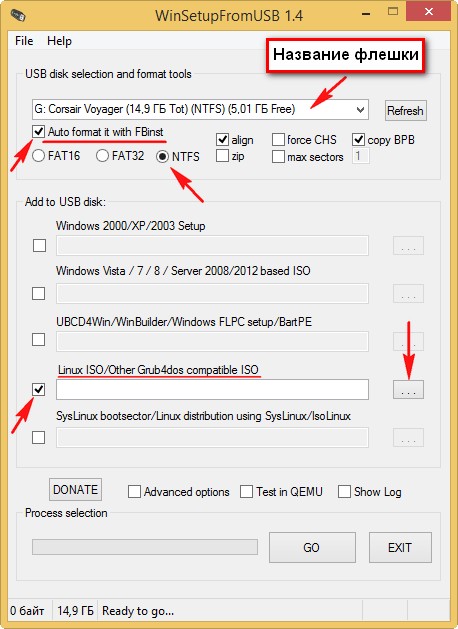
If your flash drive is already bootable and you, for example, uploaded operating systems to it using the WinSetupFromUSB program, which means we don’t mark the Auto format it with FBinst item and immediately go to the item Linux ISO/Other Grub4dos compatible ISO and click on the button on the right

An explorer window opens, in which I find my folder with images of operating systems and programs.
First of all, let's add the ESET NOD32 LiveCD antivirus disk to our multiboot flash drive,
I select it with the left mouse and click Open.


There is a short process of adding a program to our multiboot disk.


Then, in exactly the same way, we add each ISO image we have.
Let's try to boot from this bootable flash drive for fun and see the boot menu of the flash drive.
If you need to install an operating system, select the item
0 Windows NT6 (Vista/7 and above) Setup- means the installation of operating systems Windows Vista, Windows 7 and higher. Press Enter.
1 Second part/continue setup (Boot first internal disk)- boot from hard drive
As you can see, the antivirus disk from Eset NOD32 has been added to the boot menu under

In the next window, select to install the operating system that we need Windows 7 SP 1 x64 or Windows 8 x64.

Well, with programs it’s even easier, in the multiboot menu, select any program you need and press Enter. For example, you choose to download the antivirus disk from Eset NOD32 #2 eset_sysrescue from partition 0, then the antivirus program will be loaded.


To make everything more clear, let's add a few more programs to our multiboot flash drive.
Adding Dr.Web LiveCD
In the WinSetupFromUSB program, check the box Linux ISO/Other Grub4dos compatible ISO and click on the button on the right
Explorer will open, select the image of the Dr.Web LiveCD anti-virus disk


The process of adding a program to our multiboot disk

The program has been moved to a multiboot flash drive.
We boot from the flash drive, we see that the Dr.Web LiveCD anti-virus disk has been added to our multiboot flash drive. Let's check his work.
The method is simple, convenient, but has some limitations and is not the most convenient: to burn each image, you need to resort to the utility again, just copying the ISO to a USB flash drive is not enough. But what if we could just copy the ISO images to a bootable flash drive with any systems, LiveCD and utilities and they were automatically available for download? - this can be the Easy2Boot utility, and the drive can be in the NTFS file system and boot both in UEFI and Legacy systems.
This manual details the use of Easy2Boot (not to be confused with the paid EasyBoot program from the creators of UltraISO) in conjunction with RMPrepUSB (and without this utility). To some, the method may seem complicated, but in fact, it is even simpler than some, just follow the instructions and you will be pleased with this opportunity to create multi-boot USB drives. See also: ,
The instructions below describe the basic steps for writing a bootable drive using Easy2Boot, in fact, there are many nuances in using the utility, which are scattered on the official website and sometimes you have to carefully read what's what. But for most applications, the steps below will suffice.
Preparing Images for UEFI Boot with Easy2Boot and the Boot Process
By default, we can only boot from a USB flash drive in Legacy mode. The following mechanism is proposed for booting into UEFI:

The boot itself in EFI mode (disabling Secure Boot in BIOS may or may not be required, depending on the image itself and the presence of the rEFInd bootloader, which is not written by default) looks like this:

How does it even work? After “Changing the E2B Partition” in the first step, your imgPTN image is mounted on the USB flash drive, as a result, as if nothing else is on it - i.e. we boot as if "directly" into the image. Accordingly, the flash drive ceases to be multiboot (although all the data remains on it).

To restore the drive to its original state, open the e2b folder on the flash drive and run the RestoreE2B.cmd file as an administrator.
Additional Information
Some additional information that I will try to update as new information becomes available, and as I mentioned, there are a lot of nuances in the program:
- If in the folder with the image file (the format is not important) you place a file with the same name, but with the extension .txt and content in one line title MENU ITEM NAME, then your name will be displayed in the menu for this file.
- There is a file in the _ISO folder on the flash drive E2B_Editor to edit the background, colors, and other boot menu options.
- By using \_ISO\SUB_MENU_Maker.cmd you can add your own partitions in the Easy2Boot main menu.
- The MPI Tool Pack includes the Split WinISO utility for splitting Windows image files into multiple files to fit large images onto a FAT32 flash drive.
- If you are using an external hard drive or flash drive, which is defined in the system as a local drive and not a removable drive, then when installing Windows 10, 8.1 and Windows 7, you may be informed that there are no drivers. The imgPTN method with images solves this, but can potentially cause data loss on the drive.
Video instruction Easy2Boot
Everything below was written to use a previous version of Easy2Boot and as far as I can tell this method should still work so I'm not removing it from the instructions. Also, if you have your own finds on using the utility, I will be glad to comment.
Easy2Boot early drive creation method (keeps working)
The files below have been checked by VirusTotal, all clean, except for a couple of threats (which are not) in Easy2Boot, which are related to the implementation of working with Windows installation ISO images.
We need RMPrepUSB, we take here https://www.rmprepusb.com/documents/rmprepusb-beta-versions (the site is sometimes poorly accessible), download links are closer to the end of the page, I took the RMPrepUSB_Portable file, that is, not the installation one. Everything is working.
You will also need an archive with Easy2Boot files. You can download it here: http://www.easy2boot.com/download/
The process of preparing a multiboot flash drive Easy2Boot

Unpack (if portable) or install RMPrepUSB and run it. Easy2Boot does not need to be unpacked. Flash drive, I hope, is already connected.
- In RMPrepUSB, check the box "Do not ask questions" (No User Prompts)
- Size (Partition Size) - MAX, volume label - any
- File system and options (Filesystem and Overrides) - FAT32 + Boot as HDD or NTFS + Boot as HDD. FAT32 is supported by a large number of operating systems, but does not work with files larger than 4 GB.
- Check the box “Copy OS files from here”, specify the path to the unpacked archive with Easy2Boot, answer “No” to the prompt that appears.
Do not exit RMPrepUSB, you will still need the program (if you exited, it's okay). Open the contents of the flash drive in Explorer (or another file manager) and go to the _ISO folder, there you will see the following folder structure:
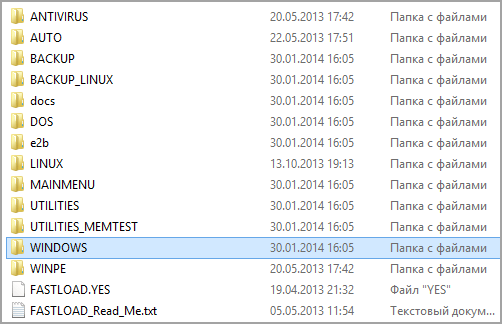
note: in the folderdocs you will find documentation in English on menu editing, design and other features.
The next step in creating a multiboot flash drive is to transfer all the necessary ISO images to the necessary folders (you can use several images for one OS), for example:
- Windows 10 - in _ISO\WINDOWS\WIN10
- Windows 8 and 8.1 - in _ISO\WINDOWS\WIN8
- Antivirus ISO - in _ISO\Antivirus

After all the necessary images have been transferred to the USB flash drive, press Ctrl + F2 in RMPrepUSB or select Drive - Make All Files on Drive Contiguous from the menu. When the operation is completed, the flash drive is ready, and you can either boot from it or press F11 to test it in QEMU.
Fix media driver error when booting from USB HDD or Easy2Boot flash drive
This addition to the instructions was prepared by a reader under the nickname Tiger333 (his other tips can be found in the comments below), for which many thanks to him.
When installing Windows images using Easy2Boot, the installer often gives an error about missing media driver. Below is how to fix it.
You will need:
- A flash drive of any size (you need a flash drive).
- RMPrepUSB_Portable.
- Your USB-HDD or flash drive with installed (working) Easy2Boot.
To create an Easy2Boot virtual drive driver, we prepare a USB flash drive in much the same way as when installing Easy2Boot.
- In the RMPrepUSB program, check the box "Do not ask questions" (No User Prompts)
- Size (Partition Size) - MAX, volume label - HELPER
- Boot Sector (Bootloader Options) - Win PE v2
- File system and options (Filesystem and Overrides) - FAT32 + Boot as HDD
- Click the "Prepare disk" button (all data from the flash drive will be deleted) and wait.
- Click "Install Grub4Dos" (Install grub4dos), answer "No" to the prompt about PBR or MBR.
- We go to your USB-HDD or flash drive with Easy2Boot, go to \_ISO\ docs\ USB FLASH DRIVE HELPER FILES. Copy everything from this folder to the prepared flash drive.
Your virtual drive is ready. Now you need to "acquaint" the virtual drive and Easy2Boot.
Remove the flash drive with the drive from the computer (insert a USB-HDD or an Easy2Boot flash drive if removed). Run RMPrepUSB (if closed) and click "run from under QEMU (F11)". While Easy2Boot is loading, insert your USB flash drive into your computer and wait for the menu to load.
Close the QEMU window, go to your USB HDD or Easy2Boot stick and look at the AutoUnattend.xml and Unattend.xml files. They should be 100KB each, if this is not the case, repeat the dating procedure (I only succeeded the third time). Now they are ready to work together and problems with the missing driver will be gone.
How to use a flash drive with a drive? I’ll make a reservation right away, this flash drive will only work with a USB-HDD or an Easy2Boot flash drive. Using a flash drive with a drive is quite simple:
- While Easy2Boot is loading, insert your USB flash drive into your computer and wait for the menu to load.
- Select the Windows image, and at the prompt of Easy2Boot "how to install" - select the item.ISO, then follow the instructions for installing the OS.
Problems that may arise:
- Windows again gives an error about the lack of a media driver. Cause: You may have inserted a USB HDD or flash drive into USB 3.0. How to Fix: Swap them to USB 2.0
- The counter 1 2 3 started on the screen and constantly repeats, Easy2Boot does not load. Cause: You may have inserted the USB stick with the drive too early or immediately with a USB HDD or Easy2Boot flash drive. How to fix: turn on the flash drive with the drive as soon as Easy2Boot starts loading (the first words of loading appear).
Notes on using and modifying a multiboot flash drive
- If some ISOs do not load correctly, change their extension to .isoask, in this case, when you launch this ISO from the boot menu of the flash drive, you can select various options for launching it and find the right one.
- At any time, you can add new or remove old images from the flash drive. After that don't forget to use Ctrl+F2 (Make All Files on Drive Contiguous) in RMPrepUSB.
- When installing Windows 7, Windows 8 or 8.1, you will be asked which key to use: you can enter it yourself, use a trial key from Microsoft, or install without entering a key (then activation will still be required). I am writing this note to the fact that you should not be surprised at the appearance of a menu that did not exist before when installing Windows, it has little effect on anything.
With some special hardware configurations, it's best to go to the official website of the developer and read about how to solve possible problems - there is enough material there. You can also ask questions in the comments, I will try to answer.
 Computer restarts while playing games or watching videos
 How to restore Windows on a Sony laptop
 Creating a multiboot flash drive with multiple Windows How to write two Windows to a USB flash drive