Flashing letter with on the printer. Eliminate errors if the printer does not want to print
The printer is a device for printing digital data. To date, almost everyone has such a device at home. There are many diverse models. They divide them both on the principle of printing (laser, inkjet, matrix) and functionality (photo printing, support for various formats, pre-processing, double-sided printing).
No matter how modern is your device, everyone may encounter problems. Many of them can be solved on their own without referring to the support service, especially if a software error.
The printer issues an error
There are several reasons for errors associated with a printer or seal, they can be divided into two categories.
First - software:
The second cause of errors - hardware, which are associated directly with the device itself, such as:

In fact, the system messages from the modern printer is much more. But all, one way or another, are associated with refueling / replacement of the cartridge or stuck paper, as well as the overheating of the device.
Most problems with a non-working cartridge occurs after it refueling, since many of them have protection from the manufacturer in the form of special counters and sensors.
Check OS and Device Settings
If you encountered the fact that the device does not display any messages, and when sending a file to print nothing happens, then before contacting the service center with a question: "What to make a printer has stopped printing, check the settings for connecting the device, as well as an operating Systems.
To make it first to do this, check whether the device is connected to the computer correctly, and whether its operating system sees it.
This follows:
- open Task Manager and find the required device;
- it must be in the list and correspond to the name of your device;
- opposite it should not be erroneous connection, conflict or shutdown designation (yellow exclamation mark or red cross).
Now you need to check the correct settings of the device itself.
In the event that the print does not begin, there may be several problems:

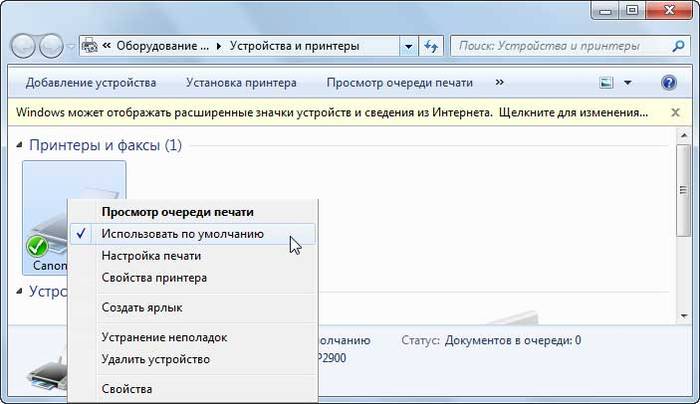
To check this data, contact the "Control Panel" and select the "Devices and Printers" item. Here you can change the device for printing selected by default (right-clicking the menu and activating the appropriate check mark). In the properties of the device - check the correct setting.
If the connection to the network apparatus is not possible, it is better to seek help to the user of the remote computer or the network administrator.
Is the driver installed?
When the primary connection of any device is required to install drivers. In the case of printers, it is better to install not only the driver, but also a program to work with the device. According to almost always comes on the disk together with the device and also contains instructions in several languages.
Occasionally in expensive models, software is provided on a USB flash drive. To check whether the driver is installed correctly, you need to go to the "Device Manager" of the Windows operating system.

This follows:
- left-click on the "My Computer" on the desktop or "computer" in the "Start" menu and call "Properties";
- in the left menu, select the "Dispatcher ...";
- check the list for your device.
The device must be in the category "Printers and Scanners". Its name must match exactly or approximately the name of your device (if the driver is universal, or the software and hardware did not change with the previous model).
For example, you have a Canon PIXMA MP 280 model, in the Task Manager can be displayed as Canon Pixma MP 200 or MP 2.
Video: Does not print printer
Busy stake in print
If you are confident that the printer works but does not print, you need to check if the print queue is not busy. Most modern devices with fully installed software themselves display a similar error. However, this does not always happen.
In this case, you need to check the queue for print. You can do this by calling the driver from the trailer (icon near the clock). However, this method is not always suitable for those who use the apparatus over the network.

Most often with the problem of the print queue, users encounter extensive networks when working with a shared printer. In this case, one task may consist of a variety of parts. For example, if it is very large, the program could have to divide it in order not to overload the internal memory of the device.
In addition, corporate practice shows that there are very often cases when one task has not completed completely due to errors (the paper has ended or jammed, the printer overheated), and was sent another one else.

Depending on the model, the device may not pay attention to the flawed tasks and continue to work until its memory is completely abandoned by similar fragments. Or immediately do not give to continue work.
Output can be two:

What if the printer does not print after refueling the cartridge
Users who tried to make the cartridge refueling, its cleaning, or soching in a special solution, often face such a problem: the printer stopped printing, what to do now?
The cartridge refill is a difficult operation containing a plurality of nuances that users do not take into account, so then contact the service center with more serious problems.
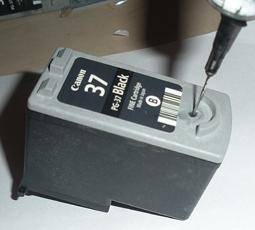
The thing is that each device requires an individual approach when it comes to refueling. First of all, it is necessary to learn about whether the cartridge is not equipped with special defensive and chips, read whether it is worth it a page meter or another cunning option manufacturers.
In addition, the refueling cartridge is independently, it is very important to follow, so as not to "deliver" the ink supply system in the case of jet printers. And on the laser device - not blur, do not scratch the drum or not knocking down the spring fixing the gears.

In any case, if after rewriting the printer works, but does not print, you need to turn to professionals, in the workshop, so as not to spoil it finally. Cartridge prices sometimes constitute half the cost of the entire device, so that you should be very careful when refueling.
Sometimes there are cases of drying cartridges with ink. Therefore, after reloading, be sure to print multiple pages to check. If this does not give results, the cartridge requires soching in a special solution.

Most printer problems arise due to software errors, but it is easy to figure it out with them yourself, without contacting the computer workshop. In case the errors are not eliminated, you should contact a specialist.
When the cartridge is required, you must carefully examine all the information and clearly follow the instructions, and for printers with inkjet printing, it is generally better to install a special ink supply system. Thanks to this, you can avoid most problems.
>Sometimes users of such printing devices like printers are trying to find answers to questions about why a red light bulb flashes or burns on a printer. Usually, the problem of this kind is found in the process of using devices of laser models and to solve it, it is enough to pay attention to a number of important points. In general, light indicators (two light bulbs), which are located on the panel, serve in order to transmit information about certain device nodes. On various changes in the state of the device, these indicators react differently. For example, they can fumble or light up for a long time. In some cases, these 2 light bulbs do not give any signs of "anxiety".
Causes and their elimination
So, if you notice that the red button is lit on the printer, which implies a "warning" (the exclamation mark on the printer models in this situation), then there is no cartridge in your printer. To eliminate this problem, you just need to open the printer cover and access the accessory for the consumable material. Next, from the new cartridge, it should be removed a special protective film, after which it is necessary to install it in the intended for it until the characteristic click is heard.
If two buttons flash on the printer panel, i.e. Green ("Willingness") and Red ("Warning"), and at the same time, then the reason is that the printing device passes the initialization process.
If you notice that I started freeze the green button, then you note that the printing device is currently performing the data processing process or receives them. It also happens that the "Willingness" light is on constantly, and warning only occasionally flashes - such indicator signs indicate a general error in the device or on the paper feed error. Such a situation is usually accompanied by a jams of sheets of paper, already captured by special rollers.
If the red light bulb began on the device panel periodically, then it can say about the presence of an incorrect installation of the cartridge. In addition, a similar signal appears in the event that the access lid to the elements of the consumable material is not closed enough. To eliminate this problem and return the printing device to the working condition, you should.
If the red lights of the device device start blinking, then the problem may lift in the stuck paper. To eliminate the malfunction, pull out all the free paper from a special tray, remove the consumables with a coloring matter from the printer and get all the sheets. In addition, this indicator may also flash due to not fully remote packaging material, incl. Special tape. To completely remove it from the inner parts of the printer, open the top cover to access the consumable material. In addition, the packaging years must also be removed from the input and output trays.
Incorrect operation of sensors responsible for closing the body can also be reflected on the fact that the "Warnings" light is constantly on the printer panel. If both indicators of the device are constantly burning, it may indicate some serious error, eliminate which by its own forces is unlikely to succeed.

It should be added that the printing device from the company for highlighting the error code is responsible for the triangle. Consequently, if you notice that a triangle with zipper is lit on the printer, then remember the code that will be displayed on the printer's display, then find it a detailed description in the instructions for the device. But the models from Epson instead of green and red indicators, as well as a triangle, if there is an error, begins to blink a droplet. 
For example, if the droplet of the device began to blink with the full cartridge, then to solve the problem, the counter of the ink "diapers" should be reset, using some service program, for example, Printhelp.
Thus, office equipment indicators in a timely manner tell us about any problems. Many of them can be eliminated independently even in the absence of certain skills.
So, if the light bulb began to light up on your device, which was not previously burned, first read the user manual. But in cases where the reason is specifically installed, it is better to use the services of a service center where your device will be carefully studied for those or other defects.
Low print cost, high speed, unpretentiousness in work, water resistance - just some positive aspects of the use of laser printers. HP devices received widespread in Russia. Printers and MFPs HP inexpensive in operation, durable and have excellent quality. However, problems are happening to them. In this article, we will consider problems with MFPs LaserJet Pro MFP M125RA.
Printer features
LaserJet Pro is a reliable, compact and easy-to-use device that is capable of printing 8-10 thousand pages per month, which is officially confirmed by the manufacturer. Such a number of printed pages is enough for a small firm, what to talk about home use. Text information print speed can reach up to 20 sheets per minute with a maximum resolution of 600 * 600 dpi.

Previously, such characteristics had not all professional models of printers, ten thousand rubles. A high-quality tablet scanner A4 format is built into the MFP, with a resolution of up to 1200 * 1200 dpi. This is enough to scan texts and photos.
However, there is a spoon of tar. The major disadvantage of HP M125 are cartridges. The cartridge, which is completed with the printer, has an installed chip controlling toner. This chip can block the work of the printer.

After refueling the used cartridge, the printer gives an error to the built-in display - the letter P is shown on it. To avoid it is necessary, replaced when refilling the cartridge chip. Let's consider the situation in more detail when the letter P is lit on the HP printer.

What does the letter r in the printer
Possible problems why the letter r is on the printer on the information display. The view of the HP M125 indicator when it shows the error can be viewed in the photo. The first actions that can be performed to eliminate the problem at home:
- If the toner ended, and the refueling was performed on home at home, it is necessary to purchase and replace the chip on the cartridge;
- The problem may be in bad contact on the chip and shaft pads with the printer. To do this, you need to remove the cartridge and wipe the contact pads with alcohol or solvent;
- If you are used cheap not original cartridges, it is necessary to check whether contacts get the contacts to the chip. It is possible to cut a bit of a plastic case a little so that the contacts are more tightly pressed against the cartridge.
- Nothing affected - it may be possible to help the restart of the device. To do this, it is necessary to turn it off from the supply network at least 5 minutes. After that, enable in the network and conduct the initialization process.

If the printer shows the letter and all of the above measures did not lead changes and the MFP does not go out of the alarm, you must contact the service center. The breakdown may be associated with the failure of the electronic components or formatter malfunction. If there is an appropriate equipment, the service engineer will figure out with solving the problem in a short time.

Conclusion
In conclusion, it can be said that the MFP HP M125RA is an inexpensive and reliable device that can solve all issues related to the printing of black and white images. For proper and correct work, it is recommended to refuel cartridges in specialized services, where you will immediately perform the necessary repair work and replace the chip.
Modern printers and multifunctional devices have a system that allows self-diagnostics of all nodes of the device. If any problems occur in the equipment, the microprocessor submits the code signal to the user to detect a malfunction. Fault codes can be displayed. on the display of devices (If it is provided with the design), or by the alternating flashing of LEDs on the device control panel. The error message with the code may appear and on the screen PC. Despite its high reliability, printers and MFPs from the HP (Hewlett-Packard) manufacturer are also subject to failures. The most common errors in the operation of HP devices, according to user reviews, are the following: print error and errors with E8, E3 and 79 codes.
Print Failure on HP Printers
Often, when trying to print a document, the user detects that the process is blocked for an unknown reason. At the same time, all attempts to remove the task in the print queue, or cancel it turn out to be unsuccessful.
This failure may appear on a number of reasons, for example, from a sudden voltage jump in the power grid, but, in any case, the problem will have to have a problem in the Print Manager program. This fact is explained by the fact that when the document goes on a printout, a special file is created in the Windows system. For a number of reasons, this file may be damaged and cause a failure in which the printer does not print. Therefore, this file must be removed in the following way.

If the printing process went fine, it means that this setting is considered completed. If you still failed to print a document, the problem can be solved using free software from the company HP. The program is called "HP Print and Scan Doctor" And it is applied to solve problems arising when printing, as well as for diagnosing equipment. You can download it from the official site for this link. Opening the program window, select Automatic troubleshooting and troubleshooting. After the program is completed, again try to print the document.
In some cases, the following measures helps to solve this problem.
- Reinstalling the printer driver. But first you need to delete it: in the "Control Panel" find "devices and printers" and open the window. Click the PCM on the HP printer icon and select "Delete". These actions will delete the driver that was installed in the system. After deletion, it is necessary to restart the PC. If for any reason you have no drivers for this model MFP (printer), you can download them from the HP site if you go through this link.
- For a while disable firewall And try printing a document.
- Log in to the system under another account (relevant in the case when the equipment was configured from another account).
How to eliminate E8 error
The service message with the code E8 is often found on the MFP of LaserJet 1132. It means that it originated problem with scanner. The instructions for the device indicates that the malfunction with the E8 code is fatal, that is, not disposable. But folk craftsmen found several ways to eliminate this malfunction, which, in some cases, can return the scanner to work.
The most common case - when the scanner line stopped in the extreme right position and does not move. At the same time, an E8 error appears on the MFP display.

In this case, the carriage just jammed. To eliminate this problem, you will have to remove the scanner glass and rearrange the line to the center of the device or closer to the left edge. To remove the glass, you must unscrew 6 bolts located around the perimeter.

To unscrew the screws, you will need a hexagon "Star".
After the glass cover is removed, take the carriage, stop it closer to the center and return the glass to the place. Turn on the device and wait for the ruler positioning (it should go to the leftmost position). If everything happened exactly that way, it means you are lucky because the E8 code may appear for other reasons.
In the case when the scanner carriage after the inclusion of MFP moving jerks and stopsAt the same time, the E8 code appears on the display, then you will have to check all the nodes of this block. To check the scanner unit, it is necessary to remove the glass cover, as mentioned above, after which you need to get the block itself and turn it over. On the bottom side of the block you will see 2 gears and electric motor, pressed plate. Next, do the following.

The actions described above usually eliminate the scanner problem in HP M1132 MFP. But in some cases this problem can cause too dense pressing gear or optocoupler. Sometimes the problem is eliminated if we loosen the clamp of the gear or completely remove the small gear. After that, turn on the device (when the scanner is removed and inverted) and watch the rotation of the gear. If it continues to move jerks, it means that the problem may hide in the optocoupler.
If you look at the optocouple carefully, you will see that there is a disk with notches between two sensors. This disk should be located in the center of the optocoupler. Sometimes he shifts one way, which causes the appearance of the E8 code. Try to install the engine so that the disk is in the center, between the sensors.
If, after all the above manipulations, the E8 code appears again, the malfunction can be covered in the engine itself or control board. If you can replace the motor yourself, then you will have to contact the service center.
Elimination of the E3 code
Often, HP MFP users observe the appearance of the E3 code on the device display. If you look into the instructions for the device, then this code is decrypted, as the "cartridge is missing or installed incorrectly". Undoubtedly, the cartridge may be incorrectly installed, unauthorized items can enter it, or it happens that it is just broken. But sometimes there is a situation where the device does not see the cartridge due to the fact that the lever having a damper is simply not getting to the optron. To get to it, you need to remove the rear (metal) Cover MFP. On how to unlock the lever, after which the E3 error will be reset, clearly shown in this video from a foreign resource (knowledge of the language is optional).
Eliminating Error 79.
Error 79 in HP printers usually means what happened software failure apparatus. To eliminate it, fly the following:
- turn off the power of the machine using the shutdown key;
- hold the pause no less than 30 seconds;
- again, enabling the unit and wait until it is initialized;
- in the case when the device was connected via a power filter, try to turn it on this time directly, into the outlet;
- if the code message continues to appear, it sometimes helps to get rid of the problem cleaning the print queue or reinstall the driver.
Reset HP Printer Errors
To reset the error or the so-called service message on HP printers, there are many ways that are only suitable for specific models. Since this manufacturer has a large amount of printing equipment, then, to reset the service messages about the problem, you can use the tables below.


In cases where cartridges are refilled (LaserJet 1300, 1320, 4250/4350), containing a chip, then it must be stuck before installing them into the device. The device, of course, will give a message that the "left" cartridge is inserted, but it will work. Also to zero chipov You can use the recommendations from the following table.


Almost any service codesMeaning errors for printing devices HP series Photosmart are reset by the following method.
- Hold the left arrow and, without releasing it, press the "Setup (Setup)" key, then remove your fingers from the keys. As a result of this action, the "ENTER SPECIAL KEY COMBO" menu will appear. Click simultaneously the "Print Photo Print" and "Photography Correction (Red Eye Removal)", and release them. Next, click on one key and release: "Photo Correction (Red Eye Removal)", "PRINT PRINT PHOTOS", "RED EYE REMOVAL)".
- Press the arrow to the right and go to the System Configuration string. Click OK.
- Again, pressing the arrow to the right to reach the line "Hardware Failure Status: Clear. Press Ok to Clear "(if the device was working before it was without failures, then you will not find this line). Remember, at the moment it is impossible to start printing.
- Turn off the device, then turn it on.
Thus, the error code was reset, and the device can be used as usual.
Modern printers and multifunctional devices have a system that allows self-diagnostics of all nodes of the device. If any problems occur in the equipment, the microprocessor submits the code signal to the user to detect a malfunction. Fault codes can be displayed. on the display of devices (If it is provided with the design), or by the alternating flashing of LEDs on the device control panel. The error message with the code may appear and on the screen PC. Despite its high reliability, printers and MFPs from the HP (Hewlett-Packard) manufacturer are also subject to failures. The most common errors in the operation of HP devices, according to user reviews, are the following: print error and errors with E8, E3 and 79 codes.
Often, when trying to print a document, the user detects that the process is blocked for an unknown reason. At the same time, all attempts to remove the task in the print queue, or cancel it turn out to be unsuccessful.
This failure may appear on a number of reasons, for example, from a sudden voltage jump in the power grid, but, in any case, the problem will have to have a problem in the Print Manager program. This fact is explained by the fact that when the document goes on a printout, a special file is created in the Windows system. For a number of reasons, this file may be damaged and cause a failure in which the printer does not print. Therefore, this file must be removed in the following way.

If the printing process went fine, it means that this setting is considered completed. If you still failed to print a document, the problem can be solved using free software from the company HP. The program is called "HP Print and Scan Doctor" And it is applied to solve problems arising when printing, as well as for diagnosing equipment. You can download it from the official site for this link. Opening the program window, select Automatic troubleshooting and troubleshooting. After the program is completed, again try to print the document.
In some cases, the following measures helps to solve this problem.
- Reinstalling the printer driver. But first you need to delete it: in the "Control Panel" find "devices and printers" and open the window. Click the PCM on the HP printer icon and select "Delete". These actions will delete the driver that was installed in the system. After deletion, it is necessary to restart the PC. If for any reason you have no drivers for this model MFP (printer), you can download them from the HP site if you go through this link.
- For a while disable firewall And try printing a document.
- Log in to the system under another account (relevant in the case when the equipment was configured from another account).
How to eliminate E8 error
The service message with the code E8 is often found on the MFP of LaserJet 1132. It means that it originated problem with scanner. The instructions for the device indicates that the malfunction with the E8 code is fatal, that is, not disposable. But folk craftsmen found several ways to eliminate this malfunction, which, in some cases, can return the scanner to work.
The most common case - when the scanner line stopped in the extreme right position and does not move. At the same time, an E8 error appears on the MFP display.

In this case, the carriage just jammed. To eliminate this problem, you will have to remove the scanner glass and rearrange the line to the center of the device or closer to the left edge. To remove the glass, you must unscrew 6 bolts located around the perimeter.

To unscrew the screws, you will need a hexagon "Star".
After the glass cover is removed, take the carriage, stop it closer to the center and return the glass to the place. Turn on the device and wait for the ruler positioning (it should go to the leftmost position). If everything happened exactly that way, it means you are lucky because the E8 code may appear for other reasons.
In the case when the scanner carriage after the inclusion of MFP moving jerks and stopsAt the same time, the E8 code appears on the display, then you will have to check all the nodes of this block. To check the scanner unit, it is necessary to remove the glass cover, as mentioned above, after which you need to get the block itself and turn it over. On the bottom side of the block you will see 2 gears and electric motor, pressed plate. Next, do the following.

The actions described above usually eliminate the scanner problem in HP M1132 MFP. But in some cases this problem can cause too dense pressing gear or optocoupler. Sometimes the problem is eliminated if we loosen the clamp of the gear or completely remove the small gear. After that, turn on the device (when the scanner is removed and inverted) and watch the rotation of the gear. If it continues to move jerks, it means that the problem may hide in the optocoupler.
If you look at the optocouple carefully, you will see that there is a disk with notches between two sensors. This disk should be located in the center of the optocoupler. Sometimes he shifts one way, which causes the appearance of the E8 code. Try to install the engine so that the disk is in the center, between the sensors.
If, after all the above manipulations, the E8 code appears again, the malfunction can be covered in the engine itself or control board. If you can replace the motor yourself, then you will have to contact the service center.
Elimination of the E3 code
Often, HP MFP users observe the appearance of the E3 code on the device display. If you look into the instructions for the device, then this code is decrypted, as the "cartridge is missing or installed incorrectly". Undoubtedly, the cartridge may be incorrectly installed, unauthorized items can enter it, or it happens that it is just broken. But sometimes there is a situation where the device does not see the cartridge due to the fact that the lever having a damper is simply not getting to the optron. To get to it, you need to remove the rear (metal) Cover MFP. On how to unlock the lever, after which the E3 error will be reset, clearly shown in this video from a foreign resource (knowledge of the language is optional).
Eliminating Error 79.
Error 79 in HP printers usually means what happened software failure apparatus. To eliminate it, fly the following:
- turn off the power of the machine using the shutdown key;
- hold the pause no less than 30 seconds;
- again, enabling the unit and wait until it is initialized;
- in the case when the device was connected via a power filter, try to turn it on this time directly, into the outlet;
- if the code message continues to appear, it sometimes helps to get rid of the problem cleaning the print queue or reinstall the driver.
Reset HP Printer Errors
To reset the error or the so-called service message on HP printers, there are many ways that are only suitable for specific models. Since this manufacturer has a large amount of printing equipment, then, to reset the service messages about the problem, you can use the tables below.

In cases where cartridges are refilled (LaserJet 1300, 1320, 4250/4350), containing a chip, then it must be stuck before installing them into the device. The device, of course, will give a message that the "left" cartridge is inserted, but it will work. Also to zero chipov You can use the recommendations from the following table.

Almost any service codesMeaning errors for printing devices HP series Photosmart are reset by the following method.
- Hold the left arrow and, without releasing it, press the "Setup (Setup)" key, then remove your fingers from the keys. As a result of this action, the "ENTER SPECIAL KEY COMBO" menu will appear. Click simultaneously the "Print Photo Print" and "Photography Correction (Red Eye Removal)", and release them. Next, click on one key and release: "Photo Correction (Red Eye Removal)", "PRINT PRINT PHOTOS", "RED EYE REMOVAL)".
- Press the arrow to the right and go to the System Configuration string. Click OK.
- Again, pressing the arrow to the right to reach the line "Hardware Failure Status: Clear. Press Ok to Clear "(if the device was working before it was without failures, then you will not find this line). Remember, at the moment it is impossible to start printing.
- Turn off the device, then turn it on.
Thus, the error code was reset, and the device can be used as usual.
 How to combine two accounts on Facebook?
 Download and insert a beautiful framework to Word Document
 How to fix clock_watchdog_timeout type "Blue screen" (0x00000101)