Overview of the Local Users and Groups snap-in. Overview of the Local Users and Groups snap-in Add User Windows 10 works
You create a new account during the installation process. But what if you want to add additional local accounts? Read on and we'll show you how to do it.
Why do this?
Millions of Windows users never create additional accounts on their computers, but use their primary accounts with administrative privileges. As practice shows, this is not safe, and users should get rid of this habit, or laziness to create a new account, as you wish.
Creating a secondary, non-administrator account for yourself and additional accounts for your children (to prevent dubious downloads from malicious sites from infecting your computer) is a great idea and one of the important things that will significantly increase the security of your machine.
You might prefer the online and synchronized features of a Microsoft online account, but we found a lot of benefits to a local account without all the online bells and whistles and potential privacy concerns. The standard local account is great for people who don't want to link their personal information to Microsoft, and it's also ideal for kids who don't need the extras (and may not even have an email address to associate with the account).
Let's take a look at the process of creating a secondary account in Windows 10.
How to create a new local user account in Windows 10
The first step is to access the Accounts menu. To do this, click on the search icon to the right of the Start menu and type “Accounts.”
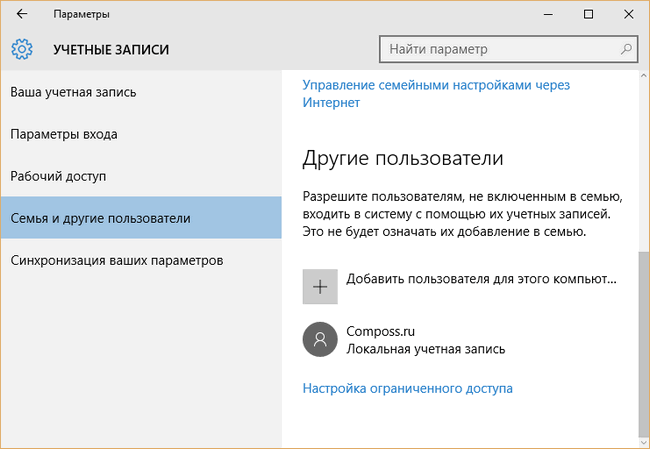
Select "Add, change, or remove other users" from the search results. Clicking on it will open the Accounts menu as shown in the screenshot below. Alternatively, you can go to Start -> Settings -> Accounts, then select "Family and other users" to get to the same menu.

Select "Add a user for this computer." Microsoft has made it so that during the process of creating an account, you will be strongly pushed towards an online account instead of a local one. So, let's be careful.

Ignore the prompt to provide an email or phone number. Instead, click the link at the bottom of the window: “The user I want to add does not have an email address.”
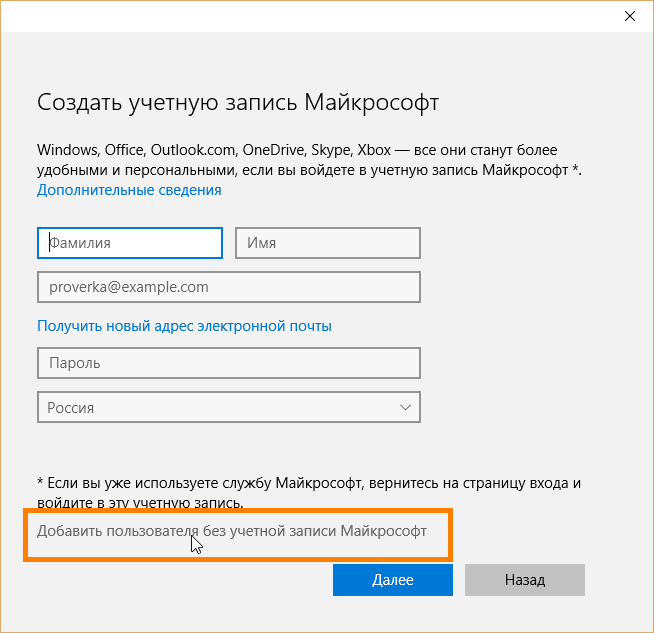
Since we don’t have an email address, Windows will prompt us to create an online account. Logical. But as we already said, Microsoft is quite insistent that we create an online account instead of a local one, and suggests creating a new email address through @outlook.com. But ignore this information and click on the link below “Add a user without a Microsoft account.”

If anyone remembers, in Windows, ten years ago, the account creation screen looked very simple: just a username and password and nothing extra. But now, as we see, everything is different... Enter your username and password and click the “Next” button.
After clicking the Next button, you will be redirected back to the account settings screen, and now you can see your new account. By default, the local account has limited rights (there is no ability to install applications or make administrative changes to the machine).
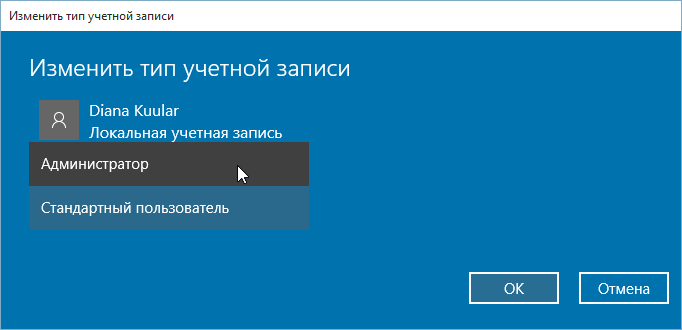
If you have a compelling reason to change your account type to one with administrative privileges, click on the account, select Change Account Type, and set it to Administrator.
You can also select "Delete" to delete an account that is no longer needed. If you need to make more changes (like child accounts or parental controls) be sure to check out for a more detailed look.
In previous versions of Windows, creating a new account was quite simple. This could be done in the Control Panel or in the Computer Management snap-in in professional editions of Windows. In the "top ten" account management occurs differently. From this article you will learn how to create multiple accounts on one computer with Windows 10, as well as how to add a local user and make him an administrator.
How to Add a Local Administrator Account in Windows 10

Now when you start your computer on the welcome screen you will have a choice of users:

Alternative way to add a local user account in Windows 10
Problems often arise when using the first method. In this case, you should try to create a local account as follows.
Click Win+R
Enter control userpasswords2
Click Enter  If the checkbox Require username and password removed, mark it.
Click Add. Click on the link Sign in without a Microsoft account (not recommended).
Select Local account.
Enter your username, password, confirmation, click Further and then Ready.
We've already discussed Windows' ability to allow users to access certain objects. These objects were folders or files. Accordingly, we could give some users access to selected objects and deny others access. File access rights are one thing, but how do you configure access rights to certain components and features of the Windows operating system? How can one user be allowed to use the remote desktop, while another cannot change the network or time settings? Here, regular NTFS access rights are no longer sufficient.
To solve this problem, Windows has special user groups with specific access rights. The best known and most used Windows user groups are groups Administrators, Users And Guests. The rights of users included in these groups are approximately clear, but today I will introduce you to them more closely. In addition, do not forget that the number of user groups ranges from 10 to 20-25, so you will be interested to know about the main ones.
How to change user access rights?
Windows provides two tools that allow you to manipulate the contents of Windows operating system user groups. In other words, adding a user to a specific group or, conversely, kicking him out of there can be done with two Windows tools at once:
- Console Computer management.
- .
Let's consider both options.
Setting up Windows user groups through the Computer Management console
How to add a user to a Windows user group:
- Right-click on the item with your computer mouse My computer.
- In the context menu, select Control.
- In the window that opens, expand the node Local users and groups.
- Select node Groups.
- In the central window, select the required group and open it.
- In the window that opens, select Add.
- In the next window, enter the name of the Windows user you want to add to this group. If necessary, use the button Check names.
- After selecting a user or several users at once, press the button OK.
How to remove a user from a group:
- Do the first 5 steps described above.
- In the window that opens, select the desired user and click the button Delete.
- Click OK.
Working with Windows User Groups in the Local Group Policy Editor
How to add/remove a user to/from a WIndows user group/group:
- Through open Local Group Policy Editor. The called file is named gpedit.msc.
- Go to node Computer Configuration - Windows Configuration - Security Settings - Local Policies - Assigning User Rights.
- Select the required policy (each policy implies certain access rights).
- Next, you need to proceed by analogy - to add a user, follow steps 6-8, and to remove 2-3 from the corresponding settings items through the console Computer management.
Policy difference from console Computer control The point is that they allow you to configure access rights step by step. If Windows user groups in Computer management have quite extensive rights and restrictions, then policies allow you to configure Windows user rights down to such a small detail as the ability to change the time or time zone.
Windows user groups and their access rights
And here is the long-awaited list of the main Windows user groups:
- Administrators. Unlimited access.
- Archive operators. Members of this group have the right to create a backup copy even of objects to which they do not have access.
- Advanced users. They are of little use, since the group is included only for compatibility with previous versions
- Performance Monitor Users. There is a wonderful thing called System Monitor(perfmon.msc), with which you can track the use of various resources by your computer. And the group gives access to this tool.
- Network Configuration Operators. Group members can change TCP/IP settings.
- Remote Desktop Users. Users in this group will be able to log in via remote desktop.
- Performance Log Users. Group 4 provides only superficial access to System Monitor. This group gives more complete rights.
- DCOM users. Group users can manipulate distributed DCOM objects.
- Cryptographic operators. Members of this group can perform cryptographic operations.
- Event log readers. I think there is no point in explaining, everything is very clear.
This list could be much wider. Here are only the main groups of Windows users that are found on almost all machines running the Microsoft operating system.
Today we will touch on the topic of how to add a Windows 10 account in different ways. There are two types of accounts in Windows 10. The first ones are tied to a Microsoft account and require you to enter a password from the corresponding email. The second ones are local, similar to those that were in earlier versions of operating systems. In this case, in the future, an account of any type can be converted into the opposite or. Let's get started.
The latest OS from Microsoft has new settings. It is with their help that we will now create a user. Throughout the article, the material is presented in the form of step-by-step instructions, each stage of which is accompanied by screenshots.
- First, let's open Windows Settings. To do this, go to the Start menu and click on the gear icon, which can be found in the lower left side of the window.

- In the window that opens, click on the tile that we marked in the picture with a red frame.


- Another window will open. On the left side there are sections - select “Family and other people”. In the right half you will see the inscription “adding a family member” - we marked it with the number “2”. This mode is used, for example, when you need to use one PC by several family members and, in order to avoid confusion, each of them creates their own account. Click on the marked button.


- Once the button is pressed, you will be taken to the next screen. Here you can choose who owns the account being created: a child or an adult. You also need to enter your email address to recover your password. We do this and click “Next”.


- We will be asked to confirm our intention to create an account - we do this by clicking on the appropriate button.


After this, an invitation will be sent to the specified e-mail and the user will be able to become a member of your virtual family.
Below you can create a new user who will not be a family member and will not be controlled by Windows 10. Let's look at how this is done.
- On the left side of the window that we opened a step earlier, click on the inscription “Family and other people”, and on the right we click on the item marked “2” in the screenshot.


- Next, we will be asked to enter the new user’s email, but if you want to create an account without being linked to Microsoft, click on the item marked “3” in the screenshot.


- We will create a local user, so in the newly opened window, click on the inscription surrounded by a red rectangle.


- Now you need to specify the name of the new user, the password for his account and a hint that will be needed in case of loss of the password to recover it. Once you have completed entering the data, click “Next”.


After this, the new account will appear in the system.

The user we created does not have administrator rights. Let's consider how to endow him with them. Please note that in order to do this, you yourself must have such authority.
- We follow the same path that we used to create a new user. We find there the account that we will edit and click on it with the left mouse button. The “Change account type” button will appear – this is what we need.


- In the next window, select the desired item from the drop-down list and apply the changes made.


As you can see, the user has become an administrator. That's all. You can now work with the new account by terminating the current session and selecting the user on the start screen.

How to add a user on the command line
In order to create another user using the OS command line, you must run it with administrator rights. This is done as follows:
- Click on the magnifying glass icon on the taskbar and enter the command in the line that opens cmd, and then press Enter. When the result we need appears, right-click on it and select the option to launch the utility with administrator rights.


- When the command prompt opens, enter the following statement: net user username password /add (replace with the desired nickname of the future account and specify the password for it), then press Enter.


- After a couple of seconds of waiting, the system will notify us that the operation has been successfully completed, and the user will be added to the system. If you need to make him an administrator, enter another operator (if the command does not work, try specifying the English administrators instead of the Russian word Administrators):

Now the user we created will appear in the system. And it will not just appear, but will receive administrator privileges.


Create a new account through " Local users and groups"
There is another option for creating a new user in Windows 10, let's take a closer look at it.
Important: the method is only applicable on Windows 10 Pro and higher - there is no Group Policy Editor in the home version.
- Initially, we launch the utility itself - we will do this through the “Run” program. To launch it, use the hotkey combination Win + R. When the window opens, enter the command into it msc and press Enter.


- When local users and groups open, select the “Users” folder on the left side, then right-click on an empty space and select “New User”.


- Specify the name of the new user, his password and password repeat, and then click on “Create”.


As a result, the user will be created - you can see it right here.


- If we want to give the account administrator privileges, right-click on its name and select “Properties”.

- Go to the “Group Membership” tab, select the user whom we want to make an administrator, and click the “Add” button (it is indicated by the number “3” in the screenshot).

- In the window that opens, in the empty field marked with the number “1”, enter the word Administrators and click “OK”.


Ready. The user now has administrator privileges.
We use control userpasswords2
To complete the picture, let’s look at another method for creating a local Windows 10 account. We take the following steps:
- As in the previous case, launch the “Run” utility using the keyboard shortcut Win + R, enter the words in the window that opens: control userpasswords2 and press Enter.


- In the next window, click on the button labeled “Add” - its name speaks for itself.


- Here you can select the type of account to create. We, similar to previous options, will create a local academic record, but you can, if you wish, link it to Microsoft. When the choice is made, click on “Next”.


- In the next screen, Windows 10 praises Microsoft accounts and scolds local accounts - you still have a chance to change your mind. In our case, the answer is no: we choose a local account.


- Enter your account name, password and hint, and then click “Next”.


- The user has been created, we just have to click on “Finish”.


- As usual, we’ll tell you how to grant a new account administrator rights. To do this, select it and click on the “Properties” button.

- Go to the “Group Membership” tab and switch the trigger to the position marked in the screenshot with the “2” button. At the end we press “OK”.


As you can see, the new user is now the administrator of the computer or laptop.


In the article, we looked at how to add a user in Windows 10 in different ways. If you still have questions on the topic, ask them in the comments and we will provide a comprehensive answer as soon as possible.
Video about how to add an account toWindows 10
Welcome back to my blog and now we will look at the pressing issue of how to add a local user in Windows 10. It’s clear that Windows will strongly recommend an account named after itself, how could it be otherwise :) But this is not necessary in all cases and not everyone wants it (what if Windows will keep track of me? No, we’ll make do with a local entry somehow). Or guests have come to stay with you for a few days and want to sit at the computer. You don’t want to let guests into your personal virtual space, which has already been set up and lived in. And the guests are so dense that they still don’t have a Microsoft account, what a horror! Just kidding, just kidding) But nevertheless, the ability to create a local user in Windows 10 is left, which we will use.
Method 1. Standard
So let's get started. Visit us at: Start -> Options -> Accounts. You can also quickly get to Settings by pressing the combination Win+I.

In the accounts window, click on the tab on the left Family and other users. Then click in the section Other users link Add a user for this computer.

We will now begin the user creation process, during which Windows will strongly recommend a network account. At first, Windows, in its simplicity, will think that you want to add a user with a Microsoft account and the first thing it will do is ask you to enter their email or phone number. But we say our firm “No!” and click on the little invisible link below I don't have this person's login information.

But Windows is not going to give up so quickly and offers to create a new Microsoft account. This, of course, is not part of our plans and we again click on the small and inconspicuous link below with the name Add a user without a Microsoft account.

Windows 10 is beginning to understand that we are determined and will go to the bitter end. And in the next window we are finally allowed to create a local account. Enter the username, for example, User2 and password if necessary. You can do without a password, it’s at your discretion. And we complete the process with the Next button.

Well, here it is, our local happiness is on the list) By the way, you can delete an unnecessary user or one that has become unnecessary if you select the account and select Delete.

By default, a standard user with limited rights is created. If you are happy with this, then you don’t need to change anything, and if you want to promote the user to Administrator, then click on his name and select Change account type. Select Administrator from the list and confirm with OK.

And now I’ll show you another way to create a user, a more cunning one)
Method 2. Tricky-advanced
Open the Run window using the Win + R key combination. Enter one of the commands there: netplwiz or control userpasswords2. Both options will bring up the same window. Press OK or Enter on the keyboard.

User Accounts shows a list of accounts on your computer. Press the button Add… and let's start creating a new user.

Windows 10 will again cheerfully advise us to create a Microsoft account. We'll also cheerfully ignore this advice and click on the little inconspicuous link below: Sign in without a Microsoft account.

 Bypass Google account verification (FRP) after resetting your smartphone (Hard Reset)
 What is a Windows avatar, how to change or remove it
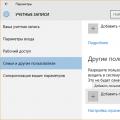 Overview of the Local Users and Groups snap-in Add User Windows 10 works