Change your Windows 10 account avatar. What is a Windows avatar, how to change or delete it
In Windows 10, as well as in Windows 8 and 8.1, it is possible to set an avatar for an account. It, in turn, appears in the Start menu, many Windows Store apps and some desktop programs (such as Microsoft Office), and some Microsoft web services (such as OneDrive). Setting an avatar on Windows 10 is very easy.
An avatar in Windows 10 is set through the Windows Settings panel. One way to open it is:
— launch the start menu;
— in the lower left part of the menu that appears, click on the “gear” icon.
After a second, a window with a list of categories will open. In it you need to find and select the “Accounts” item. A new screen will appear. By default, the “Your Data” tab will be open - this is exactly what you need.
You can immediately go to the desired section of the settings control panel. To do this, you need to open the Start menu, click on the icon with the avatar, which is located at the bottom left, click on it and select change account settings.
If an avatar was not previously set, in its place there will be a gray picture with an abstract image of a man. To change it to your own, you need to find the “Create an avatar” item somewhere at the bottom of the screen, and then select one of the ways to do this: “camera” or “Select one element”.
Using the first one, you can use a webcam to create a photo, for example, of your face, and set it as an avatar. Using the second, you can set any of the photographs already present on your computer or any other image you like as your avatar.
To take a new photo for your avatar, you need to perform the following series of steps:
- click on “camera”;
— take a photo by clicking on the round button with the “camera” icon in the window that opens;
— crop the image using the “Frame” tool in the additional window that opens;
— click on the “Done” button with a “tick” icon if the picture is suitable or on the “Cancel” button with a “cross” icon if you don’t like the photo;
— if “Cancel” was pressed, repeat the snapshot creation.
Once the “Done” button is pressed after cropping the photo, the avatar will be installed.

To set any image as an avatar, you need to select another item - “Select one element”. By clicking on it, a window will appear in which you need to select an image file. You need to follow the path where it is located, select the picture you are interested in, and then click on “Select picture”, crop it as you like, and click on “Done”. A moment later the avatar will be installed.

Setting or changing an avatar in Windows 10 is a very simple task. At the same time, you can put anything as it. The system supports many different image formats and a wide range of resolutions (including very large and small).
Every person has a need to stand out from the crowd. Some people take selfies on skyscraper lightning rods to do this, others experiment with hairstyles and piercings. And there are people who just need to change the theme and avatar in the operating system to feel special.
What is an avatar, why is it needed in Windows 10
Avatar, avatar (colloquially ava, avatar from the English avatar) is a graphical representation of the user, his alter ego, an Internet game character. An avatar can be a two-dimensional image (icon) in web forums, instant messengers, chats, portals, blogs, social networks, or a three-dimensional model (virtual worlds, massively multiplayer online games). Additionally, the avatar can be represented as text, which was common in the era of text-based MUD games. The main purpose of an avatar is a public graphical representation of the user, created by the user himself.
Wikipedia
https://ru.wikipedia.org/wiki/Avatar_(picture)
At its core, an avatar is what the user wants to say about himself, his interests or his inner world through a small picture. Since these images are used in a communication environment, Windows 10 did not ignore the issue and paid a lot of attention to the graphical representation of the user. In "Ten" the avatar is used on the welcome screen, in some applications, and for mail. In addition, the graphical representation is also synchronized with the Microsoft website and attached to all your messages in the community: comments to articles, requests to technical support, and so on.
Account avatars are synchronized between your computer and microsoft.comHow to change your avatar in Windows 10
You can change your account avatar in two ways: by inserting a pre-prepared picture or by taking a photo from a webcam if it is connected to a computer. Both methods are in the area of influence of “Parameters”:
- Press the key combination Win+I or in the Start menu click on the gear icon.
 In the Start menu, click on the gear icon
 - In the “Options” window, go to the “Accounts” applet.
 In the “Options” window, go to the “Accounts” applet
 - In the “Your data” tab, in the “Create an avatar” column, click on the “Select one element” item.
 In the “Create an avatar” column, click “Select one element”
 - In the dialog box, navigate to the image, select it and click the “Select Image” button. After this, the avatar will immediately change to the specified one.
 In the file system, select an image and click “Select picture”
In some versions of the OS, in order to add your avatar, you must click the “Browse” button.
 In some OS versions, in order to add your avatar, you must click the “Browse” button
 And in order to create an avatar from a webcam, click the corresponding button in the “Create avatar” column, smile or make a face and click on the “Take photo” button with the mouse.
 Click “Camera”, then take a photo with the “Take Photo” button
 How to delete your avatar and restore the default one in Windows 10
Since it is impossible to completely delete an avatar, you can only get rid of downloaded images using a standard image.
An avatar usually means a specific image that is associated with a certain user when logging into the system. This is a unique way to make your PC more individual and unique. But it often happens that a previously installed picture gets boring and the question arises about how to delete an avatar.
So, if you need to delete or change a user’s image in the system, then it’s worth considering how this can be done using the built-in tools of the Windows 10 OS. It’s immediately worth noting that both processes are quite simple and will not take much time and effort from the user.
Changing your avatar in Windows 10
Follow these steps to change a user's avatar.

While modifying an image is quite simple, the deletion process is more complicated, since Windows 10 does not have a function that allows you to get rid of an avatar by simply pressing a button. But it is still possible to get rid of it. To do this you need to do the following.

It is worth noting that the avatar that is currently used in the system will remain. In order to get rid of it, you need to restore the default image, which is located at the following address:
C:\ProgramData\Microsoft\User Account Pictures
Obviously, all these steps are quite simple even for the most inexperienced user, so if you are tired of your old profile pictures, feel free to change them to others or delete them altogether. Experiment!
When you sign in to Windows 10, you may see your account picture or avatar in Account Settings and the Start menu. By default, this is a symbolic standard user image, but you can change it if you wish, and this works for both a local account and a Microsoft account.
This instruction details how to install, change or delete an avatar in Windows 10. And if the first two steps are very simple, then deleting an account picture is not implemented in the OS settings and you will need to use workarounds.
There are some difficulties when it comes to deleting a Windows 10 avatar. If we are talking about a local account, then there is simply no option to delete it in the settings. If you have a Microsoft account, then on the page account.microsoft.com/profile/ you can delete an avatar, but for some reason the changes are not automatically synchronized with the system.
However, there are ways to get around all this, simple and complex. A simple option looks like this:
A more complex method consists of the following steps:
- Clear the contents of the folder C:\Users\username\AppData\Roaming\Microsoft\Windows\AccountPictures
- From folder C:\ProgramData\Microsoft\User Account Pictures delete the file named user_folder_name.dat
- Go to folder C:\Users\Public\AccountPictures and find the subfolder corresponding to your user ID. This can be done in the command line running as administrator using the command wmic useraccount get name,sid
- Become the owner of this folder and give yourself full rights to act on it.
- Delete this folder.
- If you are using a Microsoft account, also delete your avatar on the page https://account.microsoft.com/profile/ (click on “Change avatar” and then “Delete”).
- Restart your computer.
Additional Information
For users who use a Microsoft account, it is possible to both install and delete an avatar on the website https://account.microsoft.com/profile/
At the same time, if after installing or deleting an avatar you set up the same account on your computer for the first time, the avatar will be automatically synchronized. If the computer has already been logged in with this account, synchronization for some reason does not work (more precisely, it only works in one direction - from the computer to the cloud, but not vice versa).
Why this happens - I don’t know. Of the solutions, I can only suggest one, not very convenient: deleting the account (or switching it to local account mode), and then re-logging into your Microsoft account.
Almost any of the latest Windows systems has the ability to install an avatar on your account. But many people think about changing it or removing it altogether. Now we will talk about how to remove a Windows 10 account avatar. On the one hand, everything seems simple, on the other hand, you need to take into account some of the features of this modification of Windows.
and is it needed?
First, let's look at what an avatar is. Essentially, it is a thumbnail image or photo that is displayed when the user logs in and opens the Start menu. If there are several registered users working on the terminal, then upon login, an account selection menu with user pictures is displayed.
By and large, no one except people working at a computer sees such pictures, so there is little point in using them. However, many of us have a tendency to decorate or want to stand out. There is nothing wrong with this, of course. But sometimes there comes a time when you get bored with your avatar and want to change it or remove it. And it turns out that not everyone knows how to delete an avatar in Windows 10. Let's look at a few basic methods.
How to remove an avatar in Windows 10 from settings
So, let's assume that the user is tired of the installed image (own or factory) and wants to replace it with something else. In order to solve the problem of how to delete an avatar in Windows 10, you will need to delve into the settings of your “account”.

To access the main settings, use the “Start” menu, where we select the settings section, and when entering it, go to the accounts item.

In the new window below the installed image there is a browse button, by clicking on which you can select the desired image and apply the changes made.

A simpler access method is to call the menu with the line to change your own “account” by right-clicking on the avatar in the “Start” menu. This is logical to do if there are quite a lot of registered users working on the computer, so that later you don’t have to look for yourself in the list.
Subtleties of Windows 10 settings
How to remove an avatar in Windows 10 using the simplest method is already clear. Now let’s take a short digression and look at some of the nuances of the system settings.

Unlike their predecessors, the tenth and eighth versions have an original function of remembering the last three pictures that were ever set as an avatar. This is why many users want to delete all pictures altogether and install the icon that was displayed by default. We'll talk about deleting your files a little later, but for now let's restore the default settings.
How to delete an avatar in Windows 10 or restore factory settings?
All standard images used in user settings are located in the User Account Pictures directory, which is nested in the Microsoft folder of the Program Data directory, which is hidden by default. Therefore, to set a standard image, you must first set the option to show hidden files and folders in the view menu in Explorer.

After this, in the settings of your registration record, you should repeat the steps described above and set the picture from this location. Please note that there is no reset button in Windows 10. After that, simply select the desired image and save the changes. If necessary, the display of hidden objects can be removed again.
Manually deleting unused files
How to delete an avatar in Windows 10 is already clear. Now let's see how to delete your pictures. Again, they are located in hidden directories. Therefore, first you need to use the view menu again and in the user directory named after the user name, go through the AppData folder in the Roaming directory, then Microsoft, Windows and AccountPictures. This is where you need to delete all the pictures.

In principle, to simplify the procedure, you don’t have to use the view menu with subsequent transitions, but simply set the directory path in the “Explorer” search bar (usually %appdata%\Microsoft\Windows\AccountPictures). In this case, the search specifies the variable parameter “%”, which indicates the search for a hidden object. After deleting all the images in the list of used images, they will not be shown, and only the selected standard icon will be displayed in the welcome message (when logging in).
Instead of a total
As can be seen from all of the above, there is nothing particularly difficult about changing or completely deleting an avatar, as well as the issue of deleting previously used images. Whether to set an avatar for yourself or not is a matter of personal considerations and preferences. By and large, it is not needed on a home terminal, except in offices where a lot of people work at the same computer. Although one can argue with this.
 Bypass Google account verification (FRP) after resetting your smartphone (Hard Reset)
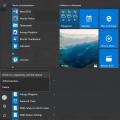 What is a Windows avatar, how to change or remove it
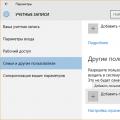 Overview of the Local Users and Groups snap-in Add User Windows 10 works