Write registration to PHP. Creating a simple user registration system for PHP and MySQL
In order to divide site visitors to some groups on the site, be sure to establish a small system registration with PHP.. Thus, you are conventionally divided visitors into two groups of just random visitors and to a more privileged group of users who are issued more valuable information.
In most cases, use a more simplified registration system, which is written in PHP in one file. register.php..
So, we were a little distracted, and now consider the registration file in more detail.
File register.php.
In order for you that you have not taken away the mass of time, create a system that will collect users, taking minimal contact information from them. In this case, everyone will be submitted to the MYSQL database. For the highest base speed, we will create a USERS table in Myisam format and in UTF-8 encoding.
Note! You need to write all scripts in one encoding. All site files and MySQL database must be in a single encoding. The most common UTF-8 and Windows-1251 encodings.
For what you need to write everything in one encoding, we will talk somehow later. In the meantime, take this information as the strictest rule creating scripts otherwise there will be problems with the work of the scripts. Nothing terrible, of course, but simply lose weight of time to find errors in the script.
How will the script itself work?
We want to simplify everything and get a quick result. Therefore, we will receive from users only login, email and his password. And to protect against spam robots, install a small captcha. Otherwise, any boy from London will write a small robot parser who will fill the entire base with lime users in a few minutes, and will rejoice in his genius and impunity.
Here is the script itself. Everything is written in one file. register.php.:
!
`; // Red Question mark $ Sha \u003d $ sh. "scripts / pro /"; // Path to the main folder $ bg \u003d `bgcolor \u003d" # E1FFEB "`; // Background color lines?\u003e Example of registration script register.php style.css "/\u003e
In this case, the script appeals to myself. And is a form and handler of data recorded. I draw your attention that the file is compressed by the zip archive and contains the configuration file config.php, the user database dump file, the file containing the auxiliary functions functions.php, the style file style.css and the register.php file itself. Also, several files that are responsible for the work and generation of capping characters.
REG.RU: Domains and Hosting
The largest recorder and hosting provider in Russia.
More than 2 million domain names for maintenance.
Promotion, mail for a domain, business solutions.
More than 700 thousand customers worldwide have already made their choice.
* Mouse over to suspend scroll.
Back forward
Creating a simple user registration system for PHP and MySQL
Creating a registration system is a big job. You have to write a code that executes email addresses, sends a message to the mail confirmation, and also performs the validation of the remaining form fields, and much more.
And even after you write all this, users will register reluctantly, because This requires certain efforts on their part.
In this lesson, we will create a very simple registration system that does not require and does not store passwords in general! The result will be easy to change and add to an existing PHP site. Want to figure out how it works? Read below.
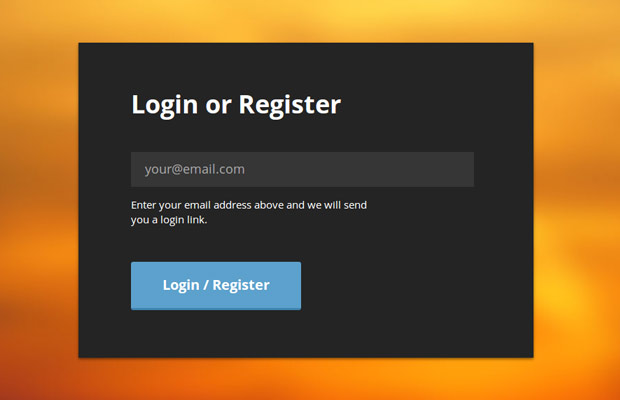
Here's how our super simple system will work:
We combine the form of authorization and registration. In this form there will be a field for entering an email address and a registration button; - When filling out the Email address field, a new user will be created by clicking on the registration button, but only if the email address entered is not found in the database.
After that, a certain random unique set of characters (token) is created, which is sent to the user specified by the user in the form of a reference, which will be relevant within 10 minutes; - By link, the user goes to our site. The system determines the presence of a token and authorizes the user;
The advantages of this approach:
No need to store passwords and carry out field validation; - there is no need to restore password, secret questions, etc.; - from the moment the user has registered / authorized you can always be sure that this user will be in your access area (that the Email address is true); - incredibly simple registration process;
Disadvantages:
User Account Security. If someone has access to the mail, it can log in. - Email is not protected and can be intercepted. Keep in mind that this question is relevant and in the case when the password has been forgotten and it must be restored, or in any authorization system that does not use HTTPS for data transfer (login / password); - While you configure how you need a mail server, there is a chance that messages with links to authorization will be in spam;
Comparing the advantages and disadvantages of our system, it can be said that the system has high yuzability (most convenient for the end user) and, at the same time, has a low security indicator.
So use it is offered for registrations on forums and services that do not work with important information.
How to use this system
In the case when you just need to use the system to authorize users on your site, and you do not want to disassemble this lesson on the bones, that's what you need to do:
You need to download sources attached to the lesson - Find file in the archive tables.sql Import it to your database using the import option in PHPMYAdmin. Alternative way: Open this file through a text editor, copy the SQL query and execute it; - Open includes / main.php. and fill in communication settings with your database (specify a user and password to communicate with the base as well as the host and name of the base). In the same file, you must also specify email, which will be used as the original address for messages sent by the system. Some hosts block outgoing mails while the form does not specify this email address, which was created from the host control panel, so specify the real address; - Load all files index.php., protected.php. And the Assets and Includes folders via FTP on your host; - add the code below to each PHP page, where you need to display the authorization form;
Require_ONCE "includes / main.php"; $ User \u003d NEW User (); if (! $ user- & gtloggedin ()) (redirect ("index.php");) - Ready!
For those who are interested, how it all works - forward to reading below!
The first step is to write the HTM-code of the authorization form. This code is located in the file. index.php.. This file also contains a PHP code that machines the form data and other useful functions of the authorization system. You can learn more in the section below dedicated to the PHP code review.
index.php.
Tutorial: Super Simple Registration System WITH PHP & MySQL
In the head section (between tags
and) I connected the main styles (in this lesson they do not understand, so you can see them yourself. The ASSETS / CSS / STYLE.CSS folder). To the closing tag
I connected the jQuery library and the script.js file, which we will write and wonder just below.
Javascript.
jQuery tracks the status of the "Register / Authorine" button using the function e.PreventDefault () And sends Ajax requests. Depending on the server response, it displays this or that message and determines further actions /
was added to the form to display the current state of the AJAX request (this became possible due to the methods ajaxstart ()) I. ajaxcomplete ()which you can find closer to the end of the file).
This class shows a spinning animated GIF file (as if hinting that the request is processed), and also acts as a flag that prevents the form of re-sending (when the register button has already been pressed once). Class .loggedin. - This is another flag, is set when email has been sent. This flag instantly blocks any further action with the form.
Database schema
Our incredibly simple registration system uses 2 MySQL tables (SQL code is in the file tables.sql). The first stores data on user accounts. The second stores information on the number of input attempts.
User table circuit.
The system does not use passwords, which is visible in the diagram. You can see the column token. with tokens adjacent to column token_validity. The token is installed as soon as the user connects to the system, sets its email to send a message (a little more about this in the next block). Column token_validity Sets the time 10 minutes later, after which the token ceases to be relevant.
Table circuit, which considers the number of authorization attempts.
In both tables, the IP address is stored in the processed form using the IP2Long function in the Integer field.
Now we can write a little PHP code. The main functionality of the system is entrusted to the class User.class.php.which you can see below.
This class actively uses IDORM (DOCS), these libraries are minimally necessary tools to work with databases. It processes access to the database, generation of tokens and their validation. It is a simple interface that allows you to easily connect the registration system to your site if it uses PHP.
User.class.php.
Class User (// Private ORM case Private $ orm; / ** * Find a user on Tocken. Only valid tokens are taken to consideration. Tocken is generated only for 10 minutes from the moment * @param String $ Token. This is the desired Tocken * @return user. Return the value of the function user * / public Static Function Findbytoken ($ token) (// Find a token in the database and make sure that the current time stamp $ result \u003d ORM :: FOR_TABLE ("REG_USERS") -\u003e WHERE ("Token", $ token) -\u003e where_raw ("token_validity\u003e now ()") -\u003e find_one (); if (! $ Result) (Return False;) Return New User ($ Result);) / ** * Authorize or register a user * @param String $ email. Custom email address * @return user * / public address ($ email) (// If such a user already exists, return the value of the user function from the specified email address stored in the database if (User :: EXISTS ($ email)) (Return New User ($ email);) // otherwise create a new user TV in the database and return the value of the function User :: Create from the specified Email Return User :: Create ($ email); ) / ** * Create a new user and save to the database * @param String $ Email. User email address * @return user * / Private Static Function Create ($ email) (// Write a new user and return the result of the user function from these values \u200b\u200b$ result \u003d orm :: for_table ("reg_users") -\u003e create (); $ result-\u003e email \u003d $ email; $ Result-\u003e Save (); Return New User ($ result);) / ** * Check if such a user exists in the database and return the Variable value of the variable * @param String $ email. Custom Email Address * @return Boolean * / Public Static Function Exists ($ email) (// Is there a user in the database? $ Result \u003d orm :: for_table ("reg_users") -\u003e Where ("Email", $ email) -\u003e count (); return $ result \u003d\u003d 1;) / ** * Create a new user object * @param instance $ param orm, ID, email or 0 * @return user * / public function __construct ($ param \u003d null) (If ($ param instanceof ORM) (// ORM Check is passed $ this-\u003e orm \u003d $ param;) ELSE if (IS_String ($ param)) (// Email checking $ this-\u003e om \u003d om :: for_table ("REG_USERS") -\u003e WHERE ("Email", $ param) -\u003e find_one ();) else ($ id \u003d 0; if (IS_Numeric ($ param)) (// user identifier is transmitted to the value of the $ param $ ID value \u003d $ param;) ELSE if (ISSET ($ _ session ["loginid"])) (// otherwise see the session $ id \u003d $ _session ["Loginid"];) $ this-\u003e orm \u003d orm :: for_table ( "REG_USERS") -\u003e WHERE ("ID", $ ID) -\u003e find_one ();)) / ** * Generate new SHA1 authorization token, writes In the database and returns its value * @return string * / public function generatetoken () (// Generate a token for an authorized user and save it to $ TOKEN \u003d SHA1 ($ this-\u003e email.time (). Rand (0, 1000000 )); // Save tokens in the database // and mark it that it is relevant only within 10 of the following minutes $ this-\u003e orm-\u003e set ("Token", $ token); $ this-\u003e orm-\u003e set_expr ("token_validity", "addtime (now ()," 0:10 ")"); $ this-\u003e om-\u003e save (); Return $ Token; ) / ** * authorize the user * @return void * / public function login () (// Mark a user as authorized $ _session ["loginid"] \u003d $ this-\u003e orm-\u003e ID; // Refresh the value of the Last_Login base field $ this-\u003e om-\u003e set_expr ("last_login", "now ()"); $ this-\u003e orm-\u003e save ();) / ** * destroy the session and divodes the user * @return void * / public function logout () ($ _Session \u003d array (); unset ($ _ session);) / ** * Check, whether the user came * @return boolean * / public function loggedin () (Return Isset ($ this-\u003e orm-\u003e ID) && $ _Session ["LoginID"] \u003d\u003d $ this-\u003e orm-\u003e ID;) / ** * Check is the user administrator * @return boolean * / public function isadmin () (Return $ this-\u003e Rank () \u003d \u003d "Administrator";) / ** * Find a user type, maybe either Administrator or regular * @return string * / public function Rank () (if ($ this-\u003e orm-\u003e Rank \u003d\u003d 1) (Return "Administrator ";) Return" regular ";) / ** * Method allows you to get private infor user account in * quality properties of the user * @Param String $ Key property feature receiving access * @return Mixed * / public function __get ($ Key) (IF (ISSET ($ this-\u003e Ор -\u003e $ Key)) (Return $ this-\u003e orm -\u003e $ Key; ) Return NULL; ))
Tokens are generated using the SHA1 algorithm and are stored in the database. I use MySQL time functions, in order to set a 10-minute restriction of the relevance of the tokeny.
When the token passes the validation procedure, we are directly talking to the handler that we consider only tokens who have no expiration date, stored in the TKEN_VALIDY column.
Note that I use the magic method __get. DOCS libraries at the end of the file to intercept access to the properties of the user object.
Due to this, it becomes possible to access the information stored in the database, thanks to the properties $ User-\u003e Email, $ User-\u003e Token et al. In the following code fragment, consider for an example, how to use these classes.
Protected page
Another file that stores useful and necessary functionality is a file. functions.php.. There are several so-called helpers - assistant functions that allow you to create a cleaner and readable code in other files.
functions.php.
Function Send_email ($ from, $ to, $ subject, $ message) (// Helper, sending email $ Headers \u003d "Mime-Version: 1.0". "\\ R \\ n"; $ Headers. \u003d "Content-Type: Text / Plain; Charset \u003d UTF-8 "." \\ R \\ n "; $ Headers. \u003d" From: ". $ from." \\ R \\ n "; Return Mail ($ to, $ Subject, $ Message, $ Headers );) Function Get_Page_URL () (// Determine the US PHP file URL \u003d "HTTP". (Empty ($ _ Server ["https"])? "": "S"). ": //" $ _ Server ["Server_name"]; if (ISSET ($ _ Server ["Request_uri"]) && $ _Server ["Request_uri"]! \u003d "") ($ URL. \u003d $ _Server ["Request_uri"];) ELSE ($ URL. \u003d $ _Server ["path_info"];) Return $ URL;) FUNCTION RATE_LIMIT ($ ip, $ limit_hour \u003d 20, $ limit_10_min \u003d 10) (// The number of input attempts for the last hour on this IP address $ COUNT_HOUR \u003d ORM: : for_table ("reg_login_attempt") -\u003e WHERE ("IP", SPRINTF ("% U", IP2LONG ($ ip))) -\u003e where_raw ("TS\u003e Subtime (now ()," 1:00 ")") -\u003e Count (); // Number of input attempts in the last 10 minutes on this IP address $ Count_10_min \u003d ORM :: FOR_TABLE ("REG_LOGIN_ATTEMPT") -\u003e WHERE ("IP", SPRINT f ("% u", ip2long ($ ip))) -\u003e where_raw ("TS\u003e subtime (now ()," 0:10 ")") -\u003e count (); if ($ count_hour\u003e $ limit_hour || $ count_10_min\u003e $ limit_10_min) (Throw New Exception ("Too Many Login Attempts!");)) Function rate_Limit_Tick ($ ip, $ email) (// Create a new entry in the table that considers Number of input attempts $ login_attempt \u003d ORM :: FOR_TABLE ("REG_LOGIN_ATTEMPT") -\u003e create (); $ login_attempt-\u003e email \u003d $ email; $ login_attempt-\u003e ip \u003d sprintf ("% u", IP2Long ($ ip)); $ login_attempt-\u003e save ();) Function Redirect ($ URL) (Header ("Location: $ URL"); exit;)
Functions rate_limit. and rate_limit_tick. They are followed by the number of authorization attempts for the expired period of time from the moment of the first attempt. The input attempt is recorded in the database in the reg_login_attempt column. These functions are called when processing and sending the form data as you can see from the next code fragment.
The code is taken from the file below. index.php. And it processes the sending of the form. It returns a JSON response, which, in turn, is processed by jQuery in the file aSSETS / JS / Script.jswhich we have already disassembled earlier.
index.php.
Try (if (! Empty ($ _ post) && isset ($ _ server ["http_x_requested_with"])) (// Output A JSON Header Header ("Content-Type: Application / JSON"); // Is this email address Valid If (! Isset ($ _ post ["email"]) ||! filter_var ($ _ post ["email"], filter_validate_email)) (Throw New Exception ("Please Enter A Valid Email");) // Check. Whether the user is allowed to log in, does it exceed the number of permissible connections? (Functions.php file for more information) rate_limit ($ _ server ["remote_addr"]); // Record this attempt to authorize Rate_Limit_Tick ($ _ Server ["Remote_ADDR"], $ _Post ["email"]); // Send a letter to the user $ message \u003d ""; $ email \u003d $ _post ["email"]; $ subject \u003d "Your Login Link"; if (! User :: Exists ($ email) ) ($ subject \u003d "thank you for registering!"; $ message \u003d "Thank you for Registering at OUR Site! \\ N \\ n";) // Attempt to authorize or register the user $ User \u003d User :: LoginorRegister ($ _ post [ "Email"]); $ message. \u003d "You can login from this url: \\ n" ; $ message. \u003d get_page_url (). "? TKN \u003d". $ User-\u003e GenerateToken (). "\\ N \\ n"; $ Message. \u003d "The Link Is Going Expire Automatically After 10 Minutes."; $ resulting \u003d send_email ($ Fromemail, $ _post ["email"], $ subject, $ message); If (! $ Result) (Threw New Exception ("There Was An Error Sending Your Email. Please Try Again.");) DIE (JSON_ENCODE (Array ("Message" \u003d\u003e "Thank You! WE \\" Ve Sent A Link To Your Inbox. Check Your Spam Folder AS Well. ")));)) Catch (JSON_ENCODE (Array (Error" \u003d\u003e 1, "Message" \u003d\u003e $ E-\u003e GetMessage () )));)
After successful authorization / registration code, the user will send a link to authorization to the user. Tocken becomes affordable, because It is transmitted as a variable in the generated link method $ _Get. With TKN marker
index.php.
If (ISSET ($ _ get ["TKN"])) (// Is this token valid for authorization? $ User \u003d User :: FindbyToken ($ _ get ["TKN"]); if ($ User) (// Yes is. To make a redirect to the protected page of $ User-\u003e login (); Redirect ("Protected.php");) // No, the token is not valid. Implement a redirect, on the page with the form of authorization / registration of Redirect ("index.php ");)
$ User-\u003e Login ()
create the necessary variables for the session, so that the user, looking through the subsequent site pages, will remain authorized all the time.
Similarly, the processing of the function to exit the system is also arranged.
index.php.
If (ISSET ($ _ get ["logout"])) ($ user \u003d new user (); if ($ user-\u003e loggedin ()) ($ User-\u003e logout ();) redirect ("index.php") ;)
At the end of the code, I again put a redirect on index.php, thus the parameter ? LOGOUT \u003d 1 Not required by the URL is not required.
Our file. index.php. requires add. Protection - We do not want people who ever once logged in the system again saw the registration form. For these purposes, we use the method $ User-\u003e Loggedin ().
index.php.
$ User \u003d NEW User (); if ($ User-\u003e Loggedin ()) (Redirect ("Protected.php");)
Finally, here is a piece of code that allows you to protect the pages of your site and make it available only after authorization.
protected.php.
// To protect each page on your site, connect the file // Main.php to it and create a new User object. That's how easy it is! Require_ONCE "includes / main.php"; $ User \u003d NEW User (); If (! $ User-\u003e Loggedin ()) (Redirect ("index.php");)
After this check, you can be sure that the user has been successfully authorized. You can also access stored information in the database using the object properties. $ User.. To display email and user and its status, use this code:
Method rank () Used here because the database is usually stored (0 for a regular user, 1 for the administrator) and we need to convert this data to the statuses to which they relate to us and this method helps.
To make an administrator from a regular user, simply edit the user entry via phpMyAdmin (or any other program that allows you to manage databases). Administrator status does not give any privileges, in this example on the page will be displayed that you are an administrator - and that's it.
But what to do with it - it remains at your discretion, you can write and create a code that defines certain privileges and opportunities for administrators.
We finished!
With this incredibly super quasi simple form, we finished! You can use it in your php sites, it's easy enough. You can also modify it under yourself and make it like you want.
Material Prepared Denis Baby specially for site site
P.S. Want to move on in mastering PHP and OOP? Pay attention to premium lessons on various aspects of site buildings, including PHP programming, as well as a free course on creating your CMS system on PHP from zero using OOP:
Did you like the material and want to thank? Just share with friends and colleagues!
1. Let's start with the creation of the USERS sign in the database. It will contain user data (login and password). Let's go to PHPMYAdmin (if you create a database on your PC http: // localhost / phpmyAdmin /). Create a table users.It will have 3 fields.
I create it in the MySQL database, you can create in another database. Next, set the values \u200b\u200bas in the picture:
Click " Save"So, we have a table. 2. It is necessary to connect to this table. Let's create a file bd.php.. Its content:
In my case it looks like this:
Save bd.php. Excellent! We have a table in the database, the connection to it. Now you can start creating a page on which users will leave their data. 3. Create a file reg.php. With content (all comments inside):