Loading ssd drive. How to connect an SSD drive to a computer to the motherboard? Disabling Search and Indexing of Files
The emergence of solid-state hard drives or SSD for short, can certainly be considered a breakthrough in the development of technologies for creating devices for recording and storing digital information. The first SSDs that entered the market, with the exception of the high speed of access to arbitrary blocks of information, were in many ways inferior to traditional HDDs. Not only could their volumes, without exaggeration, be called more than modest, they also had low fault tolerance and cost a lot of money.
What's wrong with SSD?
The high speed, quietness and low power consumption of solid state drives have served as good drivers for their development. Modern SSD drives are lightweight, very fast and mechanically quite reliable devices used in tablets, ultrabooks and other compact devices. The price of SSDs has also dropped significantly. However, they cannot be called perfect. All SSDs have a significant drawback - a limited number of write cycles.
The flash memory of most SSDs is of the MLC type and allows you to write data from about 3 to 10 thousand times, while conventional USBs exhaust their resource in 1000 or less rewrite cycles. There are also such SSDs, for example, with the SLC memory type, which can withstand several hundred thousand rewrite cycles. There are many nuances, so it is not surprising that just this feature of SSD drives raises a lot of questions from ordinary users regarding their operation, and most importantly, extending their service life. Is SSD optimization necessary in Windows 7/10 or is it just another myth created by manufacturers and commercial software developers themselves?
Basic training
Yes, you can leave everything as it is on a PC with an SSD, and you might be right, but if you really care about your drive and want it to last as long as possible, it's worth considering tuning it. Let's start with whether you bought a computer with an integrated SSD, or just the drive itself, with which you want to replace the HDD by transferring Windows from it. In the first case, you can limit yourself to setting up the system. If you install the SSD yourself, be sure to check if the AHCI connection mode for the SATA controller is enabled in the BIOS.
There are two points here: after enabling AHCI and transferring Windows to an SSD, the system may not boot, as it will not have the appropriate drivers. Therefore, either install the drivers ahead of time, or reinstall Windows from scratch. Second. The BIOS of older PCs may not have AHCI mode. In this case, the BIOS will have to be updated. Now for the SSD controller firmware. SSD owners often ask if a drive will run faster if they install the latest firmware. Yes, it will be, but if you decide to update it and in general, if the need arises, it is better to contact the maintenance service for help.
System settings. Disable defragmentation
For HDDs, defragmentation is a useful thing, but for SSDs, on the contrary, it can damage it, so Windows usually disables it automatically. However, it's worth checking to see if it's actually disabled. Run command dfrgui disk optimization utility and click "Change settings".

Make sure the "Run on schedule" checkbox is unchecked. If it's there, be sure to remove it.

Enabling TRIM
The TRIM mechanism optimizes the SSD drive by clearing memory cells of unnecessary data when they are removed from the disk. The use of TRIM ensures uniform wear of the disk cells and increases the speed of its operation. To check if TRIM is active on your system, run the following command from an administrator command prompt: fsutil behavior query DisableDeleteNotify.

If the value of the returned parameter DisableDeleteNotify will be 0, then everything is in order and the trim function is enabled, if 1 - it means it is disabled and it should be enabled by the command fsutil behavior set DisableDeleteNotify 0.
This SSD setting only applies to Windows 7/10, while Vista and XP do not support it. There are two options: either install a newer system, or look for an SSD drive with hardware TRIM. Please also note that some older SSD models do not support TRIM at all, however, the likelihood that they are still sold in digital equipment stores is very small.
In the process, a significant amount of data can be written to the hiberfil.sys file on the system disk, comparable to the amount of RAM. We, in order to extend the life of the SSD, need to reduce the number of write cycles, so it is advisable to disable hibernation. The disadvantage of this SSD setup is that you will no longer be able to keep files and programs open when you turn off the computer. To disable hibernation, run the command in a running with administrator privileges powercfg -h off.

Restart your computer and make sure that the hidden system file hiberfil.sys is deleted from the C drive.

Disabling Search and Indexing of Files
What else can be done to properly set up an SSD drive for Windows 7/10? The answer is to disable indexing of the contents of the disk, because the SSD is already fast enough. Open the properties of the disk and uncheck "Allow the contents of files to be indexed ...".


But here's the thing. If you have a HDD in addition to an SSD, then you are unlikely to want to disable indexing on it. What will come of it? By default, the index file is located on drive C and data from drive D will still be written to the solid state drive.
If you do not want to disable indexing on the user volume, you will need to move the index file from the system SSD to the user HDD. Open by team control /name Microsoft.IndexingOptions indexing options.

Now click "Advanced" and specify your index location, having previously created a folder on the user's drive.


If your PC only has an SSD, you can completely disable indexing and search by opening the Services.msc snap-in and stopping the Windows Search service.

Disabling system protection
Controversial moment. By disabling the creation of system shadow copies, on the one hand, you will reduce the number of write cycles, on the other hand, you will increase the risk of getting a non-working system in the event of some unforeseen failure. Using rollback is one of the most effective and easiest ways to return Windows to a working state, for this reason we would not recommend disabling this feature, especially since points are created infrequently and they do not take up much space.
It does not recommend disabling system protection for its Intel SSDs, the same opinion is shared by Microsoft. However, it's up to you. If you use other backup tools, such as Acronis True Image, you can disable system protection. To do this, go to the system properties, on the "System Protection" tab, select the SSD drive and click "Configure". Next, in the recovery options, activate the "Disable system protection" radio button, move the slider to zero and click the "Delete" button.

Disable or not paging file?
An even more controversial solution is to disable the swap file. Someone advises to transfer it to the HDD, someone completely disable it, but not everything is so simple. The paging file is necessary to optimize the performance of the system and programs that require significant RAM resources. Disabling swap can indeed reduce disk usage, but the resulting effect will be very small. In addition, this disabling can significantly reduce the performance of your computer.
There is no particular point in moving the paging file to a hard HDD either, since it is many times slower than an SSD, and the system’s constant access to it will slow down its work. Disabling, or even better, reducing the paging file is permissible only in one case - if your computer has more than 10 GB of RAM, and at the same time you do not use resource-intensive applications. And so, of course, it is better to leave everything by default. You can perform all manipulations with the paging file in the performance parameters window called in the "Run" window by the command system properties performance(hereinafter Advanced - Change).

Prefetch and Superfetch
In theory, it is also better to leave everything by default here. The function does not affect the durability of SSDs in any way, as it does not produce any writes. Moreover, when you install Windows on an SSD, the system automatically turns it off. Want to make sure it's disabled? Go to Registry Editor at HKEY_LOCAL_MACHINE/SYSTEM/CurrentControlSet/Control/Session Manager/Memory Management/PrefetchParameters and see the parameter value EnableSuperfetch. It should be set to 0. You can also disable it through the Services Control snap-in.

As for Prefetch, its writes to disk are so insignificant that it can be ignored. However, you can turn it off, nothing bad will happen. To do this, in the same registry key, set the value of the parameter EnablePrefetcher 0.

The same can be said about disabling the additional Prefetch ReadyBoot feature that logs the process of loading applications. The volume of records it produces in a folder C:/Windows/Prefetch/ReadyBoot is negligible, but if you want to disable them as well, set the Start parameter in the key to 0 HKEY_LOCAL_MACHINE/SYSTEM/CurrentControlSet/Control/WMI/Autologger/ReadyBoot.

Programs for optimizing an SSD drive
Almost everything that was shown in the examples above can be done using special utilities. How to set up an SSD under Windows 7/10 using third-party programs? Very simple. Most of them have an intuitive interface, represented by a set of options that can be enabled or disabled. There are many SSD optimizers, but we will focus only on the most popular ones.
SSD Mini Tweaker
The most convenient portable program for optimizing solid state drives. The utility supports working with defragmentation, hibernation and system protection functions, Trim, Superfetch and Prefetcher, paging file and Layout.ini management, indexing, file system cache and some other settings.

The SSD Mini Tweaker interface is represented by a window with a list of functions available for management. You may need to restart your PC after applying the new settings.
A shareware utility for optimizing and tuning the performance of an SSD drive. There is no Russian language in Tweak-SSD, but there is a convenient step-by-step wizard that offers optimal settings. Features of this program include disabling file indexing, program compatibility assistant, hibernation, paging file, defragmentation, last file access time recording, working with TRIM, increasing the file system cache, removing the NTFS limit on memory usage, as well as removing the kernel in memory instead of unloading parts of modules to disk.

SSD Fresh Plus
Another SSD optimizer. Unlike analogues, it supports working with S.M.A.R.T. With Abelssoft SSD Fresh Plus, you can disable defragmentation, the use of abbreviated names for folders and files, timestamps, Windows log, prefetch services.

In total, the utility supports nine different settings that optimize the performance of the SSD. Additional program features include viewing detailed disk information. Distributed in paid and free editions.
Conclusion
On this, perhaps, everything. There are also other SSD optimization recommendations, but for the most part they are either dubious or harmful. In particular, it is not recommended to disable write caching for the SSD drive and the USN journal of the NTFS file system. You should also not transfer programs and Temp temporary folders, browser cache, etc. from the SSD, because then what's the point in buying an SSD drive? We need to speed up the work of programs, transferring them to the HDD, you will only slow down the system.
And finally, here's some good advice for you. Don't bother with SSD optimization especially. Even a budget 128 GB solid state drive will take at least a decade to wear out, unless you start writing and deleting terabytes of data every day. And during this time, not only the disk model, but also the computer itself will become hopelessly outdated.
At the present time, SSD is no longer a curiosity, but a mandatory equipment of any productive computer.
Although mechanical HDDs are not yet completely gone from desktop systems, to speed up a disk system, installing an SSD as a system disk is more of a necessity than a luxury.
So, if you have already read our article, have chosen and bought an SSD, then it remains only to install it.
First of all, we determine the place in the system unit for installing the SSD.
Included in delivery some SSDs come with special adapters 2.5 " -> 3.5" for installation in a standard bay.

But if you become the owner of an SSD without such an adapter, then it can be installed in any place convenient for this.
For example, I decided to mount my Crucial M4 128Gb SATA III 6Gb/s on the side and secure with regular vinyl zip ties.

It is better to connect the SSD to the SATA III 6Gb / s port, if there is one on your motherboard.
There are two such ports on my ASUS P8P67 LE, and they are marked as SATA6G_1
And SATA6G_2

My motherboard also comes with two special SATAIII 6Gb/s cables.

If you do not have SATA III ports and cables, then you can connect a regular SATA cable to the SATA II port.
Do not forget to also connect the power to the SSD, the connector from the power supply for connecting SATA devices:

So we have already installed and connected our SSD. And if you connect an SSD, then only to the first numbered SATAIII or SATAII port. We will install the OS on our SSD and boot from it first.


Go to settings Advanced/SATA Configuration
and see the connected devices.
In this case, my HDD is connected to the first SATA II and the SSD is connected to the first SATA III.
IMPORTANT! Don't forget to set the SATA controller to .


And we set our SSD as the first boot disk. Otherwise, the system will continue to boot from the HDD.


Then we save all the settings we have made by clicking
. And at the same time we look for the SSD to stand first boot HDD
.
You can leave the CD/DVD first to install Windows. Or leave the first SSD, only at the first boot one-time (through on ASUS boards) select boot from CD / DVD.

Important!
On many Internet resources, when installing an SSD, it is advised to clone, copy, transfer, restore from an image (and similar perversions) the C: \ HDD drive with Windows installed.
But this should never be done!!!
Before installing an SSD, prepare to completely install Windows from scratch.
Since when Windows is installed on the HDD, then, accordingly, all its services are launched for the operation of the HDD. But if you transfer such a system to an SSD, then many services will not only not help you work faster, but in addition will contribute to the rapid wear of a brand new SSD (for example, defragmentation).
In order for the SSD to work correctly and for a long time under Windows, it must be installed from scratch on a clean SSD.
And then .
After all, this article is not about how to install an SSD in a computer, but how to CORRECTLY install an SSD in a computer :)
We start the installation of Windows 7, in my case it is Windows 7 x64, since I have 8Gb of RAM installed.
We make basic language and time settings for Windows 7 and get to the choice of a disk for installing the OS.
We see our unmarked SSD (Disk 0) and sections of our HDD (Disk 1).
Choose unmarked Disk 0 and click Disk setup

An SSD, or solid state drive, is very different from classic hard drives in terms of internal structure and operation, so some operations that can be done on an HDD on an SSD can lead to performance degradation and unnecessary waste of drive resource. We will talk about such operations in this article.
Do not use SATA 2 or SATA 1 interface to connect SSD
This feature applies mainly to old computers and laptops. The fact is that modern solid state drives have read and write speeds of 500-600 MB / s, which is close to the SATA 3 limit of 6 Gb / s (750 MB / s), but still less than it - therefore, the SSD connected using this interface, they will be able to work at maximum speeds. In the case of SATA 2 and 1, their bandwidths are only 3 and 1.5 Gb / s (375 and 187.5 MB / s, respectively), so SSDs connected via them will not be able to work at full speeds, although the speed increase compared to conventional hard drives is all it will be the same (since SSD has much less latency, and user HDD speeds are at the level of only 100 MB / s). In the case of old motherboards, nothing can be done - you will have to connect the SSD to the old SATA revisions. But in the case of laptops, you can do it more tricky: often, to add an SSD to the system, they use Optibay - a box in which the drive is placed and installed in place of the drive: 
At the same time, the drive usually works via the SATA 2 interface, when the hard drive in the laptop is connected via SATA 3. Therefore, it makes sense to put the SSD in place of the HDD so that it can work at maximum speed, and put the hard drive in Optibay, because SATA 2 speeds it more than enough.
Don't defrag your SSD
When a file is written to the drive, the system tries to write it to successive clusters. However, if this fails, the system looks for free clusters and writes parts of the file to them. As a result, it turns out that one file can be written in several places on the disk at once, and therefore, in the case of a hard disk, to read such a file, you have to transfer and position the read head several times, which takes a lot of time. The defragmentation process allows, as far as possible, to bring the disparate parts of the file together to reduce its reading time.
In the case of an SSD, there is no need to perform any mechanical actions to read part of a file in another cluster, so the access time to any cell, whether it is at least the next one, at least in another place on the drive, is exactly the same - which means defragmentation loses its meaning. Moreover, during defragmentation, the files are overwritten so that they are eventually written in one piece, and since the SSD has a limited number of rewrite cycles, it turns out that they are wasted.
SSD should not be used in Windows XP, Vista and other systems that do not support TRIM
TRIM is an ATA interface command that allows the operating system to notify the SSD which blocks of data are no longer in the file system and can be used by the drive for physical deletion. If the system doesn't support TRIM, then you basically just won't be able to delete the file from the SSD. Therefore, when you need to write something to the SSD, you will not have to write the data, but overwrite it, which will greatly reduce the speed of the drive. In addition, the inability to delete data provides a potential opportunity to read it, which can be unsafe if the data is confidential.

Do not completely fill the SSD
Any SSD always has filled blocks, partially filled blocks, and empty blocks. In an empty block, the write speed is maximum - no additional operations are required. But if the block is partially full, then to write to it, you first have to transfer the information originally written to it to the cache, change it, supplementing it with a new one, and only then write from the cache back to the block - all this takes time and, as a result, greatly reduces the speed of work with storage. Accordingly, as long as there are free blocks on the SSD, the system writes information to them and the write speed is high. When they run out, recording begins in partially filled blocks and the speed drops dramatically. Practice shows that the SSD slightly loses speed if it is occupied by no more than 80% - that is, on a 240 GB drive, you should leave about 50 GB free.
SSD should not be used as storage for large amounts of data
Of course, you can store all the files on the SSD as on the HDD. But there are types of data, the speed of working with which depends little on the type of drive: for example, it makes no sense to store your collection of music or movies on an SSD, because they will play just as fast on a hard drive, but without wasting solid-state drive rewrite cycles . For the same reason, you should not download files from the Internet to an SSD (with the exception, perhaps, of software installers) - the Internet speed is still much less than the HDD write speed, so the download time will be the same, but the life of the SSD can be extended.
In this article, we will think about what can be done from a non-working hard drive and a pair of flash drives and memory cards lying around at hand? You probably guessed what to make your own SSD drive, moreover, with the possibility of external connection.
To do this, you need to pull out all the insides of the old hard drive and install several flash drives into it along with a USB hub. How to do it best, you can see in the attached video.
http://www.youtube.com/watch?v=LmHBLqYzimE
As you can see, making an external SSD is pretty easy and any modder with a minimal set of tools can do it. Of course, a homemade solid state drive (SSD) will be inferior in speed to commercial solutions, due to the limitation of the USB interface. But the whole point is that our SSd screw will be assembled from unnecessary parts, instead of just throwing them away. So let's save the environment by modding!
How to make your own SSD from CompactFlash cards
The idea of an adapter that connects CompactFlash cards to the SATA interface is not new. We draw your attention to the device manufactured by Addonics Technologies, with which you can turn one or two CompactFlash cards into a solid state drive connected to a standard interface.
Century engineers went further - their development allows you to connect three CompactFlash cards to the SATA port at once (as you can see in the picture, two of them are on one side of the adapter board). Of course, you can limit yourself to two or even one card. The total amount of memory can range from 2 GB to 2 TB. The device supports RAID 0 and RAID 5 configurations. The device complies with the SATA 1.0 (1.5 Gb/s) specification, supports IDE PIO Mode 0-6, Multiword DMA Mode 0-4 and Ultra DMA Mode 1-6 card exchange modes. The price of the product is approximately $200. Pre-orders are currently being accepted.
DIY SSD drive on SDHC cards
So far, solid-state drives based on flash memory integrated circuits are still too expensive to become a full-fledged alternative for traditional mobile, and not only mobile, hard drives. However, none of the users would refuse the advantages of solid state drives - a low noise level during operation, low power consumption, especially since such a possibility is already present. The fact is that Sharkoon presents the Flexi-Drive S2S device, which is, in fact, an adapter for connecting up to six SDHC memory cards to a mobile computer.
Media is installed in special slots on a printed circuit board, which in turn is installed in a metal case of a 2.5-inch form factor. The SATA interface is used to connect directly to a personal computer.
Using Sharkoon Flexi-Drive S2S, the user can currently organize a drive up to 192 GB, while independently choosing memory cards with suitable characteristics for it: cost, speed performance, etc. Preliminary testing showed that the performance of such a flash drive, when used Class 6 cards are at the next level: 140 Mb / s when reading data and up to 115 Mb / s when writing information.
With the advent of solid-state drives, many questions arise, so there are more of them with the release of Window's 10, and the most discussed is - is it necessary to configure an SSD for ten? The fact is that Microsoft fully supports the policy of the above disks and therefore claims that making changes to the system settings on their own can lead to a decrease in the life of the ssd disk in windows 10. Let's take everything in order and see if you really should rely on authoritarian developers decision.
What is given?
Before doing anything, let's take a look at the default windows 10 settings for ssd in more detail.
Disabled defragmentation completely
The fact is that defragmentation as such is not required for ssd drives, due to its architecture, so if the HDD has clusters that periodically require rewriting by shifting data from cell to cell, then the ssd disk needs only the trim command on windows 10, you need to check if it works, if not, then read how to enable it.
- "Explorer" → "This_computer" → right-click "C:" → "Properties"
- Tab "Tools" → "Optimize_and_defragment_disk" → "Optimize"

We see that the system disk is solid-state, at the bottom of the window it is indicated that ssd optimization occurs in windows 10 on schedule - we are talking about TRIM technology - in short, it reports the presence of non-existent blocks in the file system that can be deleted. So, if the function is disabled, then go to "Change_parameters" and set the schedule, follow further to optimize the settings for the ssd drive on windows 10.


There are always reservations, so defragmentation is necessary and is performed automatically by the system when system protection is active - we are talking about creating restore points, again Microsoft claims that the algorithm is different from the usual defragmentation for the usual hdd.
ReadyBoot, Superfetch/Prefetch and Power
To the most popular question - is it necessary to configure ssd on windows 10, we will talk about the functionality that is very familiar from previous versions, but causing heated debate in windows 10.
So, ReadyBoot is immediately disabled - a function that analyzes the paths and files frequently requested over the last 5 downloads and caches the space in RAM for faster access to them the next time you work.
Superfetch / Prefetch also cause a lot of debate - they are used, but you don’t need to turn them off, so Intel manufacturers say, but Samsung thinks otherwise. The question arises, how then to optimize the ssd-disk in window's 10, if opinions differ, I would like to note here that with versions 7 and 8.1 - the above functions have also evolved, but for peace of mind - refer to the hardware developer's advice.
And an important aspect is that the operating system automatically optimizes the power of your ssd drive.
swap file
Speaking, the correct setup of the window’s 10 system is for a solid-state ssd drive, it often means disabling the paging file, but is it really? Everyone forgets what this is for, so if we are talking about optimizing services in the background, then of course this is not required, but there is software that can give an error if the paging file is disabled - commonly used Adobe Photoshop, for example, and others products of this family, and by the way, this is how we save the reserves of our ssd'shnik. Therefore, it will be correct to enter the settings and set the checkboxes we need.
- "Control_panel" → "Advanced_system_settings" → "Advanced" → "Settings" → tab "Advanced" → "Change" → there should be a check mark "Automatically_select_paging_file size" → OK.


Save battery or ssd?
As you already understood, we will also talk about how this is related to setting up an ssd - disk for windows 10, the process is generally obvious, when we send our laptop, all data is saved and naturally, data is written to memory and an endless process - which has a bad effect on the durability of the solid state drive. It turns out that laptop owners have a choice what to save the battery or the screw? Actually, it's not all that bad! Hibernation is intended for equipment with an HDD, since the speed of loading the OS and accessing files is much longer, and it is easier for users to put the machine to sleep and then wake it up to work without first launching programs and applications - wasting time on this. In the situation with SSDs, this is not required, since their main feature is speed - did you pay attention to how many seconds your PC turns on? We conclude that hibernation in the presence of ssd is not needed.
Indexing
Another tool that can be sacrificed is Windows indexing, the fact is that when the process is executed, it saves information about the location of files, thereby providing fast searches - which accordingly takes up space and constant overwriting of data - as you move them. Solid state drive technology provides fast access on its own, so feel free to turn it off - the method is below.
Right-click on the disk, in this case, select "C:"
- "Properties" → "General" tab → uncheck "Allow_to_index_file_contents..." → ok

- In the window that appears, select "To drive C:\ and to all attached files and folders" → ok


It remains only to wait for completion and close the window.
Optimization in a few clicks!
I'm afraid that now they will throw stones, because they didn’t say about the program for optimizing ssd on windows 10 before - yes, it exists and, and not only for dozens, it worked and works on earlier versions. Meet SSD Mini Tweaker, which weighs a little more than 1.5 Mb, is absolutely free and in Russian.
But this is not the only program for easy and quick setup of ssd under window's 10 version, we offer a short list:
- "Tweak-SSD" - in English, paid with an available demo version, will help you configure and improve disk performance.
- "SSDLife Pro" - a paid, Russified, also available demo version, keeps abreast of the "health" of the screw and works in the background.
- "SSD Tweaker" - free license, supports Russian language, less than 1 Mb, a good assistant in optimization.
All of the above instructions will help if the ssd is slow in windows 10, I would also like to answer other most common questions right away, so.
- How much ssd is needed for the full operation of windows 10 is a rather ambiguous wording, but in short, at least 20 Gb is needed for Windows itself, further based on needs. Office / multimedia PC - from 120 to 128 Gb; gamers of the middle category - from 240 to 256 Gb; for profi and high-level games from 480 to 512 Gb. In a situation with ssd'shnikov, the more free disk space, the better for the life of the disk and the speed of the computer.
- Some time after installing clean Windows, the system takes a long time to boot - you need to analyze the boot time and watch the event codes, so often the problem is related to updates - disable automatic and switch to manual, there may still be a reason that you did not switch from IDE to ACHI.
- Users are wondering what type of partition to choose mbr or gpt for windows 10 with ssd - the answer is simple, you need to check which version of the preprogram is installed: the good old BIOS or modern UEFI. So, GPT only works with the UEFI interface, MBR supports both versions.
You can find answers to the most frequently asked questions with instructions in the articles on our website.
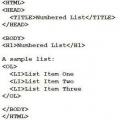 Nested lists in html. Numbered list. List marker in the form of an empty circle
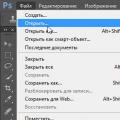 Description and purpose of the Photoshop toolbar Photoshop toolbar meaning
 Excel for Dummies - Changing Columns, Rows and Cells How to set the desired column width