How to kill windows 10 on a laptop. How to reinstall Windows: step by step instructions
Reinstalling the Windows 10 operating system can be done in two ways: by resetting to the factory version or completely. We considered the first option in detail in a separate article. It implies a rollback of "dozens" to its original state - in fact, a complete reinstallation, but with the ability to save user files if desired.
In this article, we will look at a way to cleanly reinstall the system, with a full formatting of the hard disk during it, or also with the ability to save personal files on a separate partition. A clean install of Windows 10, in our opinion, has some advantage over a rollback. The system does not save any personal settings, but at the same time it takes up less space than a reset (because it does not save the previous installation in the Windows.Old folder), installs faster and, as a rule, works a little faster and more stable. In the same time setting "tens" cleanly involves creating a bootable flash drive. Fortunately, it is not at all difficult to do it - Microsoft has released a special program for these purposes that fully automates this process.
Before writing the installation USB drive, just in case, you need to clarify the parameters of your Windows 10 operating system: its version ( Home or Pro) and bit depth (32 or 64 bits). You can do it like this:
- Click the RIGHT mouse button on the Start menu.
- Select "System".
- In the parameters window that opens, view the edition and system type.
This option is possible when you currently have a 32-bit Windows 10 operating system installed, but with an x64 processor. In this case, a 64-bit system can also be installed on the computer. This should be done if the size of the computer's RAM (looks in the same window - the "Installed RAM" item) is 4 GB or more. If the RAM is less than 3GB, then you must install the x32 version.
There is no need to delete data from the hard drive or format it! All this can be done during the installation process, just like saving a separate existing partition with personal files.
Now let's move on to writing Windows 10 files to a USB flash drive. To do this, we need the actual USB drive itself with a capacity of at least 4GB. We insert it into the computer, and we ourselves go to Microsoft official website behind the utility for creating installation media "dozens". On the page indicated by the link, select the blue button " Download tool now", and then run the downloaded file MediaCretionTool.
At one time, when starting the MediaCreationTool utility, it was observed error 80072f76 0x20017. It was associated with “jambs” exclusively on the side of Microsoft and arose everywhere around the world right from September to December 2017. At the moment, the problem has been solved, but in such cases, you can use a “crutch” to download the Windows 10 image from the official site. You can download the top ten directly by replacing the user agent in the browser with Apple Safari. Everything is simple there: press F12 in the Edge browser - then go to the "Emulation" tab - change the user agent string to "Apple Safari (iPad)" - download the necessary images from Microsoft official website(described in more detail here in English). If you don’t have access to the Edge browser due to the absence of Windows 10 anywhere and you decide to trust me (by the way, it’s completely in vain - because you can’t trust anyone on the Internet), then here I have links to ISO files in the Mega cloud storage with the latest versions of Windows 10 for December 2017: 32 bit and 64 bit. I will say right away that downloading from there is likely to be slow. It is faster to use the method with the official website and change the agent in the browser. After downloading the ISO image with Windows 10 using any of the described methods, you need to create a bootable USB flash drive from this installation image. This can be done using the utility Rufus.
After that, it may take some time and the "Windows 10 Setup Program" will start. It will first prepare and then prompt you to accept the terms of the license. In the next step, the user is asked what he wants to do. We need " Create installation media". Next, select the language, architecture (32 or 64 bits) and release. If you plan to reinstall Windows on the same computer, then the most optimal option has already been selected by the program (check the box “Use the recommended settings for this computer”). Then select the media - USB. Well, in the next step, you need to specify which flash drive we will use for recording. Please note that all information on it will be deleted!

After that, Windows 10 starts loading. Depending on the speed of the Internet connection, this stage may turn out to be the longest - during it, an installation image of the operating system weighing about 3 GB is downloaded from the Microsoft servers. Then the download is checked for a while and the creation of the Windows 10 media begins. At the end of it, the program tells us that the USB flash drive is ready, and then, having deleted the data that is no longer needed, it closes.

The MediaCreationTool utility only starts, but is not installed on the computer, so after using it there is no need to remove it.
Clean install of Windows 10
Here we are ready for a complete reinstallation of Windows 10. Just in case, check if all the necessary personal files are copied from the computer to removable media and reboot the system.
Booting your computer from installation media
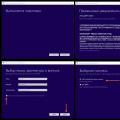
Now our task is not to let the machine boot from the hard drive, but to force it to boot from our installation flash drive. To do this, at the moment when the system starts and reports the possibility of choosing boot methods, you must press the button responsible for the Boot Menu (or Boot Agent, SetUp) - the choice of boot options (for reliability, it is better to press several times). The image below indicates that in this particular case, you need to press F12. The boot menu buttons differ depending on the manufacturer of the laptop or computer motherboard. Usually this is F12, but there are other options: F8, F9, F11, Esc, and so on.
If everything was done correctly, then the system will offer us an option from which media the computer should be loaded. You need to select your flash drive and press Enter. The figures below show two possible variants of the described events. Sometimes when you press the function button (for example, F9 on Asus laptops), the boot from the USB flash drive immediately starts without a selection list appearing. Since there are many computer manufacturers, there are too many ways to start installing Windows 10 from a USB flash drive to demonstrate everything. If something remains unclear, feel free to ask questions in the form of comments under the article.


Installing the Windows 10 operating system
After the computer has booted from the installation flash drive, the Windows 10 logo appears on the screen and after a while the installation begins. If necessary, change the default language, time and currency format, and keyboard layout. Then click "Install".

Soon the Windows 10 activation window appears. Select the item "I do not have a product key." If your system has already been activated on this computer, it will automatically receive activation after installation.
Select the installation type "Custom: Windows installation only (for advanced users)".

Before us appears a list of existing hard disk partitions. If you want to keep some section with personal files, leave it, delete the rest of the sections. To do this, select the section with a mouse click and click "Delete". At this stage, you can create two or three partitions of the desired size (for example, one for Windows 10 and programs, the second for personal files), but we recommend leaving one partition, that is, deleting everything that is. The fact is that for separate storage of personal files it is better to use a second physical hard drive, rather than a separate volume on an existing one.
We get up on "Unallocated space on the disk ..." and click "Next".
Begins reinstalling windows 10 clean. It has five stages: copying, preparing, installing components, then updating, and finally finishing.
After that, the computer restarts and the initial self-tuning of the installed operating system continues: services are started, devices are being prepared, etc.

Then the system prompts us to select the country where we are located and the keyboard layout.

It is proposed to add a second layout. Strictly speaking, it means third layout- English is always set by default, we have already chosen the second (Russian) at the previous stage, now you can put the third one, for example, German, French or Finnish. Skip this item if not needed.
After that, the system checks the Internet connection and updates. If your computer does not have a wired connection but has a Wi-Fi adapter, you are prompted to connect to an existing wireless network.
You can then sign in to your Microsoft account to use it instead of your traditional local Windows account. If you don't have an account, you can create one. To do this, you will need an email address and a password. The benefit of signing in with a Microsoft account is that some of your data and files are automatically synchronized. We will consider the option of creating offline account. Select the appropriate item at the bottom left.

Now we enter the username, and then we come up with a password (you can skip it - then there will be no password). If the login is protected by a password, then in order not to enter it every time, you can come up with a 4-digit pin code. Enter, confirm, click OK. This option is especially convenient for those who sign in to Windows 10 using a Microsoft account. This step can be skipped (the "Delay" button).

Now we need to select privacy options. Those who are afraid of surveillance by Microsoft (US authorities, the world behind the scenes, etc.) can turn off all items. We recommend disabling only "Speech Recognition" - this function still does not work in Russian yet.
After that, the system will talk to us a little more ("Hello", "Preparation is in progress for you", "This may take a few minutes", "Let's start!") And it will start - the desktop will appear.

It is possible that, as in the picture, you will see a message about searching for a video driver. It will be installed automatically, but until then the screen resolution will look unusual: fuzzy, with large elements. You don't have to be afraid of this. The question will immediately be asked whether to allow "other computers on this network to discover your PC." If you are connected to the Internet at home or at work, feel free to answer “Yes”, if on a public network, then no. To make it easier to understand what we are talking about, we inform you that this question is an analogue of such an installation message from the times of Windows 7.

Immediately after the first launch of a freshly installed Windows 10, we recommend that you check for available operating system updates. To do this, go to the "Settings" tool (gear icon in the Start menu), select "Update and security", then click "Check for updates". Further, in parallel with the process of downloading OS updates, you can proceed to install the necessary programs. By the way, this is very convenient to do using the Ninite.com website (this is not an advertisement - it's just really convenient). There you can select all the programs you need with checkboxes and download the installer at once (the “Get Your Ninite” button), which, after launch, will install them into the system without any unnecessary questions and, most importantly, without any spam add-ons.
Windows 10 (Microsoft's latest operating system) offers many improvements and features. With a focus on interaction, applications and data synchronization, it benefits not only ordinary users, but also business people.
However, even such an optimized OS is not immune to bugs, software failures, or malware attacks. For some reason, you probably have undesirable circumstances. Windows 10 is in an unusable state so now you need to reinstall it. Otherwise, you probably purchased new hardware or want to transfer data to a new system.
Reinstalling the system is a great way to remove "viruses". As a rule, Windows 10 is distributed bundled with laptops or compatible devices, where a large number of programs are installed. They only take up hard drive space and weaken the processing power of the device.
In any case, you need to reinstall the OS.
In order for the reinstallation to go smoothly, it is important to prepare the following:

A reinstall isn't all that different from a regular install. Put the items listed above in one place so that you do not have to search for them in the future.
Requirements for reinstalling Windows 10
Surely you want to install the system on a laptop / PC without an OS or upgrade from Windows 7 / 8.1. Whatever the reason, you must meet the Windows 10 requirements. Make sure your system meets the minimum standards.

Otherwise, reinstalling won't work:
- 0 GHz processor or faster;
- 1 GB RAM for 32-bit systems and 2 GB RAM for 64-bit;
- at least 16 GB of free hard disk space;
- broadband or wireless Internet (3 Mbps recommended);
- video card with support for DirectX 9 or higher;
- Microsoft account.
Questions about reinstallation
Before installation, you may have a few questions:
- I upgraded from Windows 7/8 for free. Can the system be reinstalled?
- Do I still need a product key?
- Can I still reactivate the OS?
If you managed to update the system to the latest version for free, then you can still reinstall it. When registering, Windows will still be recognized by Microsoft.
During offline activation, you only need a product key. When connected to the network, Windows 10 will register without your participation. This will not work if the key is not purchased.

Reactivation is also an automatic process. However, if you have made changes to the hardware, such as installing a new motherboard, then the version may not be valid.
Important! Before reinstalling the operating system, make sure that you have backed up all files and data (if possible).
Reinstalling Windows 10 from a flash drive
Previously, operating systems were installed from disk. Now the method using a bootable USB flash drive is popular. To do this, you will need a compatible USB drive with Windows 10 optimized on it.

It is important to note that simply installing Windows 10 on a USB device is not enough. When booting the BIOS before the actual installation, the system must be prepared and recognized.
You can also create an installation disk, but for now we'll focus on the USB drive.
Create an installation USB drive
Step 1. First you need to download the system image from the Microsoft website. But one ISO file is not enough. In order for the computer to be able to recognize and boot the system, you need to create an installation USB flash drive.

Step 2 To do this, download the Windows 10 ISO file as well as the Windows 10 Media Creation Tool.
Step 3. Connect the USB stick to the device you want to use for reinstallation.

Important! Make sure your flash drive has enough space (about 8 GB is recommended).
Step 4 Launch Media Creation Tool.
Important! All data on the flash drive will be deleted, so it is better to use a new one or an empty one.
- You will be presented with several options, one regarding the update and the other regarding preparing the USB. Click "Create Installation Media (USB Flash Drive, DVD or ISO)".

Click on "Create installation media (USB flash drive, DVD or ISO-f)", click "Next"
- Then decide on the version (64-bit or 32-bit) and system language.

- Next, select the USB drive connected to the computer. Once the process is complete, the tool will automatically select the options that are right for you.
- In the new window, select the "USB Flash Drive" device.

- First, all files will be downloaded, and then the process of unpacking and creating a bootable flash drive will begin. The download time of the image depends on the speed of your Internet.

It's time to reinstall Windows 10
Step 1. You will need to boot from a USB stick. To do this, make sure it is connected. Restart (or power on) the system you want to reinstall. To do this, go to the BIOS. To get there, quickly press the F8 key or one of the suggested ones at boot (F12, F10, F2). As a rule, it can be found at the bottom of the screen. The number depends on the motherboard.

Step 2 This will open the BIOS screen. Again, depending on the motherboard and hardware specifications, it may vary slightly. However, all BIOSes have common kernel parameters:

Step 3 Depending on your setup, you will see a number of options. For example, when installing Windows 10 on brand new hardware, you will be prompted to enter a registration key. However, since we are reinstalling the system, we must select "I do not have a product key". Activation will occur after the OS is installed.


Step 4 During installation, you will see several screens where you need to select the correct options. When a window appears with a choice of installation type, click "Custom". This is done because we are not updating, but completely reinstalling the system.

Step 5 You will then be able to select the primary partition where Windows will be installed. Suppose you want to overwrite and delete all previous data. Hence, format the current partition.

Step 6 The installation process will continue until the login screen appears. If you have created a password, enter it now. If not, then you will be taken to the main desktop.


Step 7 When you connect to the Internet, Windows 10 should register automatically. Otherwise, you will have to enter your product key when prompted. If you have already done this before but cannot activate the system, then you installed it with incorrect settings or changed the assigned hardware, such as the motherboard.
Step 8 If the version of Windows is correct (Pro or Home) and there are no problems, but it is not activated yet, the Microsoft servers may be busy. To solve the problem, try restarting your device (we recommend checking if the download is stuck).

Step 9 If you are still unable to activate Windows 10, either due to an error or due to other hardware, then contact Microsoft Support for assistance.
Important! You can also activate using the following command on the command line (leave the brackets): "slmgr.vbs/ato". It restarts the activation request, asks for a product key and stuff like that.
Congratulations! You have successfully reinstalled the OS using the flash drive as bootable media.
Video - The easiest way to reinstall Windows 10
Sooner or later, the Windows operating system has to be reinstalled. Even if you use a reliable antivirus and watch what you run on your computer, reinstalling Windows is still inevitable. In this article, we will walk you through the process of reinstalling Windows 10.
The whole process of reinstalling Windows 10 can be divided into several stages:
- creating a boot disk (if you don't have one);
- booting a computer from a Windows 10 disk;
- directly the process of reinstalling Windows.
Create a boot disk to reinstall Windows 10
In order to reinstall Windows 10, you need a boot disk with this operating system. If you already have such a disk, then you can skip this step.
So, in order to prepare a boot disk you need two things:
- disk image with Windows 10 in ISO format;
- program for burning disk images;

Once you have entered the BIOS settings, you need to go to the BOOT (Download) section.

And then go to the subsection responsible for the boot order. Usually this section is called "Boot Device Priority".

Next, you will see a list of three or more items: 1st Boot Device, 2nd Boot Device, 3rd Boot Device, and so on. Opposite each of the items will indicate which device is being loaded at this stage.

We want to boot from disk first. Therefore, here you need to open the 1st Boot Device item and change its value to CDROM.

After that, you can save the settings and exit the BIOS. In most cases, this can be done by pressing the F10 key.

We press any key and wait until the installer appears on the screen, with which we can start.
Reinstalling Windows 10
The next step is directly reinstalling Windows 10 itself. After booting from the disk, a window should appear on the screen with a choice of regional settings. Here you need to specify the language of the operating system that you want to get after reinstallation, as well as the time format and keyboard layout. After selecting these options, click on the Next button.


The next step is to choose the installation method: or full installation. If you are reinstalling Windows 10 from scratch, then you need to choose the second option. If you are upgrading from an older version of Windows to Windows 10, choose the first option accordingly.

Next, you will see a window with a list of partitions on your hard drive. If you are reinstalling, you should already have at least two partitions. Select the one on which the operating system is installed and click on the "Format" button.

After formatting, click on the "Next" button. At the same time, at the moment you click on the “Next” button, the partition that we just formatted should be selected.

Next, a window will appear informing you that the files are being copied. Wait a moment while the installer copies the files and restarts your computer. After the reboot, the screen will again show “Press any key to boot from CD or DVD”, but in this case, you do not need to press anything. Just wait until the computer boots up by itself.
After the computer boots up, the initial setup window will appear on the screen. Here you can select "Use express settings" and "Customize". If you use the “Use express settings” option, the system will apply the standard settings and will not ask any questions. If you select "Customize", then you can configure everything manually. We'll choose "Use express settings" since this option will work for most users.

After clicking on the “Use express settings” button, you will see a form for entering the login and password from your Microsoft account. Since you are reinstalling Windows 10, you should already have this account. Enter your username and password and click on the "Next" button. If you don't have an account, you can register it. To do this, click on the "Create a new account" link.

After entering your username and password, you will be prompted to protect your account. You can skip this step by clicking on the "I can't do this right now" link.


And after a few minutes, the Windows 10 desktop will open in front of you.

That's it, the reinstallation of Windows 10 is over. You can start installing the necessary programs and setting up the system.
Installing each new edition of Windows is easier than the previous one and requires less and less effort from the user. With the release of Windows 10, this task has not been further simplified: now, to install an operating system on a computer, you do not need any special knowledge and ingenious applications. You don’t even need a Windows distribution kit - the installer “learned” to download it itself. She herself creates installation media - a DVD-ROM or USB flash drive. The user can only respond to requests and follow instructions that are understandable even to those who do it for the first time.
Today we will tell you how to clean install Windows 10 on any laptop and desktop PC. A clean install is the installation of an operating system on media that does not have an operating system (for example, on a new computer or a formatted hard drive). Or where it is, but is subject to a complete overwrite without saving the installed software, accounts and settings. By the way, don't worry about the license: if you install a system instead of a legally activated one, you can save it. And we will not hide from you what needs to be done for this.
What you need
- Bootable media for recording a Windows 10 distribution. It can be a USB flash drive of 3 GB or more, a DVD, a portable or internal hard drive. Since the vast majority of users prefer to install Windows from a flash drive, consider this method as the main one.
- or set of files.
- Utility for transferring system files to installation media. If you are going to install Windows 10 on a PC with UEFI (advanced "BIOS"), you can do without it - just copy the distribution files and folders to a USB flash drive. By the way, in Windows 8 and 10, the ISO image can be opened in Explorer as a regular folder, but in earlier systems, this will require a special application, for example, any archiver program.
- The computer on which you will prepare the bootable flash drive.
Cooking a flash drive
If you do not have a pre-prepared "dozens" distribution kit, it is easier and more convenient to entrust downloading it to the Microsoft Media Creation Tools utility and burn it to a USB flash drive or DVD with its help.

The utility does not require installation on a PC, just run it with administrator rights.
After launching Media Creation Tools:
- In the "License Terms" window, click "Accept".

- To the question "What do you want to do?" we answer: "Create media for another computer."

- In the "Options selection" section, we determine the system language, edition ("home for one PC" or "Windows 10") and architecture (bit depth) - 64 or 32. If the selection options are inactive, the "Use recommended settings" checkbox should be unchecked.

- Next, select the drive: USB - to create a bootable flash drive, or an ISO file - to download the image, which you will later burn to DVD.

- After selecting the USB device, click "Next" and wait 30-50 minutes while the program downloads the distribution and creates the installation media. At this time, the computer is available for use.

- You will be informed that it is time to proceed with the installation by the message: “USB flash memory device is ready”.

If you downloaded the distribution beforehand or don't have stable Internet access, use other tools to create Windows 10 installation media. For example:
- Rufus. Works without installation. To write the operating system to a USB flash drive, you just need to specify the location of the distribution, as well as determine the partition scheme and type of system interface: MBR for computers with BIOS (old), GPT for computers with UEFI (new, released after 2013) or MBR for computers with UEFI ( if the PC with UEFI has disks marked according to the MBR standard).

- . This utility is as simple as Rufus. In the "Add to USB disk" section, just check the "Windows Vista / 7/8/10, etc." item, specify the path to the Windows 10 image and click the "Go" button.

- Windows 7 USB/DVD Download Tool . This proprietary Microsoft utility is able to transfer all versions of Windows, starting with the "seven", to USB flash drives and DVDs, in just 4 steps.

In addition to these, there are many other free utilities for creating installation media. You can use any - the result will be the same.
Starting the installation
Installation launch options
Starting the installation of Windows 10 is possible in two ways:
- From under a running system. It can be used if you plan to reinstall it or install the "ten" from scratch to another partition of the disk.
- When booting from the installation media (via BIOS). A universal option that is suitable for installing the system on a new computer, and for reinstalling an old copy of Windows.
If you choose the first option, open the boot disk or USB flash drive in Explorer and run the Setup.exe file.

If you select the second one, boot your computer from the installation media.
How to boot a PC or laptop from a USB flash drive
The BIOS Setup utility has a different interface on different computers. To enter it, immediately after turning on the machine and the manufacturer's splash screen appears on the screen, press a certain key. Which one is usually indicated at the bottom of the splash screen. Most often it is Delete, F2 and Escape, sometimes F1, F3, F10, F12 or a combination of several keys.
After opening the utility, go to the "Boot" section (Download). In the version of the BIOS Setup Utility shown in the screenshot, this is a separate tab in the top menu.

In other versions, it does not exist as such, and the necessary settings are collected in the "Advanced Bios Features" section. In order not to confuse anything at the most crucial moment, study the BIOS interface of your computer in advance and figure out what and where is located.
In the "Boot" section, you will see a list of devices from which the machine can boot. In the first place is usually the hard drive. You need to make sure that, first of all, the computer checks the boot files not on it, but on the USB flash drive. To do this, using the arrow keys, as well as F5, F6, plus and minus (the hint is located in the right half of the BIOS window), raise the USB device to the top of the list. Press F10 to save the setting and exit the utility.
In graphical versions of UEFI, you do not need to change the device order, just click on the USB device. After that, the PC will restart and start loading from the selected media.

The main part of the installation
Most of the Windows 10 installation process takes place without the active participation of the user. You will have to work only at the beginning and a little at the end.
So, the first thing you have to do is select the language of the operating system, time formats, currency units and the main keyboard layout. If you downloaded the Russian-language version of Windows, the Russian language will be here by default.

After defining the language settings, click the "Install" button.

Accept the license terms. To move on to the next task now and later, click the "Next" button.

Now you need to determine the type of installation - as an update or "custom" (in previous versions it was called "clean"). We, accordingly, need the second type.

Let's move on to choosing a place where the new Windows will "settle". If the hard disk is not partitioned or you want to change their proportions, select the desired area of the disk and click "Create".

In the "Size" field, specify the number of megabytes that you allocate for the system partition. Windows 10 64-bit requires at least 32 GB. Click Apply. If necessary, create other partitions in the same way, then format them.
Attention! If you want to install the system while maintaining the license, do not format the disk, but install it in the same partition where the previous one is located - the activated copy of Windows. The second important factor in maintaining activation is that the new system must be the same version as the old one. If you install Windows 10 Ultimate instead of Home, you will not be able to do without losing your license!

After finishing working with the disk, you can relax - the next 40-60 minutes the process will go on without your participation. If you want, just watch him.
Approximately 1/4 of the time will take copying files.

The computer will then restart and continue with the installation. Most of the time, the Windows logo will hang on the screen and the “wheel” will rotate. The status of the process can be understood from the messages at the bottom of the screen.

It's time to move on to action again, because the end of the installation is nearing. When you see a suggestion to increase the speed of work, click the "Use default settings" button. You can change them later if you wish.


After the upgrade, you will need to create the first user account. By default, it will be assigned administrative rights. Everything is simple here - enter a username and enter, if necessary, a password.


Finally - the long-awaited desktop. Everything is ready, the installation of Windows 10 is finished. We hope it didn’t tire you too much, because now you have to set up the network, design the desktop, install applications and other pleasant chores to “settle in” the new OS.

If during the installation Windows did not require you to enter a license key, check if the activation is in place. Open the context menu of the Start button and go to System Settings.

Activation information is located at the bottom of the basic computer information window. In our example, it was not completed, since the "ten" was installed in the virtual machine from scratch.

If you were able to reinstall while keeping the license, you can delete the C:\Windows.old folder, which contains the files of the previous copy of the system. They are no longer needed - the activation information has been successfully transferred to the new one.
How to install a system from a hard drive
There are situations when neither flash drives nor DVDs are at hand. In a word, nothing but the hard drive of the same computer on which you want to install Windows 10.
To install "tens" from the hard drive, 3 conditions must be met:
- Have a distribution. More convenient - in the form of a set of files and folders. If you have only an ISO image, you will have to unpack it, for example, using an archiver application (WinRAR, 7-zip and analogues) or Windows Explorer (only in the "eight" and "ten").
- Have an additional partition on the hard drive with a capacity of 3 GB or more. Preferably free.
- The computer must boot from the same disk. If not, you'll need a Live CD/Live USB (portable operating system) media like BartPE, Alkid Live CD, etc. You can easily find images of these on the web.
The hard drive, or rather its additional partition, will serve as the carrier of the installation files. You will need an operating system to copy the distribution and create its bootloader.
Installation order
- Boot your computer from your hard drive or portable OS media.
- Copy the files and folders of the Windows 10 distribution to the root of the additional partition (not the one where the system will be installed).

- Rename the boot file (bootmgr) to "Win10" for example. The length of his name should not exceed 5 characters.

Now you have to create a distribution bootloader using the BootICE utility. You can use other boot management tools instead, but we chose BootICE because we think it's the easiest and most convenient tool.
- Run the utility (it does not require installation). In the "Physical disk" section, select the computer's hard drive from the "Destination disc" list. Click the "Manage MBR" (Process MBR) button.

- Check the "Grub4DOS" box and click "Install/Configuration".

- In the "Rename GRLDR" section, write down the new name of the Windows 10 boot file (as you remember, we named it "Win10") and click "Save to disk" (Save to disk). Click OK on the message that the bootloader was successfully created and close the utility.

It remains to restart the computer. At the next start, the Windows 10 setup program will take control, and then it will be the same as when installing the system from a USB flash drive.
10. Possible reasons why it may be required: the desire to clean the system, damage to important files, unrecoverable problems, virus threats, and so on. There are two main ways to reinstall Windows 10: a clean reinstall or a recovery option.
PC recovery
This option is suitable for owners of branded computers. The bottom line is that the manufacturer left a recovery partition on the hard drive. It contains all the necessary system files, programs and components.
Included with the PC must be accompanied by an installation disk, with which it is possible to restore the OS. A special utility for this can also be downloaded from the official website of the developer. It should be understood that the programs are different for different brands of computer.
If you have such a disc, simply insert it into the DVD-ROM and reboot your system. The reinstallation procedure will automatically start, just follow the prompts on the screen.
In addition, Windows 10 has a built-in reset function with two modes: with the removal or preservation of user data. You can find it in PC settings. Open the Start menu and click on the gear icon. Go to Update & Security - Recovery. In the right block of the screen, click on "Start".

When you activate it, you need to understand that the computer will erase all system data and update the OS. During the installation procedure, do not restart or turn off the computer (it may restart itself along the way - this is normal), as this may disrupt the recovery process.

Clean reinstall
This method should be resorted to if there is no proprietary disk or utility for restoring the OS and the option of reinstalling using Win's internal tools is not possible. It is only suitable for advanced users.
To perform this method, you will need to create a boot disk or flash drive. Therefore, initially you need to find and download the system image, and then mount it on the media.

Microsoft has a special utility for this - Media Creation Tool. You can download it on the official website www.microsoft.com/ru-ru/software-download/windows10. Select the second launch option by first inserting a disk or USB flash drive into your computer. The media must have at least 5 GB of space, it must first be formatted.

When the image is mounted, restart the computer and enter the BIOS (click Delete on the keyboard when the image appears on the monitor). There you need to find the boot option (boot priority), usually it is in advanced settings (advanced). In different bios, its location is different. See your motherboard manual for details. Set the options to start from the drive and save the settings. Then restart your computer, after a while the installation of the system will begin. In the process, you need to completely clean up the system disk, otherwise there will be 2 versions of the OS on the PC.

Actions after the first start of the system
Performing one of the Windows cleaning methods will format all system data. This will be followed by the first start of the computer, at which time it will configure various settings. This will take some time, please wait until the end.
Steps to follow in case of PC recovery:
- Clean Win from unnecessary programs. The fact is that the system will have original software from the computer developer, a certain part of which will be unnecessary for the user, but will hang at startup, taking up RAM and space on the system disk.
- Update drivers to the latest versions. When restoring the system with a special utility, all the necessary drivers are installed by default. But their version will be outdated, so an update is required. The latest drivers can be downloaded from the official website of the manufacturer.
Steps to follow in case of a clean installation of Windows:
- Download all the programs used, configure the system as you wish.
- Install the latest hardware drivers.
 How to reinstall Windows: step by step instructions
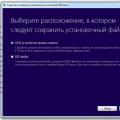 Reinstall windows 8 from flash drive on laptop
 Unable to find recovery environment