How to install windows 8.1 on an old computer. We use third-party programs for recording
In this article, we will discuss the question of how to install Windows 8 from a disk. There is nothing complicated here, but sometimes there are certain difficulties. In order not to get into a hopeless situation, carefully read the article. Here we will look at all the problems that may arise when installing Windows 8 on a computer on which the "seven" or older versions of the OS were previously installed.
Before proceeding with the installation, we need to prepare the computer. First of all, we must have a bootable DVD. If we are talking about a laptop, then you can enable booting from disk by simply pressing the "Esc" key and selecting the appropriate device. If the system is installed on a desktop computer, then in the BIOS it is necessary to set the initial boot from the DVD. This option is located in the "Boot" section. .
So, we have a disk, in the BIOS we have enabled booting from a disk, now we can proceed to the installation.
Also, do not forget about the license key, which we will need in the process. If you bought it remotely via the Internet, then do not forget to rewrite it so that it can be accessed during the installation process.
Create Bootable DVD in Windows 7 USB DVD Download Tool: Video
Installing Windows 8
It is worth noting that installing Windows 8 from a disk is performed in the same way. Therefore, the rules described below will work in any case. Insert the disc into the drive and restart the computer. Due to the fact that we have set the BIOS to boot from the disk, the computer will not boot the operating system, but will immediately start working with the disk. In some cases, this action must be confirmed by pressing the "Enter" key. Just keep a close eye on the screen.
So, if you did everything correctly, the system will automatically start the installation. And first of all, as in all previous versions of the OS, we will be asked to specify the installation language, keyboard and currency. That is, if you need the Russian version, then in three points you select "Russian". If you need another language. Then choose the appropriate options. We press "Next".


Next, a window will appear in which you should click the "Install" button. It is located almost in the very center of the screen, so you will not be able to miss it. After that, the inscription "Starting installation" will appear.

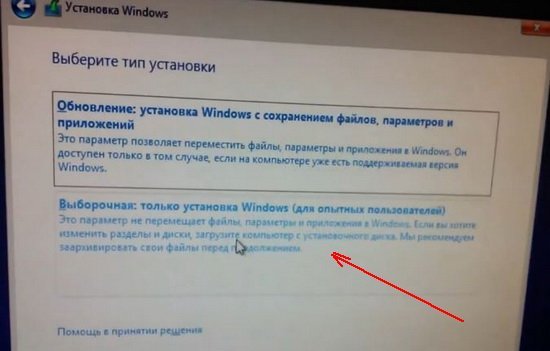
In the next step, we will have to choose between two options:
- - This is an option for those who use previous versions of the OS and do not want to lose data. In this case, Windows will be updated to the new version.
- Custom installation (or full installation) is an option for those who do not need to save anything. In this case, you will get a clean operating system.
We choose the second option.

How to install Windows 8 from CD / DVD disc: Video
Selecting and working with hard drives
It is worth noting that if your hard drive does not have important data, it is recommended to format it. You can also perform the following operations in this menu:
- Delete and create sections.
- Format.
- Perform conversion and so on.

But all these actions will delete all data on the drive. If your hard drive has only one partition, then it is recommended to split it into at least two volumes. One is required to install the operating system, and the second is for storing files, installing games, and so on. To do this, click the "Disk Settings" button. Several additional features will appear. Now, select our hard drive and click "Delete".
Now we have an unallocated area. Select it and click "Create" A window will appear below, in which you can specify the volume of the volume to be created. It is measured in megabytes. Create a 60000 MB partition and click Apply. This will be the system partition where we will install Windows 8.
Of course, it will require less memory, but in the process of using it, you will install various programs, as well as service packs, which also require additional disk space. If you completely take up all the space on the system partition, then the performance of your computer will decrease significantly. When creating the first volume, the system will automatically create an additional 350 MB boot partition.
Click the "Create" button and immediately "Apply". Thus, we will collect all the remaining unallocated area into the second partition, in which you will store all your data. Next, select a partition with a size of 60 GB and click "Next". Everything, after that, copying and preparing files, installing components and updates, and so on will begin.

Continued installation
Everything will happen automatically. The computer will restart several times during the process. It is worth noting that after the first reboot, you should enter the BIOS and return the primary boot from the hard drive where we selected CDDVD in the BOOT section. The fact is that in some cases, after the first reboot during the installation process, the system will boot from the disk again, and the copying of files will start again.
So, after the process of copying and installing files is completed, we move on to the next step. Here we need to set up our computer. And first of all, you need to enter the name of the computer, as well as select the preferred color scheme for the windows. Next, we can apply the standard settings or enter them manually. Here you choose the most convenient option. More experienced users set everything up manually. If you are not an advanced user, it is recommended that you select the default options. It is worth noting that everything that is configured here, you can change at any time during the use of the OS.
Next, the system will ask us to enter . In this OS, these fields are required, unlike previous versions. Enter your name and create a password. When setting up your desktop, carefully read the prompts on the screen, and you will not have any difficulties. And this completes the installation process. Now you know how to install Windows 8 from a disc.
Windows cannot be installed on this disk GPT: Video
Microsoft releases new versions of operating systems with new features quite regularly, and therefore it is not surprising that many users want to upgrade or even completely reinstall Windows. Most people think that installing a new OS is difficult and problematic. In fact, this is not the case, and in this article we will look at how to install Windows 8 from a USB flash drive from scratch.
Attention!
Before you do anything, make sure that you have duplicated all valuable information in the cloud, external media, or just another drive. After all, after reinstalling the system on a laptop or computer, nothing will be saved, at least on the system disk.
Before you start doing anything, you need to create an installation USB flash drive. You can do this with the help of a wonderful program. Just download the required version of Windows and burn the image to a USB flash drive using the specified program. For more information on how to do this, see the following article:
Installing Windows 8 from a USB flash drive is no different from that from a disk. In general, the whole process should not cause any difficulties for the user, because Microsoft made sure that everything was simple and clear. And at the same time, if you are not confident in your abilities, we recommend that you contact a more experienced user.

Now you can work with the brand new Windows 8. Of course, there is still a lot to be done: install the necessary drivers, set up an Internet connection, and generally download the necessary programs. But the most important thing we have done is to install Windows.
You can find drivers on the official website of your device manufacturer. But also special programs can do it for you. Agree, this will save you a lot of time, as well as select the necessary software specifically for your laptop or PC. You can view all the programs for installing drivers at this link:
You will also need a web browser to surf the Internet. There are also many such programs and, most likely, you have heard only about the main ones.
Introducing a guide to installing Windows 8.1 Professional from a USB flash drive. This is done very simply: all steps take place automatically, the user only needs to select a section for the system and enter personal data. However, even such a simple procedure has its own nuances, which we will discuss later.
First you need to know its system requirements:
Windows 8.1 system requirements
- Processor with a clock frequency of at least 1 GHz. It must support PAE, NX, and SIMD (These are features of the processor that provide increased performance. They are needed for the correct operation of the latest generation operating systems).
- RAM - at least 1 GB for a 32-bit system. For 64-bit versions, you will need at least 2 GB of RAM. Free space on the hard drive - at least 16 GB (for x64 version - at least 20 GB). These numbers correspond to a "clean" OS, that is, without any built-in software. The more of it, the better.
- Video card with at least 128 MB of memory and support for Dirext X (version 9.0 or later). Such data is only needed to activate the Aero visual theme. If your computer has an integrated (built-in) video card, then you need to set the maximum performance in the BIOS settings. It borrows video memory from RAM.
- Free USB input.
- Internet access (optional). You will need it for activation, as well as for automatic download of updates. In its absence, you can postpone this setting.
The whole process for convenience is divided into 2 stages. At the first stage, we will consider preparing for installation (or reinstallation), we will create a bootable USB flash drive. On the second, we will work with the installer.
Stage 1. Preparation
Create a bootable flash drive
Download the image of Windows 8.1 we need:
What are these images?
These are original MSDN images downloaded from the official microsoft site. The only change is the ability to select the edition of the system during installation is unlocked. No files are affected, the system is not activated.
We write the desired one to an empty USB flash drive, following the instructions from
We save important data
Before starting the installation, you need to perform a few simple steps:
- Create important data.
- Just in case, find discs with drivers in old boxes. If you have any non-standard equipment (for example, a steering wheel), then you should make sure that the drivers for it are compatible with Windows 8.
Set the boot order in the BIOS
BIOS is a program built into the motherboard that allows you to control certain parameters of the PC hardware. It allows you to set the main parameters even in the absence of an installed OS. So, to run the Windows 8.1 setup program, you need to. To get into the BIOS, you must immediately press a certain key after turning it on. Usually this is F2 or Del, but there may be other options (F8-F12, Esc and others). Some Lenovo laptops have a special round button to enter the BIOS (has a logo with an arrow).
Once in the menu, you need to change the device boot priority:
- Use the arrows to open the item Boot. Inside it we choose device priority.
- The boot priority menu will open. Most likely in the first place will be indicated hard drive.
- We need to place the selected media (CD or flash drive) in the first place. To do this, use the Enter key and the up and down arrows.
- At the end, select "Save and exit" for the changes to take effect.
Stage 2. Installation
All the preliminary stages have been passed, the turn of the decisive chord has come. Now let's take a look at the steps on how to install Windows 8.1. It should be noted right away that the process of installing the OS has been greatly simplified, almost all stages are performed automatically.
Step #1. We insert the USB flash drive into the USB port, reboot. During boot, a message with the following content should appear on the screen: “Press any key to boot”. It means that you need to press any key (this should be done quickly). If everything is fine, the Windows icon will appear.
Please note: if such a message does not appear, there may be two reasons: the boot order is incorrectly specified, or the flash drive was recorded with errors.
Step #2. Language settings. The first point is the language of the system. The second is the format in which the time and currency will be displayed. The third is the keyboard input method. Everywhere we expose Russian and click "Next".
Step #3. Installation start. A window will appear in which you need to click the "Install" button. Also in this section, you can restore the system by clicking on the corresponding button in the lower left corner.
Step #3. Windows edition choice. Select the version for which you have an activation key. If there is no key, choose professional - we will activate later.
Step number 4. We agree to the terms of the license. It may differ depending on the build, so it's worth reading. Then click "Next".
Step number 5. Type of instalation. We select a custom installation, specify all the parameters manually and format the disk. As a result, we get a clean system without any garbage.
Step number 6. Disk layout. A window for selecting a partition to install will appear. This is the most important step, so let's take a closer look at it. Again, make sure you back up your important files.
Step #6.1 When installing on a new drive. Consider the case when you are installing Windows on a new computer or laptop with an unpartitioned hard drive.
1. Let's create a partition for installing the system. Size - not less than 30 GB. To the question " To ensure that all of its features work correctly, Windows may create additional partitions for system files.» we answer "OK".

2. Let's create a partition for storing data. This will be the D: drive. During the next system reinstallation, all files on this disk will be preserved. Therefore, photos, movies and favorite music are stored on the D: drive, and not on the desktop 🙂

3. Select the partition for installing the system (the future C: drive), click next.

Step 6.2. When reinstalling. In the case of reinstalling Windows, simply format the partition of the old system and install the new one there. This will remove all files, including viruses. To the question that formatting will destroy all data, we answer “Ok”. We do not touch the “Reserved by the system” section.


Step number 8. Key entry. If it exists, enter it. If not, click the Skip button.


Step number 10. Network connection. The system will then prompt you to connect to a wireless network. If it exists, connect. To do this, click on the network name, and enter its password. Otherwise, select the "connect later" option. In our case, this window did not appear, because the computer is connected to the Internet via a local network (via a router).
Step number 11. Settings. In the next window, click on the "Configure" button and set everything as in this slide:


Step number 12. Microsoft account. Select "Create a new account".

Step number 13. Select "Sign in without a Microsoft account". For authorization in the system, you must create a local account.
Step number 14. Entering a username and password. The password can be set later, we will enter only the username. Preferably in Latin.

Step number 15. We are waiting for the installation to finish. The system will perform initial settings, install critical updates, and reboot several times.


Congratulations, Windows 8 is installed!

In the side menu, you can go to the "Options" item and change some of the settings that were selected during installation. As you can see, the installation process is very simple and anyone can handle it. Finally, make a backup of the system as often as possible so that in case of unforeseen errors, return it to working condition. You just have to activate the system, install the drivers and the necessary programs, with detailed instructions.
Good day!
The whole process, conditionally, can be divided into 3 stages: this is the preparation of a bootable flash drive; bios setting; and the installation itself. In principle, this article will be built ...
Before installation: save all important files and documents to other media (flash drives, hard drives). If your hard drive is divided into 2 partitions, then you can C copy files to local drive D (during installation, they usually format only the system partition C, on which the OS was previously installed).

An experimental laptop for installing Windows 8.1.
1. Create a bootable USB flash drive with Windows 8.1
The principle of creating a bootable USB flash drive with Windows 8.1 is no different from creating a USB flash drive with Windows 7 (this was discussed earlier).
What do you need: an image with Windows 8.1 (more details), a flash drive from 8 GB (the image simply may not fit on a smaller one), a recording utility.

Flash drive used - Kingston Data Traveler 8Gb. Been sitting on a shelf for a long time...
As for the recording utility, it is best to use one of the two:, UltraIso. In this article, we will look at how to create a bootable USB flash drive in the Windows 7 USB / DVD download tool.
2) Run the utility and select the ISO disk image with Windows 8 that you are going to install. Then the utility will ask you to specify the flash drive and confirm the entry (by the way, the data from the flash drive will be deleted).

3) In general, wait for a message that the bootable flash drive has been successfully created (Status: Backup completed - see the screenshot below). It takes approximately 10-15 minutes in time.

2. Setting the bios of an Acer Aspire laptop to boot from a USB flash drive
By default, usually, in many versions of Bios, booting from a USB flash drive in "boot priority" is in the penultimate places. Therefore, the laptop first tries to boot from the hard drive and simply does not reach the verification of the boot records of the flash drive. We need to change the boot priority and make sure that the laptop first checks the USB flash drive and tries to boot from it, and then only reaches the hard drive. How to do it?
1) Go to bios settings.
To do this, take a close look at the laptop's welcome window when you turn it on. The first "black" screen always shows the button to enter the settings. Usually this button is "F2" (or "Delete").
By the way, before turning on (or rebooting) the laptop, it is advisable to insert the USB flash drive into the USB connector (so you can clearly see which line you need to move).

To enter the Bios settings, you need to press the F2 button - see the lower left corner.
2) Go to the Boot section and change the priority.
By default, the Boot partition is the following picture.

Boot partition, Acer Aspire laptop.
We need the line with our flash drive (USB HDD: Kingston Data Traveler 2.0) to be in the first place (see screenshot below). To move the line in the menu, the buttons are indicated on the right (in my case, F5 and F6).

The settings made to the Boot section.
After that, just save the settings you have made and exit Bios (look for the Save and Exit inscription at the bottom of the window). The laptop goes to reboot, after which the installation of Windows 8.1 will begin ...
3. Install Windows 8.1
If the boot from the flash drive was successful, then the first thing you will see is most likely a Windows 8.1 welcome and a prompt to start the installation process (depending on your installation disk image).

In general, you agree with everything, select the installation language "Russian" and click next until you see the "installation type" window.
Here it is important to choose the second point " Custom - Installing Windows for Advanced Users«.
1. If you have a new hard drive and there is no data on it yet, create 2 partitions on it: one system partition 50-100 GB, and the second one local for various data (music, games, documents, etc.). In the case of problems and reinstallations of Windows - you will only lose information from the system partition C - and on the local drive D - everything will remain safe and sound.
2. If you have an old disk and it was divided into 2 parts (drives C with the system and drive D - local) - then format (as I do in the picture below) the system partition and select it as the installation of Windows 8.1. Attention - all data on it will be deleted! Save all the necessary information from it in advance.
3. If you have one partition on which Windows was installed before and all your files are located on it, you should probably think about formatting and partitioning the disk into 2 partitions ( data will be deleted, you must first save). Or - create another partition without formatting due to free disk space (some utilities can do this).
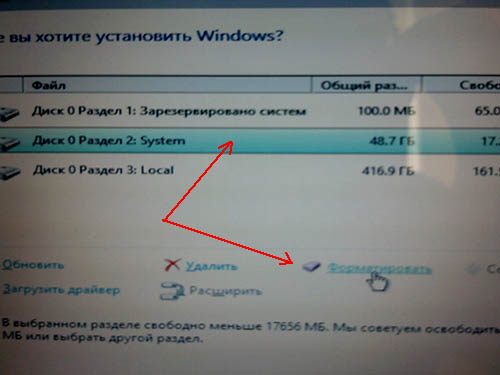
Formatting the system partition of the hard drive.
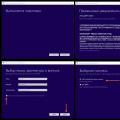
After selecting a partition for installation, the Windows installation process itself takes place - copying the files, unpacking them and preparing to set up the laptop.

The fact is that after a reboot, the laptop will again start booting from the USB flash drive, and not from the hard drive where the installation files were copied. Those. the installation process will start from the very beginning - again you will need to select the installation language, disk partition, etc., and we do not need a new installation, but its continuation…

We take out the flash drive from the usb port.
After the reboot, Windows 8.1 will continue with the installation and start customizing the laptop for you. Here, as a rule, there are never any problems - you will need to enter the computer name, choose which network you want to connect to, set up an account, etc. You can skip some of the steps and proceed to their settings after the installation process.

Network setup when installing Windows 8.1.
In general, after 10-15 minutes, after Windows 8.1 is configured, you will see the usual “desktop”, “my computer”, etc. ...

"My Computer" in Windows 8.1 is now "This PC".
4. Finding and installing laptop drivers
There are no drivers for the Acer Aspire 5552G laptop for Windows 8.1 on the official website. But really, it's not a big problem...
How to use this package:
1. Download and install the program (or similar for opening ISO images);
2. Download the Driver Pack Solution disk image (the package weighs a lot - 7-8 GB, but you download it once and will always be at hand);
3. Open the image in Daemon Tools (or any other);
4. Run the program from the disk image - it scans your laptop and offers to install a list of missing drivers and important programs. For example, I just press the green button - update all drivers and programs(see screenshot below).

Installing drivers from Driver Pack Solution.
What is the advantage of Windows 8.1 over Windows 7? Personally, I did not notice a single plus - except for higher system requirements ...
Installing an operating system from a USB flash drive includes three main steps: preparing a bootable USB flash drive (or flash drive) by writing all the necessary files to it to boot the system, enabling boot from USB media in the BIOS of the computer, and then directly installing the operating system from external media.
For a long time, Windows users have known that preparing a bootable flash drive is a relatively easy procedure if you know a thing or two about working in the command line (Command Prompt). Since not every user is well versed in this mode, in our article we are going to tell you two ways to install the Windows 8.1 operating system step by step from a USB flash drive.
The first method involves creating a bootable USB flash drive with Windows 8.1 using third-party programs, and the second method is suitable for those users who do not want to use additional programs and are ready to work on the command line. It should be noted that both methods are good for installing 32-bit and 64-bit versions of the operating system.
Method 1: create a bootable USB flash drive through an additional program
Note: this guide prepares a bootable USB flash drive for installing Windows 8, but it is also suitable for creating a USB flash drive with Windows 7.
Although there are a large number of programs available today to accomplish this task, including Microsoft's own product Windows 7 USB/DVD Download Tool, we prefer to use Rufus software, the best utility for the job.
Step 1: connect to the computer the USB flash drive from which you want to subsequently install the operating system and make a backup copy of all the data recorded on it on a local disk. This must be done, because during the process of creating a boot sector, all data on the media will be destroyed during formatting.
Step 2: Go to and download the latest Rufus utility. The file size does not exceed 0.5 megabytes.
Step 3: Double click on the downloaded Rufus.exe file to run the utility (no installation required). Next, you will see a small dialog box that asks if you need to check for program updates every time: “Do you want to allow Rufus to check for application updates?”. Click "Yes" or "No" to continue.
Step 4: Select your flash drive from the drop-down menu, then select the disk partition management section "Partition scheme and target system type" and set the target system type to the standard MBR partition table type (suitable for PCs with BIOS or UEFI) "MBR partition scheme for BIOS or UEFI computers", and then select the file system type in the "File system" section - NTFS.
Note: if you are preparing a bootable USB flash drive only for a UEFI PC, then you will need to select the disk partition type "Partition scheme and target system type as GPT partition scheme for UEFI computer" and the file system type "FAT32". Don't forget that UEFI doesn't support the 32-bit version of Windows 8.1 at all.
Step 5: Make sure "Create a bootable disk" option is enabled, then select "Create a disk from ISO Image" option and click CD/DVD icon to specify the path to Windows 8.1 ISO file. If you already have a Windows 8.1 DVD ready, we recommend that you use method number 2 below.
Step 6: That's it! Your bootable USB flash drive is ready to use. Now you can connect it to your computer, enable boot from external media in the BIOS, and start installing Windows 8.1.
Method 2: create a bootable USB flash drive via the command line
Step 1: Open the Command Prompt application with administrative rights (Command Prompt). To do this, in Windows 8, press the "Windows" + "X" buttons at the same time, which will allow you to see the extended user menu in the lower left corner of the screen. Select "Command Prompt (admin)" in it and then click "Yes" in response to the UAC warning.
If you are using Windows 7, open the start menu and type CMD in the search bar and then press the Ctrl + Shift + Enter buttons at the same time to launch the command line utility with administrator rights.
and press "Enter".

and press "Enter". You will see a list of all disk drives connected to the PC.

Here you must remember the disk number corresponding to your USB stick that you want to make bootable. For example, according to the screenshot, the target disk number is "1" or "Disk 1". Before proceeding, we suggest that you double-check the disk number of the flash drive, since the next step will be formatting it and entering the wrong disk number may end up deleting the data you need (for example, on a local disk).
Step 4: enter the following commands in sequence, completing each entry by pressing the "Enter" button
SELECT DISK 1 (replace “1” with the number of your USB flash drive) CLEAN CREATE PARTITION PRIMARY SELECT PARTITION 1 ACTIVE FORMAT FS=NTFS QUICK ASSIGN EXIT
Close the command line utility.

Step 5: Next, you need to insert the installation DVD with the Windows 8.1 distribution kit into the optical drive or mount the virtual disk. If you are using Windows 8, then mounting the image is quite easy, just right-click on the ISO image, and select the “Mount” option from the context menu. When you mount the virtual disk, you will see it in the list of disks in the My Computer window.
If you're using Windows 7, follow our instructions for mounting an ISO image in Windows 7 posted earlier.
Step 6: At this point, you will need to copy all files from the Windows 8.1 DVD or mounted virtual disk, including autorun.ini. Then your USB flash drive will be ready to use!

Good luck! Now you can reboot or connect a USB flash drive to your computer to start installing the new version of the Windows 8.1 operating system.
If your computer does not support booting from USB media, read our instructions on how to install Windows from a USB drive even if your PC does not support booting in this mode.
 How to reinstall Windows: step by step instructions
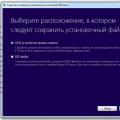 Reinstall windows 8 from flash drive on laptop
 Unable to find recovery environment