Reinstalling Windows 8 from a flash drive on a laptop. IN
In this article, we will consider installing Windows 8 on a new hard drive installed on a laptop.
This hard drive is not yet partitioned, we will do this during the installation process. We also note that
installation on the system unit is no different.
Installing Windows 8 can be divided into several points.
- System preparation
- Creating a bootable USB flash drive with Windows 8 image
- Installing Windows 8 Directly
- Driver installation
System preparation.
You need a flash drive with a capacity of more than 4GB.
Download the desired Windows image from the Microsoft website in the form of an iso image. You can also use the mediacreationtool.exe utility from the Microsoft website. This program will download the selected image itself. About it below.
Preparing drivers. At the end of the article, options for installing drivers are described.
Create a bootable flash drive.
1. Create a bootable flash drive without third-party programs.
If you do not have a program for creating a flash drive at hand, you can use the method using the command line.
2. Creating a bootable flash drive using programs.
The easiest option is to download the mediacreationtool.exe program from the Microsoft website.
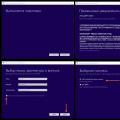
We launch the program and select the desired language, Windows version and OS bit depth.
Choose how to load the image. We chose a USB drive and therefore the image will immediately be downloaded to the USB flash drive.

Selects the desired flash drive. We have one inserted.

We agree to delete files.

And the process of downloading the installation files begins.

The flash drive is ready.
Installing Windows 8
The first step is to set the BIOS to boot from a flash drive. This can be done in several ways:
If possible, you can call up the hot boot menu, usually these are the F12, F9, F10, F8 buttons -
depends on laptop model. After launching the menu, select boot from the USB drive.
If the boot menu is not available, then we enter the BIOS and make settings there. You can enter BIOS by
buttons Delete, Esc, F9, F2, etc. - it also depends on the laptop model. In our case, the HP laptop and the entry was made with the Delete button.
Entering the BIOS, we find the tab with the boot settings. In the picture below, Boot Option.

There we find the item USB diskette on Key... You may have this item called differently, including mentioning the name of the flash drive.
Now you need to move this menu item to the very top. To do this, select it and use the +, - or F5, F6 button to raise it up.


This time, the flash drive booted up and the first installation screen appeared. Leave the Russian language and

Click install.

During the installation process, we will need to enter a license code.
- If you bought a laptop with Windows 8 preinstalled, then you will not find this data on the bottom of the laptop, unlike Windows 7. In our case, the code is registered in the BIOS and it is picked up when installing exactly the version of the operating system that was originally installed from production. If Windows is not activated after installation and connecting to the Internet, due to an inappropriate license key, the program will come to the rescue R.W.Everything. We download the 32 or 64 bit version from the Internet, launch it, find the ACPI menu and in the MSDM tab we find the key of our operating system.
- When Windows is purchased separately, then this code is in the box with the installation disc.
Select the desired version to install, click Next

We agree to the license terms, check the box and continue.

Here we have reached the moment of choosing a partition for installation. Since we have a new hard drive,
Let's create two partitions, one for Windows and programs the second for user data.
Click Create.

The volume of our hard drive is 500GB, so the first partition will be 150GB.
Enter 150000 and click apply. You can split as you wish.

Warning about creating additional system partitions. Click OK.

The necessary system partitions were created and ours is 146GB. You can format it right away.
Choose a 146GB drive. Click format.

We create the second partition, allocating the remaining memory to it. Click create.

The remaining hard drive capacity is automatically filled in the box. You can like this
way to create the number of sections you need.
Click Apply.


So the process of copying Windows 8 system files has begun.
We are waiting for the end of this process. The laptop may restart several times during the installation process.
Therefore, if you chose a USB flash drive as the first source in BIOS, you need to immediately after the first
reboot go into BIOS and return the hard drive as the first drive. Otherwise, each of you
once the Windows installation starts.

After the reboot, in the next window, select the background color and enter the computer name.

Now a window will appear with a choice of options. For a quick setup, select
Use default settings.

Set up a network connection.


You can skip this step by selecting Sign in without a Microsoft account.

All the necessary data is entered and the installation is completed.

Ready. We see the Windows 8 start screen.

Installing drivers.
At the moment, manufacturers rarely complete laptops with driver disks. It is easier with system units, usually there is a driver disk with the motherboard or video card. With laptops, there are several options.
Download drivers from the manufacturer's website (very often they are there)
You can use the SamDrivers driver installation kit.
We are looking for drivers on the Internet by hardware ID.
In today's article, we'll talk about how you can install Windows 8 from a USB flash drive, what questions arise in this case, and how best to solve them. If before this procedure you have not yet saved important files from your hard drive, I recommend that you do this.
And so, let's go...
To do this, we need a simple utility: Windows 7 USB/DVD download tool. Despite the name, it can also record images from Win 8 OS. After installation and launch, you will see something like the following.


I personally really like, for burning bootable discs, the UltraISO program. About how to burn a disc in it, there was already an article earlier. I recommend to get acquainted.
2. Setting up Bios to boot from a USB flash drive
Most often, by default, booting from a USB flash drive is disabled in Bios. But turning it on is not difficult, although it scares novice users.
In general, after you turn on the PC, the first thing that boots is Bios, which conducts initial hardware testing, then the OS is loaded, and only then all other programs. So, if after turning on the computer itself, press the Delete key several times (sometimes F2, depending on the PC model), you will be taken to the Bios settings.
But everything is intuitive. To enable booting from a flash drive, you only need to do 2 things:
1) Check if USB ports are enabled.

2) Change the order of loading. Usually the first is a check for the presence of a bootable CD / DVD, then a hard disk (HDD) check. In this queue, before booting from the HDD, you need to add a check for the presence of a bootable flash drive.

Yes, by the way, after you make all the settings, you need to save them in Bios (most often the F10 key). Look for the "Save and exit" item.
3. How to install Windows 8 from a flash drive: step by step guide
Installing this OS is not much different from installing Win 7. The only thing is brighter colors and, it seemed to me, a faster process. Maybe it depends on different OS versions.
After rebooting the PC, if you did everything correctly, the download from the USB flash drive should begin. You will see the first greeting of the eight:

Before starting the installation, you must agree. Nothing over original...


Then a rather important point will follow: disk partitions, formatting, creating and deleting. In general, a hard disk partition is like a separate hard disk, at least the OS will perceive it that way.
If you have one physical HDD, it is advisable to split it into 2 parts: 1 partition for Windows 8 (it is recommended about 50-60 GB), the rest of the space should be given to the second partition (disk D) - which will be used for user files.
You may not create partitions C and D, but if the OS crashes, it will be harder to restore your data ...

After the HDD logical structure has been configured, installation begins. Now it’s better not to touch anything and calmly wait for an invitation to introduce the name of the PC ...

The computer at this time may restart several times, greet you, show the Windows 8 logo.

After unpacking all the files and installing the packages, the OS will start configuring the programs. To get started, you'll choose a color, give your PC a name, and you'll be able to do a lot of other settings.

At the installation stage, it is best to choose the standard options. Then in the control panel you can change everything to the desired ones.

You will then be asked to create a login. It's best to choose a local account for now.

So this data will then be used at each OS boot, i.e. this is the data of the administrator, who will have the most extensive rights. In general, later, in the control panel, everything can be replayed, but for now, enter and click next.


Here, simply click several times with the mouse on different corners of the monitor. I don't know why they put it in...

The next screen saver usually takes about 1-2 minutes. At this time, it is advisable not to press any keys.

Congratulations! The installation of Windows 8 from a USB flash drive is completed. By the way, now you can take it out and use it for completely different purposes.

In view of the permanent development of digital technologies, old solutions are gradually becoming obsolete, and they are being replaced by new, more efficient ones. The same goes for digital media: optical CDs have been replaced by compact, ergonomic, higher-capacity and rewritable drives based on flash memory. In this regard, users are increasingly using a USB flash drive to install the operating system on a laptop and computer. In today's article, we'll look at how to install Windows 8 from a USB flash drive, and also learn how to create bootable media with a distribution of the new OS.
Forming a bootable USB flash drive with Rufus
Rufus is a free utility designed to create bootable USB drives and burn ISO images of Windows or Linux installation discs to them.
First, we download the application from the Rufus page on the laptop and run the downloaded executable.
Then we set the following parameters:
- "Device" - select a USB flash drive, where we will write the contents of the installation image from Windows 8 for installation on a laptop.
- “Partition scheme and system interface type” - the option as in the screenshot will do, even if you do not have the newest laptop.
- "File system" and "Cluster size" indicate "NTFS" and "4096 bytes", respectively.
- "New volume label" - enter the name of the flash drive.
- Be sure to select "Quick Format" to reset the file table.
- Check the box "Create a boot disk", select "ISO image", click on the disk icon in the drive and specify the path to the Windows 8 image file.
- Click "Start" and confirm the formatting of the flash drive.

It is recommended to check the drive for bad sectors. This will avoid problems in case of a critical error during the installation of the OS due to the fact that one of the installation files may be damaged.
We write the Windows 8 distribution kit to a USB flash drive using WinSetupFromUSB
WinSetupFromUSB is a powerful program for creating bootable USB drives with distributions of all operating systems from Windows, Linux distributions, WinPE and LiveCD. The product also allows you to create multi-boot flash drives with multiple distributions.
- Download the archive with the portable version of the application from the project page.

- Run the installer and extract the contents of the archive to a convenient location.
- We launch the version of the program for your Windows (x32 or x64). For information, see the properties of the "My Computer" directory.

- We select a USB flash drive from the list "USB disk selection ...", if there are several of them connected.
- Check the box "Auto format with FBinst" in order to format the media.
- Below we indicate the file system - preferably FAT32.
- In the "Add to USB disk" field, check the second item where Windows 8 is on the list.
- Click on the button with three dots and set the path to the image with the Windows 8 distribution.
- We press "GO", we confirm the formatting of the device with the subsequent removal of all information from it and wait while the application transfers the installation files from the image to the USB flash drive.

After a few minutes, the utility will notify you that the process of writing files is completed. Now we reboot the laptop and proceed directly to the process of installing the operating system.
Booting from a USB device to start installing Windows 8
In order to boot a laptop from a removable drive, use the boot menu of its BIOS or UEFI. It will allow you to select the media whose bootloader will be given control of the system after initialization. The boot device selection window is called up by pressing the F12, F11 or F9 key immediately after BIOS initialization.

The same is done through the Windows 8 boot options menu. The method is available only to users whose laptop is running the "eight" or "tens".
Installing Windows 8 from a flash drive
The following window will appear while the computer is booting from the flash drive.

- Click on any key on the keyboard.
- In the window with options for choosing a language, date format and keyboard layout, set “Russian” everywhere and click “Next”.

- Click "Install" to start the procedure for installing Windows 8 on a laptop.

- Enter the license key in the text form and click "Next".

- We accept the terms of the license, preferably after reading them.

- We stop at the second option: "Custom: only installing Windows ...".

- The disk settings window will appear.
- Select the current system partition and click "Disk Setup.

- Format the partition by clicking Format.

- Confirm your intentions by clicking on the "Yes" button.
Keep in mind that all information on the disk will be deleted and overwritten during the Windows file copy process, reducing the chances of recovering any files to near zero.

- After selecting the formatted disk, click "Next".

- Click "OK" in the window that appears, where the installer asks permission to create a tiny 350 MB system partition to store the bootloader and some critical files.

- We are waiting for the system to install.

- After restarting the PC, enter the computer name, select the design, create an account and, by selecting "Standard Settings", we get to the Desktop in the ModernUI style.
Windows 8 has been installed on your laptop . Now we proceed to install the device drivers and application software.
(Visited 2 627 times, 1 visits today)
Windows 8.1 is currently the latest version of the operating system from Microsoft. And although the "eight" has collected a lot of negative reviews due to its unusual interface and some errors, many users want to try installing it on their laptop or computer. If you do not have a disk or optical drive, it will be useful to learn how to install Windows 8 from a USB flash drive.
Create a bootable flash drive
The first step is to prepare removable media by writing the Windows 8 distribution onto it. If you installed Windows 7 from a USB flash drive, you must remember that this is one of the most time-consuming processes in the entire system installation procedure.
Simply copying files to media will not bring the desired result - the system will not boot from a USB flash drive.
Creating a bootable flash drive is easier, faster and more convenient with the help of special utilities - Windows 7 USB / DVD Download Tool and WinToFlash. You can also do this using the command line, but in this case you will have to enter several commands and carefully check the correctness of their spelling.
Command line
Insert a flash drive into a USB port and launch the Windows command prompt.

Open a list of all connected disks with the "list disk" command. 
Determine the number of your flash drive, based on its volume. Select it using the "select disk 2" command (if the flash drive has received the number 2). 
Delete all contents of the removable drive using the "clean" command. 
Create a new partition by typing "create partition primary" at the command prompt.
Select the newly created partition - "select partition 1". 
Activate it with the "active" command. 
Format removable media in NTFS - "format fs = NTFS". 
Assign a partition letter with the "assign" command. 
Type "exit" to exit the DISKPART utility. 
Mount the ISO image of the Windows 8 distribution using Daemon Tools. Go to "My Computer" and see what letters are assigned to the virtual drive and your flash drive. Remember them.
Enter the following value at the command prompt: "K:\Boot\bootsect.exe /nt60 G:". "K" in this case is the letter of the virtual drive; "G" is your removable media where you create the boot sector. After that, you should receive a message that the operation was successful and the code has been written.  You just have to transfer the Windows 8 installation files to the created bootable USB flash drive. There are several ways to do this: for example, use Total Commander or simply copy files from a disk image to a USB flash drive.
Another way is to use the command line. Run it again and enter a command like this: "xcopy K: G: / s / e / h / k". 
As you already understood, "K" here is the letter of the virtual drive on which the image with the Windows 8 files is mounted; "G" is your flash drive. After completing these procedures, you can restart your computer and proceed with the installation of the system.
If working with the command line seems too complicated for you, use special utilities.
Windows 7 USB/DVD Download Tool
This program features a simple interface and minimal features, making it ideal for beginners who worry they might accidentally do something wrong.
The process of creating bootable media is divided into four simple steps.
Run the program and click the "Browse" button to specify the path to the Windows 8 ISO image. After selecting the desired file, click "Next".  Select the media on which the Windows 8 distribution will be written. Insert the USB flash drive into the port and click "USB Device".
  Select your removable media in the corresponding field and click "Begin copying".
  Confirm flash drive cleaning:
  Wait for the process of copying Windows 8 files to a removable drive. This usually takes several minutes.
Download the utility and run it. A “Welcome” window will appear on the screen, which details what this program is used for. Click "Next" to go to the next window. 
 You will have to press the "Next" button two more times before you get to the window with the program transfer wizard.
Attention! Before adding Windows 8 files to WinToFlash, you need to unpack the distribution ISO image.
Open the Prepare Flash Drive Wizard and click Next.  Select the path to the unpacked files of the Windows 8 system and the letter of the flash drive to which you want to write the distribution.
  Accept the terms of another license agreement.
  In response to a warning that all information from the flash drive will be erased, click "Continue".
  Wait for the boot media creation process to complete.
  Click "Next" and then "Exit" to exit the program.
Working with BIOS
The distribution media has been created, now you need to open the BIOS and set up the boot order.

Changing the boot order is done with the arrows on the keyboard, the F5/F6 or Page Up/Page Down keys.
Change the order so that the USB HDD is loaded first and then the HDD.  Save changes and exit BIOS. Usually this can be done using the F10 button, but it is better to clarify this value in the BIOS menu - all hot keys should be listed here.
After exiting the BIOS, the computer will restart again. You will be prompted to press any key to start installing Windows. After that, you will see a window where you need to select the language to be installed. 
After choosing a language and clicking "Next", another window will appear in which you can notice a large "Install" button. 
At the bottom there is a "System Restore" button. If you already have Windows 8 installed and you only want to fix critical errors, use this feature.
You will be prompted to enter the serial number of the product. Specify it and click Next. 
Accept the terms of the license agreement and click Next. 
From the proposed installation options, select "Custom" so that you can independently manage the partition into which the system will write. 
If the disk is partitioned, it should have two partitions: one for system partitions, the other for storing files. Select the system partition (it should be much smaller in size) and click the "Disk Setup" button. 
Click "Format" to clear the partition. If you do not format it, then the Windows 8 files will be written from above to the existing system (if any), which can lead to critical errors. 
In response to the warning that all data will be erased, click "OK". 
After the formatting process is completed, select the system partition and click "Next" to start the process of installing Windows 8 files. 
After installing the components and updates, the computer will automatically restart. The next time you start, you will be prompted to specify the name of the computer, as well as configure the system settings. 
You can use the "Standard Options" or customize them yourself.
Next, you will be asked to enter your email address, making it your Microsoft account login. If you don't want to do this, click the "Login without an account" button. 
The system will once again prompt you to create a Microsoft account. If you don't want to do this, click Local Account. 
On the next tab, enter the username and password for your account. Click the Done button. You have finished installing the system and configuring its settings. 
Immediately after the installation process is completed, you will need to install hardware drivers, which are recommended to be prepared in advance, and various useful programs: antivirus, media player, browsers, etc.
If you absolutely do not like the installed system, you can always remove Windows 8 from your laptop or computer, replacing it with the "seven".
In this article, we would like to go back to the basics and tell you about one of the most important processes that every advanced user should be able to do: install and reinstall the operating system. In view of the fact that today the most popular and relevant operating system is Windows 8, we would like to tell you about its installation. By the way, most recently we did, so if you are interested in this operating system, we recommend that you read the article mentioned.
On the Internet you can find a large number of instructions on how to properly install the operating system, but we decided to talk a little about another and no less popular way to install and reinstall the operating system - using a flash drive.
For those who are not in the know, the operating system is most often installed from a DVD, which is not very convenient. A more practical option is to install it from a USB flash drive. In order to install Windows 8 from a flash drive, you will need an 8 GB flash drive. You can also read about that in our previous publications.
How to write a Windows image to a flash drive
Many of you will immediately have a question: how to burn a disk image to a USB flash drive !? This is no more difficult to do than writing an image to a regular disk. To burn a Windows 8 image to a flash drive, use the Windows USB/DVD Download Tool. This program can be downloaded from the official Microsoft website. To do this, enter the name of the program in the Google search bar and go to the program download page. In the "Installation" section in the first paragraph, click on the link, after which the program will begin downloading. At the end of the download, run the program, you will see its screenshot below.


After burning the image, open the USB flash drive through Explorer, without autorun, and check its contents.
Preparing to install the operating system
How to reinstall the systemBefore proceeding directly to the installation procedure, a few words should be said about reinstalling the system. If you install the operating system on a new one, then the only task is to correctly partition the hard disk into partitions, and this must be done rationally. In the case of reinstalling the operating system, if you want to install a new one instead of an already installed system, then you need to re-save your data from the hard disk partition on which the system is installed. Why do it?
Reinstalling the system involves formatting the partition (that is, completely erasing it) on which the operating system is installed. Most users on this section have the necessary files in the Documents and Downloads folders. Therefore, in order not to lose data on the system partition, they must be resaved to another partition that you will not format, for example, to the “D” partition. When the data is resaved, double-check the "C" drive and then proceed with the reinstallation.

Starting the installation of Windows 8 from a USB flash drive
In order to install the operating system from a USB flash drive, you need to make some settings in e. You can start the BIOS settings by restarting the operating system and holding down the "Delete" key on the keyboard. Next, using the arrows on the keyboard, we go to the boot priority section, most often it is called "Boot Priority", to enter it, press the "Enter" key. In this section, you need to change 2 parameters. In the first parameter "1st Boot Device" you need to set the value to "USB-HDD", and for "2nd Boot Device" you need to set the value to "Hard Drive". Then press the "Esc" key and select "Save and Exit".
How to properly install Windows 8
After restarting the computer, you will need to confirm the launch of the bootloader by pressing any key on the keyboard. Then the operating system installation procedure will begin.
To start the installer, you need to wait a while, after which the system installation window will appear.

In the window that appears, if you downloaded the Russian version of Windows 8, Russian localization will be installed in all fields, making sure that you click on the "Next" button.

In the next window, click the "Install" button.

Before installing the system directly, the installer will check the configuration of the computer and its readiness for installation. Next, you will need to enter the product key to activate Windows 8, and then click on the "Next" button.

Now let's move on to the so-called installation setup, where you first need to read the license terms and, if you agree with them, check the box next to "I accept the license terms" and then click "Next".

The next step is to select the installation type. In our case, you need to select: "Custom: Windows installation only (for advanced users)". Next, you need to configure the hard drive.

At this stage, you can reallocate disk space, and you will also need to specify the location where the installer will install the operating system. We will touch on the sections in more detail in a separate article, and now we will talk about further installation.
When installing the system on a new hard disk, it must be divided into sections, at least 2: for Windows and for data storage. To do this, click on the inscription "Disk settings" and make the necessary settings. If the operating system is being reinstalled, then also click on the inscription "Disk Setup", after which you select the partition where the old operating system is installed and delete it. Then click on the unallocated area and click on the "Next" button.

After allocating space and specifying a partition for installing the operating system, the installation itself will begin. At this point, the installer will copy the Windows 8 files to your hard drive and prepare them for installation, then all components and updates will be installed.

After the above processes are completed, the computer will restart.

When restarting, you do not need to press anything, the bootloader will restart on its own. At this stage, the devices will be checked.


The first thing you will be asked is to choose your preferred system color. Based on it, the background of the interface of the Start menu and the style of personalization of windows and the taskbar will be set. You will also need to come up with a computer name. If your computer is part of a local network, then try to keep its name unique and not the same as the names of other computers on the network. After that, click on the "Next" button.

In the next menu, you can select "Use default settings" to leave all the default settings, or click on the "Customize" button to customize the system to your own preferences.

Now you need to set up login. If you have a Microsoft account, you can use it to sign in to your account. Site site experts recommend not using a Microsoft account, but choosing: "Sign in without a Microsoft account" to create a local account.

To create a local account, you need to enter a username, and if necessary, you can enter a password so that only you have access to the computer. If this is not necessary, we recommend that you do not enter a password. To complete the operating system settings, click on the "Finish" button.

The installer will then make the final settings on its own. At the same time, you will be able to familiarize yourself with the innovations and benefits of Windows 8 by viewing the slides that will be shown to you during the completion of the setup.

When all settings are completed, the operating system will start. The Start menu will appear in front of you. To get to the familiar desktop, click on the corresponding window labeled "Desktop".

This completes the installation of the operating system. We recommend that you immediately activate the operating system and install the drivers. After the above steps, you can install the programs you need.

Finally, we want to remind you of the need to restore the original BIOS settings in order to set the computer's hard drive as the primary boot source. This will increase the speed of loading the operating system, since the bootloader will immediately be directed to the hard disk, and not to search for the installation flash drive. To do this, when restarting the operating system, hold down the "Delete" key and in the boot settings, as described above, select the "Hard Drive" option as the primary boot (1st Boot Device). As a secondary boot (2nd Boot Device), you can install a CDROM - if necessary.
 How to reinstall Windows: step by step instructions
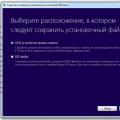 Reinstall windows 8 from flash drive on laptop
 Unable to find recovery environment