What does the toolbar look like in the AUTOCAD program. What to do if the toolbar disappeared into AutoCAD? Command line area
Frequently, in the course of working in the program, you have to use any AutoCAD command that is missing on standard toolbars and called through the menu. It becomes inconvenient to contact the menu and much better create in this situation. autoCAD Toolbar And call the team by clicking on it. Another situation When the use of a separate AutoCAD toolbar is justified - the standard toolbar is too big, and you use only one, two commands from it.
So let's learn how to draw your own AutoCAD toolbar. To do this, go to the Control tab, then click the user interface. Or in the Tools menu, select Adaptation - Interface. Or even easier on the command line, dial the PN letters and press ENTER. In any case, a window will appear:
If the window does not look like in the picture, click on the arrow in the lower right corner and it will take a similar view. Please note that you are on the Adaptation tab of the user interface adaptation window. In the upper left side of the adaptation: All files find the panel item. Click on the right mouse button on it and select a new toolbar in the menu that appears. 
Set the name for the panel, for example, by the command name.
Now we need to put the desired command on the created toolbar. This is done as follows: In the lower subheading, the command list needs to find the necessary AutoCAD command. The correct name of the command can be found from the menu where the command is called from the prompt appearing when you hover the cursor on the panel with the command. To quickly search, you can enter its name or only the first letters of the name in the line to the left of the magnifying glass icon. 
When you find the desired command in the list of commands, press it with the left mouse button and not releasing the button drag to the created AutoCAD toolbar until a small arrow appears to the right of the panel name, as in the picture. Next, if everything was done correctly, you will see that the command is on the created panel. 
Additionally, AutoCAD is laid on changing the icon of our AutoCAD toolbar. Select it in the adaptation pod: All files and right in the bottom icon, you can select any icon for a new panel or even draw your own by pressing the Edit button. Now it remains to make the last action - click Apply and OK. The window will close and the new AutoCAD toolbar. Drag it in a comfortable place on the screen and use it!
In the previous lesson, we got acquainted with the interface of the AutoCAD program: ""
And in this lesson, consider how it is carried out. setup AutoCAD.. No matter how good the standard autocadal interface, there are no few users who will seem not comfortable. That is why car manufacturers laid wide opportunities for its change in their program, allowing you to configure the interface individually to each user.
For many years I worked in autocada in a two-dimensional dimension. Therefore, all changes in the AUTOCAD interface, which I will tell below belong to the creation of a more convenient space for working in two-dimensional space.
Modes of work space.
For many years, the autocardist interface included the main menu and toolbar. See fig. one
Fig. 1. Classic AutoCAD.
Gradually, from year to year, the number of tools grew. To conveniently compactly place a large number of Tools, manufacturers have created a new interface element called the tape. The tape consists of thematic tabs, each of which contains several toolbars. See fig. 2.

Fig. 2. Drawing and annotation
AutoCAD manufacturers understood that this innovation would not like everyone. Therefore, they left the possibility of transition to the old interface. So since 2009 in the autocada, for a two-dimensional drawing, two working space modes appeared:
1) mode " Drawing and annotation"(It costs the default, starting with AutoCAD 2009)
2) mode ""
The question arose: in which of these two modes of the workspace work better?
I think there will be no little supporters of both one mode and the other. And those and others will lead no facts in proof of their preference. But, in my opinion, there is no unambiguous answer to this question. Because the user-friendly interface is the concept of purely individual. And that is convenient to one, it may not be a comfortable other. In addition, both in one and other mode there are ample opportunities for its change. Those. To solve certain tasks and the other mode, you can make convenient and comfortable for the user.
Since the "drawing and annotation" mode is raised by default, the number of its supporters from year to year is growing. While the number of users preferring the "Classic AutoCAD" mode gradually decreases.
Supporters of the "Classic AutoCAD" regime - for the most part, it is experienced usersFor many years working in autocadus. And many of them are not worse you know how to configure AutoCAD for yourself.
On the contrary, there are many newcomers among people in the "drawing and annotation". Therefore, in this lesson, we will change this mode.
But at the beginning, let's, all the same, consider how to move from one mode to another.
The first method: it is on the shortcut panel, click on the name of the current work space, and select the desired mode in the list.
See fig. 3.
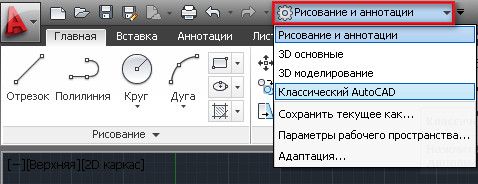
Fig. 3. Workspaces.
(But not in all versions of the autocadus, in the shortcut panel, there is such a possibility of switching).
The second method: in the lower right corner, click on the switching button of the workspaces. And in the discontinued menu, select the required mode. See fig. four.

Fig. 4. Workspace.
Now let's consider a number of changes that, in my opinion, make the AutoCAD interface more convenient when working in two-dimensional space.
1) If we assume, work only in two-dimensional space. You can safely turn off the elements associated with work in 3D. Thus, we unload the workspace:

Fig. 5. Application button
The Settings window opens. See fig. 6.

Fig. 6. "Setup" window
In it, select the 3D modeling tab. We remove all the checkboxes highlighted in red and click OK.
2) Turn off the "Navigation panel". Click on the button shown in Fig. 7.

Fig. 7. Close Navigation Panel
I have enough navigation, which is laid in the mouse:
- Tighten the mouse wheel forward - the drawing is approaching.
- Tightened back - removes.
- Click on the wheel and not releasing it moving the mouse - the drawing moves along with the workspace. We let go in the right place.
- We click two times in a row on the mouse wheel - the entire drawing will appear in the working field.
If you want to return the navigation pane. See fig. eight.

Fig. 8. Return the navigation panel.
3) We add frequently used tools to the "Quick Access Panel". Let's add the "layer properties" button.

Fig. 9. Adding the Layer Property button on the Quick Access Panel
Now whatever the ribbon tab we can, we can always open the "Layer Properties Manager" from the Quick Access panel. See fig. 10.

Fig. 10. Layer Properties Manager
Similarly, add the "Layers" tool to the "quick access panel". See fig. eleven.

Fig. 11. Adding the "Layers" tool on the Quick Access Panel
and the "Switch windows" tool. See fig. 12.

Fig. 12. Adding the "Switch window" tool on the quick access panel
Now we always have the ability to switch layers at hand. See fig. 13.

Fig. 13. Switching layers.
and move from one window to another. See fig. fourteen.

Fig. 14. Transition from one window to another.
4) Fastening the right or left of the frequently used palettes. Let's do more easy access to the "Properties" palette.
Go to the "View" tab, click on the "Properties" button - the "Properties" palette opens. Click on the button selected blue and choose "fasten the left". See fig. fifteen.

Fig. 15. Fastening the palette.
The "Properties" band will appear on the left. If the mouse pointer is placed on this strip, the "Properties" palette will appear. If the mouse pointer to take to the side of the palette is removed from the screen. The band can be converted to the button. To do this, click the right mouse button along this strip and select "only icons". See fig. sixteen.

Fig. 16. Palette in the form of icon.
On the left at the top will appear the icon when you hover on which the "Properties" palette will appear. If you want the palette to temporarily disappear from the screen, click on the button selected red. See fig. 17.

Fig. 17. Fastening the palette.
Now the palette will be constantly on the screen. To the palette disappear again, click on the Collapse button. See fig. eighteen.

Fig. 18. Collapse the palette.
Similarly, you can organize quick access to other palettes.
5) It happens that part of the toolbars, on any tab, are collaborated and they are not convenient to use. See fig. 19. So that they turn out you can turn off the panels that you do not use.

Fig. 19. Disable toolbars.
To do this, place the mouse pointer to the tape and click the right mouse button. Next, go to "Show panels" and remove the checkboxes from those tool panels that we want to hide (you can disable and not used tabs). If the panels are still rolled, you can temporarily, which or panel pull out the drawing window. To do this, place the mouse cursor on the desired panel, click left button Mice and not releasing it drag the panel into the drawing window and let go there. After the panel you no longer need, you can return it to the tape. Click on the button "Return the tape panel" button. See fig. twenty.

Fig. 20. Return the panel on the tape.
6) Organization of quick access to the project folder. Click on the Open button. The "File Selection" window appears. We find the folder to which you would like to have quick access (in my case it is a "my project" folder). We place the mouse cursor to the folder, clamp the left mouse button and do not releasing it by dragging it into the "repository list" and only they let go. See fig. 21.

Fig. 21. Adding a folder to the repository list.
A link to your folder will appear in the repository list. By clicking on which you will find out inside the "My Project" folder. After working with the project is completed, a link from the "Warehouse List" can be deleted. To do this, place the mouse pointer to the desired link, click the right mouse button and select Delete. See fig. 22.

Fig. 22. Delete a folder from the repository list.
There will be messages in which click OK. See fig. 23. ( The project itself will remain, in the place where he lies in wholeness and preservation. Only reference to it will be removed).
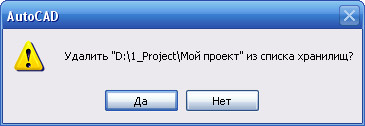
Fig. 23. Message.
7) If you have learned the team well and rarely use the "context menu". You can right up the mouse button to use instead of a key.
This will allow you to:
- Complete cyclic operations by pressing the right mouse button (instead of pressing
). - Call the last, completed commands, the right mouse button is not looking for them on the tape.
Click on the "application button" and in the opened window on the "Parameters" button. See fig. five.

Fig. 5. Application button
The Settings window opens. In it, select the "Custom" tab and click on the "Right Mouse Button" button. The "Setting Right Mouse Button" window opens. See fig. 24.

Fig. 24. Setting the right mouse button
In this window, click on the circles selected red and click on the "Accept" and "OK" buttons.
Now press the right mouse button - instead context menuThe "Settings" window will appear (as this is the last completed command). Just close it.
This is not just not big, some of how we can change settings AutoCAD..
How to create your own tabs on the tape. How to create your toolbars see the lesson: "Creating a button for the LISP program"
I sincerely hope that the information set out above will be useful for whom.
Write in the comments:
In what mode of work space do you work?
What are the changes in the interface considered in this lesson, did you use it?
If you apply something else that helps you in your work, then share your secrets.
If you want to receive news from my site. Make a subscription.
Panel autoCAD toolswhich is also called a ribbon, is a real "heart" of the program interface, so its loss from the screen for any reason can completely stop the work.
This article will tell how to return the toolbar in the autocada.
How to return toolbar in AutoCAD
1. If you find that familiar tabs and panels are missing at the top of the screen - press the combination of hot keys "Ctrl + 0" (zero). In the same way, you can disable the toolbar, freeing more free space on the screen.

2. Suppose you work in the classic automotive interface and the top of the screen looks like shown in the screenshot. To activate the tape with the tools, click on the "Service" tab, then "palettes" and "tape".

3. Using autocades, you may find that your tape with tools looks like this:

You need to have instant access to the tool pictograms. To do this, simply press the small idle icon. Now you have a full tape again!
Commands needed to build drawing and editing it are located on the toolbars ("Drawing", "Editing", "Layers", etc.). These teams will help you start learning the AutoCAD program, and our articles from the Self-Skad for Beginners' section will give a complete picture of them. Commands are structured and are on the ribbon menu. Thematic tabs such as "insert", "annotations", etc. contain sets of toolbars. This allows you to quickly find the necessary command.
How to open the toolbar in the autocada, and what to do if the toolbar disappeared?
In order for an extended panel to appear, it is enough to click on the arrow, as shown in the figure. We will tell you how to configure the toolbar in the autocada. Such panels can be fixed by pressing the pin in the lower left corner.
How to hide / add new toolbar on the tape?
To do this, you need a PCM to click on any panel. A list appears in which you want to select "Show panels". Putting or removing a tick opposite the name of the panel, you will, respectively, add it or hide it from the tape.

It plays an important role when you have a small monitor. In AutoCAD, the toolbar folds to the buttons. It becomes inconvenient to choose the desired command. In this case, it is advisable to remove the panels that you do not use.
In addition, the toolbar can be dragged at a comfortable place on the ribbon. It is enough to clamp the LKM at the bottom of the panel and move the mouse to a suitable place.

Working with quick access panel.
The shortcut panel is designed to compose frequently used tools on it. By default, this panel contains some tools. You can delete them by pressing PCM → "Delete from the quick access panel".

For convenience, you can endure the necessary tools. To do this, it is enough to choose a suitable command on the ribbon, press PCM → Add to the panel Fast access" This optimizes work in AutoCAD.

What should I do if the tools are missing in autocada?
If the toolbar disappeared in the autocada, then you may simply change the ribbon representation. To return everything to the place, use the button in the upper right corner, as shown in the figure:

This can be done by busting, or choose the desired display from the list by pressing the arrow nearby. Try to do this if your toolbar disappeared in the autocada. So, there are three options:
Collapse to panel buttons;

AutoCAD is a huge program in its capabilities, and those panels that are displayed by default immediately after installing the program, represent only very small opportunities, only the most necessary. That is why, first of all, it is very important to solve the question of how to open the toolbar in the autocada - just to understand everything that developers provide. Do not say that these objects can be configured at your own desire - some rarely used opportunities to clean, and some, on the contrary, output.
There are several ways to restore the toolbar in the autocada.
Well, and, of course, add or restore these means of work is important if they have disappeared accidentally for any reason. In the end, floating objects - stretching from any of them from the usual place, turning into the window, then it is easily easily removed by clicking on the "Cross" in the upper right corner.
When working with the program under consideration, you should always keep in mind what version you use what year - 2002, for example, or 2014. Work with the objects under consideration in various developments is organized in different ways. This, of course, the case of taste and habits, can be said differently - do not stop progress, but many, tuned to the development, and not to study the developers' frills, more like the order adopted in versions until 2006. But the vast majority, who came to the program later, are accustomed to other ways.
Panels in the latest versions of autocada
So, if the toolbar disappeared in the autocade, it will not be difficult to return it to the place. More than new panel programs are presented in two types - ribbon and classic menu. If you have a "tape", and it disappeared, it is enough to click on the "Ctrl + 0" key combination. When you press the keys to press the same combination, the panel will disappear again.

If a classic is assigned, then to activate the "ribbons" to see also the available commands, you need to go to the "Service" tab, then select "Palettes" and a string "Tape". If the panel is completely modest - only in one line, and no "service" is not, then you need to refer to the button with the down arrow, this button is extreme on the right in the menu bar.

Click on this button and such a wide menu is turned on again. Now the button already has an arrow up, re-pressing, and the menu is compressed. This is useful when the display size is not so big and there is not enough space to output the drawing.
Working with panels more familiar
Another, more familiar way to solve the problem, how to return the toolbar, and any of almost two dozen is offered in versions until 2006 inclusive.

Here already act as follows:
- Go to the "View" / "View" menu.
- In the field that opens, choose in the bottom line "Toolbars".
- Custom settings open - here are 4 bookmarks, but we will be interested in the second - "toolbars".
- We notice that in front of each line there is a positioning position of the output check mark. Those that are currently output are supplied with a check mark that are not output - no ticks. The output is made with a simple installation of this check mark. Initially, the panel is placed as a window, with a "cross" closing, but capturing the header with the title with the name, it can be moved to any other place if the object is moving to the left, right, up or down, it becomes an elongated string of the icon commands.
Pay attention to the tab "Commands", adjacent to the window considered in the window custom settings. On this bookmark, you can find all the commands used in the autocada, even those with which the graphic buttons - pictograms are not matched. Any of the commands can be displayed in any place on the screen or remove the usual tightening.
 How to combine two accounts on Facebook?
 Download and insert a beautiful framework to Word Document
 How to fix clock_watchdog_timeout type "Blue screen" (0x00000101)