How to replace the color in the FSH. As in photoshop change the color of the object
And hello again, my dear readers. Today I would like to tell you how to replace the color in photoshop to another in a separate area and even throughout the picture. After all, you probably often have a desire to repaint something to see how it will look. But in order not to make mistakes, first it is better to do it on some mockup or photo. Then you will know how and what looks like. Let's see how to change the color of the subject to the car repainting specified on the example.
The first way. Replacement color
Let's look at the simplest case when our background is absolutely different from the object itself, i.e. cars.
- So, upload a photo, a picture or picture to our editor and now go to the familiar menu "Image". Next, select the item "Correction", and then "replace the color".

- The color replacement window has opened before us. What do we do here? First, let's make sure that in this window the active tool is the usual pipette (no signs). Now just click on the left mouse button anywhere on the car's hood.

- As you can see, in the window we have a small drawing. What is painted light shows us what area will replace color. Now start pulling the "Color Tone" slider. See? Part of the color begins to change when you move this tone. Do not be upset that not the whole car has painted. We will fix it.

- To start, clamp left button Mice on the slider "scatter" and pull it into the biggest side. Just try to make the machine so that the car is painted as much as possible, while the background would be untouched. In this case, there are no yellow shades against the background, which allows me to put the maximum scatter 200.
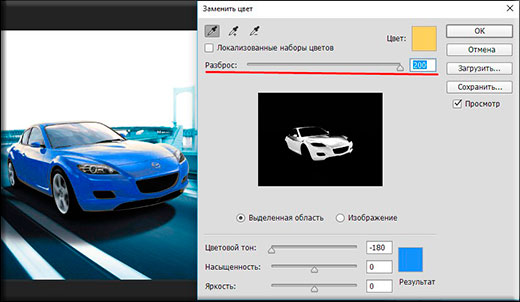
- The desired object changed almost all the color, but not completely? Again, it does not matter. Activate the internal tool "Pipette +" and press the left mouse button on those parts of the car, where the non-crushed areas remain in the figure.

- Voila!) As you can see, everything turned out and even our background did not suffer. And by the way, you can still move the "Color Tone" slider, "saturation", "brightness" to achieve the desired shade.

See. It looks like it is necessary. And this feature can be used in different areas, for example, to replace the color of clothing, or to give an unusual, but a certain shade of vegetables or fruits. In! Try to make a blue watermelon. Trust me. It is easy, very interesting and useful for consolidation.

Correction of misunderstandings
Let's look at the case a little harder. Suppose I want to change the color of the car, but already another. As you can see, the color of the car is the same as in the background. Well? Let's do everything as at the top and see what we succeed.

And we do not care, the background is so similar to the color of the machine that neither the "pipette" nor the reduction in the scatter does not help. If we want us to be purple, then we will also have similar mountains. What to do?

In such difficult situations will have to work a little handles. In fact, nothing terrible is not here. You just have to take advantage of your acquaintances. Yes Yes. Handles erase failed painted objects or background, thereby leaving with a certain color only the subject itself, i.e. In our case, the car.

Even better before changing the color, duplicate the layer and make all actions on the created copy. And unnecessary details can be erased by usual. So it will be better if you suddenly want to change the color later.
The second way. Overlay mode
Well, since we spoke here about the repainting of the car in Photoshop, I can't not mention another good way to implement this action. True, here you will also have to work with handles, as you have to change and paint all the places. But we can easily be able to replace the color in Photoshop to any other.
Let me load the same car as above.
- We take and how we would like to paint this machine. Well, let's say I want to see her green, then this particular color I will choose.
- Now create a new layer by pressing the key combination SHIFT + Ctrl + N. And then take a look at the panel of the layers. See there there are overlay modes? By default, it is normal, but you will open the drop-down list and select the "Color" item (by the way the "Color Tone" mode is also suitable, so you can choose it). Excellent. Well done.

- But now choose the size, shape and rigidity of the brush, and forward! Machine machine. Just carefully, so that you do not hurt too much. Well, if they crushed, then the eraser will straighten, nothing terrible.

- And now, if you want to change the color you nipped, you need to go to our new image "Image" menu and there choose "Correction" - "Color tone / saturation". But I advise you to immediately use the simple key combination Ctrl + U.

- Well, in the newly opened window you can also move the color tone slide, saturation and brightness, in order to change the shade. Everything is simple.

How are you a lesson? Everything was clear and interesting? I hope that yes. Personally, I, when I learned about the replacement of the color of the subject in Adobe Photoshop.was just delighted. If, of course, something will be incomprehensible, then you can always clarify or ask. I will be glad to help as far as possible.
I would also advise you to see you cool video course on photoshop. The video tutorials are simply awesome, the course comes from the easy to complex, everything is told by the human language, nothing is missed and at the same time no extra "water". All over the shelves. So be sure to look.
Well, I'm saying goodbye to you today. I will be glad to see you in my other articles. Well, so as not to get lost, be sure to subscribe to updating my blog. I will not spam - everything is only in the case, honestly. Well, you practice. See you in other lessons. Bye Bye!
Sincerely, Dmitry Kostin.
In this lesson, we will get acquainted with the color replacement program and learn how with it you can quickly change the color of items in the photo.
We will show you not the most professional, but the easiest and fastest, method of changing the color in the image. This method does not always give the desired result, but it usually works well for uncomplicated tasks. This is a simple tool and it is worth trying to work with it before proceeding to more complex and time-consuming methods.

Color Replacement Tool (Color Replacement)
The Color Replacement Tool tool (color replacement) was first entered in Photoshop CS, and if you work in Photoshop CS or CS2, you can find it in a group along with the "Handing Brush" tool (Healing Brush).
If you have Photoshop CS3 or CS4, CS5 or CS6, click on the Brush tool icon (Brush) and hold it until the drop-down list of other group tools is appeared, select "Color Replacement".

Once you have chosen the Color Replacement tool, the mouse cursor will turn into a circle with a small cross in the center.

You can adjust the size of the circle with hot keys - brackets [or]. The left bracket reduces the size, the right - increases. To adjust the rigidity (hardness) of the brush, add the Shift key pressing (SHIFT + left quarter. The bracket makes the edges of soft, shift + right sq. Pickup makes brush tougher).
How the Color Replacement tool works:
When you drag the Color Replacement tool in the image, Photoshop continuously scans the color sample currently under the cross cursor. This is a color that will be replaced by the current color of the foreground. Any other pixels that surround the round cursor also change the color when moving it on the object.
For example, if you install the cursor on the blue color in the photo, and the color of the foreground is red, then in the area of \u200b\u200bthe cursor, the color under it will be changed to red. There are several options for setting up tools in the top panel, but we will look later.
In the tool palette, you see color settings at the moment. The default is black color:
In order to change the color of the foreground, click on the upper square (color sample) and select any new color from the color palette. Choose green. Click OK and close the colors palette.

Look at the tool palette. The foreground color sample has changed. Now the color of the foreground is green. Now, if we draw in the image tool "color", the original color will be replaced with a green color:
Take example photo girls with balls:

She looks happy with a blue balloon in his hand, but maybe she would like to have a green ball. Let's see what we can do for her. Using the "Color Replacement" tool / "Color Replacement" by clicking on the cursor over the ball, start moving inside it. Photoshop begins to replace blue color green.

To change the color of the rest of the ball on green, you just need to keep the mouse button pressed.

If you accidentally go beyond the border of the ball and get on the yellow wall behind him, photoshop will start changing yellow on green:

Tolerance
Everything is simple and no problem until you reach the edges of the ball. If you look carefully, you will notice that the edges of the ball remain closed not completely, the blue strip is noticeable.

We have already said that the "Replacement color" tool has several parameters that can be configured on the control panel. One of these parameters is "tolerance". "Tolerance" determines the sensitivity to the replaceable color. By default, tolerance is 30%, which is a good starting point. But this is not enough for our case. Increase tolerance up to 50%, which will allow the "color replacement" tool to influence a wider range of colors:
We set great tolerance. Now, let's cancel the last step and try again to handle edges.

We finish processing in the remaining areas and our Blue Ball Magically turns into green, thanks to the "Color Replacement" tool:

Use color
In the above example, we accidentally chose a new color of the bowl of the colors palette in Photoshop. Similarly, you can choose the color directly from the photo itself. To do this, with the active tool "Color Replacement" (Color Replacement Tool), press the ALT key and your cursor turns into a pipette (Eyedropper Tool).
Click the photo area that contains the color you want to use. Photoshop will make this color the main background. On the front and rear layout icon, the upper square acquired the color you choose.
Take the color blouse girls:

If you look at the front plan color sample on the toolbar, you will see that the color to which you have pressed has become the primary color:
With this color, we can again paint the ball with the help of the "Color Replacement" tool:

Overlay modes
Overlay modes
The reason for which the "color replacement" tool stores the volume and texture is that it uses overlay modes to mix new colors.
The new color interacts with the previous color and it turns out such an effect. The overlay modes you see in the upper setup menu. Four them: tone, saturation, color and brightness (Hue, Saturation, Color, and Luminosity). The default color (Color) mode is specified.
If you have ever studied the color theory, you probably heard that the color consists of color tone, saturation and brightness. You can choose any mixing mode depending on which of these three aspects of the source color you want to affect.
Tone / Hue: When applying the "HUE" mode, only the main color will change. It will not change the saturation and brightness of the original color. This mode is convenient for images, where the colors are not very intense and it usually gives very little changes.
Saturation / Saturation: Saturation mode changes only the saturation of the original color. Tint and brightness are not affected. This mode is useful to reduce color intensity, or remove the color completely.
Color / Color: "Color" mode is set by default and changes the shade and saturation. The brightness will remain unchanged. This overlay mode you will use most often.
Brightness / Luminosity: And finally, the "LUMINOSITY" mode changes the brightness of the original color to the brightness of the new color. Tint and saturation remain unchanged.
We take another photo with balls:

One way to highlight one air balloon, reduce the saturation of the color of other balloons. We will not change the actual color of the balls, and we will change only the intensity of colors. In the Mixing Mode tab, I select Saturation mode.
If we wanted to completely discolor balloons, we would have installed the main color black, white or gray, but since we want to get a thinner effect, we simply take one of the less rich colors from the image. Holding the ALT key My (Win) / Option (Mac), we temporarily switch to the Eyedropper Tool tool, and click on the color that we want to use. We will choose less saturated yellow. Color by itself does not matter, since the overlay mode does not change the original color. The mode will only affect saturation:

We choose the tool "color replacement" and draw on those balls on which we want to reduce the level of saturation, making them paler. The size of the brush can be adjusted by square brackets. If necessary, adjust the level of tolerance. Under the example below you see how different the initial shade of the ball from the changed.

Pain your other balls. Their saturation is reduced. This is how the result looks like:

Problems with brightness
Unfortunately there are situations in which the use of the "Replace Color" tool causes complexity.
These are cases when there is a big difference between the brightness of the original color and replacing it. For example, we want to change the shade of the top orange bowl on the purple color of another ball. It seems that it's easy to do, but ...
First, refund all the colors of the balls in the original condition. To do this, proceed to the File menu - Return (File- Revert). Then take a color sample from a purple ball by clicking on it with squeezed key Alt.To switch to the pipette.

Mixing mode Install in Color. This is the default value. Then we begin to paint the orange ball to change its color on dark purple. Here is the result:

Hmm This is definitely purple, but it is not quite similar to other purple balls, isn't it? The problem is that our orange ball is much brighter than purple balls. Mounted mode Mixing does not affect the brightness. It acts only on color. Let's change the mixing mode on the "brightness" / "Luminosity":
Let's cancel all previous actions and rub the ball orange color, and then set the mixing mode "Brightness" / "Luminosity". Now, paint the ball dark purple.

You can say with confidence that the result is bad. In the "Brightness" / "Luminosity" mode, the ball became brighter, but it remained orange and lost the structure.
The problem lies in too much difference in the brightness of objects. The "Color Replacement" tool perfectly copes with simple tasks, where you just need to change the shade or saturation of the color, but if there are too many differences between the brightness of the two image elements, then you need to choose other ways to replace color.
Let's look at the "COLOR REPLACEMENT TOOL" tool again.
In the upper menu, we see three icons with a picture of pipettes. Each of these icons is an option to select a color sample to work (sample). We look at the left: Sample - continuously "Continuous" - default is set; Sample - once "Once"; Sample - sample background "Background Swatch". To switch from one option to another, you just need to activate the selected icon.
Consider options.
Sample - continuously "Continuous". In this option, the choice of color will be carried out continuously until you hold the mouse button pressed and drive the cursor over the image. This parameter can be used when numerous and complex color changes are required in the object.
With a single breakdown "Once", Photoshop takes into account the color that you have chosen the click of the mouse, regardless of how long you drive the cursor on the image. This option is best suited for replacing large areas of homogeneous color.
Sample background "Background Swatch". You will most likely not apply this option. Here, the background color replaces the original color. Only those pixels that match the color of the background will be replaced in the picture. To do this, select the shade in the color palette, the most suitable color to the image. This can be done by clicking on the bottom square of the color icons. Adjust the tolerance value if the shade does not suit you.
"Restrictions" / "Limits"
The following option of the "Color Replacement" tool settings controls the location of the replaceable pixels and is called "restrictions" / "limits". There are three color detection options: adjacent pixels (Contiguous), non-absession (Discontinuous) and selection of edges (Find Edges).
Most often you will use the first two.
By default, the limit type "adjacent" / "Contiguous" is set. In this embodiment, the "COLOR REPLACEMENT TOOL" tool is repainting the pixels that are under a cross within the cursor. The effect of the instrument will not act on the pixels that match the selected color, but are separated from the cursor to the area of \u200b\u200banother color. At least until the cursor is in these zones.
The limit type "Unbendable" / "Discontinuous" replaces all the pixels located within the cursor.
The last type of selection of edges "Find Edges" replaces the color in areas with a shade of the selected color, keeping the outlines of the edges of the object.
Consider the last option in the top menu of the "Smoothing" / "Anti-Aliasing" tool settings. Use this option if you need to smooth the edges at the exact outlines of the object. If you do not need smoothing, uncheck the checkbox.
Good luck to you in processing ;-))
How to change the color of the object in Photoshop?
Probably, each girl at least once in his life thought about changing the color of the hair. But far from each of it was solved. After all, a new color can, how to decorate and spoil the whole image. But how to check it before staining? Everything is very simple, you just need to use the Adobe Photoshop photo editor.
So, open your photo using the file\u003e Open or the Ctrl + O key combination. Select your hair using the "Magic Wand" tool (key w).
To do this: set the tolerance, and select the desired part of the photo, the alternating button "Adding to the selected area" (1) and "subtraction from the selected area" (2). If the magic wand has allocated too much area, you need to reduce the tolerance.
In the Image menu, select Correction and subparagraph "Color Balance ..." or press Ctrl + V. In the window that opens, you can change the color of the selected part of the photo (in this case of hair) with the help of adjusting the runners in the one or other side.


When the color you want, click "OK". If the hair color turned out to be too dull, or, on the contrary, bright, in the Correction item, select subparagraph "Brightness / Contrast ...".

By moving the runners left or right, set the desired contrast and brightness.

Now save the image in a new file, compare with the old, and conclude: Do you need to change your hair color? :)

Of course, in Photoshop, you can change not only the color of the hair. It can be a color dress, car, sky .... In general, that only the soul will wish!
11.02.2015 27.01.2018
In this lesson, I will tell you in detail about how to change the color in Photoshop. I will write down all the steps in detail, accompanying pictures to be clear and intelligibly explain where and what function can be used.
1 way
The first way to replace the color is to use the finished function in Photoshop "Replace the Color" or Replace Color in English.
I will show on the simplest example, on a not sophisticated picture. Take the icon and open it in Photoshop.
Stretch on a yellow icon. We will replace the yellow color to any other of interest to us. To do this, go to the Image menu - Correction - Replace Color (Image - Adjustments - Replace Color)
.png)
The color replacement function dialog box appears. Now we have to specify which color will change, for this, activate the pipette tool (see the arrow) and click on the trowel. You will see how this color will be displayed in the dialog box in the upper part, which is entitled as a selection.
.png)
At the bottom of the replacement header - there and you can change the selected color. But before you can specify the variation parameter in the selection. The greater the parameter, the more it will capture the colors. In this case, you can put a maximum. It will capture all yellow color in the image.
Configure color replacement options - on the color you want to see instead of replaced. I made green, setting the parameters of the color tone, saturation and brightness.
.png)
When will be ready to replace the color - click OK.
So we changed one color to another.
2 way
The second way according to the work scheme can be said to be identical to the first. But we will look at it on a more difficult image.
For example, I chose a photo with the machine. Now I will show how to replace the color of the car in Photoshop.
.jpg)
As always, we need to specify which color we will replace. To do this, you can create a selection using the Color Range function. In other words, highlight the image in color.
To do this, go to the selection menu - Color Range (Select - Color Range)
.jpg)
Next, it remains to click on the red machine and we will see the function determined it - painting with white in the preview window. White color shows which part of the image is highlighted. The scatter in this case can be adjusted to the maximum value. Click OK.
.jpg)
After you click OK, you will see how to select:
.jpg)
Now you can change the color of the selected image. To do this, use the feature - Image - Correction - Color Tone / Saturation (Image - Adjustments - Hue / Saturation)
.jpg)
A dialog box appears.
Immediately check the toning parameter (bottom right). Now using color tone, saturation and brightness can be customized color. I set up a blue color.
.jpg)
Everything. The color was replaced.
.jpg)
It was - became:
.jpg)
It is often like this: I found the right picture, and the color is not that; Or simply wanted to diversify the usual. How to replace the color in photoshop to another? The question is justified, because in Photoshop, it is possible to replace the color in several ways. Much depends on the dispersal of a certain shade throughout the image. The less often the color replacement will occur on other sections of the image, the easierless of the color replacement in photoshop.
And now let's look at a few ways and understand how in Photoshop, replace one color to another.
The first way is the easiest and fastest. But the object of the repainting should not be too complicated. For example, take a photo lime on the table. The background is almost homogeneous, green is present only on lime. Fruit round, it will not be difficult to repaint.

Open the image in Photoshop and remove the fixation of the layer by clicking the right mouse button on the lock image.

Above the layer with a photo create a new transparent layer ( SHIFT + CTRL + N). Call tool "Brush" / Brush (key B.). Brush is better taken hard. In the control panel, we call the properties of the brush and choose a hard, with navigating edges of the smear.

Brush Color Choose the one in which we want to repaint lime. Take, for example, blue. The palette is on the toolbar below. Called double-clicking on the icon. By moving the slider on the spectrum, you can select a color range. Color tone choose by moving the white ring in a square window, where the tone moves from white into black.

We become on a transparent layer, select the size of the brush keys Kommersant - increase or H. - Reduce and paint our lime.

Now change the layer overlay mode with "Normal" / Normal on the "Color Tone" / Hue. You can do it on the layer palette. Thus, lime will change the color.


If you hold the key Ctrl And, by clicking the cursor to the layer icon, click once, the zone of the core is highlighted. Now, without removing the selection, you can change the color of the brush and pick up other colors. You do not need to look again. You can, after selecting the color, press the key combination Alt + Delete.. So the dedicated zone will fall as new color.

In the following example, consider how to replace the color in photoshop better. This method can take a little longer, but the result is worth it.
How to replace one color to another in Photoshop, if the shades of the varied color are often found in the picture
Suppose you need to change the color of the model of the model. Red, pink and shades of these colors are present in the color of the skin. By changing the lip color, you need to leave the skin color unchanged.
Open the image in Photoshop. Create a correction layer. The list of corrective layers can be opened on the layer palette at the bottom.

In the adjustment layer settings window, select the color of the color "red", click on the tool "Pipette" / Eyedropper Tool, then make one click on the lips of the model. So we will define the color that we will change.

Below, on the gradient, moving brackets will appear. With their help, you can make wider or already a range of specified color. When moving Checker "Color Tone" / Hue The selected shade of the lips will change throughout the spectrum, depending on where you will assign a checker. At the same time, the shade of red will change over the entire image.

Ctrl + I.

Selecting the color you need to change, close the editing window of the correction layer, we become on the modifying layer mask (white square) and press the keys Ctrl + I.. The mask is inverted into the black, and all our changes will disappear.

When all sections, where the color you need to change, worked out, you can save the image (keyboard key SHIFT + CTRL + S). If in some kind of site you missed, you can cancel action Alt + Ctrl + Z Or sketch on the mask of the correction layer, all the blunders of black brush. This method will more accurately help choose a new color, and work will look careful.
Even more about Photoshop can be found in the course in Fotoshkola.net.
How to replace one color to another in Photoshop, if the original color is black or white
Cases with a change of black and white color. Otherwise.
To change the black color, you can apply the correction layer "Color Tone / Saturation" / Hue / SaturationBut it does not work with the flower channel, but with toning. To do this, in the setting of the layer you need to check "TONING" / COLORIZE.

Consider more. Suppose you need to repaint a black sofa. Select a sofa using the tool (Calling the key W.).

Using combinations Ctrl + C. and Ctrl + V. We carry the selected area to the transparent layer and apply a correction layer to it. "Color Tone / Saturation" / Hue / Saturation. To do this, between the corrective layer and layer with a dedicated object, you need to click on the left mouse button while holding the key Alt..

Now you call it a double click on the correction layer, put a tick "TONING" / COLORIZE And by moving the color tone, saturation and brightness checkers, select the desired color.

It turns out simple, beautiful, without a trick.
You can use the correction layer for white repainting "Color" / Color In overlay mode Multiplication / Multiply.
Open the image, create a correction layer "Color" / Color. The color of the layer immediately ask the one in which we plan to paint white.

Change the imposition mode on Multiplication / Multiply, become on the mask of the corrective layer and click Ctrl + I..

Go to the layer with the image and highlight the desired sections of a white tool "Quick Selection" / Quick Selection (Calling the key W.). Without removing the selection, we become on the mask of the correction layer and the white brush of the large diameter are missing the mask. Color will change only where you set up the tool "Quick Selection" / Quick Selectionwhich can be defined by dotted.

If you wish, you can replace the color of the correction layer. To do this, click on it double-clicking and choose any new color in the spectrum.
So everything is simple. Try, experiment. You will definitely succeed. Now you know several ways to replace the color to another in Photoshop.

Even more about Photoshop can be found in the course in Fotoshkola.net.
 Doesn't Diablo III start?
 How to check the computer to spyware
 Spyware on the computer