Adjust the speed of the computer or laptop fans. How to set the speed of rotation of coolers (fans) automatic adjustment of the speed of the cooler
This manual is suitable for any version. Speedfan..
I recommend using the English-speaking program interface. This will avoid problems with discarding the names of temperatures and fans, and it looks like english text More concosive and compact.
Setting up the program
Press the button " Configure.».Before us the first tab - " Temperatures."Displays installed on motherboard Sensors and current temperatures with standard parameters.
Let's start setting
You can see that all available temperature values \u200b\u200bare displayed that Speedfan. was able to detect. In a collumn " Chip.»The sensor chip is specified. In this case, we have three different chips: one W83782D and two LM75. We can distinguish two LM75 due to differing addresses ($ 48 and $ 49). LM75 chips, in this case, are actually clones created by W83782D, and we will not pay attention to them, since all temperatures are available directly via W83782D. But it is not always true. WinBond chips can be configured in such a way that they will actually hide the present temperature obtained from the main sensor. In this case, you need to work with LM75. So, choose the desired temperature. For example, we chose TEMP02.
Select the "desired" (desired) and the "alarming" (warning) temperature values \u200b\u200baccording to our wishes. Note that we say: "Wishes". You are free to install any values. But you should not rush in extremes and set values, for example, in the area of \u200b\u200b15 degrees. This will not bring the desired result.
Ideally, set the thresholds are necessary. Pick up a comfortable processor fan speed for inactivity mode (usually set so that it is not heard), and now remember what the temperature of the processor at such a fan speed. For example, if the temperature of the processor is in simple 35 degrees, then desired ( Desire) It is necessary to set more, for example, 37-40. Then, when you exceed this threshold, the fan will accelerate to the top value ( Warning) In its settings, and when the temperature begins to fall and cross this mark ( Desire), then the fan will reset the turnover.1. If the temperature of the sensor is less DesireThe fan will rotate with the MIN speed (configured).
2. If the temperature of the sensor exceeds DesireBut less Warning - The fan will rotate at speeds Maximum Value. (usually exhibited<100%).
3. If the temperature of the sensor exceeds the value WarningThe fan begins to rotate 100% possible speed.
As you can see, we first have to choose the temperature, then we can select its parameters. You can also rename the name of the temperature (using the mouse or by pressing " F2."). The new name will be more vividly displayed in the main window.
In modern systems, there are usually a large number of different temperature sensors. To properly identify them, it is recommended to start parallel to the program. Aida64. and rename all the necessary temperatures according to its testimony, which reaches the same indicators.
We renamed TEMP1 and TEMP2 in CPU1 and CPU0.
So, we finished rename and set the parameters for each temperature. Since in our case the highest temperature in the system - the temperature "Case", we decided to display it in the taskbar (checkbox " Show in Traybar.»).
Now we must hide in the main window those temperatures that are unused. In our case, these are indicators LM75. Not every system has unused sensors, but it also happens that there are nonconnected sensors on the motherboard, which report wrong values \u200b\u200b(for example, -127 or something like that).
Uncheck flags from those temperatures that, in your opinion, are not useful or have incorrect values.
Now you can arrange the temperatures displayed in the main window. All we have to do is use Drag & Drop to move them up or down.
So, the first part of the setup is successfully completed, and we have achieved the following result:
Setting fans
Just as in the case of temperatures, we can rename the names of the fans ...
... Remove from the main window unused ...
... and streamline.
Speed \u200b\u200bsetting
These are the default parameters for this system. You can set your minimum ( Minimum Value) and maximum ( Maximum Value.) Power values \u200b\u200bfor each fan.Do not forget that not every motherboard has the ability to manage fan rotation speeds. This, first of all, depends on which sensors can be installed on it and detected by the program. Speedfan.. The same applies to the temperatures, stresses and fans. Not every sensor chip can control all these parameters. Speedfan displays all information available to it.
As usual, we can rename ...
... Remove from the main window unused (W83782D has 4 PWM, but you can hardly use them all) ...
... and streamline.
Voltage settings We will not describe here, because They are also, by analogy with other parameters, you can rename, hide and streamline.
Purpose of temperature velocities
Now the main window looks much better than when you first start the program. The flame icons disappeared, and unnecessary parameters no longer clutter the window :-)
But we still have the CPU0 speed and the CPU1 speed, equal to 100%. It is necessary to reduce the turnover of fans. Note that you will not be able to change all speeds. It depends on the sensors and controllers installed on your motherboard. Since, in this case, we have W83782D, we have the ability to change many parameters.
Going back to the settings panel, we can see that the CPU0 temperature is associated with all available speeds, two of which are flags, and there are no other two. This happens because we hid some speeds from the main window and the program, assuming that we do not need these speeds, it automatically removed the checkboxes from them.
Each PWM can increase or decrease the speed of one fan. Theoretically, each fan can affect any temperature. Here we specify the program that the CPU0 speed and the CPU1 speed (which are associated with PWM2 and PWM1) are both affected by the CPU0 temperature. It means that Speedfan. Will try to speed up both of these fans when the CPU0 temperature is too high and will try to slow them when the temperature decreases.
So we formed the temperature CPU0 to the present. But this is not what actually occurs in this system. Here, the CPU0 temperature changes under the influence of the velocity (fan) of the CPU0 and the CPU1 temperature changes under the influence of the CPU1 speed.
Change the configuration accordingly.
There is another temperature that we would like to control: Temperature " Case" This temperature varies actually under the influence of both fans. We can easily inform the program about it.
Automatic speed change
As you can see, when the flag is installed Automatic Fan Speed."The speed does not change automatically. Therefore, we return to the tab " Speeds.»Settings panels.
We choose the velocity of the fan and put a tick in the column " Automatically variated"(Automatic change). So you need to do for all coolers whose speeds are planned automatically.
Now the speeds of the fans we need will be changed depending on the temperatures we installed on the tab " Temperatures.».
Default, Speedfan. It may vary each speed from 0 to 100%. If you remove in the main window of the program tick " Automatic Fan Speed.»(Automatic fan speed adjustment), Speedfan. stop automatically controlling speeds.
Setting the desired speeds
One of the fans of our system is sufficiently quiet at 65% of the power ( Minimum Value). It is good because it still works at a speed of 5,700 revolutions per minute. Another fan is more noisy. Therefore, the value of its power will differ somewhat from the first.
90% of power ( Maximum Value.) The second cooler is enough to cool the central processor to an acceptable temperature. At 100% noise level becomes quite high.
With such settings, the program will dynamically change the speed of the first fan from 65 to 100%, and the second speed is from 65 to 90%.
Note that if " Anxious» ( Warning) The temperature is achieved, Speedfan. Sets the speed of the fans 100%, regardless of what we were installed earlier.
This describes the basic settings that need to be performed for the successful operation of the program.
1.1. Configure Advanced Fan Control.
In recent versions Speedfan. There was an opportunity to set the fan speed dependences of the fan speed - Advanced Fan Control . You can see detailed information on the setting on the link. I note that if you are not satisfied with the accuracy of pointing points, open the file speedfansens.cfg. And there, set the dots right numbers (value ControlPoints.After changing the program you need to restart). It should be borne in mind that the minimum and maximum fan speed thresholds on the tab Speeds. have a higher priority compared to the curve Advanced Fan Control. The same temperature: if the point on the curve goes abroad Warning On the tab Temperatures.The fan will start rotating from 100% speed.2. Turning on the startup.
The program is configured, but now we need it to run with each computer loading. With Windows XP, there are no problems, there you only need to throw a shortcut in the startup. And with Windows 7 and 8 more complicated.In Windows 7 with the default settings, the program may not start using a simple transfer of the label to autoload, so the easiest way will reduce the UAC slider to a minimum. If it does not suit you (and in Windows 8 it may also not work), it will help a way to schedule tasks. Right-click by My Computer - Management - Task Scheduler - Task Scheduler Library. On the panel on the right - Create a task. On the tab General Enter the name of the task (arbitrarily) and check Fulfill the highest rights. Tab Triggers - Create - when entering the system. Tab Action - Create - Starting Program - specify Speedfan.exe. button Overview. Click OK - The task will be created. You can check its launch immediately: right-click - Perform.
3. F.A.Q.
Q: How to find out what the temperature sensors are TEMP1, TEMP2?A: Start parallel Aida64. And find the same testimony. Rename the previous names to desired.
Q: Help! One of the sensors (AUX) shows 127 (-125) degrees!
A: If the readings of this sensor are always the same - boldly remove it from the list shown.
Q: After changing the names of the sensors and fans to its next download, the previous names of VENT1, temp2, etc. appear again. You have to press "Configuration - OK" and only then instead of the vent and the tempo, my names appear.
A: Use English interface language.
Q: I did everything, as it is written in the program setting, but the fan on the processor cooler does not change its speed.
A: Make sure the fan with a four-pin connector is inserted into the four-pin connector on the motherboard. If the fan has only 3 wires, then the turnover control is impossible (with rare exception).
Q: I have a three-pin connector on the motherboard and the same on the fan / I have a four-pin connector on the motherboard and the same on the fan - the turns do not change anyway.
A: Change the CONFIGURE - Advanced settings in the IO settings (Configure - Advanced) PWM x mode (where X is the desired fan) to something like Software Controlled or Manual Pwm Control, not forgetting to put a daw "Remember (Remember)"
Q: The program shows that the voltage on the 12V line is only 9V. What to do?
A: Do not trust this data. The only correct solution will be measured with a voltage with a voltmeter.
Q: I'm going to rearrange the operating system, but I do not want to re-configure the program. How can I save all settings?
A: Copy 3 files from the program's working folder: SpeedFanevents.cfg, Speedfanparams.cfg, Speedfansens.cfg.
Q: Fan speed 0Ard values. In other programs normally.
A: Change the CONFIGURE-ADVANCED settings (configure - Advanced) First, the value of Fan DIV, if it does not help - Fan Mult.
Download Speedfan from the official website: www.almico.com/sfdownload.php.
All questions related to the configuration and functioning of the program are specified in the appropriate topic.
In the comments, please specify the selected errors and typos.
With help speed \u200b\u200bcontrol systems vehicle, you can fix the speed value when it exceeds 30 kilometers per hour. It is also possible to maintain it at the same level.
The input signals include:
1. The rotational frequency of the crankshaft;
2. Load directly to the engine - measuring signal from mass air flow;
3. The speed at which the car moves;
4. Feed a braking signal;
5. Feed the signal that the clutch is squeezed;
Turning on / off signals from the SRS switch:
1. Control of the throttle block;
2. Control unit from the engine;
3. Measuring instrument of air mass flow;
4. Rotational frequency of the crankshaft sensor;
5. Sensor when you click on the brake pedal;
6. Sensor when pressed on the clutch pedal;
7. Switching SRS;
8. The speed at which the car moves.
On a specific signal sRS switch The control unit starts controlling the throttle. Then this throttle begins to open to such an extent that it needs to maintain the driver specified by the driver. In those machines that have a multifunction steering wheel equipped with an additional SRS switch. When signals come about that either braking is performed, or the clutch is squeezed, the system that adjusts the speed is automatically turned off. The accelerator pedal module gives signals that are subsequently enter directly to the block input that controls the engine control. In this block, signals begin to be processed, given all additional values, and then the best mode of operation for the engine is created, which corresponds to a torque specified by the driver. From the electric motor, the throttle valve is received by the signal, and the new operating mode begins. When the control lamp caught fire, it means that some kind of malfunction occurred in the system itself.
Speed \u200b\u200badjustment by automatic mode:
Pretty comfortable and useful feature - automatic. Adjusting speed. Especially when the driver accounts for a long time to go at one level level, it allows him to be more relaxed. With one key, which is on the arm driving, there are options to enable the function " cruise control ". But the speed at the same time should be from 30 to 240 kilometers per hour. There is another feature - adapted "cruise control"You can buy it to order. It will adjust the vehicle speed on the basis of how much the distance is up to the car in front. The principle of his work is as follows: in the central front air intake there is a special radar sensor, which begins to control the zone not more than 200 meters on its band, before the vehicle. Then this system begins to lower the speed, dropping the gas supply, and slowly the car begins to slow down, slowing down somewhere up to 3.5 m / s2. Thus, this system works until the configured distance in front of the car is not achieved. If you need to brake a sharper, the driver must do it yourself. In this case, the vehicle begins to follow in front of the riding car at a lesser speed.
Question from the user
Good day.
Playing 40-50 minutes to one computer game (approx.: The name is cut) - the processor temperature grows up to 70-80 degrees (Celsius). Changed the thermal paste, cleaned from dust - the result is the same.
Here I think, is it possible to increase the speed of rotation of the cooler on the processor to the maximum (and in my opinion he is slightly rotating)? The temperature without loading the processor is 40 ° C. By the way, is it possible because of the heat? And then we have about 33-36 ° C outside the window ...
Arthur, Saransk
Good day!
Of course, the temperature of the room in which the component temperature is also dependent and the temperature of the components, and the load on the cooling system (therefore, with overheating most often, it is necessary to encounter in the summer hot time). The fact that your temperature comes up to 80 degrees is not normal (although some laptop manufacturers allow such heating).
Of course, you can try to set the cooler rotation settings to the maximum (if it is not so), but I still would recommend a set of measures (You can learn about them from the article to measure and control the temperature of the processor, video card, HDD -).
By the way, it is also often a reverse side of the medal: the coolers rotate at the maximum and create a strong noise (while the user does not load the computer at all, and they could rotate much more slowly and quieter).
Below I will consider how to adjust their speed of rotation, and what to pay attention to. So...
Increase / reduction of coolers rotation speed
In general, on a modern computer (laptop), the cooler speed sets the motherboard, based on data from temperature sensors (i.e., the coolers above are the faster) and loading data. The parameters from which the mat is repelled. The board, usually, can be set in the BIOS.
What is measured by the speed of rotation of the cooler
It is measured in revolutions per minute. Denotes this indicator as rPM. (By the way, they are measured by all mechanical devices, for example, the same hard drives).
As for the cooler, the optimal rotational speed, usually, is about 1000-3000 RPM. But this is a very averaged value, and to say exact which you need to set - it is impossible. This parameter is highly dependent on the type of your cooler, for which it is used, on the temperature of the room, on the type of radiator, etc. of the moments.
Methods, how to adjust the speed of rotation:

Speedfan.
A free multifunction utility that allows you to monitor the temperature of the computer components, as well as monitor the work of the coolers. By the way, "sees" this program is almost all the coolers installed in the system (in most cases).
In addition, you can dynamically change the speed of rotation of the PC fans, depending on the temperature of the components. All variable values, work statistics, etc., the program saves in a separate log file. Based on them, you can see graphs change temperatures, and fan speeds.
Speedfan works in all popular windows 7, 8, 10 (32 | 64 Bits), supports the Russian language (for its selection, click the "Configure" button, then the Options tab, see the screenshot below).

Main window and appearance Speedfan program
After installing and starting the Speedfan utility, the Readings tab must appear before you (this is the main program window - see Screenshot below). At my screenshot, I broke the window to several areas to comment and show what he answers.

- Block 1 - The "CPU Usage" field indicates the processor load and its nuclei. Nearby also arranged the "Minimize" and "Configure" buttons designed to fold the program and its settings (respectively). There is still a check mark "Automatic Fan Speed" - its purpose automatically adjust the temperature (I will tell about it just below);
- Block 2 - here are a list of discovered cooler speed sensors. Please note that everyone has a different name (SYSFAN, CPU FAN, etc.) and opposite each - their meaning. rPM (i.e. rotation speeds per minute). Part of the sensors show RPM by zeros - these are "trash" values \u200b\u200b(you can not pay attention to them *). By the wayIn the names there are incomprehensible abbreviations for someone (decrypt just in case): CPU0 FAN - fan on the processor (i.e., the sensor from the cooler, stuck in the connector CPU_FAN on the mat. board); AUX FUN, PWR FUN, etc. - Similarly shows RPM fans connected to these connectors on the mat. board;
- Block 3 - Component Temperature: GPU - Video Card, CPU - Processor, HDD - Hard Disk. By the way, there are also "trash" values \u200b\u200bfor which one should not pay attention (TEMP 1, 2, etc.). By the way, it is convenient to remove the temperature with AIDA64 (et al. Special utilities), about them here:
- Block 4 - But this unit allows you to reduce / increase the speed of rotation of the coolers (set in percentage. By changing percentages in the graph SPEED01, SPEED02. - You need to look at which cooler has changed the speed (that is, what is responsible for what).
Important! The list of some indicators in Speedfan will not always coincide with the cooler with which it is signed. The fact is that some computers are connected (for one or another considerations), for example, a processor cooler is not in the CPU FAN socket. Therefore, I recommend it to gradually change the values \u200b\u200bin the program and look at changes in the speed of rotation and temperature of the components (even better, open the roof of the system side and visually watch the speed of rotation of the fans).
Adjusting the speed of rotation of the fans in Speedfan
Option 1
- As an example, it will try to adjust the speed of rotation of the processor fan. To do this, you need to pay attention to the CPU "CPU 0 Fan "- It is in it that the RPM indicator should be displayed;
- Next, alternately change the values \u200b\u200bin the "PWM1" graphs, "pwm2" and others. When the value was changed - wait a while, and see if the show did not change rPM., I. temperature (see Screen below);
- When you find the right one PWM. - Adjust the speed of the cooler to the optimal number of revolutions (about processor temperature I , I also recommend to familiarize) .

Option 2.
If you want to be involved in the "smart" mode of operation (i.e. that the program dynamically changed the speed of rotation, depending on the processor temperature ), then you need to do the following (see Screenshot below):
- open the program configuration (Note: Button "Configure") , then open the "Speed" tab;
- next choose a line that is responsible for the cooler you need (It is necessary to first be found experimentally, as recommended in version 1, see a little higher in the article) ;
- now in the "minimum" and "maximum" graphs, set the desired values \u200b\u200bin percentage and check the "Autimension" checkbox;
- in the main window of the program, place a tick opposite the "Automicacy of Fans" item. Actually, the speed of rotation of the coolers is also regulated.

Addition! It is also desirable to go to the "Temperature" tab and find the processor temperature sensor. In its settings, set the desired temperature that the program will support and the alarm temperature. If the processor is heated before this alarming temperature, then Speedfan will begin to spin the cooler at full power (up to 100%)!
For those who do not work Speedfan
Setting up automatic adjustment of coolers in BIOS
Not always the SpeedFan utility works correctly. The fact is that BIOS has special functions that are responsible for automatic adjustment of the rotational speed of coolers. Call in each version of BIOS they can differently, for example, Q-Fan, Fan Monitor, Fan Optomize, CPU Fan Contol etc. And immediately note that they are not always working correctly, at least SpeedFan allows you to very accurately and finely adjust the work of the coolers, so that they and the task are performed, and the user did not interfere with ☺.
To disable these modes (The photo below shows Q-FAN and CPU Smart Fan Control), you need to enter the BIOS and translate these functions to mode Disable. By the way, after that, the coolers will earn maximum power, it may become very noise (so it will be until you adjust their work in Speedfan).
Hot keys to enter the BIOS menu, Boot Menu, restore from the hidden section -

That's all today, everyone's good luck and optimal fans work ...
Proportional control - Pledge of silence!
What task is placed in front of our management system? So so that the propellers in vain do not rotate, the dependence of the rotational speed is from temperature. The hot device - the faster the fan rotates. Logical? Logic! On that and damaged.
Of course you can bother with microcontrollers, which will be even easier, but absolutely not necessary. In my opinion it is easier to make an analog control system - it will not be necessary to bother with programming on assembler.
It will be cheaper, and easier in commissioning and configuration, and most importantly, if desired, can expand and suck the system to taste, adding channels and sensors. All that you will need only a few resistors, one microcircuit and thermal sensor. Well, straight hands and some skill soldering.
Collecting top view

View from below
Structure:
- Chip size resistors 1206. Well, or just buy in the store - the average price of one resistor 30 kopecks. In the end, no one prevents you from a bit to correct the fee to hit the chip of the resistors to have ordinary, with legs, and in any old transistor TV in bulk.
- The multi-turn variable resistor is about 15k.
- Also required chip capacitor size 1206 to 470 NF (0.47MKF)
- Any electrolytic consumer voltage from 16 volts and above and the capacity in the 10-100mkp area.
- Screw terminal carts optionally - you can simply solder the wires to the board, but I put the terminal bar, clean for aesthetic considerations - the device should look solid.
- As a power element, which will manage the cooler nutrition, we will take a powerful MOSFET transistor. For example, IRF630 or IRF530 it can sometimes be able to exhaone from the old power supply units from the computer. Of course, for a tiny propeller, its power is redundant, but is there any little, suddenly you want to go there anything help?
- The temperature will be subject to the precharged LM335Z sensor, it costs no more than ten rubles and the deficit of itself does not represent, and it is possible to replace it with some thermistor, since it is also not uncommon.
- The main part on which everything is based is a microcircuit of four operating amplifiers in one case - LM324n is a very popular thing. It has a bunch of analogues (LM124N, LM224N, 1401UD2A) The main thing will be killed so that it is in the DIP case (so long, with fourteen legs, as in the pictures).
Wonderful mode - PWM

Education of PWM signals
So that the fan rotates slowly enough to reduce its tension. In the simplest deabulas, this is done by means of a variable resistor, which is posed consistently with the engine. As a result, part of the voltage will fall on the resistor, and the engine will fall on the engine as a result - reduction of revolutions. Where is Padlana, do not notice? Yes, the ambush is that the energy released on the resistor is not transformed into something, but in the usual heat. Do you need a heater inside the company? Obviously no! Therefore, we will go more tricky way - we will apply latitude and pulse modulation aka. Shimor PWM.. It sounds scary, but do not be afraid, everything is simple here. Imagine that the engine is a massive cart. You can push his foot continuously, which is equivalent to direct inclusion. And you can move kicks - it will Shim. The longer the time to push the foot with the stronger you accelerate the cart.
For Shim Nutrition on the engine is not constant voltage, but rectangular pulses, as if you turn on and turn off the power, only quickly, dozens of times per second. But the engine has a slight inertia, and also the inductance of the windings, so these impulses are as if they are summed up each other - integrate. Those. The greater the total area under impulses per unit of time, the greater the equivalent voltage goes to the engine. Serve narrow, like needles, impulses - the engine barely rotates, and if you apply wide, almost without cleansings, it is equivalent to direct inclusion. Turn on and off the engine will be our MOSFET. transistor, and to form pulses will be a scheme.
Saw + straight \u003d?
Such a cunning control signal is elementary. For this we need to comparator Turn the signal pilotum Form I. compare him with any constant Voltage. Look at the drawing. Suppose our saw goes to a negative way out. comparator, and constant voltage to positive. The comparator folds these two signals, determines which of them more, and then removes the verdict: if the voltage at the negative input is more than on a positive, then the output will be zero volt, and if the positive will be more negative, then the output will be the supply voltage, that is, about 12 volts. We saw in us continuously, it does not change its form over time, such a signal is called reference.
But the constant voltage can move up or down, increasing or decreasing depending on the temperature of the sensor. The higher the temperature of the sensor, the more voltage from it it comesSo, the dummy at a permanent entrance becomes higher and according to this, the pulses at the output of the comparator become wider, forcing the fan to spin faster. It will be until the constant voltage blocks the saw, which will turn on the engine to full rev.. If the temperature is low, then the voltage at the output of the sensor is low and the constant will leave below the lower body of the saw, which will cause the cessation of any pulses and the engine will stop at all. Uploaded yes? ;) Nothing, brains useful to work.
Temperature mathematics

Regulation
As a sensor, we use LM335Z.. In essence, it thermostabitrone. The joke of Stabilon is that on it, as on the restrictive valve, there is a strictly defined voltage. Well, and in thermostabilities, this voltage depends on temperature. W. LM335dependence looks like 10mv * 1 degree by Kelvin. Those. Counting is conducted from absolute zero. Zero Celsius is two hundred seventy-three degrees in Kelvin. So, in order to get the voltage overlooking the sensor, let's say at the plus of twenty-five degrees Celsius, then we need to twenty-five to add two hundred seventy-three and multiply the resulting amount of ten Millivolt.
(25 + 273) * 0.01 \u003d 2.98V
At other temperatures, the voltage will not change much, on the same 10 Milvolt for degrees. This is the next substab:
The voltage from the sensor changes rigorously, on some tenths of the volt, and it is necessary to compare it with a saw from which the height of the teeth is accurately achieved as much as ten volts. To obtain a permanent component directly from the sensor to such a voltage, it is necessary to heat it up to a thousand degrees - rare crashes. How then to be?
Since we still have the temperature, it is still hardly dropped below twenty-five degrees, then everything is not interested in us, which means that it is possible from the output voltage from the sensor only the very tip, where all changes occur. How? Yes, just deduct from the output signal two whole ninety-eight hundred volts. And the remaining crumbs multiply on gain, Say, thirty.
In accurate, we get about 10 volts of fifty degrees, and up to zero at lower temperatures. Thus, we turn out a peculiar temperature "window" from twenty-five to fifty degrees within which the regulator works. Below is twenty-five - the engine is turned off, above fifty - is turned on directly. Well, between these values, the velocity of the fan is proportional to the temperature. The windows width depends on the gain coefficient. Than it is more, the window is already, because The limit 10 volts, after which the constant component on the comparator will be above the saw and the motor will turn directly, come before.
But we do not use a microcontroller, nor the means of the computer, how will we do all these calculations? And the same operating amplifier. After all, it is not for nothing that is named operating, its initial purpose is mathematical operations. All analog computers are built on them - stunning cars, by the way.
To subtract one voltage from another you need to submit them to different inputs of the operational amplifier. The voltage from the thermal sensor is applying for positive inputand the voltage that must be subtracted, the offset voltage, we feed on negative. It turns out the subtraction of one of the other, and the result is also multiplied by a huge number, almost at infinity, another comparator turned out.
But we do not need infinity, since in this case our temperature window is narrowed to the point on the temperature scale and we have either worth it, or a rotating fan is mad, but there is nothing more annoying than the turning and turning compressor of the scooping refrigerator. The analogue of the refrigerator in the computer is also not needed. Therefore, we will lower the gain, adding to our subtractor feedles.
The essence of the feedback is to drive back to the input from the output. If the output voltage is deducted from the input, then this is a negative feedback, and if it is folded, then positive. Positive feedback increases the gain coefficient, but can lead to signal generation (automatic machines call it loss of system stability). A good example of a positive feedback with a stability loss is when you turn on the microphone and speech to them in the speaker, usually the opposite or whistle is once there is a generation. We should also reduce the gain coefficient of our operator to reasonable limits, so we apply a negative connection and start a signal from entering a negative input.
The ratio of feedback and input resistors will give us the gain affecting the regulatory window that affects the width. I figured that thirty would be enough, you can recount for your needs.
Saw
It remains to make a saw, and more accurately assemble the saw-shaped voltage generator. It will be from two operatingors. The first due to the positive feedback is in the generator mode, issuing rectangular pulses, and the second serves as an integrator, turning these rectangles into a sawn form.
The condenser in the feedback of the second operating amplifier determines the frequency of pulses. The smaller the capacitor capacitance, the higher the frequency and vice versa. Generally B. Shim Generation the greater the better. But there is one jamb, if the frequency falls into the audible range (20 to 20,000 Hz), the engine will disgust to squeeze at the frequency ShimWhat is clearly dispersed with our concept of a silent computer.
And from this frequency scheme more than fifteen kilohertz, I could not - sounded disgusting. I had to go to the other side and drive the frequency to the lower range, to the district of twenty hertz. The engine began to vibrate a bit, but it is not heard and felt only with his fingers.
Scheme.

Tax, with blocks figured out, it is time to look at the scheme. I think the majority have already guessed what's what. And I still explain, for greater clarity. The dotted line indicates functional blocks.
Block # 1.
This is a saw generator. R1 and R2 resistors form a voltage divider to submit to the generator half the supply, in principle they can be any nominal, the main thing is to be the same and not much greater resistance, within a hundred kilo. The R3 resistor to a pair with a C1 capacitor determine the frequency than their nominal value, the greater the frequency, but again I repeat that I could not withdraw the scheme for the sound range, so it's better to leave as it is. R4 and R5 are the resistors of positive feedback. They also affect the height of the saw relative to zero. In this case, the parameters are optimal, but if you do not find the same then you can take about plus minus kiloma. The main thing to observe the proportion between their resistances is approximately 1: 2. If the R4 is strongly reduced, then it will have to reduce R5.
Block # 2.
This is a comparison unit, there is a PWM pulse and constant voltage.
Block # 3.
This is just a scheme that suits the calculation of temperature. Voltage from the thermal sensor VD1. It is fed to a positive input, and the displacement voltage from the divider is supplied to the negative input R7. Rotating the handle of the rapid resistor R7 You can shift the control window above or below the temperature scale.
Resistor R8. May be within 5-10k, it is more undesirable, less too - a thermal sensor can burn. Resistors R10 and R11 must be equal to each other. Resistors R9 and R12. Also should be equal to each other. Nominal resistors R9 and R10 It may be in principle any, but it must be borne in mind that the gain depends on their relationship determining the width of the regulatory window. KU \u003d R9 / R10 Based on this ratio, you can choose the nominations, the main thing is that it is not less than kiloma. Optimal, in my opinion, is the coefficient of equal to 30, which is provided by resistors on 1kom and 30k.
Installation

Printed circuit board
The device is made by printing to be as compact and careful. Package pattern in the form of a layout of the file is lied right there on the site, program SPRINT LAYOUT 5.1. You can download and model biscuit boards from here

The same printed circuit board is performed once or twice by laser-iron technology.
When all the details are assembly, and the board is etched, then you can start assembling. Resistors and capacitors can be soldered without feet, because They are almost not afraid of overheating. Special caution should be shown with MOSFET. transistor.
The fact is that it is afraid of static electricity. Therefore, before getting it from the foil, in which you should be wrapped in the store, I recommend to remove synthetic clothes and touch with a hand of a bare battery or a crane in the kitchen. Mikruchu can be overlayed, so when you solder it, then do not hold the soldering iron on the legs longer a couple of seconds. Well, finally, let's give the Council on resistors, or rather on their marking. See the numbers on his back? So this is the resistance in Omah, and the last digit indicates the number of zeros after. for example 103
this is 10
and 000
i.e 10 000
Ohm or 10kom.
Upgrade is thin.
If, for example, you want to add a second sensor to control another fan, then it is not necessary to make the second generator at all, it is enough to add the second comparator and the calculation scheme, and the saw from the same source. For this, of course, you will have to redraw a picture of the printed circuit board, but I don't think it will be a lot of work for you.
The main reasons for overclocking the fan two. First - too high The temperature of the components inside the system unit, which is not associated with dust pollution of the computer or a malfunction of cooling systems. In this case, logical raise speed Cooling fans within the permissible feature.
The second reason, the opposite requires reduce this very speed is elevated noise. It is important to find a reasonable compromise in it - the most silent work with sufficient cooling of the elements of components. Therefore, you need somehow change Fan speed. About how to make it will be discussed further.
Initially, the speed of revolutions is indicated in the settings BIO.S.based on which the computer motherboard sets the specified parameters, in particular changing tensionsupplied to the fans controlling this way turns. However, you can manage this speed not all coolers, but only on three output, two-unit will always work on high Speed.
Also adjust can be rotated fans installed on the video adapter and the central processor.


This can be done with Bios. (UEFI) either using third-party programs, and some manufacturers produce their branded utilities to control cooling systems for laptops.
Increase the speed through the bios
In order to initialization During system launch, press Del. or F.2
(or another option, depending on which bios). We find the option associated with the speed of the cooler, usually it CPU Fan Speed. And change the value. 
If there is no such item or it is impossible to make changes, then this can be done using special software.
In some BIOS, there are such options as Smart. CPU. Fan. Temperature., CPU. Smart. Fan. Control or Noise. Controlwhose inclusion will allow you lower noise when turning on and author Regulatory revolutions during operation, that is, if the load is increased, the turnover increases, otherwise they are down, up to a complete shutdown. 
That is, the setting thus is to establish a limiting temperature or in a simple inclusion of this function in the BIOS.
We use Speedfan
The most popular program for setting the speed of rotation of the coolers is Speedfan.. Old and very well-known utility, free and easy to use. Find and download it will not be a problem.
The installation process is shown below. Everything is intuitive.


Installing The program will see the following window. 
The principle of operation of all versions of similar.
You can see the processor load at the moment in the field. CPU usage. To enable automatic rotation adjustment Check Automatic Fan Speed..
Below is a set of velocities and temperatures installed from you fans, where:
- RPM. - the number of revolutions per minute;
- FAN1. - cooler connected to the connector near the chipset;
- FAN2. - The cooler on the processor is also called Cpufan,
- Fan.4 - the second processor fan, if there is;
- FAN3. - propeller, thrown into the conclusions of AUX0;
- FAN5. - AUX1;
- Pwrfan. - cooler in power supply;
- Gpufan. - Fan video card.
Below in percent you can change The range of the smallest and largest turnsBy adjusting them by pressing arrows. This will immediately affect the volume of their work, that you will immediately feel. Just do not disconnect the fans completely, there is a risk of burning anything from the components.
Speed \u200b\u200bAdjustment With AMD Overdrive and Riva Tunes
Branded utility AMD OVERDRIVE. Allows you to change the settings of the AMD platforms. 
Among the many other features, you can also programmatically control rotation frequency coolers.
You can run this program only on chipsets, its supported AMD 770, 780G, 785G, 790FX / 790GX / 790X, 890FX / 890G // 890GX, 970, 990FX / 990X, A75, A85X. 
Running the program Press the section Fan Control And choose the necessary characteristics Fan speeds.
Another interesting program with the function of regulating the speed of coolers is Riva Tuner. First of all, she prefer to use the owners of the stringy video cards.
Download and install the program. In our case, this is version 2.21. 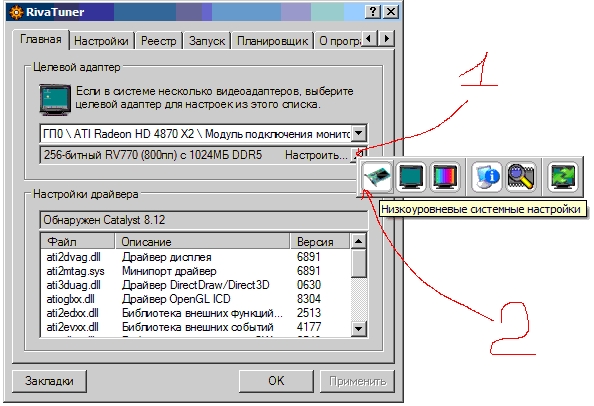
Running, finding low-level System settings, after which we open the bookmark Cooler. Before us opens the following window. 
Tick \u200b\u200bon Enable low-level management Cooler. Create presets Fan speeds, in percent indicating the desired values. Create several presets. 
Create a task Depending on when you want to obtain a decrease in the speed of rotation of the fans, that is, configuring schedule, range temperature other characteristics.


So you can achieve fine settings The speeds of coolers depending on the temperature change components of the system unit.
 Firmware for HTC One SV from flash drive
 Why is the laptop heats and what to do about it?
 Reset to factory SAMSUNG smartphones