Create a virtual hard disk (VHD) for a Windows installation. How to make a virtual disk in five minutes How to create a virtual disk in win 10
Creating a virtual hard disk in Windows 10 (VHDX or VHD) is the process of creating a file that can use the extension ".vhdx" or ".vhd" and acts like a physical hard drive, with the difference that it is stored on a real hard drive. By using any format (.vhdx or .vhd) for the virtual disk, you can store any files, including documents, images, videos, boot files, and the entire OS installation. The only differences between the two formats are that the .vhdx file supports a maximum size of 64TB, is fault tolerant to power failure, and provides better performance. Typically, a VHD is useful for adding additional storage to a Hyper-V virtual machine, and because of its ability to support other OS installations, this storage virtualization technology can be used to create a dual boot system without modifying an existing partition.
Working with virtual disks in Windows.
As more and more data began to be stored on a computer, tablet or phone, replacing filing cabinets, bookshelves, photo albums and CD holders, we quickly had to deal with the fact that the device might not have enough space for all information, including a collection of movies or games. One solution is a hard drive. Virtual hard drive partitions take digital storage to the next level. First, we'll look at what we're talking about when we mean a virtual image. And one of the most important points: the terms "virtual disks" and "virtual machines" can be used interchangeably. Digital storage space and strong demand for it will continue to grow. Many web services offering a virtual image in the cloud are subject to rigorous scrutiny of their privacy policies. Unlike storing all of your files on your own computer or a physical external drive, with a virtual drive, you upload your files to the server. This means that, technically, you won't be the only one with access to them.
A virtual disk is a type of logical partition that is used in virtualization solutions. It looks like a regular one, but it is installed on a virtual machine or virtual server. A virtual image performs the same task as a hard drive for a computer, except that it does it for a virtual machine. It is created by the virtualization manager, logically dividing and distributing space between one or more virtual machines. The virtual disk can be used to install guest operating systems, applications, and virtual machine data. The capacity of the virtual storage device depends on the basic capacity requirements of the physical storage device. In memory virtualization, a virtual disk is a logically isolated storage device on top of a storage area network. A cloud storage solution installed on a local computer is also used as a virtual hard drive.
Laser disc imaging
You can create a virtual disk on Windows 7 using one of the many imaging and virtual disk applications. Let's look at the process using the example of PowerISO, WinISO and WinCDEmu.
How to make ISO image of CD, DVD or Blu-ray disc with PowerISO
PowerISO can create ISO file from CD, DVD or Blu-ray by performing step-by-step copying. All information, including download data, will be copied. You can launch ISO maker using the main program or the shell context menu. ISO file with main program:
- Start PowerISO.
- Click the Copy button on the toolbar, then select Make CD / DVD / BD Image File ... from the pop-up menu.
- PowerISO will open the ISO Maker dialog box.
- Create and select a virtual drive containing the disk you want to copy.
- Click OK to start the ISO creation process.

ISO file via the shell context menu:
- Open "My Computer" and select the drive you want to copy.
- Right click on the selected disk, the shell context menu will appear.
- Select the Make Image File menu.
- The "ISO Maker" dialog box will open.
- Choose the name of the output file and set the output format to ISO.
- Click "OK" to start the process.
WinISO can meet your needs for working with all image formats such as .ISO, .BIN, .CUE, .NRG (Nero), .MDF, .MDS, .CCD, .IMG and DVD.
- Step 1. Installing and running the software. First, download WinISO for free from the official website, install and run it. After installation, run the program.
- Step 2: Click the "Tools" button. Click the Tools button on the toolbar and then Make Image from CD / DVD / BD. Or you can just click Create. Creating a virtual disk for Windows 10 is similar.
- Step 3. Selecting and setting the destination. A dialog box will appear. Select the drive containing the CD / DVD / BD and at the destination select the desired output format, then enter "File Name". After that, you can click the "OK" button to start creating the ISO file.

You can optimize the storage of data, applications and anything else that can be burned to CD / DVD by creating ISO images and storing them on your hard drive. Installing a program from an ISO image is much faster than using a real optical disc. Double clicking on an image to mount it is faster than inserting it into the drive, and finding the correct image using Windows Search is much more convenient than finding the desired CD on the shelf. To create an ISO image using WinCDEmu, follow these steps:
- insert the CD you want to rip into the optical drive;
- open the "Computer" folder in the "Start" menu;
- Right-click the CD icon and select Create ISO Image.
- Choose a filename for the image. This is similar to saving a newly created document or image. Click "Save".
- Wait for the image creation to complete. Once it is created, you can remove the physical CD from the drive and mount the image whenever you need it.

Virtual hard disk
With Windows 7, Microsoft introduced a new way to back up your data called Backup and Restore. It allows you to back up all data to another location and provides the ability to create a system image. A system image is a large document with a VHD extension. It can be used to restore the entire system. In windows 7, the program for creating images was so popular that it remained in Windows 8 and Windows 10. There is a tool in the control panel - Backup and Restore (Windows 7). The convenience of backing up a computer using this method, in addition to the ability to completely restore it later, is that you can transfer the file to any Windows 7, 8 or 10 computer, and access the data in the same way as from a regular hard drive. Therefore, if you only need to copy a few files from your backup, it is much easier to make the virtual hard disk use a VHD, rather than restore the backup, which will first completely delete the data and then copy the data saved in the image.
Mount VHD
To mount the image in Windows, click "Start" and type "Computer Management" in the search box. You can also go to Control Panel, then System and Security, then click Administrative Tools and then Computer Management. If you are in the Icons view, click Administration. Now in the menu on the left, click "Disk Management", and wait for the list of disks and partitions to appear. Then right-click Disk Management and select Mount VHD. In the dialog box, click Browse, navigate to the location of the file you want to connect, and click OK.
ATTENTION. If you do not check the "Read only" checkbox, you can add, modify or delete files / folders from the virtual hard disk. This is really useful because you can attach your file, add some more data that you want to copy, and then just extract it.
Once the system finishes mounting, you will see that the disk will appear as a new device in My Computer. Windows will automatically assign a drive letter. Otherwise, right-click on Primary Partition and select Change Drive Letter. To remove a VHD, right-click on the gray area with the drive name and select Eject VHD.

You can save a copy of the operating system and all personal data in the document using Microsoft's free tool. Go to Computer Management, click Disk Management, and then right-click Disk Management. Instead of selecting Mount, click Create VHD. This will bring up a window in which you need to specify the document size, format and location. It is recommended that you choose the VHDX file format as it is less susceptible to cracking and can support large sizes. If you choose the VHD file format, it will recommend a fixed size. If you choose VHDX, you will be prompted for dynamic expansion. Better to leave the default settings. Be sure to enter a value for the size of your virtual disk. You can change it to GB or TB in the dropdown.

Now another device will appear in disk management - marked "Unassigned". In the gray section for the new image, right-click and select Include Disk. Then you need to choose what to use - MBR or GPT. Select MBR for compatibility with Windows versions older than Vista. For new features and large hard drives, use GPT. Now right click on the unallocated area and select New Simple Volume. This will bring up the New Volume Wizard. First, you must choose the size of the new volume. It cannot be the size of the unallocated space.

Click Next and select a drive letter to assign to the partition. Then choose a formatting method. It is set to NTFS by default, but FAT32 can also be selected. Select NTFS if you are using virtual media to back up files from your computer. Click "Next" and "Finish" and that's it! The new device will now appear in Disk Management.
Using a VHD disk in a virtual machine
The extension stands for a virtual hard drive. It is a format that is structured to represent a standard hard drive and allows the operating system and data to be encapsulated into a single file. This document supports all standard operations. The document is on our hard drive, but all content is recorded inside the document. All sections, data and the entire file system are stored in the document that is used for loading. Please note that an extension may include an operating system and / or data. The name can be selected during the configuration process, but its extension will always be .vhd. You can create a new document using the available disk space.
The image is like an unused hard drive. After creating a VHD, you can create one or more partitions in it and format them using the FAT, ExFAT or NTFS file system. When it comes to size, a VHD can be fixed in size or dynamically expanded. A fixed VHD has a predefined amount of space that is reserved on the physical media. This reservation also includes white space. It takes more time to create a VHD, but its performance is better because it is all a single block. A dynamically expanding VHD allocates physical disk space because the virtual memory is used by the virtual machine. This means that the size of the .vhd file grows as we use our virtual machine. In addition, dynamically expanding VHD files do not get smaller when files are deleted.
An existing image can be mounted (mounted) to display on our existing operating system. You can also mount the image as a readable disk. Thus, the contents of the image cannot be changed. Mounted images can be removed (unmounted) or deleted. The advantage of using a VHD is the ability to boot and configure multiple versions of the operating system. When configuring multiboot using standard parameters, you need to create a new partition and install Windows there. When using images, a new VHD is simply created. This means that it is possible to have one partition with several files (multiple operating systems). Installing a virtual disk also offers a lot of flexibility when it comes to disaster recovery. We can copy an image from one computer that has been damaged to another with similar equipment. Users will have access to the same OS and data as on the old computer.
Management tools
You can use DiskPart, Windows Disk Management, WIM2VHD, and BCDEdit to manage VHDs. MMC for disk management allows you to create, mount and extract images. With DiskPart, you can create, mount, extract, compress, expand, and view image details. Common diskpart commands used for a virtual disk are:
- create vdisk - creates an image with the size of the VHD file expressed in MB (the file name must have the extension .vhd);
- mount vdisk - mounts the image;
- extract vdisk - extracts the image;
- compress vdisk - reduces the size of the image;
- increase vdisk - expands the maximum size available in the image;
- vdisk details - displays information.

The Windows Automated Installation Kit (Windows AIK) includes the WIM2VHD emulator utility that you can use to create an image from a Windows installation source. Using WIM2VHD, you can create a new image of the specified type and size, apply a WIM, and use an Unattend file to automate the Out Of Box portion of Windows loading when you first run a generalized image and apply updates to it.
Hello admin! My computer has one hard drive divided into two volumes. On the first partition (C :), Windows 8.1 is installed, and on the second partition (D :), I want to install Windows 10, but not just like that, but on a virtual VHD. Please explain how to do this quickly and easily? I read on the Internet that on a simple hard disk you can place a dozen virtual disks and actually install an operating system on each of them!
How to install Windows 10 to a virtual disk using the program WinNTSetup
Hello friends!
First, I'll tell you what a VHD is and why our reader wants to install Windows 10 on it.
Secondly, I will present another hero of today's article, this is a utility WinNTSetup, capable of creating virtual VHDs and installing operating systems on them.
Virtual Hard Disk (VHD) is a file format that has an identical structure to a hard disk. In simple words, the operating system perceives virtual diskVHD is like a normal hard disk, but the disk has VHD has several advantages, the most important of which allows multiple operating systems to reside on the same partition of a regular hard disk at the same time!
For example, we have a hard disk installed in our computer, in order to install five operating systems on this hard drive, it must first be divided into five partitions, but this is not at all necessary when using virtual disks. We will simply take and create five virtual disks on any partition of the hard disk. VHD and install different Windows on them. We can do all this without leaving the operating system!
I propose to go from theory to practice and create a virtual VHD using the utility WinNTSetup, then the same utility will install Windows 10 directly to the virtual hard disk for us, everything is quick and easy.
- Note: If you like to solve various computer problems, then WinNTSetup will come in handy more than once, I suggest that you familiarize yourself with the descriptions of the work of the program.
- Another article for you on this topic.
Preparation for work
We look at Disk Management of my computer.
The hard drive is divided into three partitions.
1 . Hidden System Reserved partition containing Windows 8.1 boot files.
2. Disk (C :) with Windows 8.1 installed (there is an ISO image of Windows 10 on the desktop).
3. The new volume (E :) is a file trash can. On it, we will create a virtual VHD disk, on which Windows 10 will be installed.
Note: Before starting work, be sure to create a backup copy of the boot store (BCD), in case, using Windows 10, you decide to delete it, because after removing the system, the choice of operating systems ( Windows 8.1 or Windows 10) will remain at boot.

EditBoot storage (BCD) and removing the unnecessary entry is very easy, but it's even easier to deploy a backup. In detail, this question, be sure to read it.
Windows 10 ISO image
Before starting the WinNTSetup program, find the ISO image with Windows 10 on the drive (C :) and copy all the distribution files to some folder or double-click on the ISO image by connecting it to the virtual drive (if you are working in Windows 8.1).
I have a Win 10 image right on my desktop.

Windows 10 ISO image connected to virtual drive (D :)

It's WinNTSetup's turn
Download WinNTSetup you can on my Yandex.Disk by the linkhttps://yadi.sk/d/xLGkpAOzhXCPcor on the official website
http://www.winntsetup.com/?page_id=5

Unzip and run the executable file of the WinNTSetup_x64.exe program (if you are running a 64-bit version of Windows).


In the main WinNTSetup window, specify the install.wim file located in the D: \ sources folder of the Windows 10 distribution.
We press Select.

Select the file with the left mouse install.wim and click Open.

The Windows 10 bootloader is automatically selected by the program - Z: (the first partition, System Reserved, Reserved by the system, volume 350 MB, hidden and does not have a letter).
Create a VHD file, on which Windows 10 will be installed. Press the VHD button.


If you create a dynamically expandable the size of a virtual disk VHD, then after installing Windows its size will be small (several megabytes), but during operation it can grow to gigantic sizes and when data is deleted from it, the size will not decrease, this is a little inconvenient. It is worth choosing this type in case you do not plan to work for a long time in a system installed on a VHD disk, but just want to experiment.
If you create a fixed size virtual disk VHD and select its size 50 GB, then a virtual disk of exactly this size of 50 GB will be created, when the files fill up, its space will be filled, and when deleted, it will be freed, that is, everything is the same as in the case of a simple hard disk. I will choose this option.
I indicate the size of the created VHD file and click on the View button.

In the explorer window that appears, I indicate the location of the created virtual disk on the (E :) partition, also give it the name Windows 10.vhd and click Save.


The process of creating a virtual hard disk VHD on volume (E :) begins and ends successfully


Disk management


In the WinNTSetup program, click on the Install button.


The process of installing Windows 10 to a virtual disk VHD begins

and ends successfully, click OK.

To proceed with the installation, we restart the computer.
After rebooting, a window for selecting operating systems (Windows 8.1 or Windows 10) appears.
Choosing Windows 10

and enter the final stage of installing Windows 10, familiar to you from our previous articles about the WinNTSetup program (I will not repeat myself).

I think everything worked out for you and Windows 10 booted successfully.

In Disk Management, you can see that Windows 10 takes our virtual VHD disk for a regular hard disk with one partition under the letter C: (the operating system is installed on it).
However, the virtual disk itself is on partition (E :).


Windows 10.vhd virtual disk properties

Device Manager

In the same way, you can create several more virtual disks on disk (E :) and install operating systems on them. When the computer boots up, the boot menu will appear, in which you can select the Windows you need to work with.
With the development of technology and the increasing availability of high-speed Internet, the need for physical media is steadily decreasing. Of course, completely abandoning CDs and DVDs, flash drives and external hard drives will not work, since they are needed for backup data storage. However, virtual devices can keep their usage to a minimum.
What are virtual devices in Windows 10 and what are they for
Virtual devices are software codes that mimic physical devices, fully or almost completely implementing their functionality. Examples of these types of devices that are most commonly used in everyday life are:
- virtual (on-screen) keyboard;
- virtual drive;
- virtual hard disk (VHD).
Virtual keyboards are needed in case of impossibility to use physical ones, they are not capable of more. For example, if the real keyboard is broken or a person with a disability is working at the computer, you can display an input device on the screen and use the cursor to enter a key combination or type text.
Using the virtual keyboard, you can fully enter dataVirtual drives are designed to connect CD and DVD images to a computer and then interact with them. Disk images are often used when installing software products: applications, games, and system shells.
 Virtual drives are designed to mount disk images and then interact with them
 Virtual hard disks are the most widespread. First of all, because a virtual hard drive partition is very easy to encrypt or password protect. This greatly improves the security of documents and other sensitive data. In addition, VZD is a convenient environment for testing software, scripts and other software development products. Virtual disk technology makes it easy to back up data, clone physical media, and more.
How to create a virtual hard drive in Windows 10
The creation of a VZD is a fairly simple procedure that takes a little time. It runs as follows:
- In the Windows search, enter the line "Computer Management" and select the best match.
 In the Windows search, enter the line "Computer Management" and select the best match
 - On the left side of the window that opens, go to the "Storage Devices" section and select the "Disk Management" item.
 On the left side of the computer management console window, go to the "Storage Devices" section and select the "Disk Management" item
 - On the toolbar, open the "Action" tab and click on the line "Create virtual hard disk".
 On the toolbar, open the "Action" tab and click on the line "Create virtual hard disk"
 - We select the place on the hard drive where the file containing the virtual hard disk will be located, and enter its name. Set the size in MB, GB or TB in the corresponding field and click the OK button.
 We set the size of the VZD file, enter its name and indicate the location on the physical disk
 - At the bottom of the window, in the section with volumes, a new section "Disk 2" will appear (the number may differ depending on the number of hard disks installed on the computer). This section will be marked to the left of the name with a red arrow pointing down. Right-click on it and select the "Initialize disk" action, and then click OK in the confirmation window.
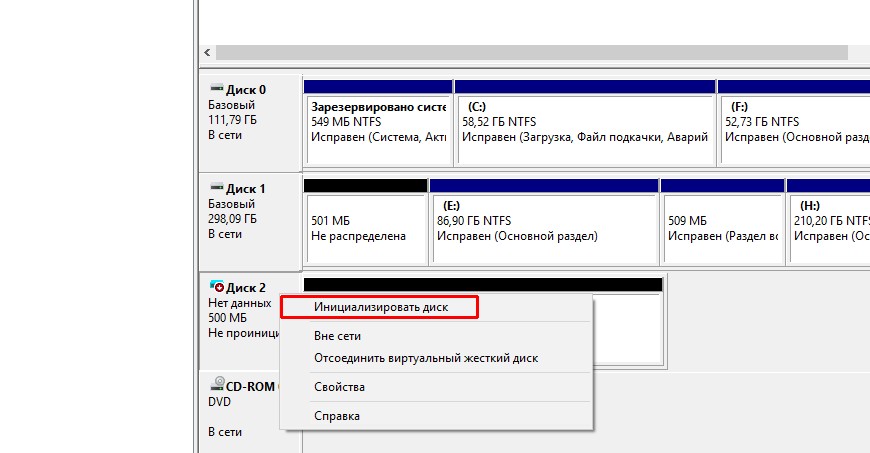 Right-click on the new partition and select the "Initialize Disk" action
The virtual disk is connected and healthy. The only thing left is to create a section. For this:
- Right-click on the "Not Allocated" area and select the "Create Simple Volume" option.
 Right-click on the "Not Allocated" area and select the "Create Simple Volume" option
 - In the opened window of the utility for creating partitions, click the "Next" button, select the size of the virtual volume and click "Next" again.
 Set the size of the volume in megabytes and click the "Next" button
 - Assign a drive letter from the available ones and click the "Next" button.
 Choose a Latin letter from the available ones and click the "Next" button
 - Leave the formatting settings intact and click the "Next" button.
 Leave the file system type NTFS and click the "Next" button
 - We confirm the changes with the "Finish" button.
 We check the specified parameters and click the "Finish" button
 - Upon completion of the operation, a new partition will appear on the hard disk containing a ready-to-use virtual volume.
 In the "Disk Management" console, VZD practically does not differ from the standard partitions of the hard drive
For myself, I've only created virtual hard disks a couple of times. The first time, the reason was that important documents were stored on a work computer, to which many people had access. Therefore, during working hours, I initialized the VZD, and after work I turned it off. All data on the disk was saved, but no one had access to them. This is the second time I created VZD to store very personal media files. Unfortunately, the hard drive then burned down along with the virtual disk.
Video: how to create a virtual hard disk
How to create a virtual drive
Using standard Windows 10 tools, you cannot create and permanently save a virtual drive on the system. The service responsible for virtual DVD devices starts working only after the image is mounted. That is, the virtual drive immediately disappears as soon as the ISO file is extracted from it. This is how standard Windows features differ from special emulator programs. This implementation option was chosen in order to save RAM.
To connect a virtual drive, do the following:

How to remove a virtual device in Windows 10
If the virtual drive is not in use, then I recommend removing it. Support for a virtual DVD takes up computer resources, albeit small, but they may also be needed if you are playing a more or less decent game. I always fetch the image immediately after I finish working with it.
How to remove a virtual drive
As mentioned above, a standard virtual drive in Windows is removed by extracting a file - a disk image. If you used third-party emulator programs, then each of them removes the drive in its own way.
Removing a standard virtual drive
To remove a standard virtual drive, open the Disk Management Console, and then do the following:

Disable virtual drive in emulator programs
In most emulators, virtual drives are created automatically the first time the program is launched, sometimes even without the user's knowledge. But removing them is easy. This is done this way (in each program in its own way):
- In the UltraIso program on the top panel, open the "Options" tab and select the "Settings" mode. Then go to the "Virtual Drive" tab, set the "Number of Devices" filter to "No" and save the changes with the OK button.
 We find the parameters of the virtual drive and set the filter "Number of devices" to "No"
 - In the Alcohol 120% program, open the "Service" tab, select "Settings", then go to the "Virtual Disk" item, set the number of drives to 0 and save the changes with the OK button.
 Find the parameters of the virtual drive and set the "Number of virtual disks" filter to 0
 - In the Daemon Tools application, right-click on the bottom panel with drives, select "Delete All" and confirm the action.
How to remove a virtual hard drive
If the virtual hard disk is no longer needed, it is very easy to remove it. This can be done in two ways:
- through the disk management console;
- using the command line.
Uninstalling via the Disk Management Console
We carry out the following steps:
- Open the "Disk Management" console. Right-click on the virtual hard disk and select the "Delete volume" action. Then we agree that all data from this section will be deleted, and we wait for the result.
 Right-click on the virtual hard disk and select "Delete volume"
 - Next, again right-click on the virtual hard disk, select the item "Disconnect the virtual hard disk" and agree to the terms by clicking OK.
 Right-click on the virtual hard disk, select the item "Disconnect the virtual hard disk" and agree to the terms by clicking OK
 - After that, we delete the virtual partition file itself.
 After disconnecting the virtual hard disk, delete the partition file
Uninstall using the command line
The command line also allows you to delete a virtual volume, and this can be done literally with one command.
For this:

It is very easy to create a virtual device on a computer. At the same time, you get a disk or drive that is practically not inferior in its properties to a physical one, and can use it for a variety of purposes. And when it's no longer needed, it's just as easy to remove.
Each user can create a virtual drive if they wish. But what if you no longer need it? We will talk about how to correctly remove such a drive in Windows 10.
In total, it is worth highlighting two methods that will allow you to properly remove the drive. You need to choose the one that corresponds to the preliminary process of creating a virtual hard disk. In practice, everything looks not as complicated as it seems at first glance.
Method 1: "Disk Management"
This method will suit you if the virtual drive was created using the specified tool.
Remember that before performing the steps described below, you should copy all the necessary information from the disk to be removed, since after the final uninstallation you will not be able to restore it.
In order to remove a disk, you need to do the following:

This completes this method.
Method 2: "Command line"
If you created a virtual drive through Command line, then you should use the method described below. The following operations must be performed:

By resorting to one of the methods described above, you can effortlessly remove the virtual hard disk. Remember that these steps do not allow you to delete the physical partitions of the hard drive. To do this, it is better to use other methods, which we talked about earlier in a separate lesson.

A virtual drive can be created very easily. However, there may come a time when division no longer makes sense. Correctly deleting a new section is a less trivial task. But this task can scare off many users with its perceived complexity. How to do this simply and quickly will be discussed in this article.
Virtual disk uninstallation methods
The drive could have been created by you in two ways: a special utility from Windows called "Disk Management" or using the command line. Depending on what was used earlier, you need to choose one of the presented methods. At first glance, the procedures may seem complicated, but in practice everything is much easier.
Method one: disk management
If the partition was created using the specified utility, then you need to stop at this method. It is the easiest to complete and does not require any additional knowledge.
Important! Be sure to transfer all important information from the virtual disk that you want to delete, or make a backup for emergency recovery. All information previously created on it is stored in the image of this drive. After deleting a partition, all data written to it will be lost along with it. Remember this!
If you have heeded the warning, then you can start. Below is a detailed plan of action:

Second way with the command line
But an additional section could be created using the command line, which happens much less often. For this case, you need to use the second method. It is also detailed below. Preparation for the procedure also consists in transferring important information to another drive. After that, you can follow the plan, which consists of a small number of steps, and they are quite simple to complete.

Using one of the methods presented in the article, you can delete unnecessary virtual disks without any outside help. These methods are very simple, but they will be sufficient for the task at hand. However, it is important to understand that these solutions cannot remove the physical partitions of the hard drive. Options for solving this problem were described by us earlier in another lesson.
 Installing a printer on Windows 10
 Windows Password Recovery: utility to reset Windows account password
 How to set up virtual private networks (VPN) Vpn extension for chrome android